Using VPN with Synology NAS teaches you to set up a VPN connection between a VPN client and a Synology NAS that hosts a VPN server. This instruction focuses on a VPN connection based on the OpenVPN standard and this standard combines a good level of security with ease of installation.

Using VPN with Synology NAS
Compared to other remote access solutions like DDNS or reverse proxy, a VPN or Virtual Private Network takes an entirely different approach to overcome the challenges of accessing your internal network over the internet.
As the name suggests, you create a private network virtually over the internet. The VPN connection you make is between your computer’s VPN client and your internal network’s VPN server, while encryption secures the connection between the endpoints.
For connecting over the internet, a VPN connection is considered more secure compared to the DDNS/port forwarding way because:
- the listening port is password protected
- all traffic to and from the private network is encrypted
Another benefit of a VPN connection is accessing your DiskStation as if you are on the internal network.
Despite the benefits of a VPN, it may be complex to set up and troubleshoot. A VPN is not for the faint of heart, it seems. Hopefully, this post helps more users overcome to achieve their goal of a safe remote connection.
Note that there are other options where the VPN server in the network runs in a Docker container on your NAS or the internet router.
These options have advantages, but it makes the installation more complex. This post covers the VPN Server application as part of DSM.
For a quick overview of the Synology VPN Server application, please reference the VPN Server datasheet.
Process Overview
Before we start clicking on buttons, I outline using a VPN with Synology NAS.
First, you make some preparations on your network and NAS. Next, you install the VPN server, export the VPN connection details in a configuration file, and edit the configuration.
Moving over from the VPN server to your computer, you download and install the VPN client and apply the configuration file. And last but not least, you test your connection.
If the connection fails, you will find some troubleshooting tips.
Prepare Your Network And NAS
Before installing Synology’s VPN Server package on your NAS, there are some preparations to make.
Secure your Synology NAS
The moment that you decide to connect your NAS to the internet, in whatever way, you should take any possible measure to prevent unwanted access to your device. And in case this happens, you should have your recovery plan ready.
Securing your NAS starts with a solid backup and recovery strategy, a password policy, 2-factor authentication, disabling SSH, and enabling notifications, among others. Please refer to my post Secure your Synology NAS [sorry, in preparation].
Fixate internal IP address
Before installing a VPN service, you must ensure that the NAS always has the same IP address on your local network because your internet router will redirect incoming VPN traffic to a specific IP address.
In general, IP addresses are dynamic on your local network, which is usually fine. But in this instance, you must fixate on the address.
Please see my post How To Configure A Fixed IP Address, for details on achieving this goal.
Discover external IP address
Your internet router is the linking pin between your internal network and the internet or external network. On both sides, the router has an IP address.
Knowledge of the external or internet-facing address of the VPN server location is essential because that is where the VPN client on your computer has to go to.

To discover the external IP address of the location where you create the VPN server, open your browser and point it to https://myip.com. Copy your IP address from the top of the page and save it in a note for later reference unless you use DDNS.
If your external IP address is dynamic, it can change over time, as with most consumer connections, you need DDNS. I discuss enabling DDNS below. If you have a static IP address, skip the section on DDNS and keep the external IP address for reference later.
Forward port on the router
Port forwarding is a very crucial step in the process. Once the VPN client on your computer goes out to connect, it looks for your internet router. The router listens at a specific port and forwards traffic coming in on that port to the NAS. Now, you have to instruct your router to do precisely that.
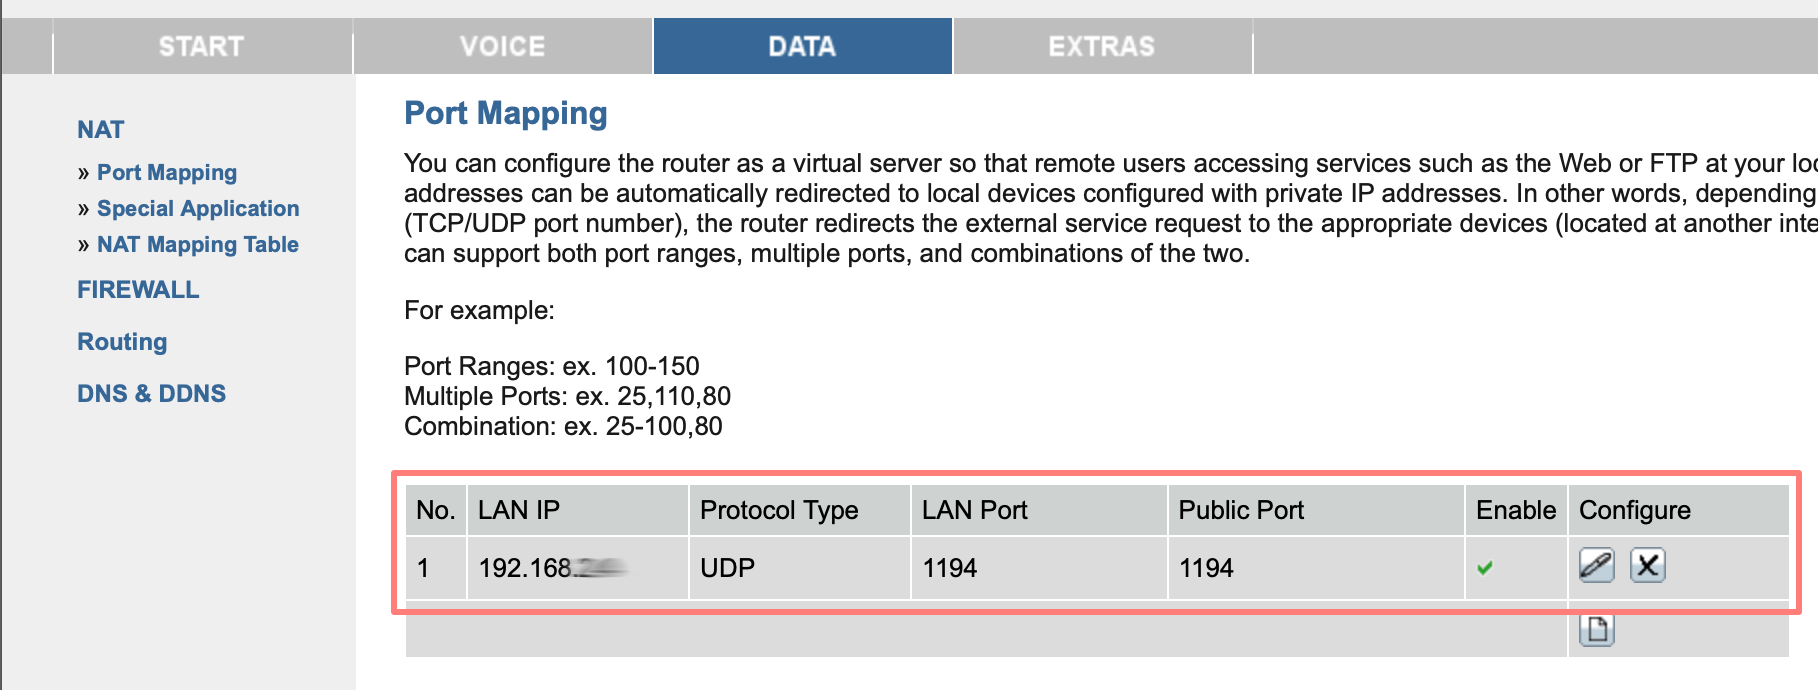
Unfortunately, there are countless routers, and they are all different. You can do an internet search for a manual for your brand and model. Generic steps are:
- While on the network where the NAS is, open your browser and type in your router’s IP address. This is primarily the default gateway and log in.
- look for a port forwarding tab; it is often part of features like IP, network, NAT, or firewall
- enter UDP port 1194 and forward the port to the IP address of your NAS
- save your settings
You must forward UDP port 1194 to the same port on your NAS for OpenVPN. Fill in the IP address of your NAS that you made static earlier.
Enable DDNS On NAS
Most of us do not have a fixed external IP address. If we use the current IP address in the VPN configuration of the VPN client, chances are that you will not be able to connect at one moment in the future.
We enable DDNS or Dynamic DNS on the NAS and use it as an in-between to resolve this issue. DDNS registers your current external IP address to a name. If your IP address changes, it automatically records the new address to that name. The DNS name of DDNS remains the same.
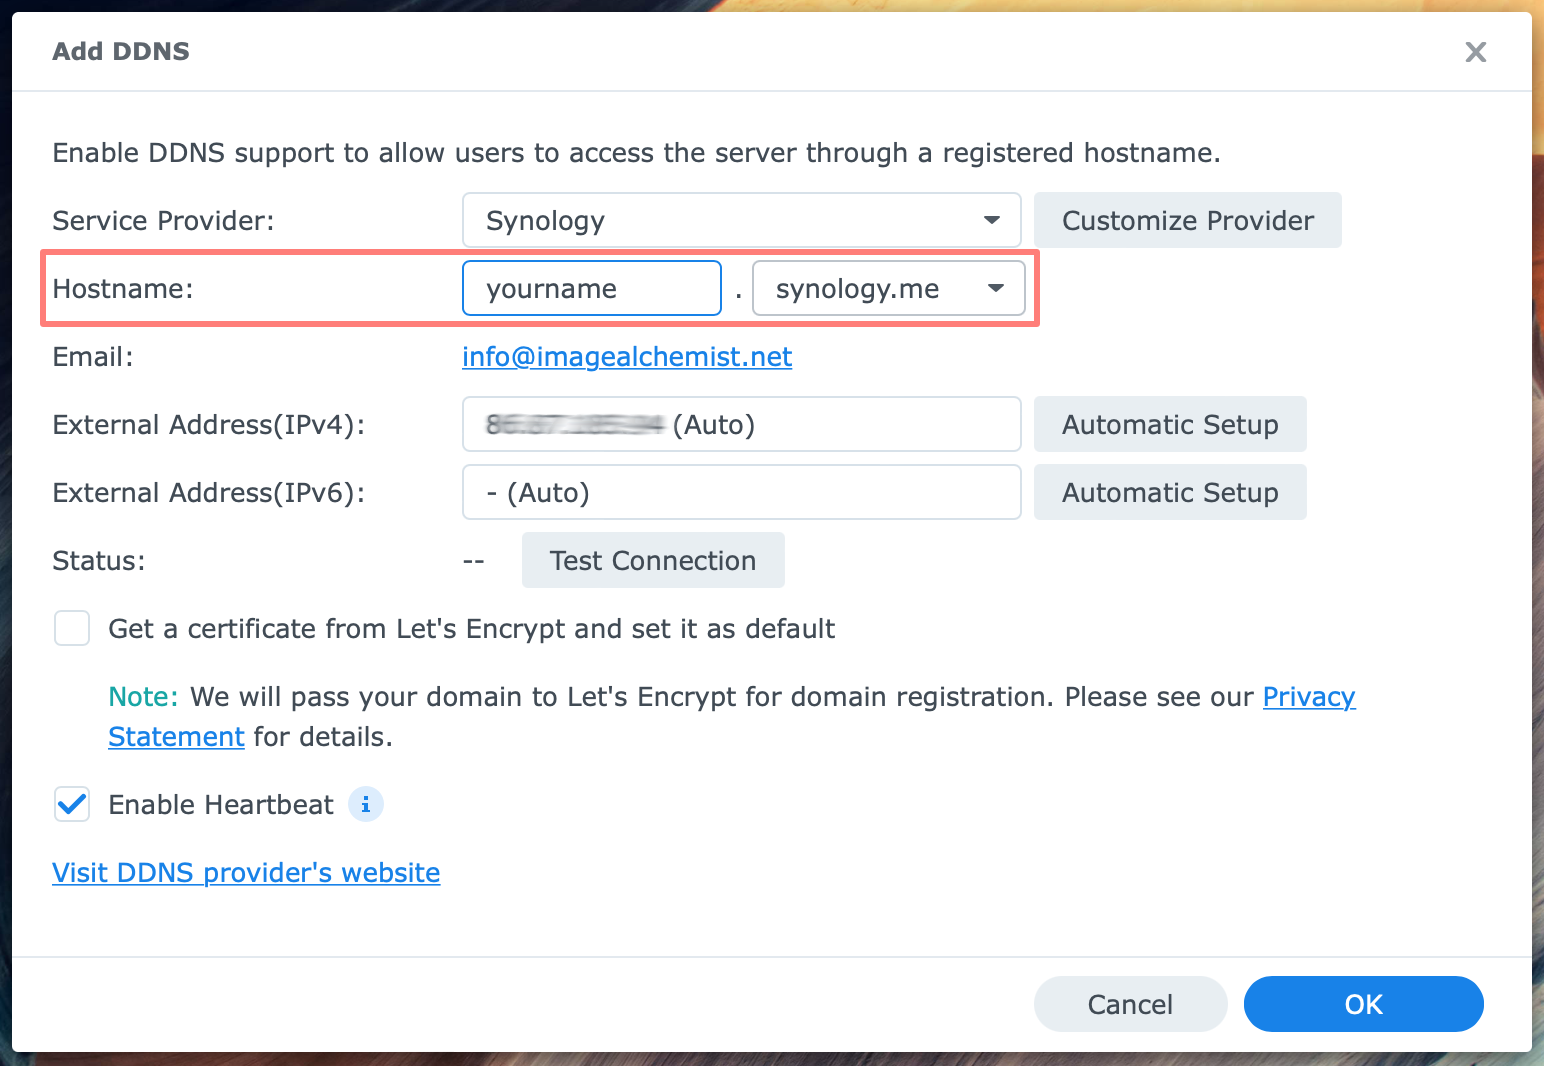
Log in to DSM with an administrator account. Open Control Panel, External Access under Connectivity. In the pane at the right, select the DDNS tab. Click on the Add button. The DDNS page (DSM 6) or Add DDNS page (DSM 7) opens.
On the Add DDNS page, select a Service Provider. I choose Synology, listed at the top, but you can choose a different provider.
Under Hostname, enter a hostname. As an example, I filled in yourname. Please fill in your hostname.
The synology.me domain is automatically added because you chose Synology as the service provider in the previous field. Notice that the full name will become yourname.synology.me.
Under Email, either the email address of your Synology account appears or you are requested to sign in.
Notice that under External IP address (IPv4), you can also find your external IP address.
You do not have to request a certificate from Let’s Encrypt because you do not use DDNS to connect to the NAS. We use a VPN for that. Keep the heartbeat enabled. It is a bonus feature.
Click OK to save the configuration and wait a few seconds for the DDNS connection to appear on the DDNS page.
VPN Server On NAS
After the preparations outlined above, you can set up the VPN Server application and service and start using VPN with your Synology NAS.
Install the VPN Server package
Log in to the DSM desktop with an administrator account and open Package Center.

In the search bar at the top, search for VPN. On the VPN Server package, click Install. The VPN Server – Install wizard starts.
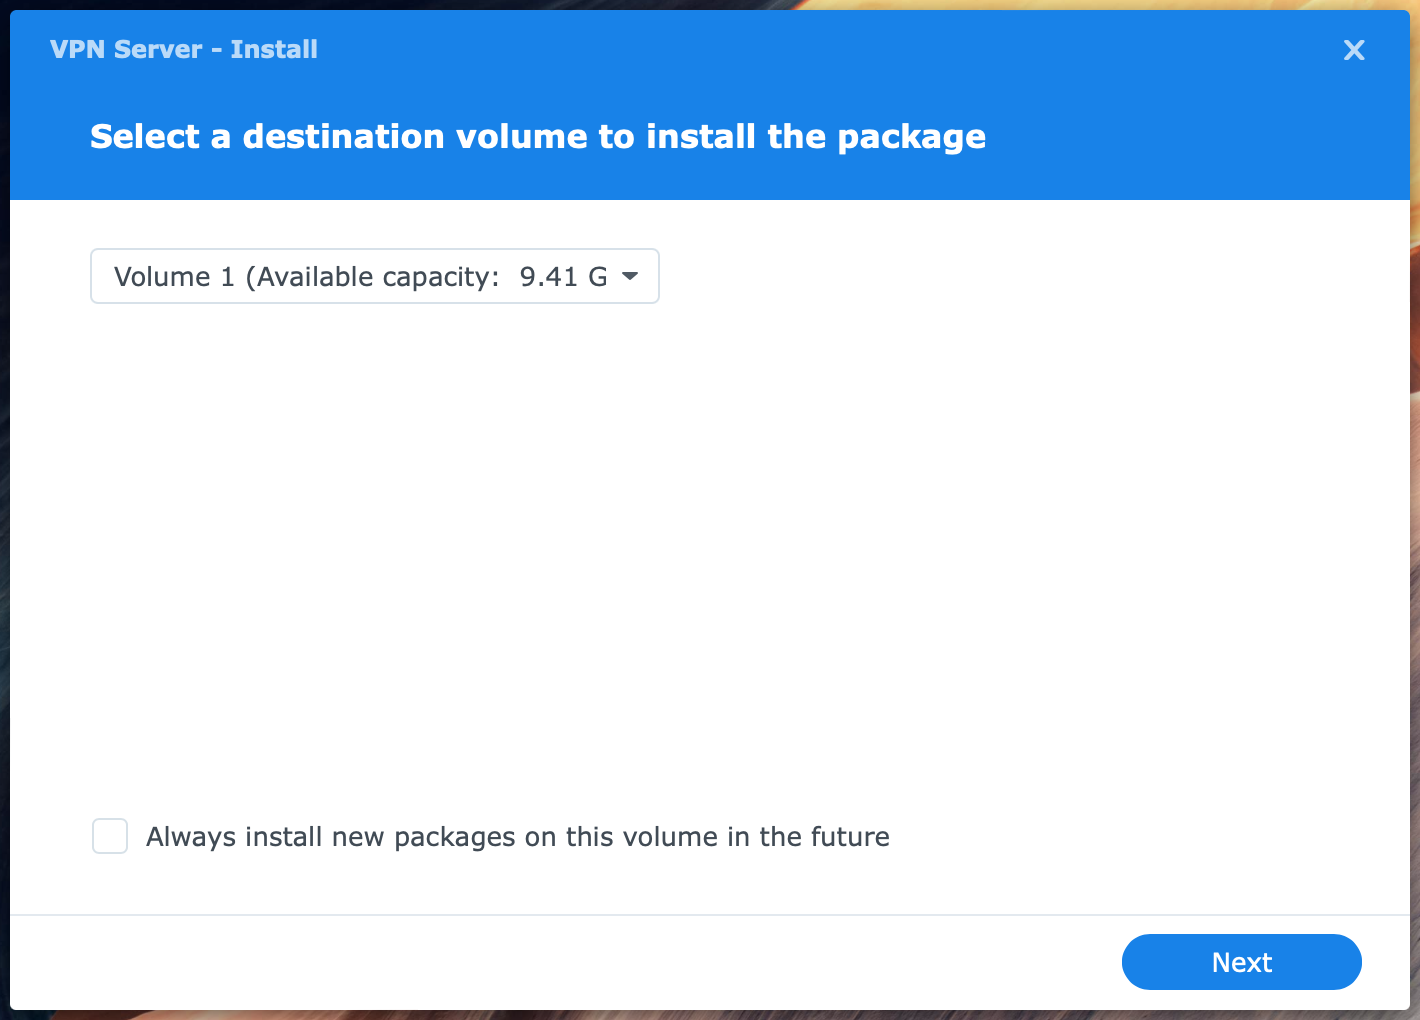
You can select a volume to install the VPN Server on the first screen. Note that this screen does not appear if you have a single volume in your NAS. Click Next.
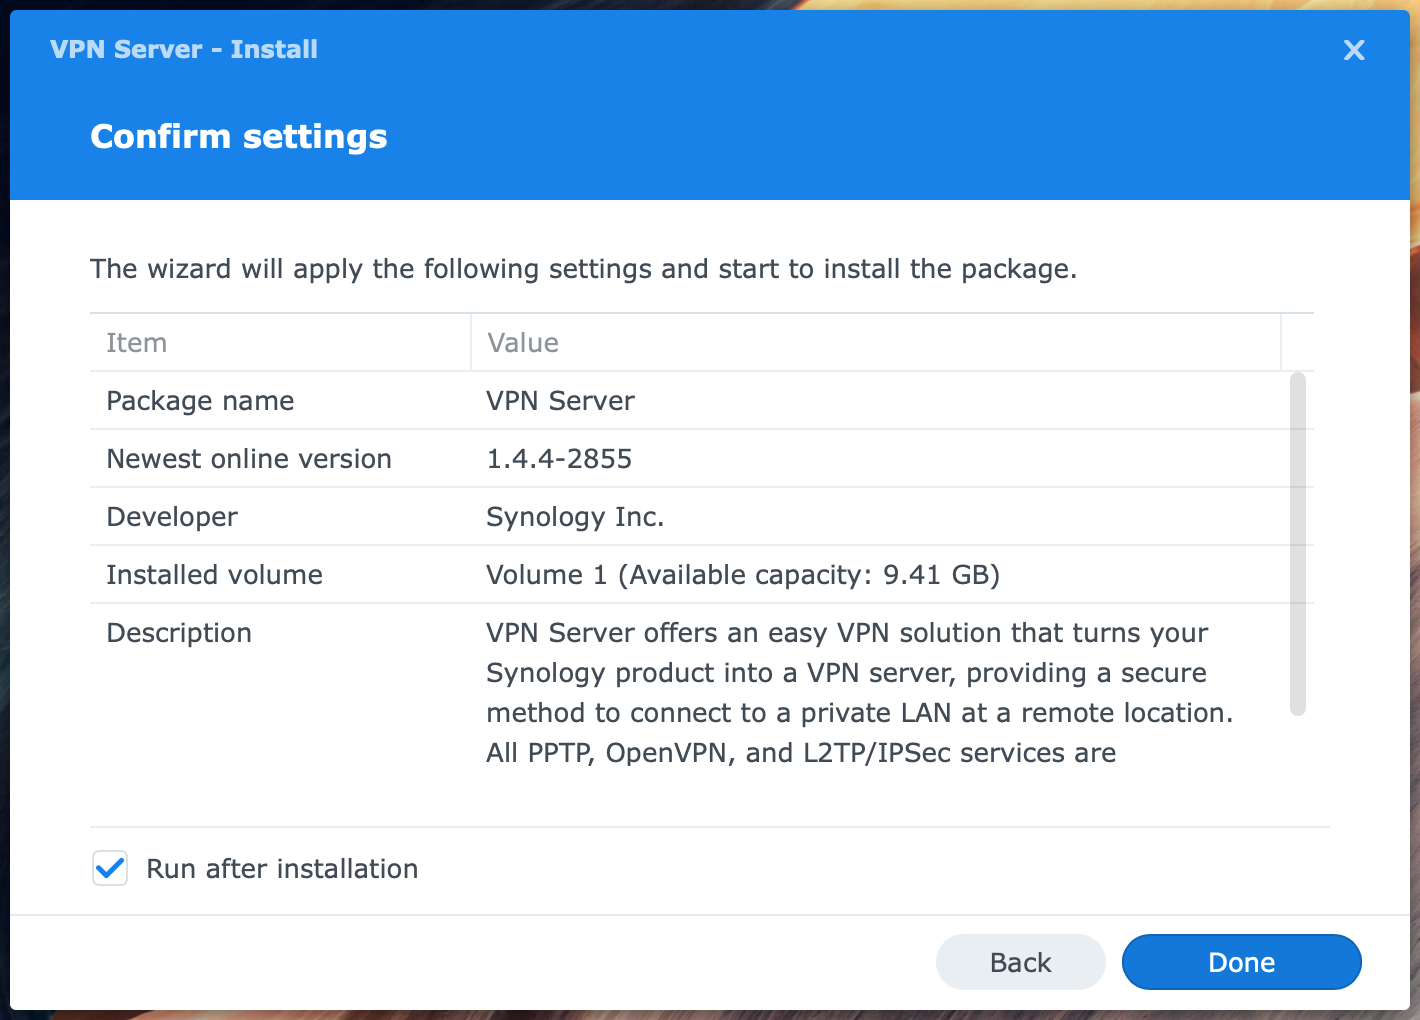
Ensure that the Run after installation box is checked and click Done.
You return to Package Center, and you can follow the progress of the installation. When the installation finishes, select the Open button. Note that you can open VPN Server from the main menu in the top-left corner of the screen.
You can now close Package Center.
Configure VPN Server certificate
You installed the VPN Server package. The next step is a formality, perhaps, but necessary anyway. DSM assigns a certificate to the VPN Server. We are going to check on that.
Go to Control Panel > Security > Certificate and click on the Configure (DSM 6) or Settings (DSM 7) button.
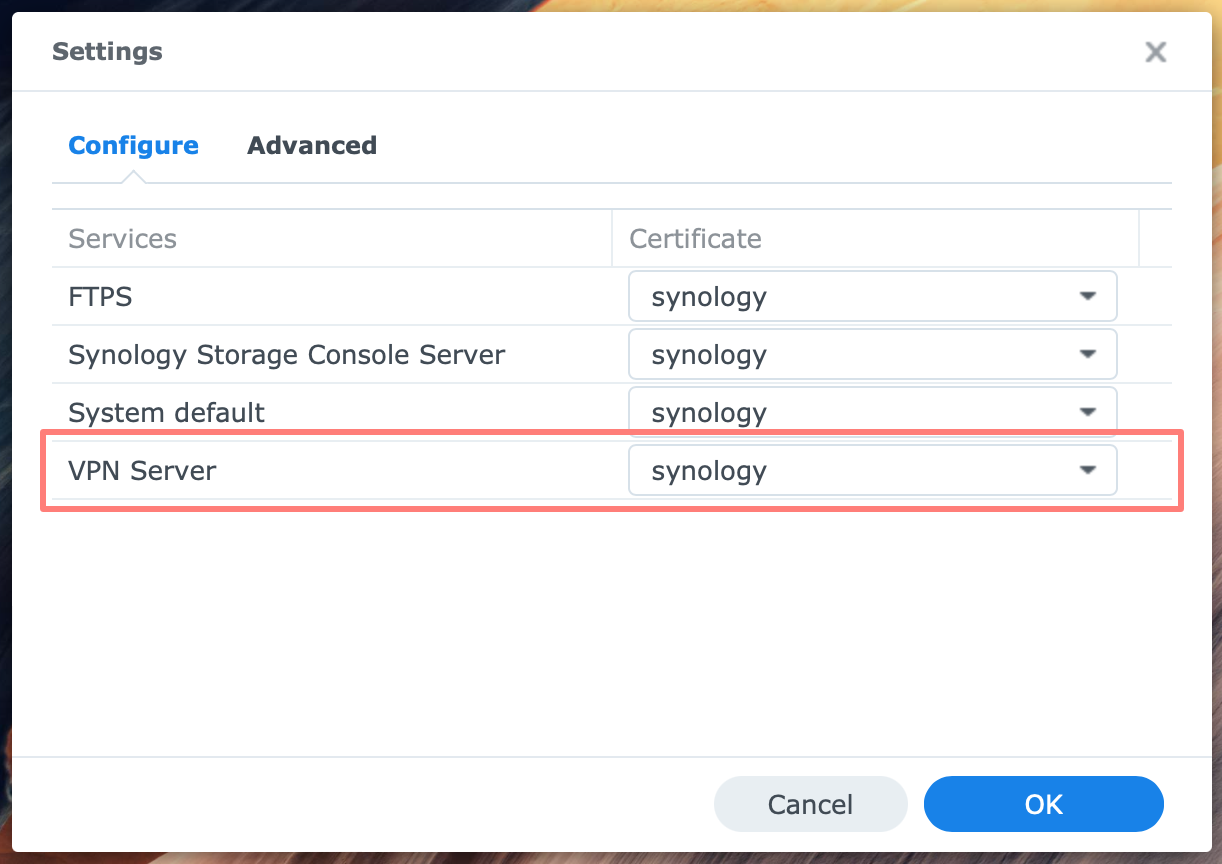
In the list of Services, look for the VPN Server and the certificate assigned to it. If this is the correct certificate, you like to use for the service, close Control Panel and continue.
If it is not the proper certificate, click on the drop-down list next to the VPN Server and select the appropriate certificate.
There is no right or wrong certificate. The VPN Server uses the certificate in the .ovpn configuration file for the VPN client. This file contains the certificate for the connection and must match the certificate in Control Panel. Therefore, be aware that when you change the certificate for the VPN Server in Control Panel, all VPN clients that use a configuration made with the previous certificate will fail to connect.
Renewal of a current (read: not expired) Let’s Encrypt certificate had no adverse effect on connecting with an older configuration. Renewal renews the expiration date but does not change the certificate’s contents.
Configure the VPN Server
You first see the Overview page when you open the VPN Server application. Notice that there are three protocols, PPTP, OpenVPN, and L2TP/IPSec. They are all disabled at this stage, but that will change.
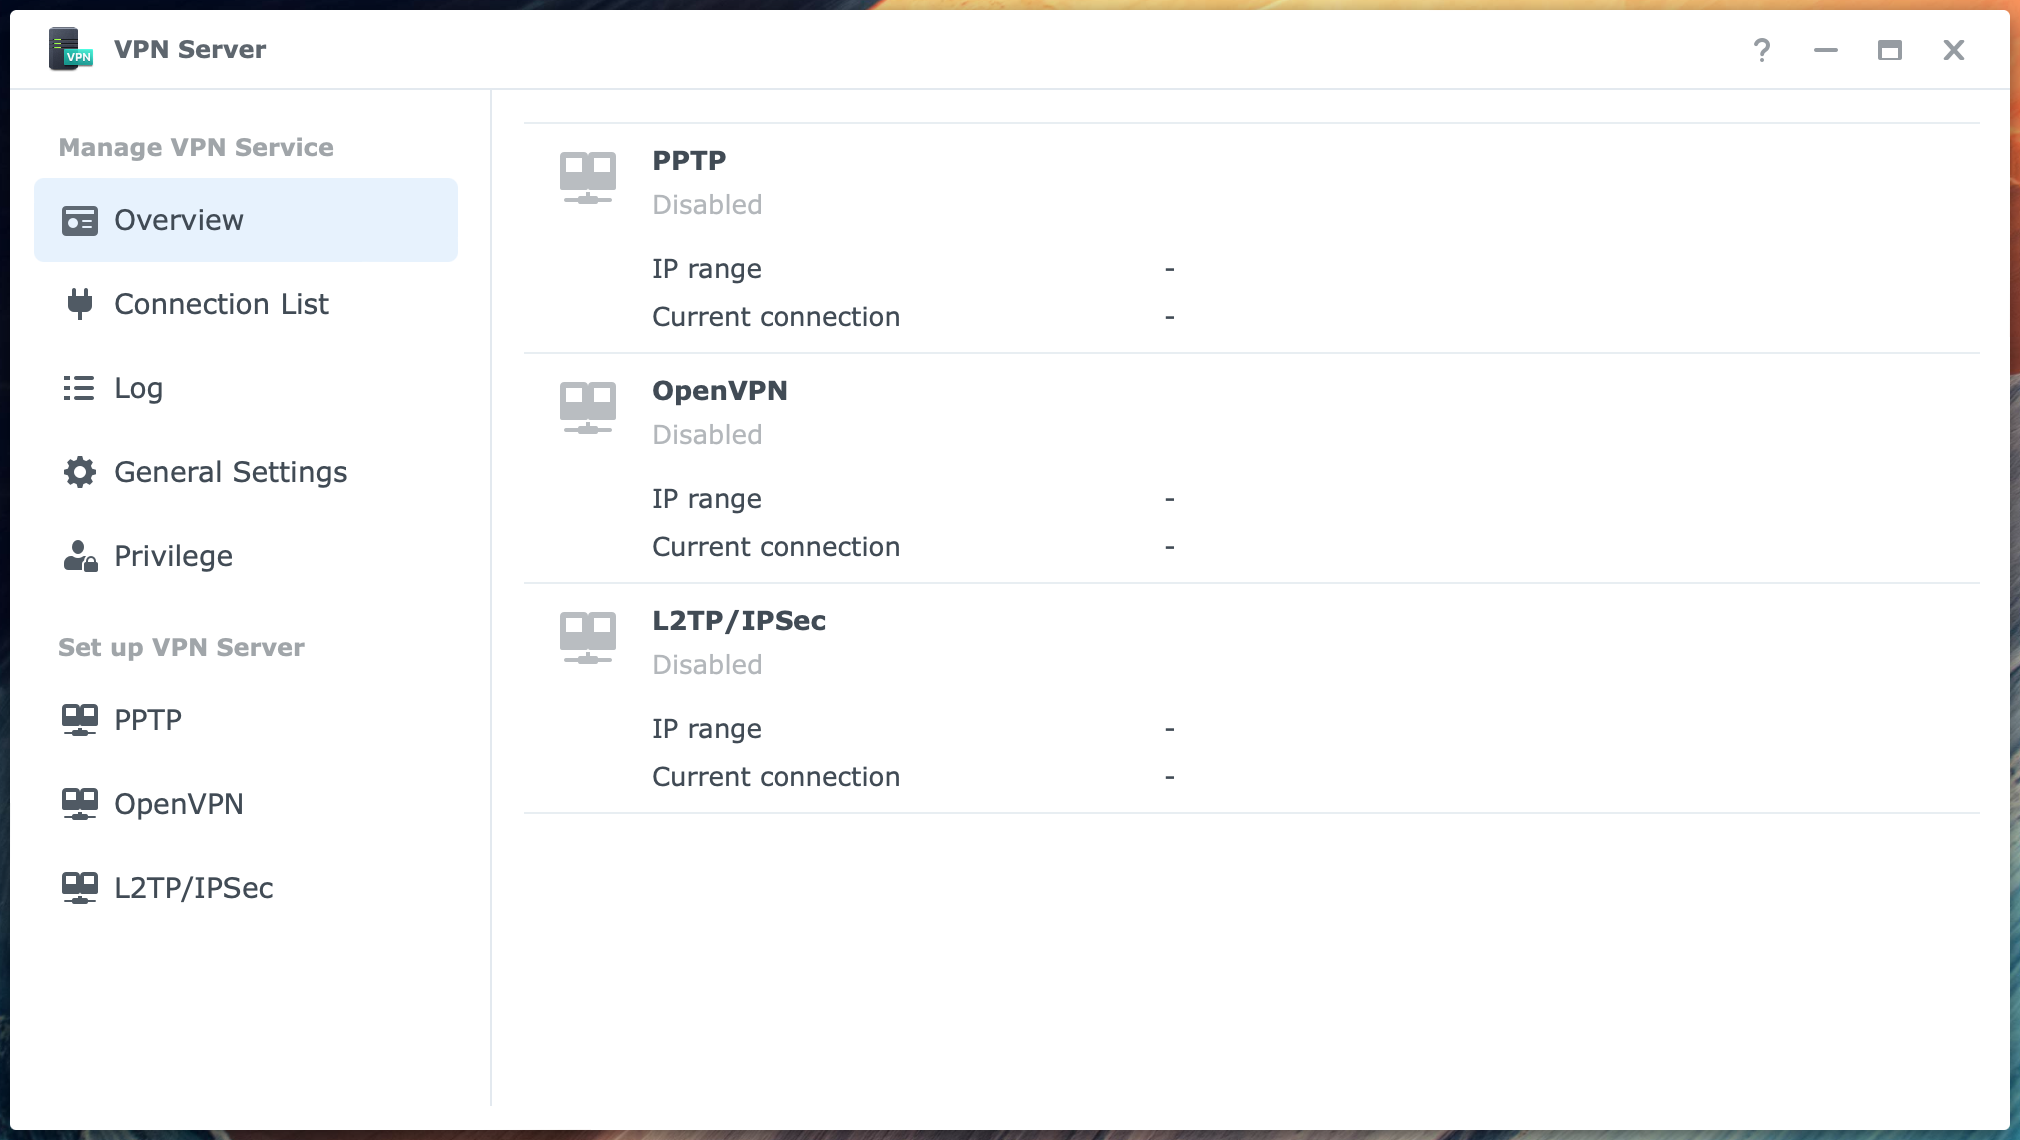
In the column at the left, you can select different items grouped under Manage VPN Service and Set up VPN Server.

In the left column, our first stop is General Settings. The Network interface setting is only relevant when you have multiple network interfaces. Select the interface connected to the internet router that receives the incoming VPN connections.
You can grant the VPN permission to new users that you add in the future. This prevents you from separately enabling them on the Privilege page. But perhaps you like to only give selected users explicit permission. If so, uncheck this box.
Auto Block should be enabled in Control Panel. This is part of securing your NAS that I mentioned at the beginning of this tutorial.
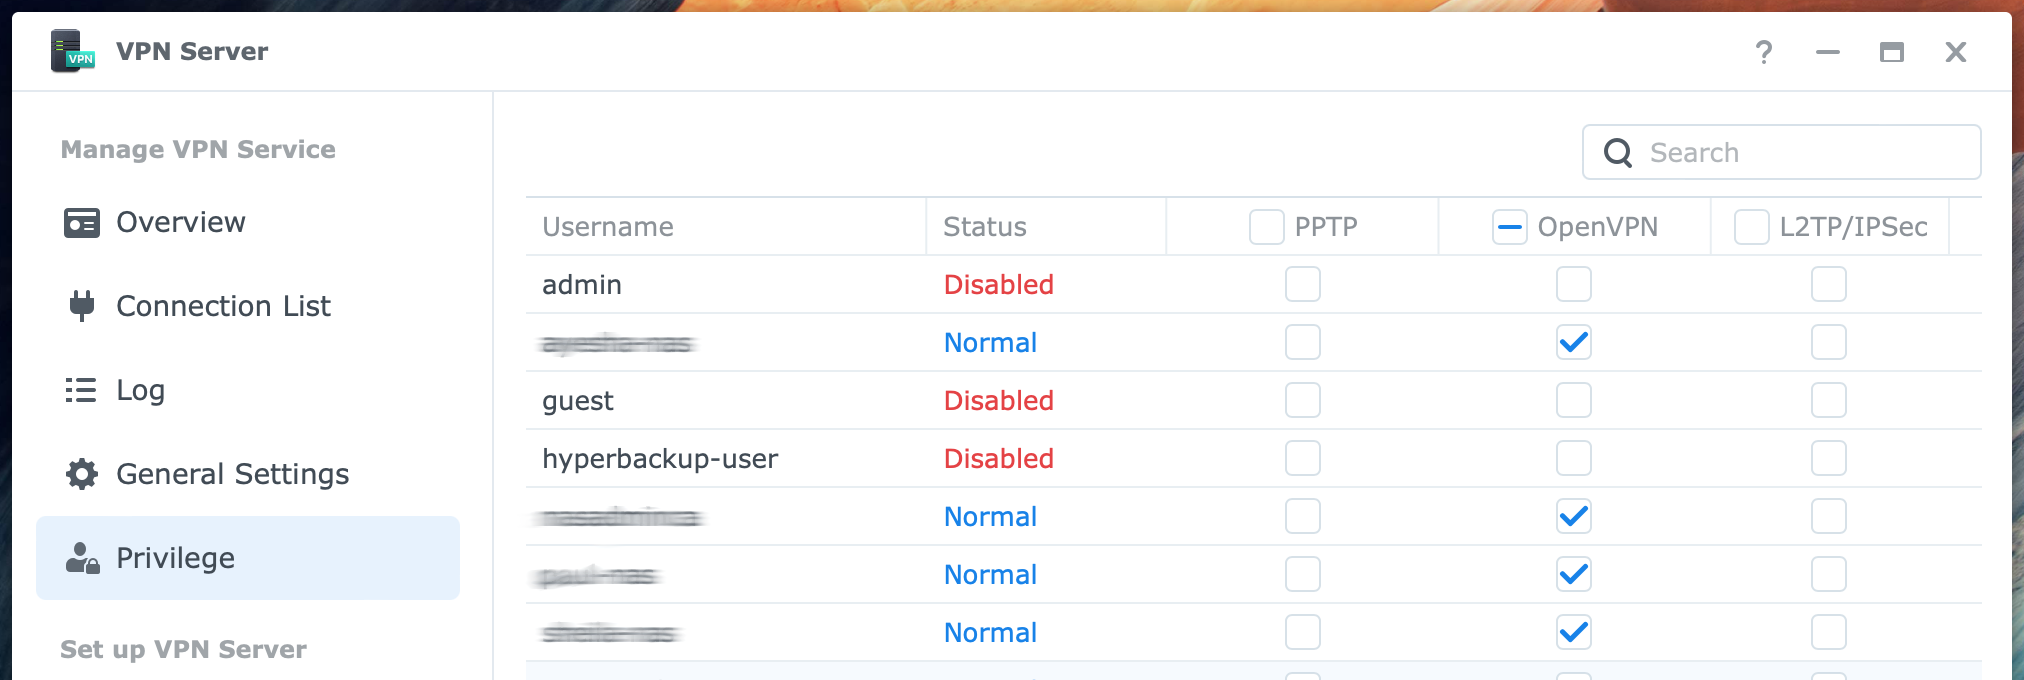
In the left column, select Privilege under Manage VPN Service. On the Privilege page at the right, you see the user accounts and three columns for the respective VPN protocols. You enable those who can use the VPN service on a per-user and per-protocol basis. Set a checkmark for the users you want to grant VPN access to.
Uncheck both PPTP and L2TP/IPSec unless you use either of these protocols in addition to OpenVPN.
In the left column, select the option OpenVPN below Set up VPN Server.
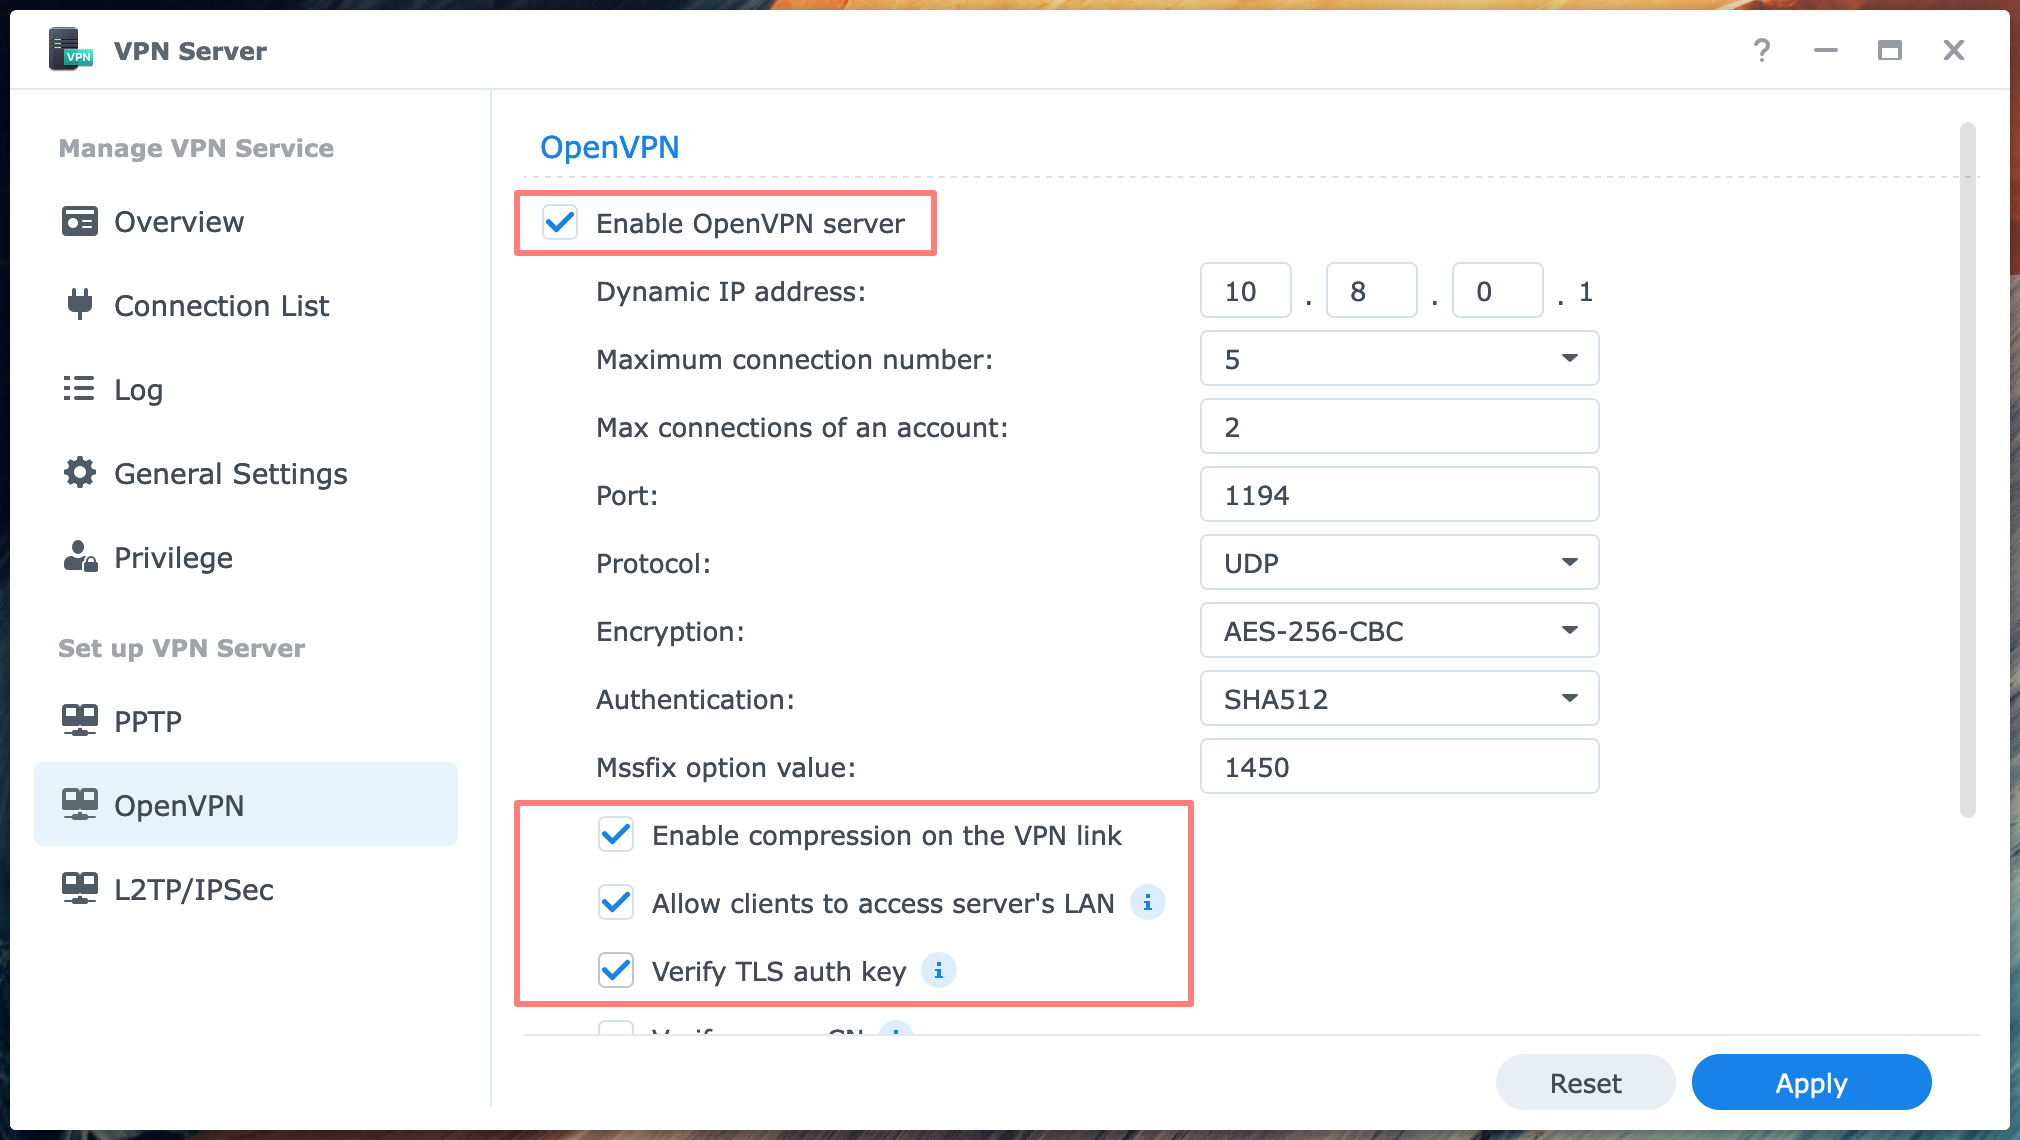
Check the box Enable OpenVPN server at the top of the OpenVPN screen.
Review the settings and, in particular, the Dynamic IP address 10.8.0.1 at the top. In general, this is good and needs no change. However, if your local network, where the NAS with the VPN Server resides, happens to have a network segment in the 10.8.0.0 range; you do need to change this. In other words, the VPN server must have an address in a different range than your local network.
The Maximum connection number default is 5, the lowest value. When you expect more simultaneous users, raise the amount. The Maximum connections of an account default are 3. You could lower it if you see a reason for it. The port and protocol are 1194 and UDP. I suggest that you only change the port if you insist on not having the default port number or if you have more than one OpenVPN server on the network. In that case, you need a different port for at least one of the VPN servers. The values for Encryption and Authentication are set very secure by default.
At the bottom of the page, there are five other checkboxes. Leave Enable compression on the VPN link checked, and enable Allow clients to access the server’s LAN. This last setting lets you go from the VPN server to the NAS on your network. If you have other devices like a second NAS, this will be accessible.
I enabled Verify TLS auth key setting for additional verification of the VPN connection.
Click the Apply button when ready.

Notice the message to check the port forwarding and firewall for UDP port 1194. Click OK to close the message. See also my remark on the firewall below.
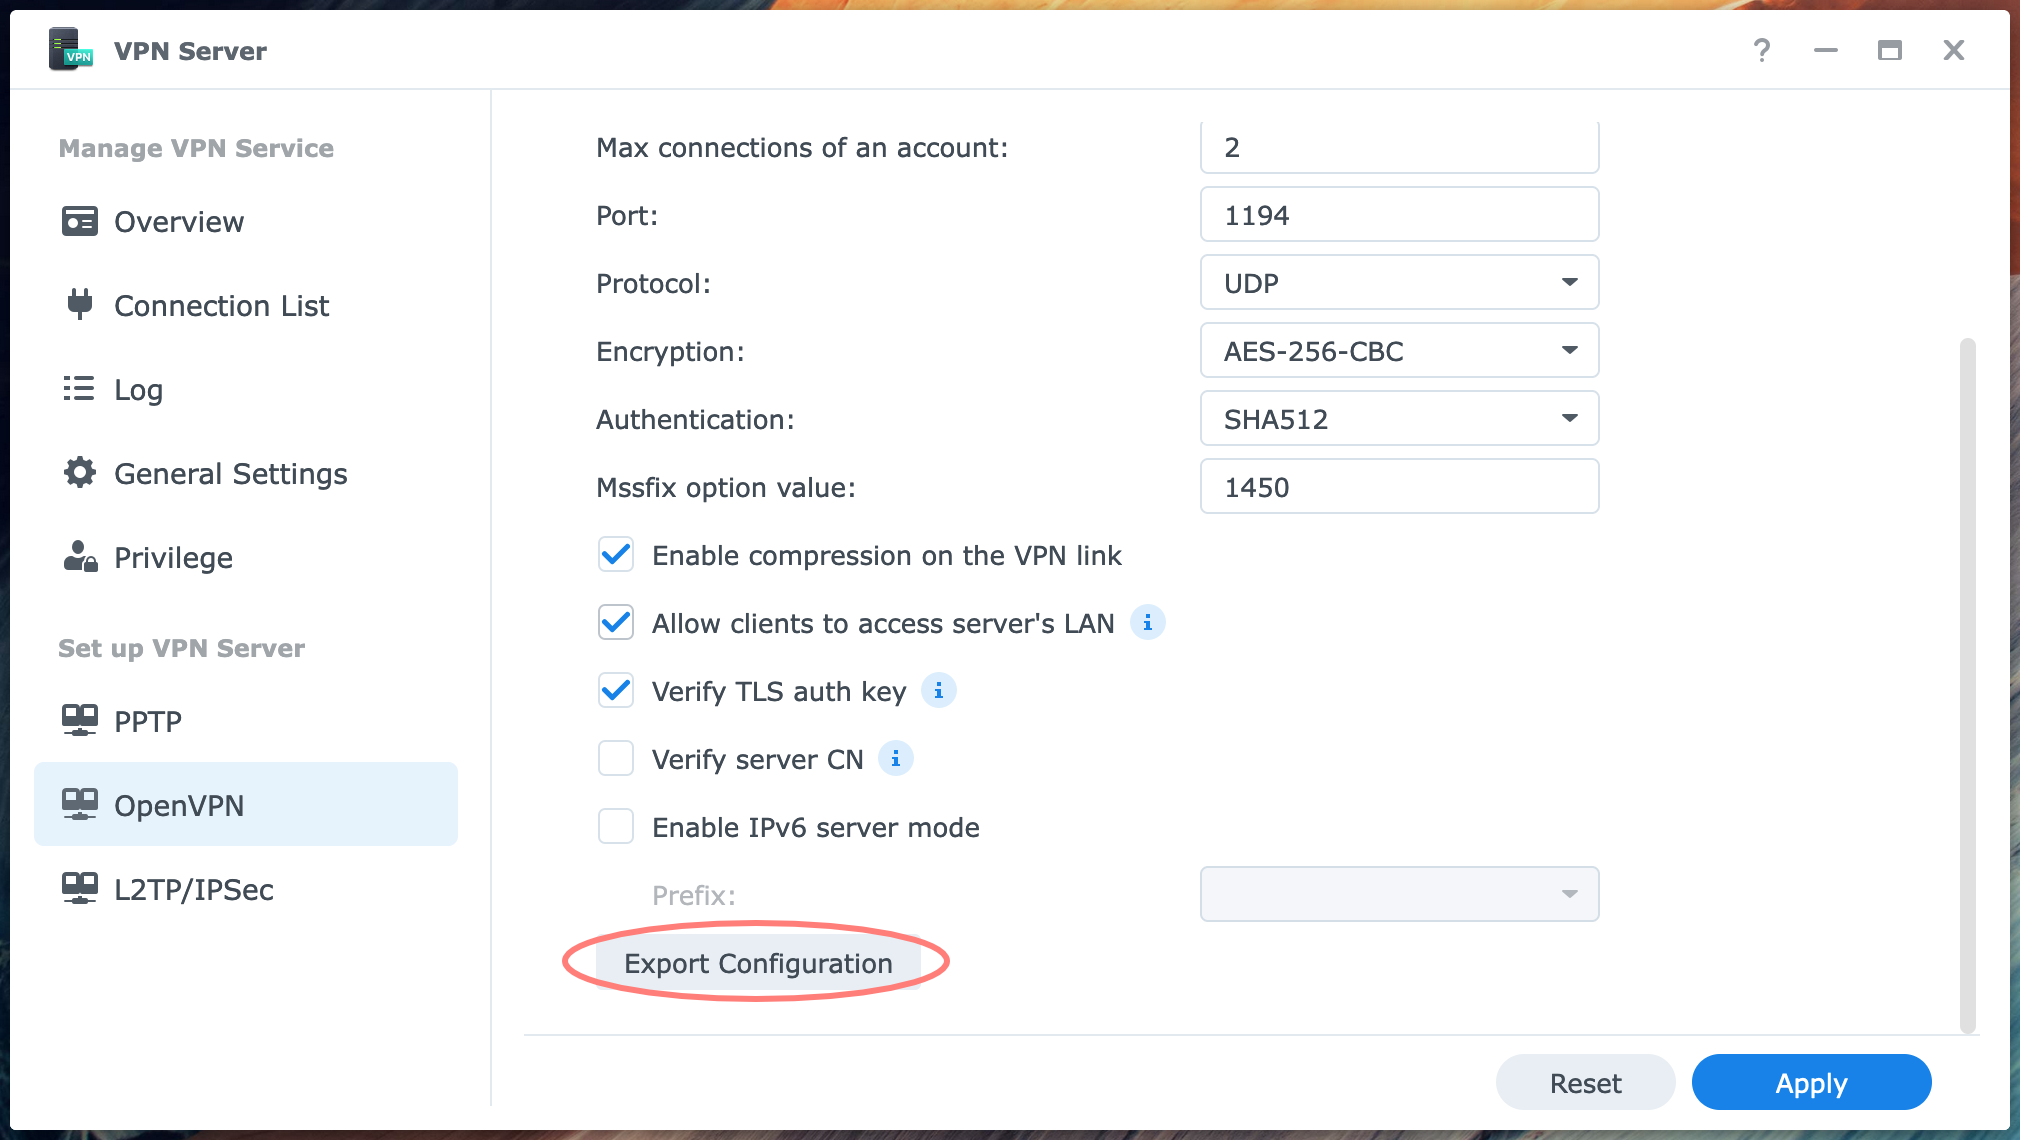
Notice that the Export Configuration button is available at the bottom of the OpenVPN screen of the VPN Server application. Click on the button to download the openvpn.zip file. We will configure its contents in a minute.
You can close the VPN Server application now.
Configure the firewall
I enabled the option to Allow clients to access servers’ LAN. As the name suggests, I can access other hosts on the LAN via the VPN connection.
Strangely enough, with some of my clients, I can access other Synology NAS devices on the same LAN, but with some other clients, I can not. I can only access the NAS that runs the VPN Server.
I found out that when I allow the VPN Server’s subnet, typically 10.8.0.0/24 or 10.8.0.0 with subnet 255.255.255.0, in the firewall of the VPN Server’s NAS, the issue is resolved, and I can access other hosts on the local network.
To diagnose the problem, I used the ping command from a command box on the VPN client while connected. Without the rule mentioned, I could neither ping the VPN Server nor ping other hosts or access them.
Configure VPN Server backup
Using Hyper Backup on your NAS, you can include the application settings in a data backup task.
From your DSM desktop, open Hyper Backup, select an existing data task and click Edit. Go to the Applications tab and check the box for VPN Server.
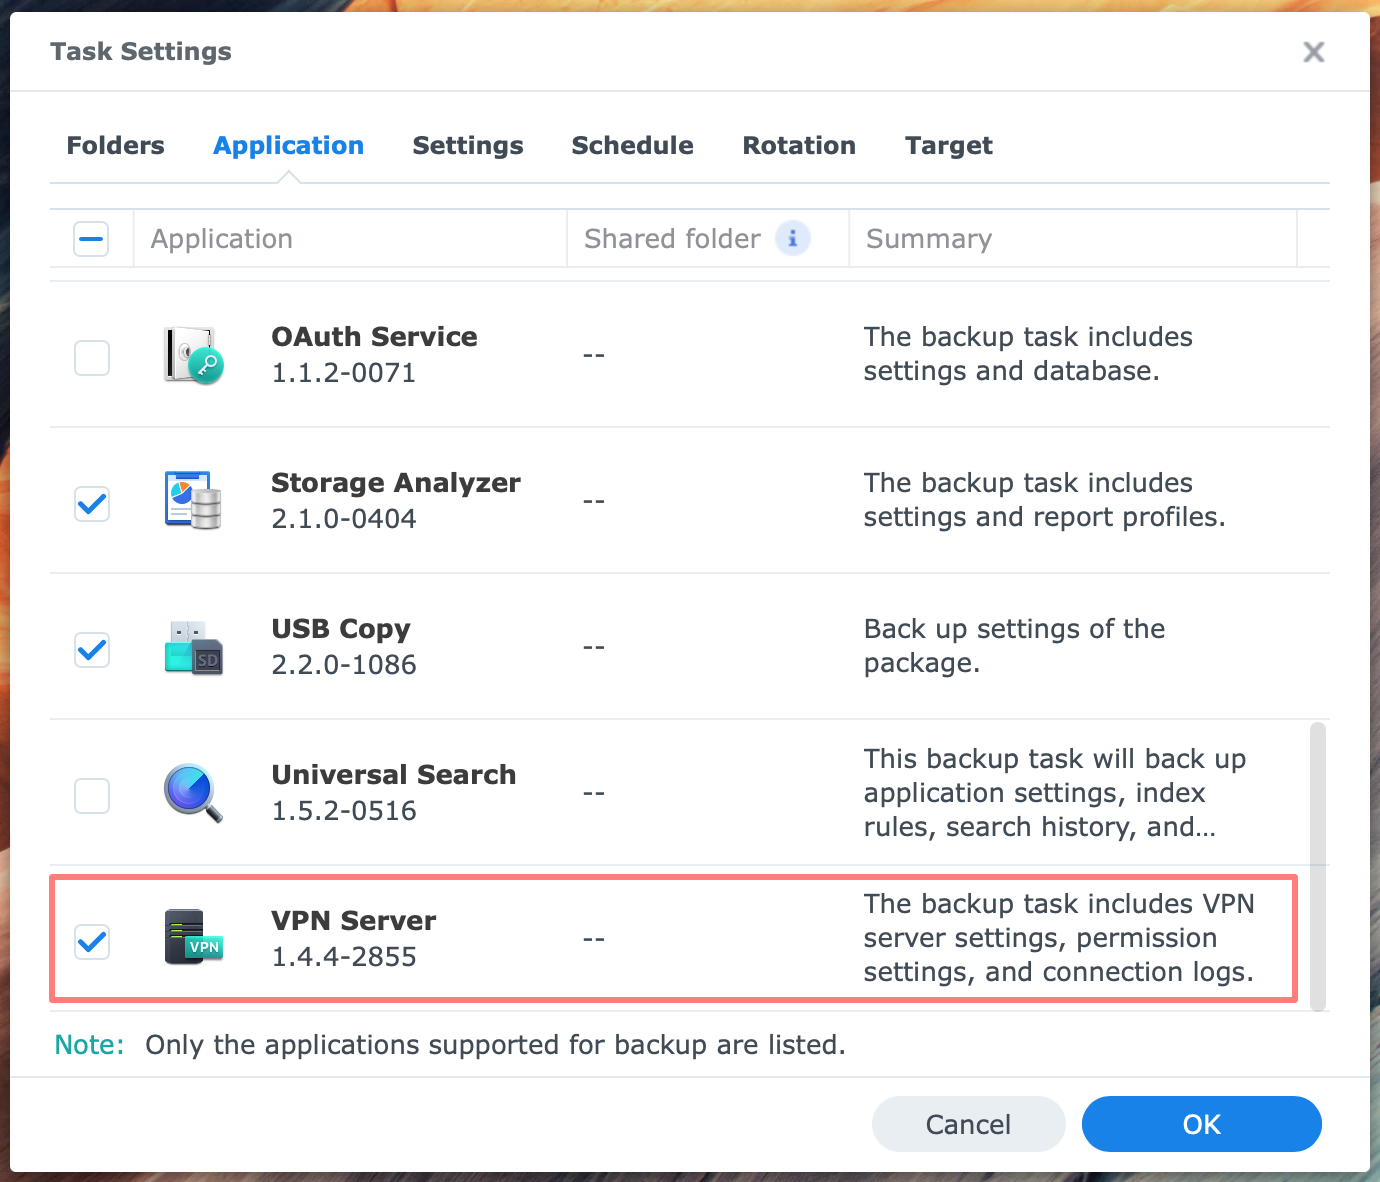
Click OK to save the task and close Hyper Backup.
VPN Client On Computer Or Mobile
You install a VPN client application on the computer, tablet, or smartphone, making a secure connection to the VPN server. Once the connection is established, you continue working as you would in the location where your NAS and VPN server reside.
You first edit the VPN configuration file you exported from the VPN server. Next, you install the VPN client and import the configuration. Last but not least, you test the connection.
If the connection is unsuccessful, you will find some troubleshooting tips.
Editing the VPN configuration
In a previous step, you exported the configuration file. The export downloaded openvpn.zip to your computer. This zip archive contains two files, README.txt and VPNConfig.ovpn. Open VPNConfig.ovpn in a plain text editor like TextEdit or BBEdit on macOS or Notepad on Windows. Change the following line:
- remote YOUR_SERVER_IP 1194
Replace YOUR_SERVER_IP with the external IP address of your router. You can get your external IP address via https://www.myip.com, assuming you are at the location and network of the VPN Server.
Instead of the IP address, you can fill in the DDNS name if you configured that earlier. As you know, DDNS is preferred if your router has a dynamic external IP address.
- redirect-gateway def1
During the VPN connection, you create a virtual tunnel to your destination, where your NAS resides. However, you might want to access the internet for other tasks like web browsing or mail with an active VPN connection. The redirect-gateway def1 line affects how the VPN connection handles that internet traffic.
You create a so-called full-tunnel VPN when you enable the redirect-gateway def1 line by removing the # character. Internet traffic is direct via the tunnel to the VPN server’s location, typically your home or office. Next, from that trusted location, you browse the web.
This is a great configuration when you access the internet from an untrusted hotspot, but it might interfere with the firewall configuration on your NAS. In other words, if you have a firewall enabled on your NAS, it could prevent access to the internet via the VPN tunnel on your NAS.
However, when you are at a trusted location, your home, for example, making a VPN to your office, you do not have to redirect other internet traffic through the VPN tunnel to the office. In that scenario, you leave the redirect-gateway def1 line marked out by the # character. This creates a so-called split-tunnel VPN. You access the internet for other non-VPN-related traffic directly from your current location.
Alternatively, you could make two configuration files, one disabled (trusted location, with #, known as split-tunnel VPN) and one enabled (untrusted location, without #, full-tunnel VPN).
- client-cert-not-required
Our configuration does not have a separate certificate file since the certificate is inside the configuration file. As a result, the VPN client generates a warning when we connect. To suppress that warning, add the client-cert-not-required statement at the end of the configuration lines.
Installing and configuring the VPN Client
Download the OpenVPN client from https://openvpn.net/vpn-client/. On macOS, it installs the OpenVPN Connect application in the Applications/OpenVPN Connect folder, including a shortcut. On Windows, it installs in the C:\Program Files\OpenVPN Connect folder and places a shortcut on the desktop.
Start the application.
When you start the application for the first time, you get four screens with helpful information. On the last screen, click Get Started.
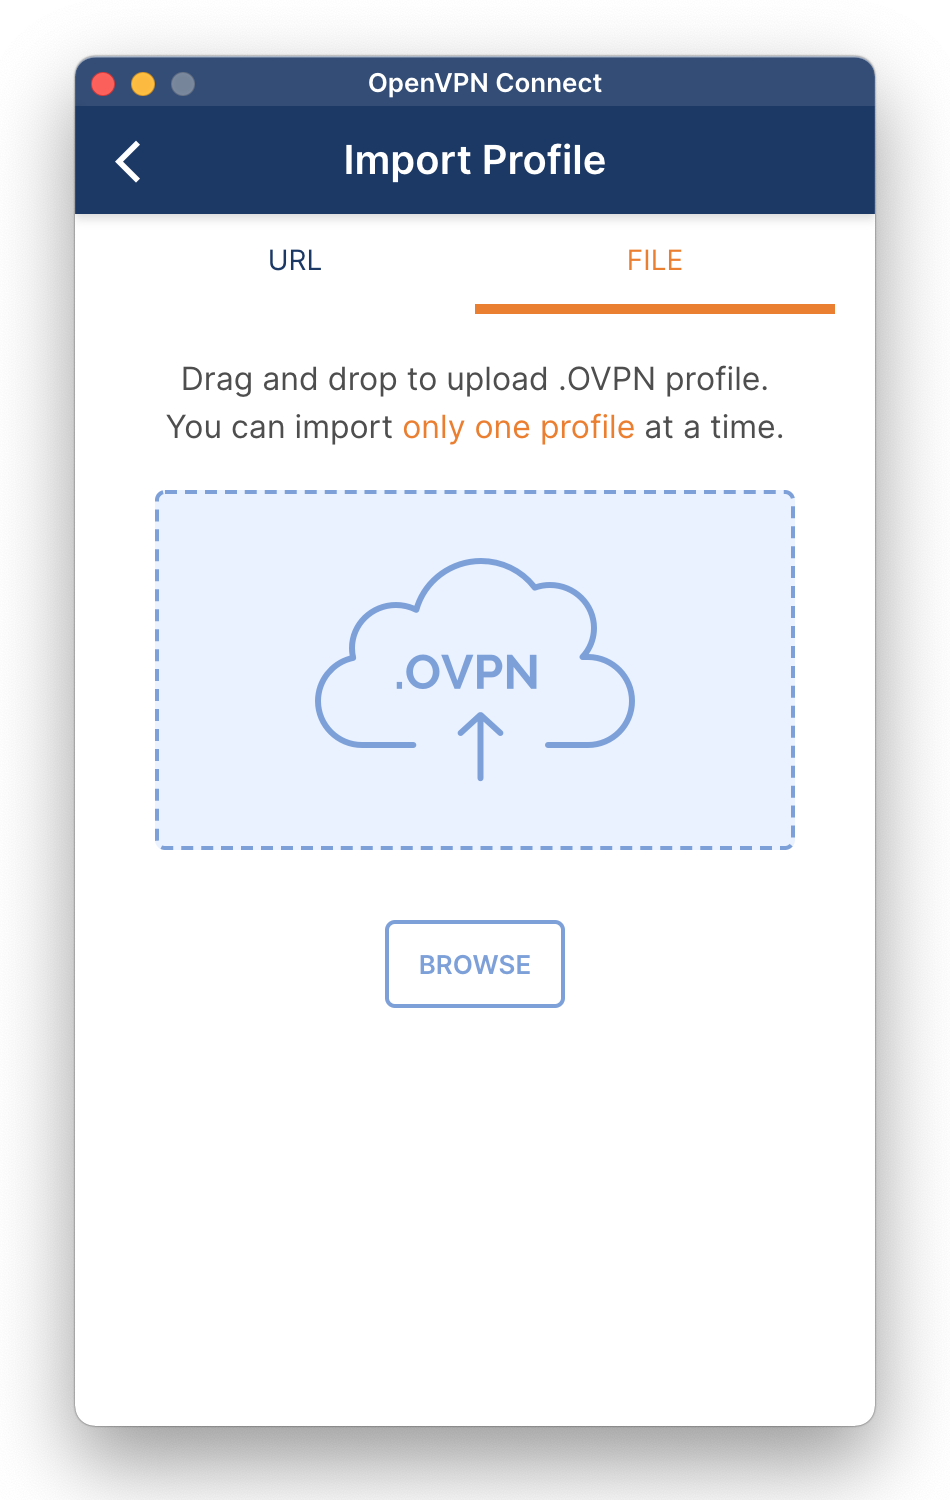
When you reach the Import Profile screen, select the File tab, drag or import the .ovpn file you edited earlier, or use the Browse button. If you want to import another profile, click on the three bars in the top-left corner and choose Import Profile.
Note that the application remembers the user name in the profile. The next time, you only have to enter the password. To change the user name, edit the profile.
To connect, click on Connect. Enter the username and password of your user account on the NAS, and click OK.
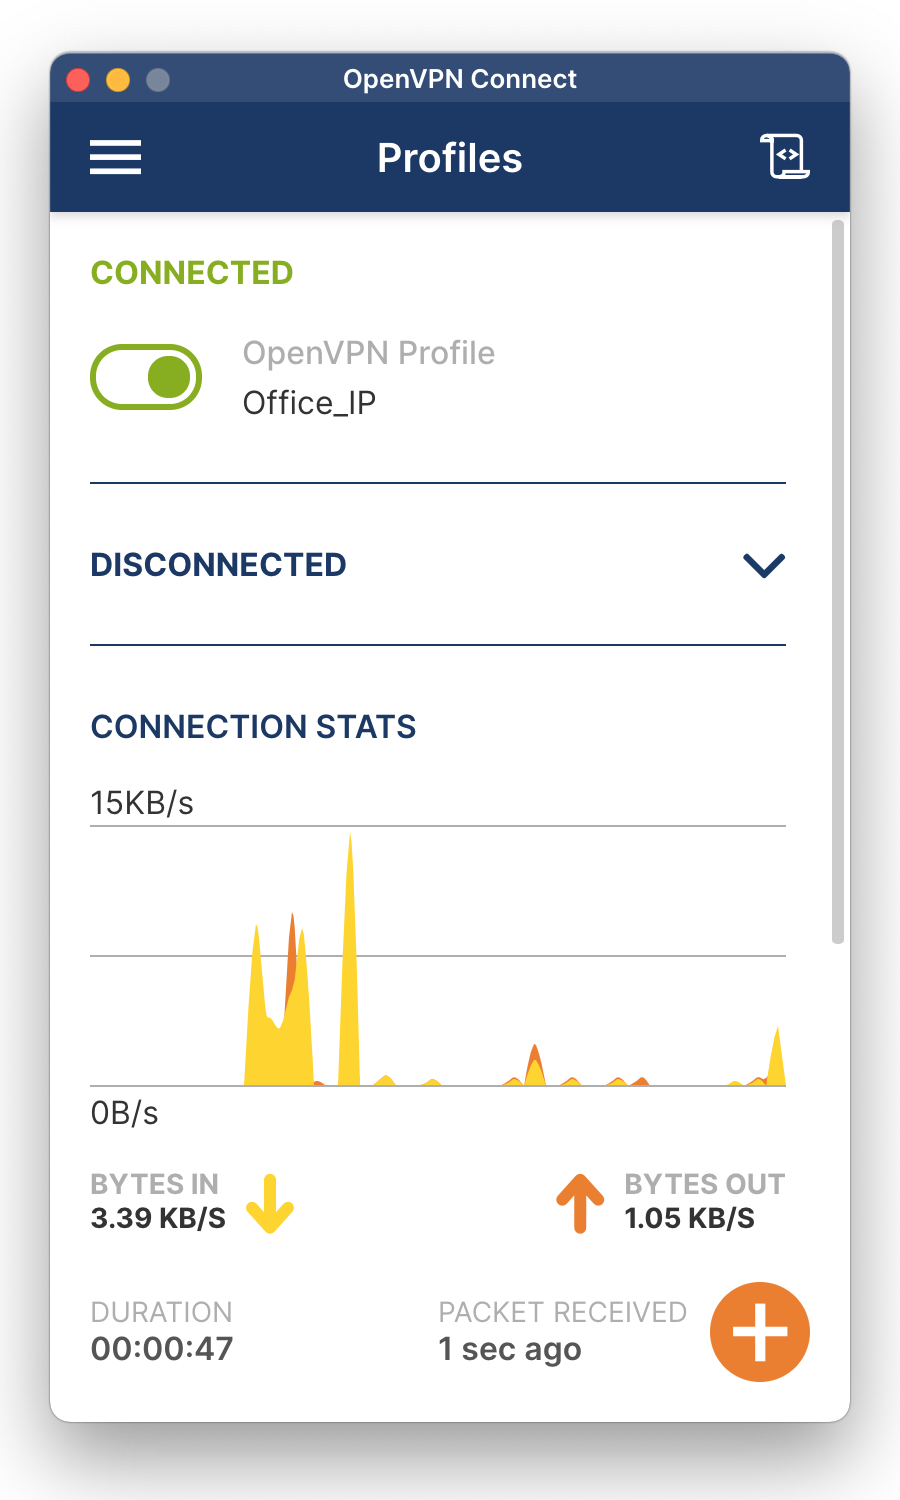
When the message Connected in green appears, you are connected to the NAS through a VPN. Notice the connection statistics. You can disconnect by clicking the green button in the top-left corner and confirming to disconnect.
I have a remark for the safety-conscious among us. After importing the configuration file into the VPN profile, consider deleting the .ovpn file. You do not need them any longer; you can export them again if needed, and it contains security information (the password for the connection). Don’t have them lying around longer than necessary.
Using the VPN connection
Normally, when you connect to the NAS from the same network, you can use its name or IP address without a VPN. But via a VPN connection, you can use the IP address only. There is a solution to circumvent this limitation by setting up a DNS server on the NAS or else in the network, but that is out of the scope of this tutorial.
Aliases and port numbers in the browser for applications on the NAS work via the VPN connection as they work from the local network.
Monitor Your Connections
The VPN server on your NAS and the VPN client keeps a log for monitoring and troubleshooting. Often, you can test and connect with server and client on the same local network because many internet routers allow for loopback. But to insist on a full-proof test, go to a different location and network or use your smartphone’s hotspot.
With your smartphone as a hotspot, you can connect any computer over WiFi via the smartphone to the internet.
Monitor the VPN server
Log in to DSM as an administrator and open the VPN Server application from the main menu.

Go to Connection List to see the current connections. Notice the refresh icon in the bottom-right corner. This page shows which users are connected, how long, and which protocol they use. If necessary, you can disconnect with the Disconnect button at the top. Disconnecting can be helpful if a connection gets stuck, preventing the user from connecting again.

Go to Log to see the VPN server log. The log shows similar information to the connection list but includes a history. You can clear and export the log. You can filter the log per protocol from the drop-down list in the top-right corner to make browsing through the events easier.
Monitor the VPN Connect client
It can happen that you cannot connect to the NAS’s VPN server. The OpenVPN Connect app on your computer can generate different error messages. I will show them below with an explanation.
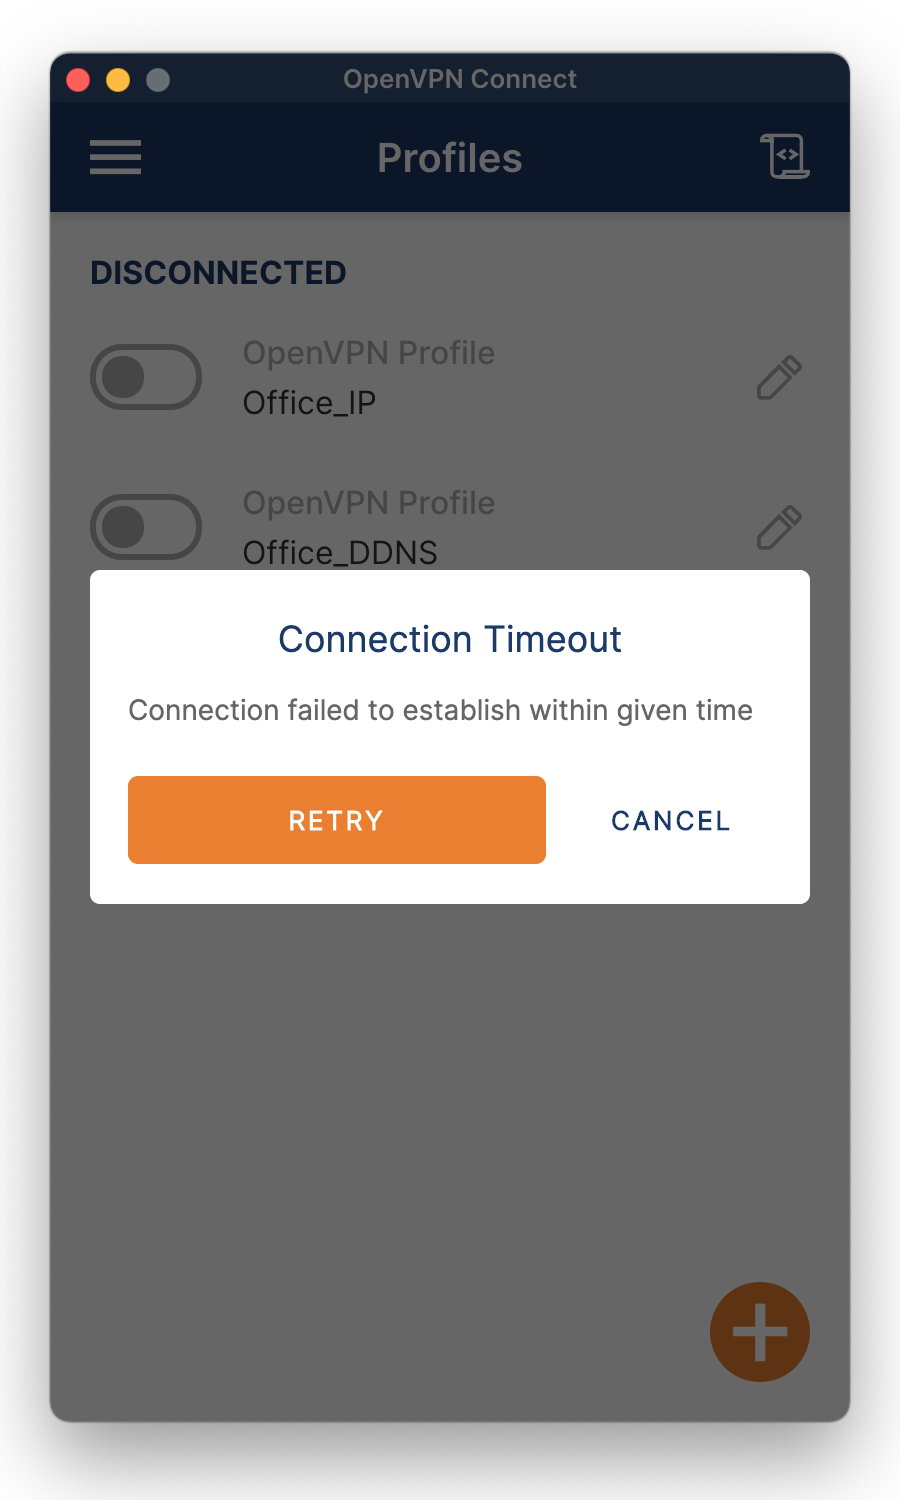
A Connection Timeout means that the VPN client could not connect to the VPN server. A timeout happens if the VPN server is not running, the router does not forward traffic properly, or the IP address or DNS name the client attempts to connect to does not listen to the assigned port.
Check the VPN server, router configuration, the external IP address, or (D)DNS name.
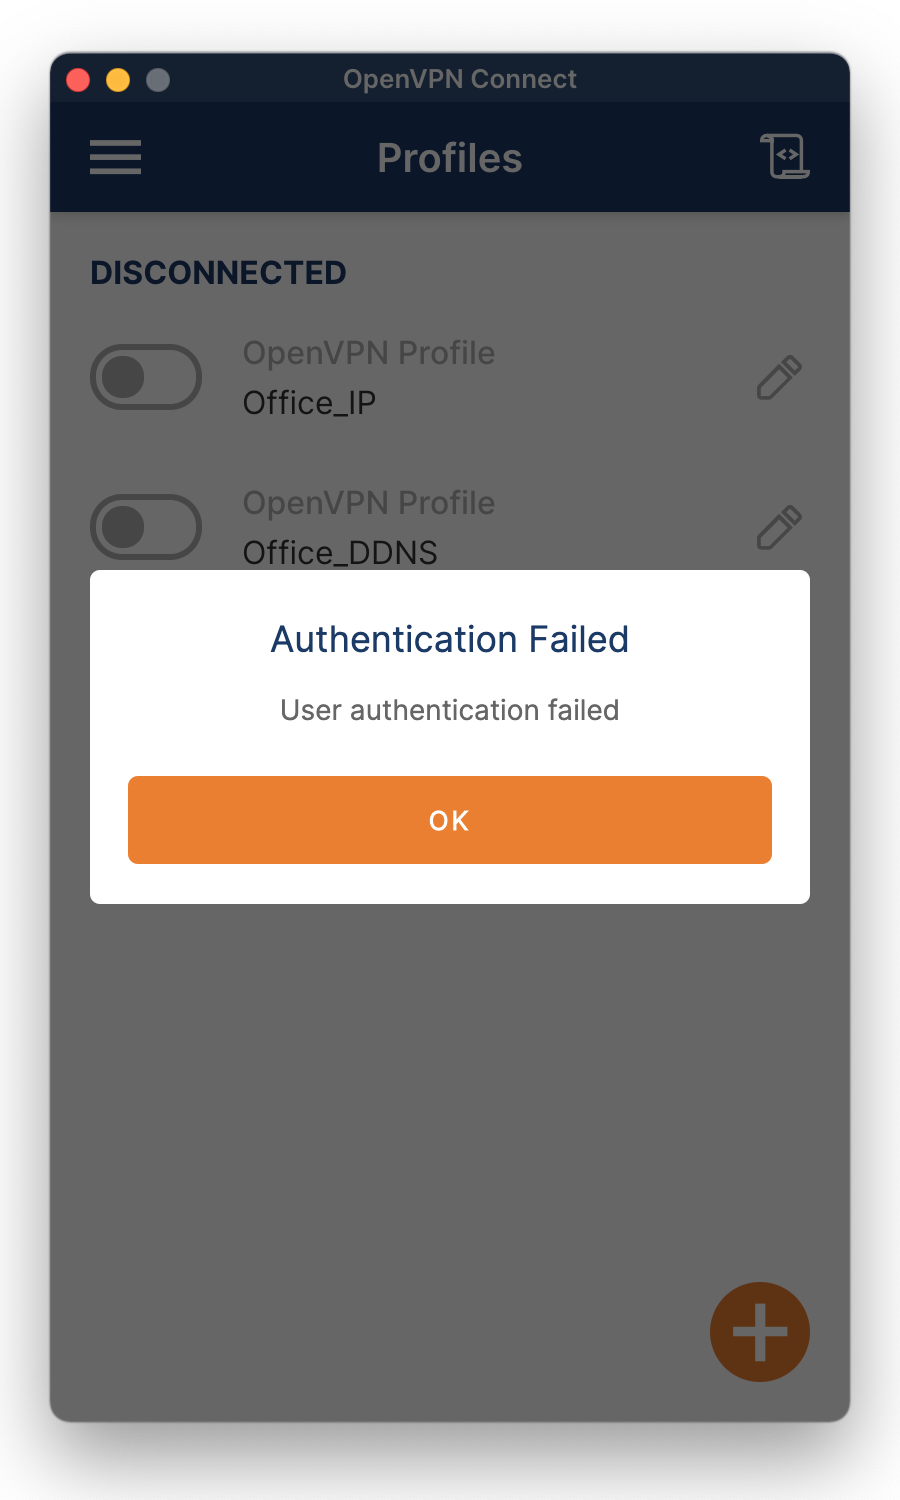
An Authentication Failed message means a successful connection with the VPN server, but the user authentication failed. Possible causes are that the user has no privilege for the link, too many connections, or too many connections for the VPN server. A wrong password is also a possibility.
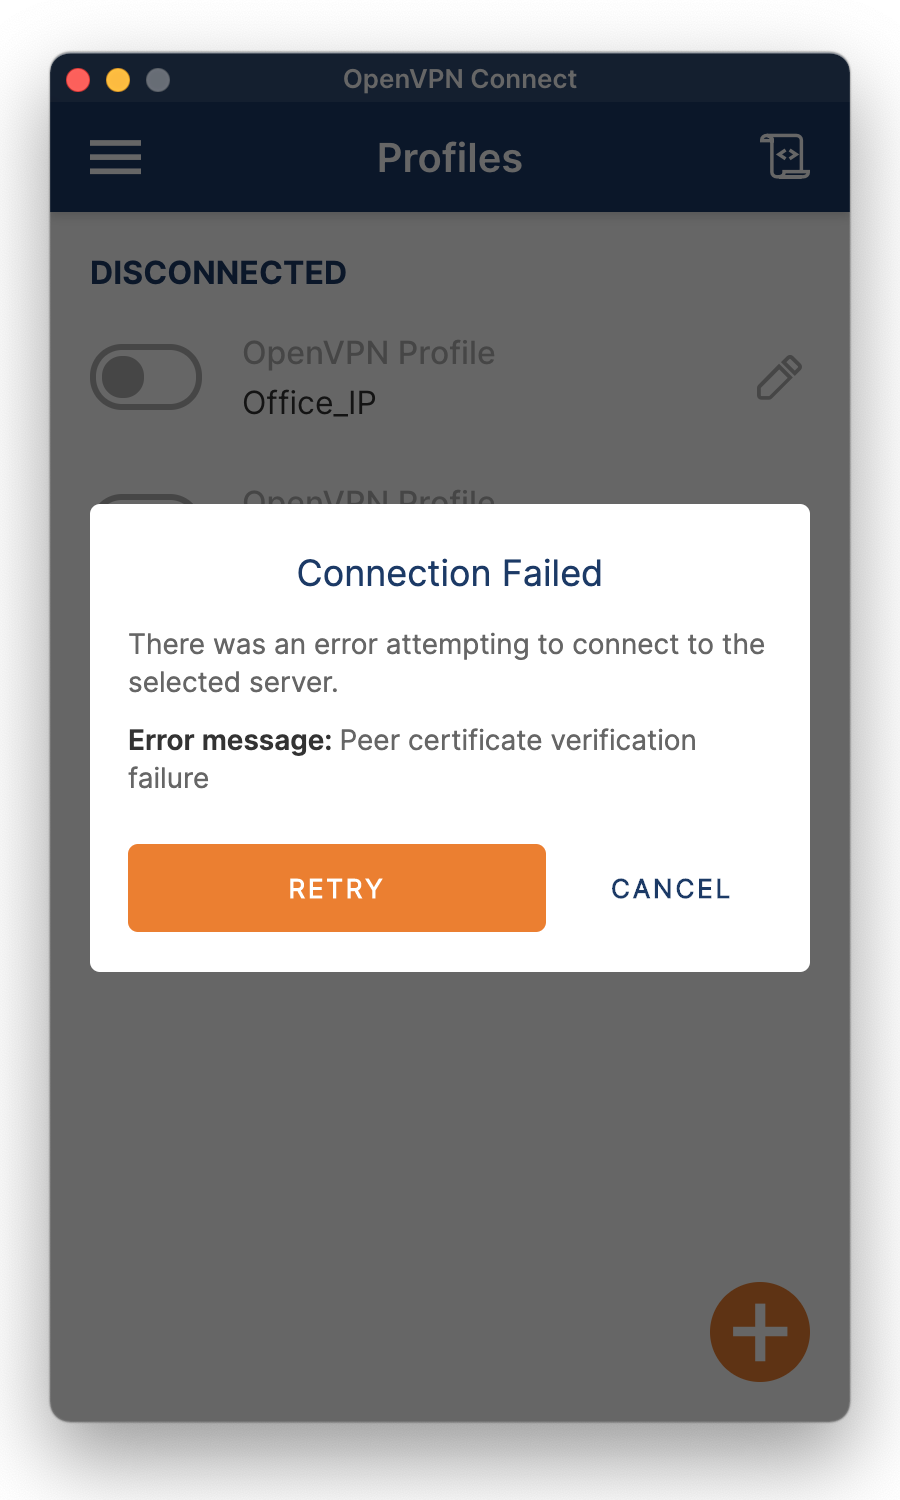
The Connection Failed message means that there initially was a connection, but it was dropped immediately. The explanation is in the error message. It is about a certificate. Both the VPN Server on the NAS and the VPN client on the computer have a certificate and are peers.
This error occurs when the certificates do not correlate. A possible cause is that the certificate for the VPN Server on the NAS is changed since the connection details for the VPN connection were exported.
To solve the issue, export the connection details again and reconfigure the VPN connection on the VPN client.
Another known cause is that your OpenVPN Connect client needs an update. Go to the download page at https://openvpn.net/vpn-client/ and install the client’s latest version.
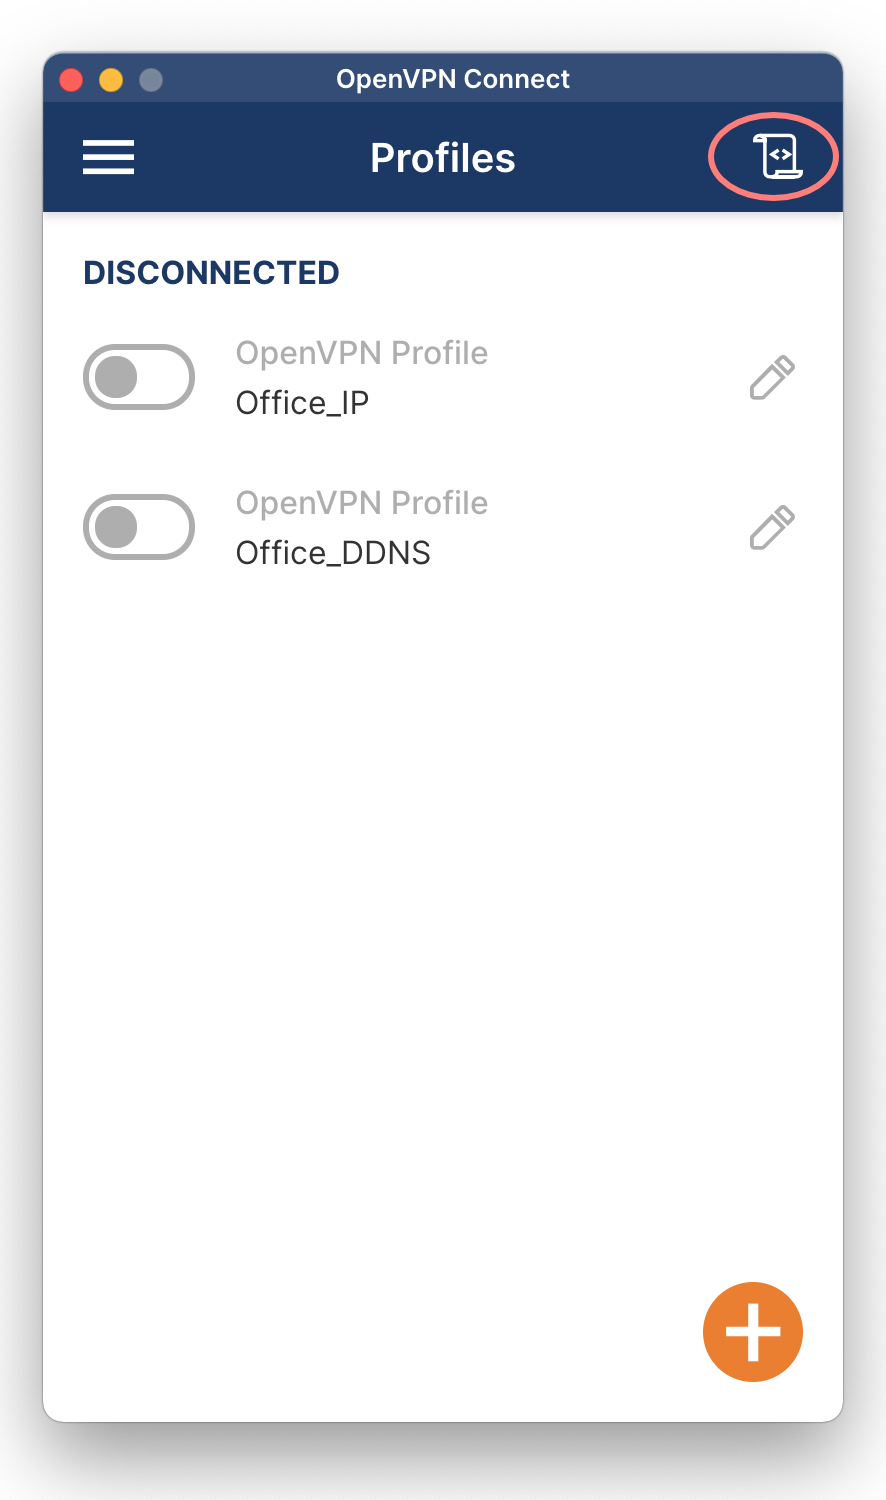
The OpenVPN Connect client has a built-in log. Click on the icon in the top-right corner to open the log.
The log is quite extensive and can be overwhelming. It can be helpful for an experienced administrator to solve any issues you may have.
Troubleshoot your connection
To wrap up monitoring and troubleshooting, here are some tips to solve issues with your connection.
- Is the computer with the VPN client connected to the internet? Note that a local network connection does not guarantee access to the internet. Browse a popular website, or go to https://myip.com to read your external address, as this gives a good indication of a healthy connection to the internet.
- Is the IP address the VPN client connects to still valid? The external IP address of your destination site can be changed. When this happens, the connection fails. On the side of the VPN Server and NAS, go to https://myip.com and compare the address with the one configured in the VPN client.
- If you connect to a DDNS name, is the DDNS service still active? Check the DDNS set up on the NAS, assuming you use that service from the NAS.
- Are you the only one with connection problems, assuming you have coworkers? Maybe you have a VPN client installed on a smartphone or tablet. Try to connect from one of these devices to see if that works.
- Is the port forwarding in the internet router on the destination site still active? Does it point towards the right IP address of the VPN Server and, in our case, also the NAS?
- Is the NAS still up and running? Is the VPN server on the NAS still up and running? The NAS might be hibernating. Wait a minute and try again.
Thanks for reading
This post is donation-ware, and I made it to help you. If it did, please consider leaving a comment or even buying me a coffee. I will be eternally grateful.
Paul Steunebrink / Storage Alchemist

Thank you for the great guide.
But I have a small problem. I have 3 users. All users get the same IP address at the same time – 10.8.0.6.
How can I change that?
Hi Cungalunga,
There is no relation between users and IP addresses. The first user that connects often gets address 10.8.0.6. Concurrently connected users each get a different IP address in 10.8.0.x range.
Best regards,
Paul Steunebrink / Storage Alchemist
Nice post. Thanks.
What could be the reason if a port scan (1194) from outside doesn’t show an open port.
Already checked:
– the public IP is correct
– the port is forwarded correctly on the router
– the port shows as open if I do the same test but use the port on a dummy local webserver
Is there a setting on the Synology NAS which might prevent showing the port as open?
Hi Stephan,
I am unsure why the open port does not appear in the port scan. It could be because it is in a UDP port but that is a guess on my part.
Best regards,
Paul Steunebrink / Storage Alchemist
Congratulation my friend, amazing post!
Good to hear, Kyriakos!
Thank you for the exhaustive post, I am home Synology nas user, so the step-by-step instructions greatly appreciated. I noticed you did not recommend enabling “Verify TLS auth key” – Is it not needed?
Mark
Hi Mark,
Thank you for your kind comment. The TSL auth key verification is a sensible option. I use it now as well and plan to update the text and image. Thank you for the feedback.
Best regards,
Paul Steunebrink / Storage Alchemist
Security and speed is the best I can receive for my pc. Good guide. Thanks.
Thank you Rolando, good to hear it works for you.
Best regards,
Paul Steunebrink / Storage Alchemist