Using USB Copy on Synology NAS makes copying tasks between USB disk and NAS quicker and easier. Define tasks and link them to a USB disk. After connecting the drive, copying can start automatically.
Using USB Copy On Synology NAS
A Synology DiskStation has one or more USB ports. You can connect an external USB disk to each of the ports. After the disk is mounted, you can manually copy files and folders to and from the NAS with File Station or your computer. USB Copy takes this a step further.
This post is based on DSM 7.2.1 and USB Copy 2.2.1.
When to use USB Copy?
The beauty of USB Copy is its simplicity. It automatically runs on connecting the USB disk or on schedule; it copies one folder to another and can disconnect when ready. You can remove and take the USB disk with you or store it safely. This way, you create a simple backup task from NAS to USB (export) or vice versa (import).
The main limitation of USB Copy is that you can back up only one shared folder per task. Whether this is a deal breaker depends on how you organize the folders on your NAS.
But USB Copy is not a one-trick pony. Because it identifies each USB disk independently, and each specific device is linked with a different task, you can create separate tasks, import or export, for different USB disks. Quickly dumping data from a USB disk to NAS (import) or vice versa (export) is a unique and distinct feature of USB Copy.
If you need more sophistication for backup from NAS to USB, consider Hyper Backup. With Hyper Backup, you can create a backup task that is either a single version or multiple versions.
Hardware And Software
The USB Copy application works with a USB storage device like a USB disk or an SD card with a card reader. In my testing, other types of memory cards with USB readers work equally. USB Copy is unavailable in virtual DSM since the USB ports are not virtualized. When I use the term USB disk throughout this post, it includes the card with a USB reader.
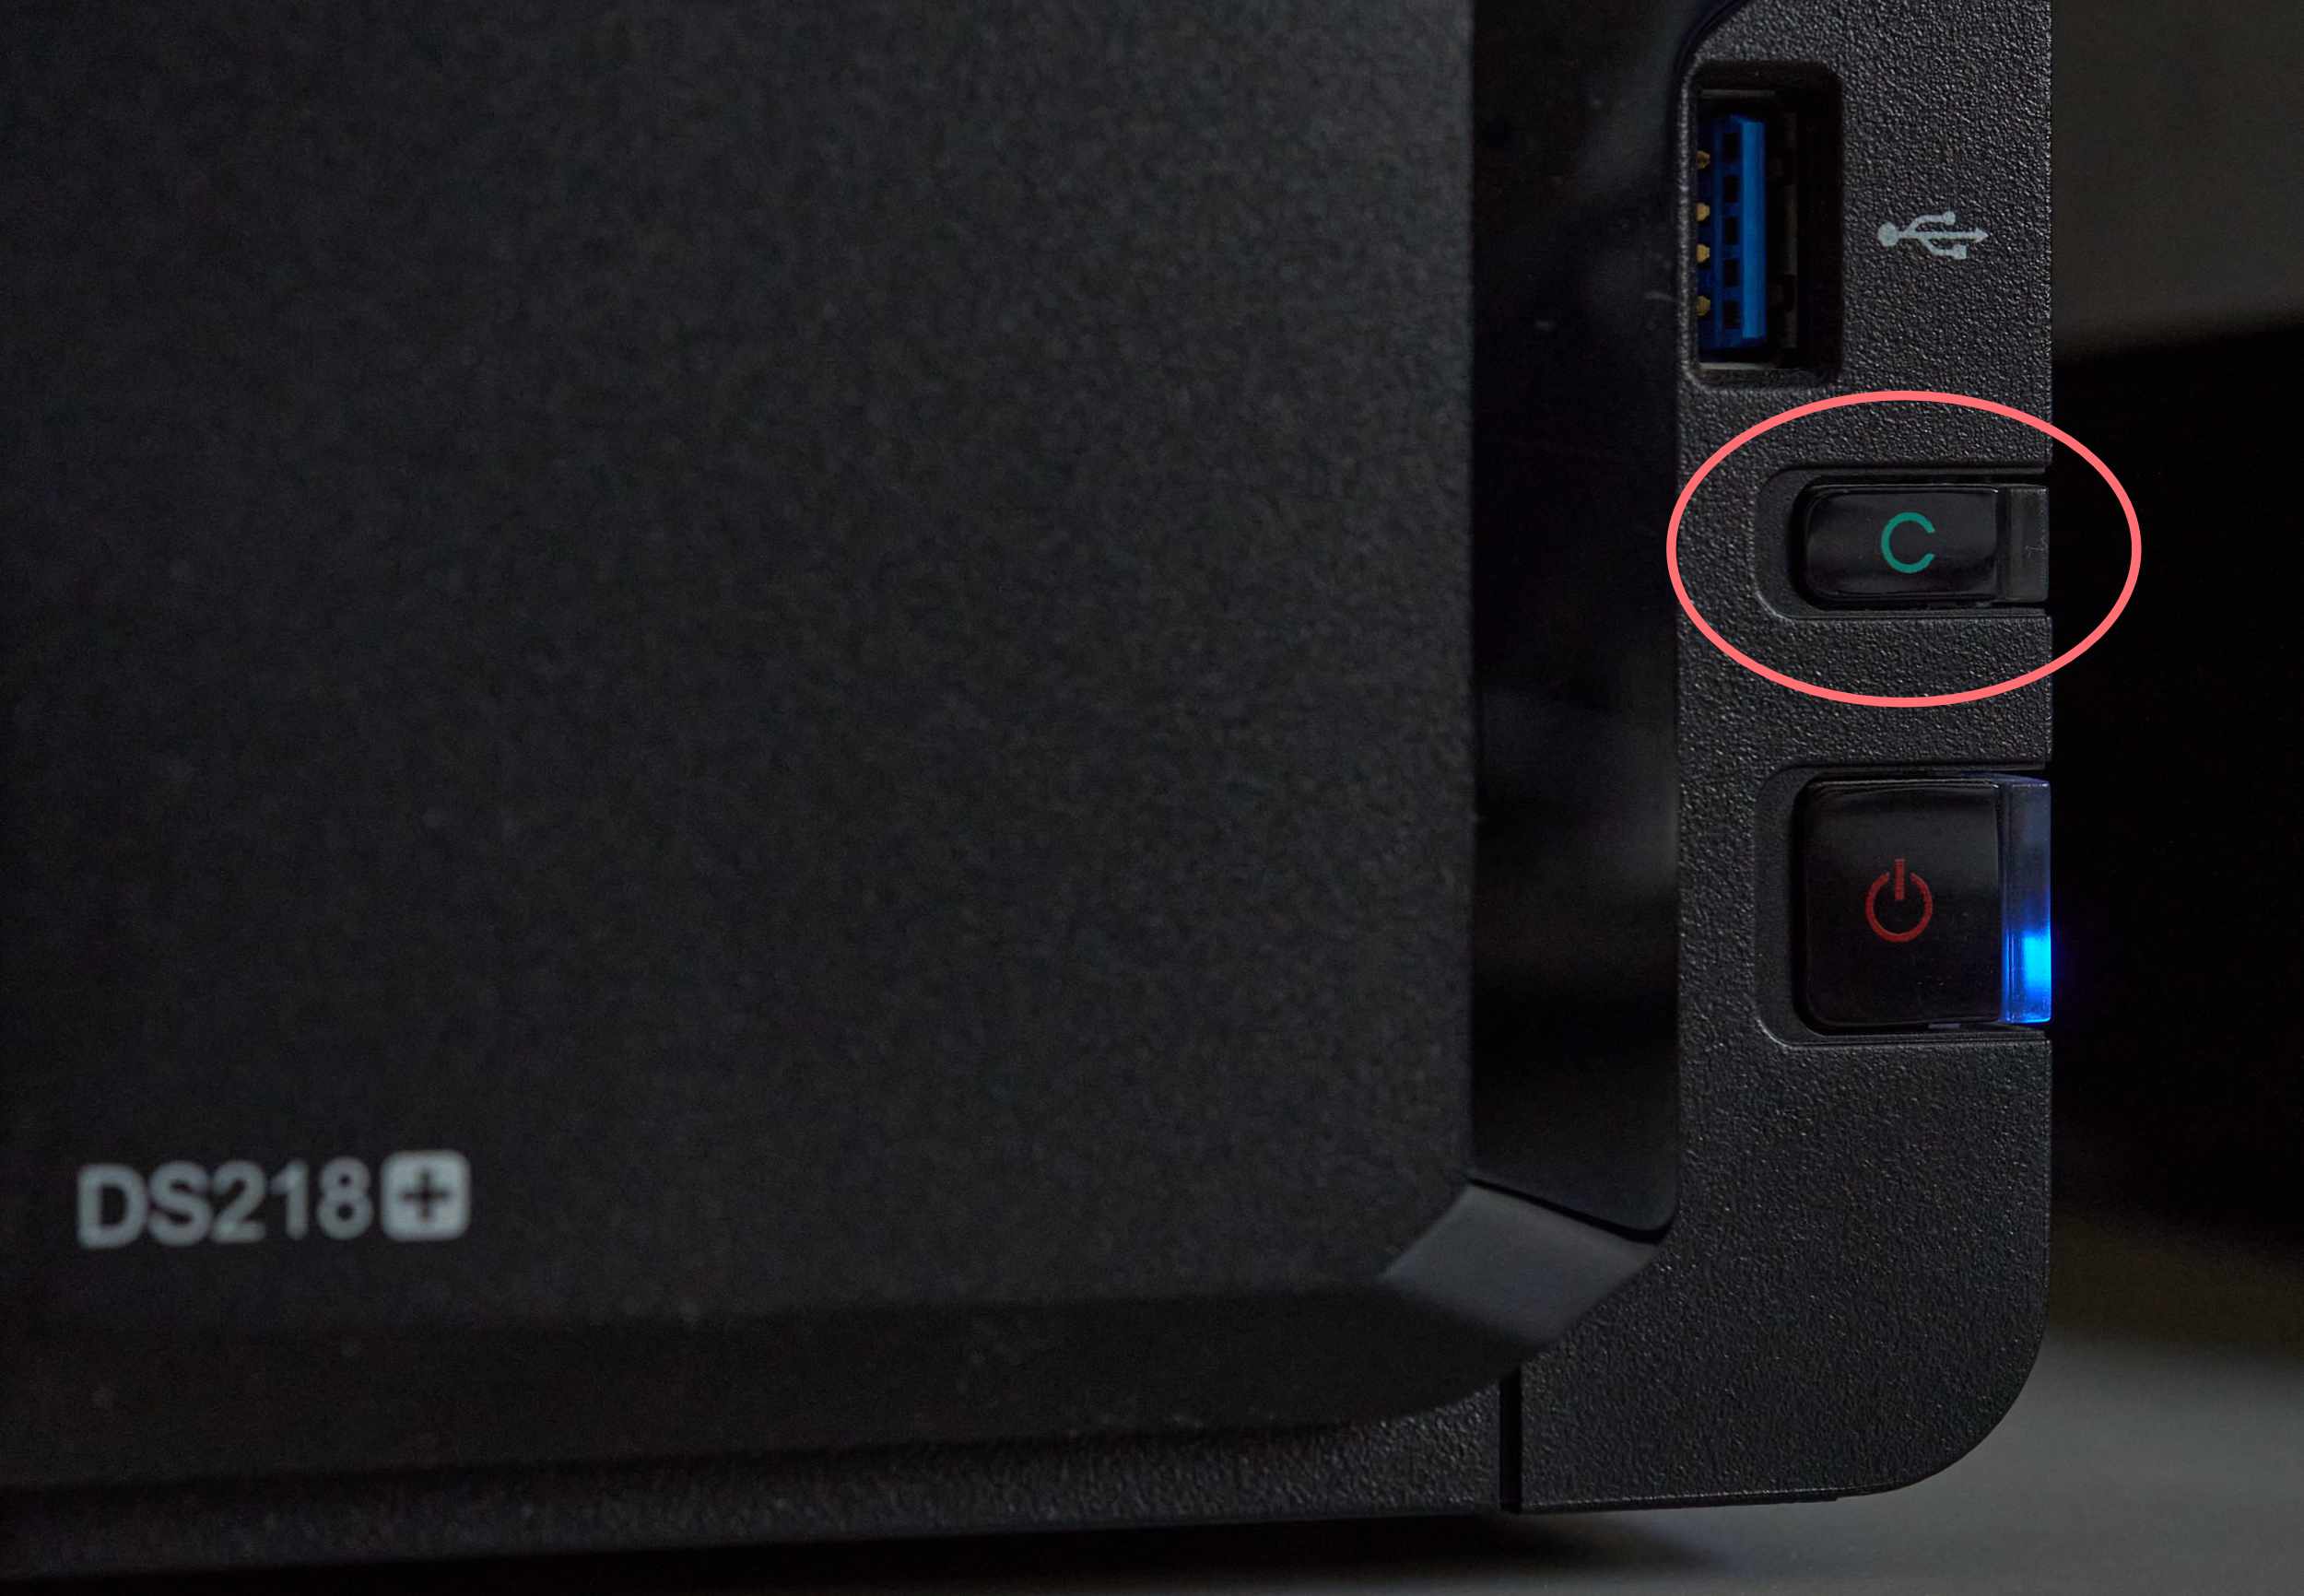
Some DiskStation models targeted for home use have a hardware Copy button that works in conjunction with USB Copy and the USB port at the front, next to said Copy button. I discuss this separately below.
First use
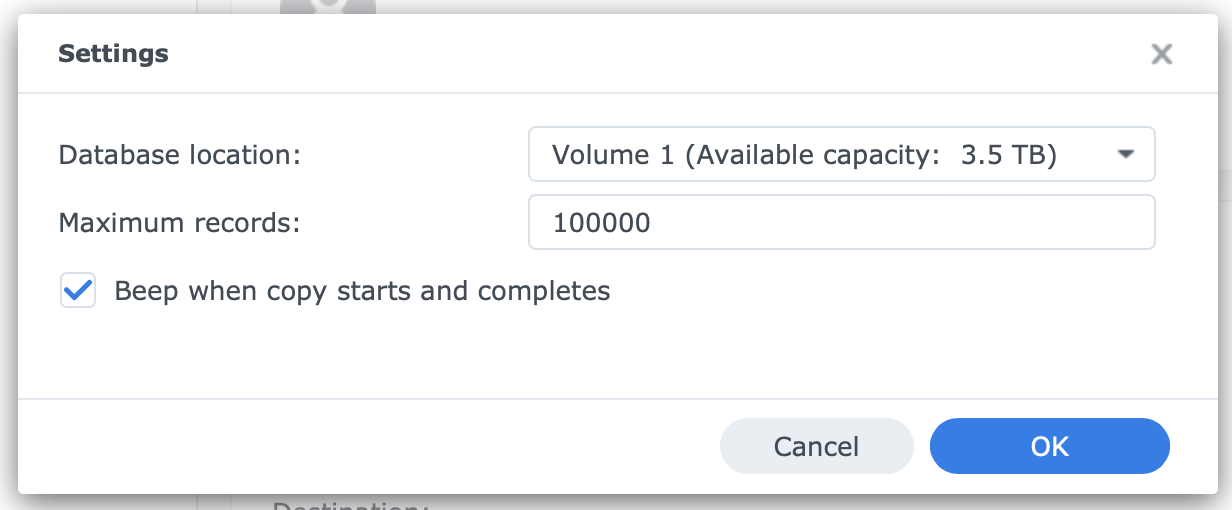
When you open USB Copy for the first time, it may ask where to store its database and how many records it should keep. I suggest to allow for 100,000 records. Each file it copies is a record. This is how USB Copy keeps track of its operation. Optionally, enable the beep. You can change this later from the Settings dialog in USB Copy.
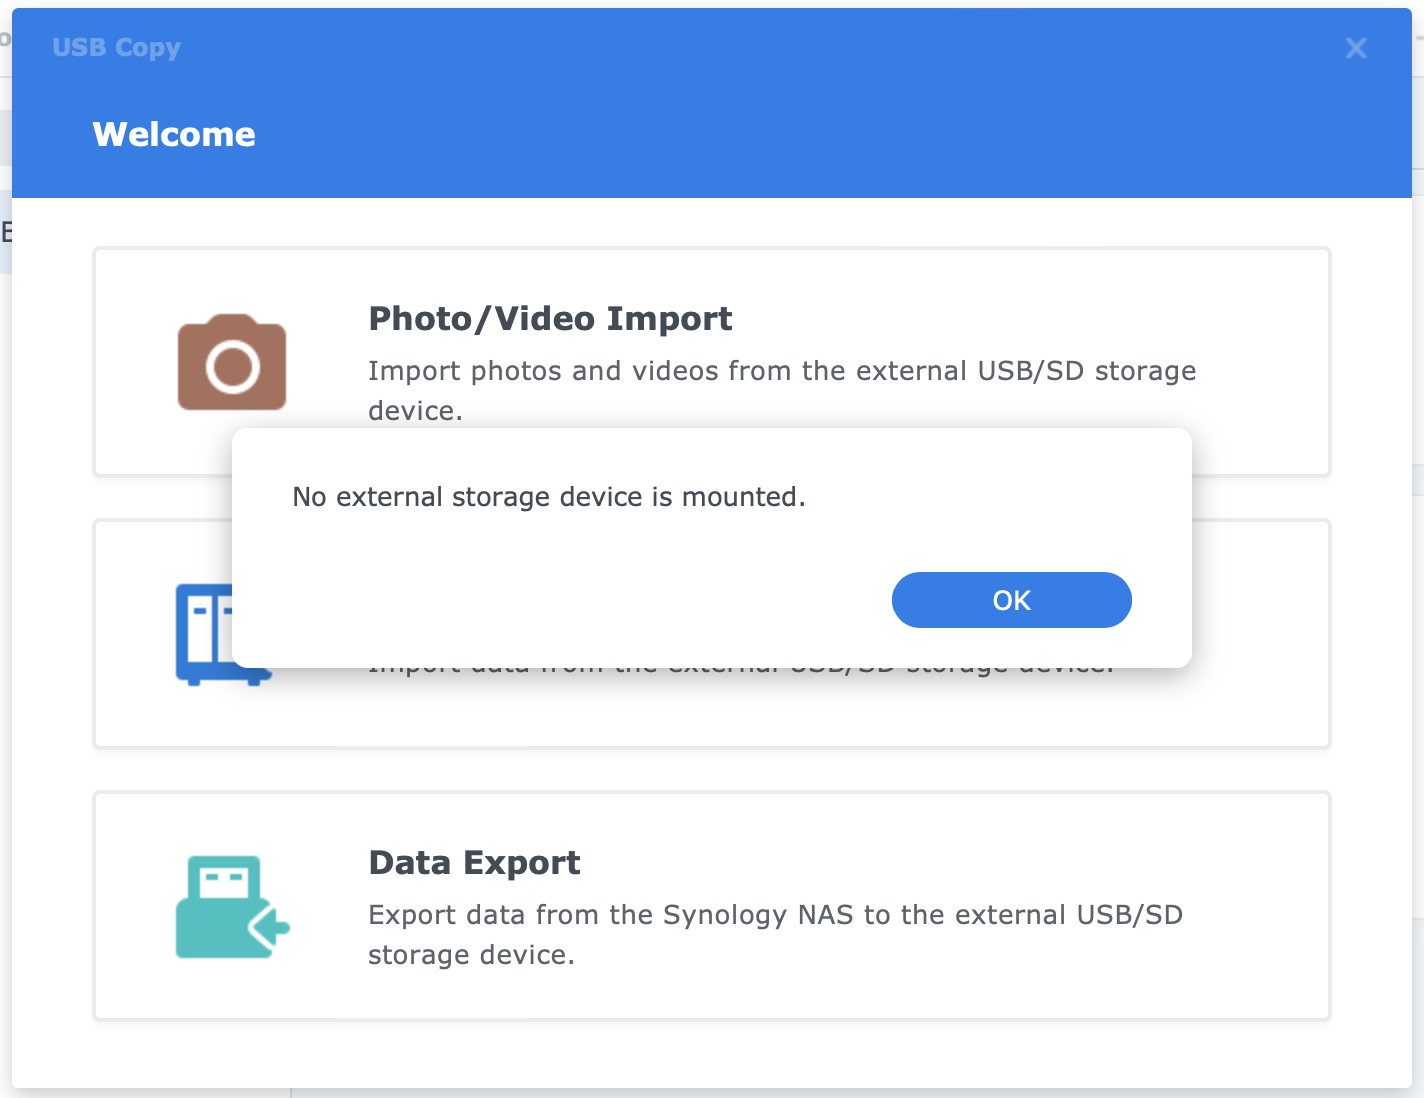
Next, without any defined task, it attempts to create a task. If no USB disk is mounted, you see a warning. Click OK to close the warning, connect an external disk, and click on the plus sign to create a task.
As mentioned earlier, DiskStation models with the Copy button have a Copy Button task already defined on first use, and USB Copy will not force you to create a task on first or later use.
Setting Up A Task
When you set up a new task, use the following workflow. For steps 3 and 4, both optional, you use Control Panel. For details on these steps, please refer to Using USB Disk With Synology NAS.
- log in to DSM with administrator-level privileges
- mount the USB disk (optional for the Copy Button task)
- optional: format USB disk for export tasks only since, for import tasks, you probably have valuable data on the disk [Control Panel]
- optional: rename shared folder [Control Panel]
- open USB Copy, select task type, and define task properties
- run the task or wait for the scheduled time
Select task type
You might get the Welcome screen with three big buttons when you open USB Copy. If not, click the plus sign in the top-left corner to open the USB Copy wizard.
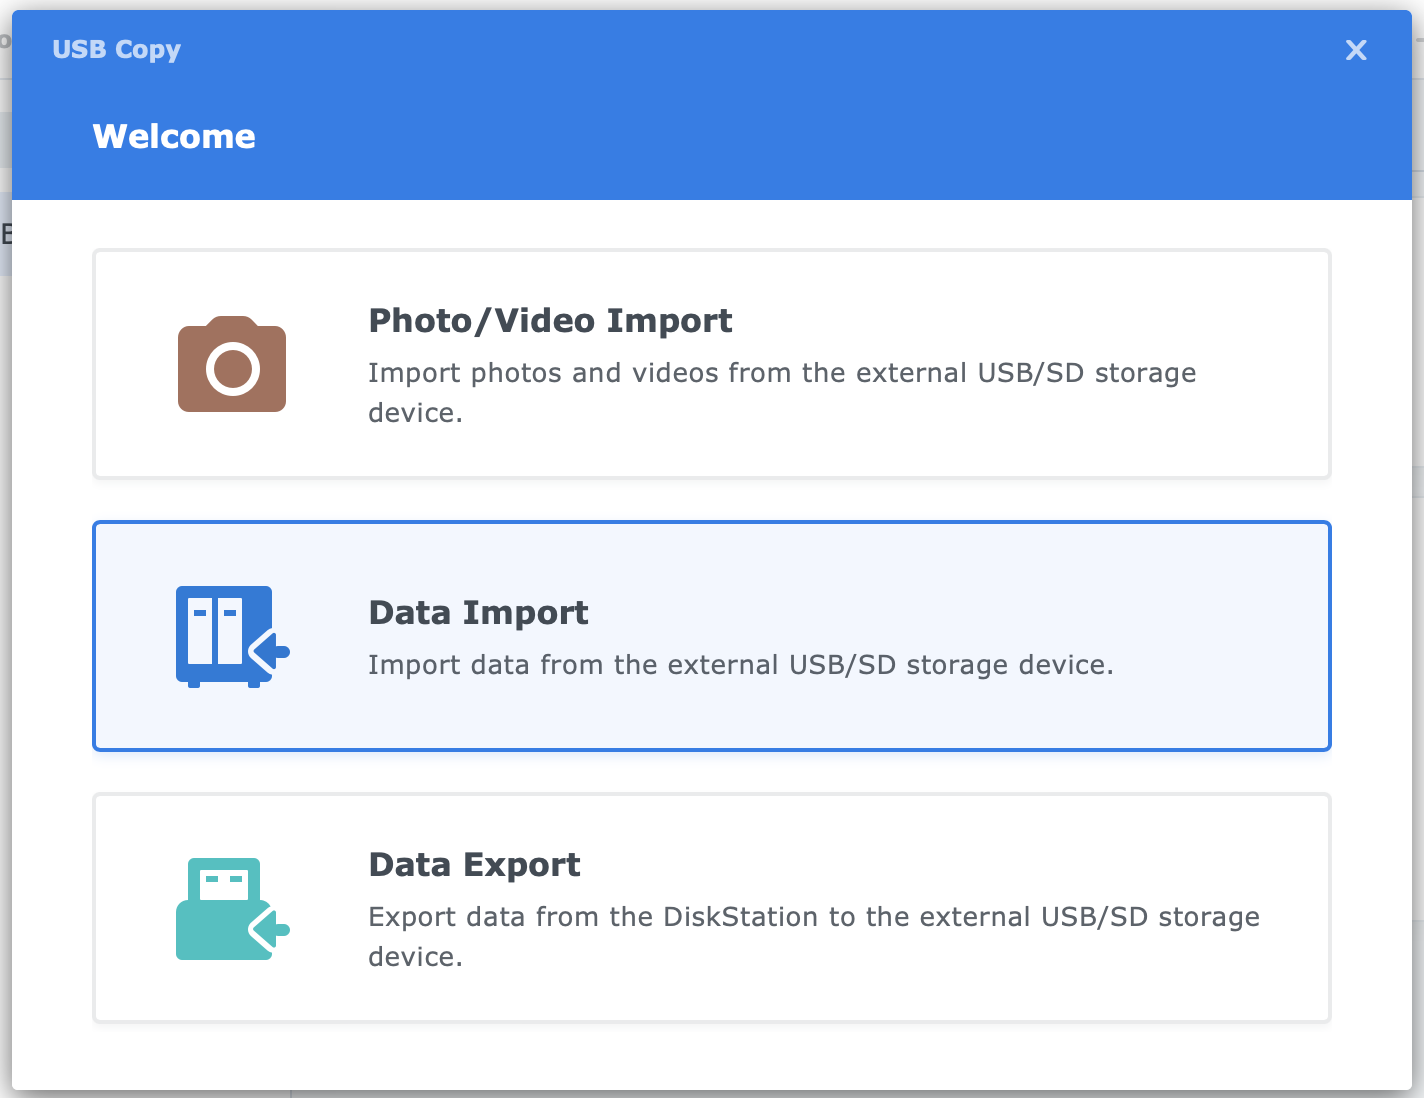
In this example, we create a Data Import task to bring data from the USB disk to the NAS. If you prefer to create an export task, click the Data Export button.
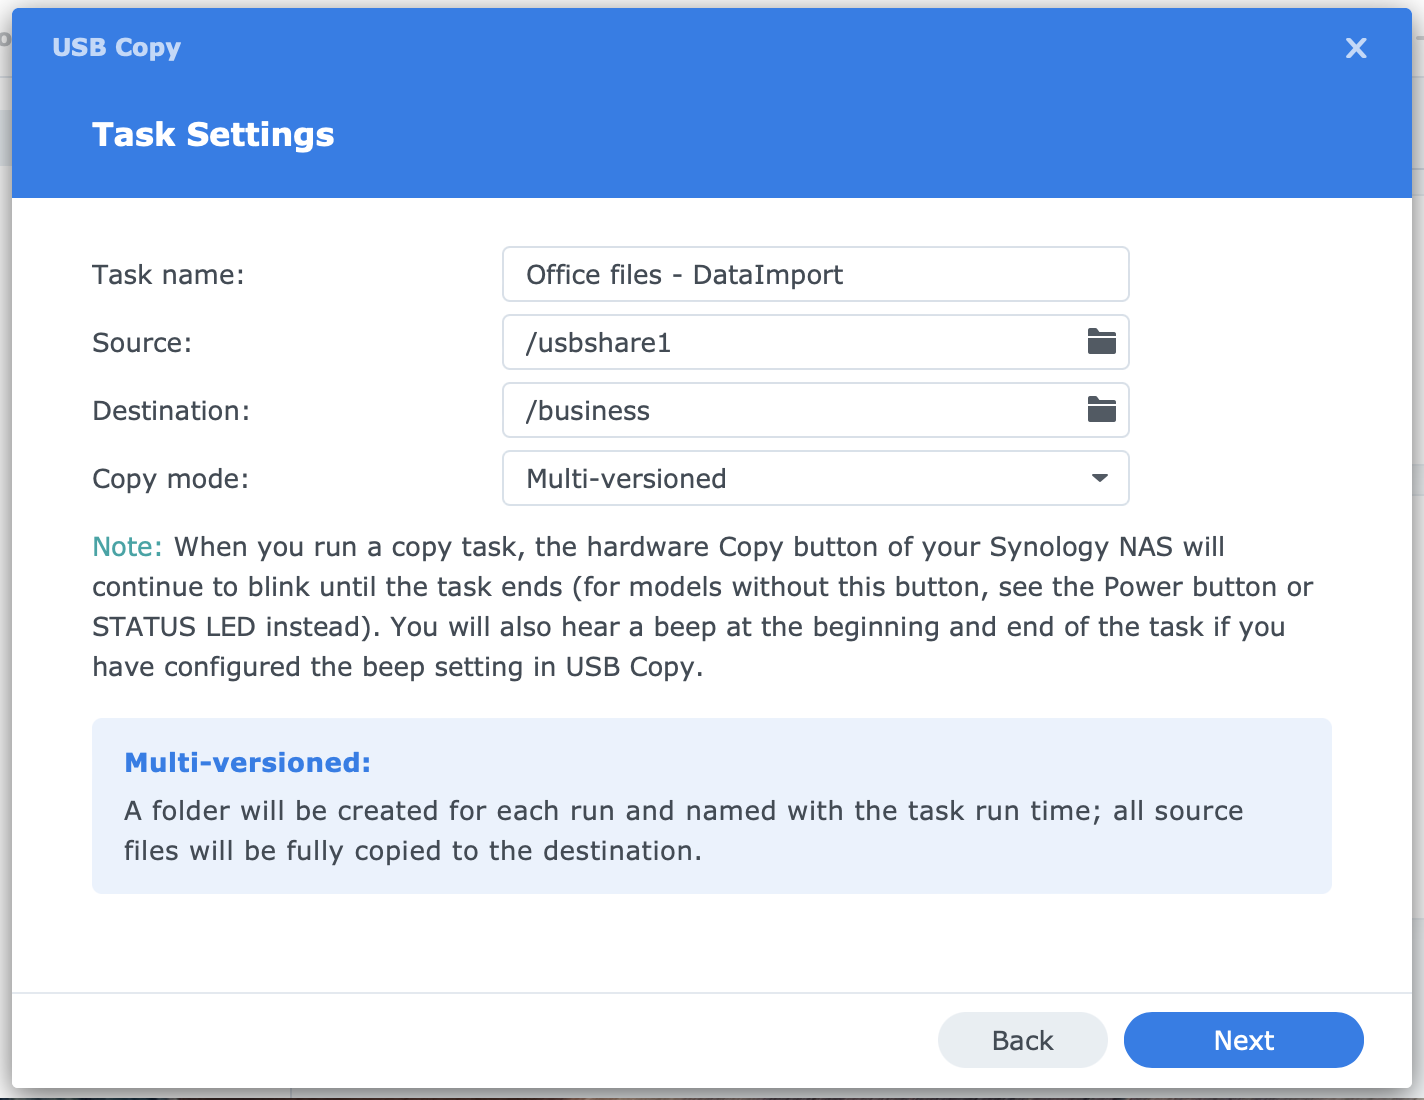
On the Task Settings screen, you give a task a sensible name, select the source and destination, and define the copy mode. USB Copy is smart enough to look for a USB disk as the source and a shared folder in the NAS as the destination. In a Data Export task, this works vice versa.
You can choose from three different copy modes. It is not only important to select the proper mode for your needs, but you can not change this afterward unless you delete the task and create a new one. See below for details on copy modes.
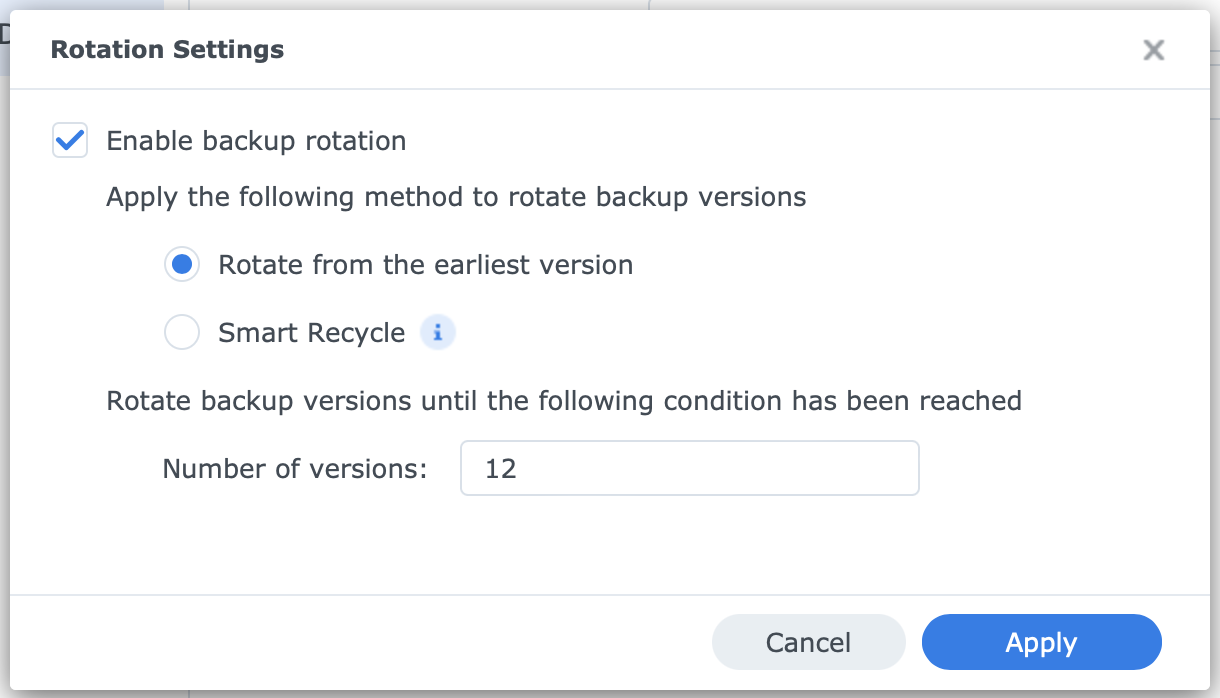
If you chose Multi-versioned as copy mode, the next screen is Rotation Settings. Other copy modes do not have this option. The number of versions you define is the number of copies USB Copy keeps. When the threshold is met, USB Copy deletes the oldest copy when it saves the newest.
The next screen is Trigger Time, and the last is File Filter. You can find more details in the text below.
Concepts Of USB Copy
To learn USB Copy, you best get familiar with the different concepts it is built upon.
Installation
You can install USB Copy from Package Center.

DiskStation models with the Copy button may have USB Copy installed by default.
Users
Only members of the administrators’ group can manage tasks in USB Copy. Standard users do not have access to the application. However, an administrator can select a user’s folder as source or destination, depending on whether it is an export or import task.
Tasks
USB Copy works with tasks that you define. A task is a predefined action that USB Copy executes when you attach a USB disk or when scheduled.
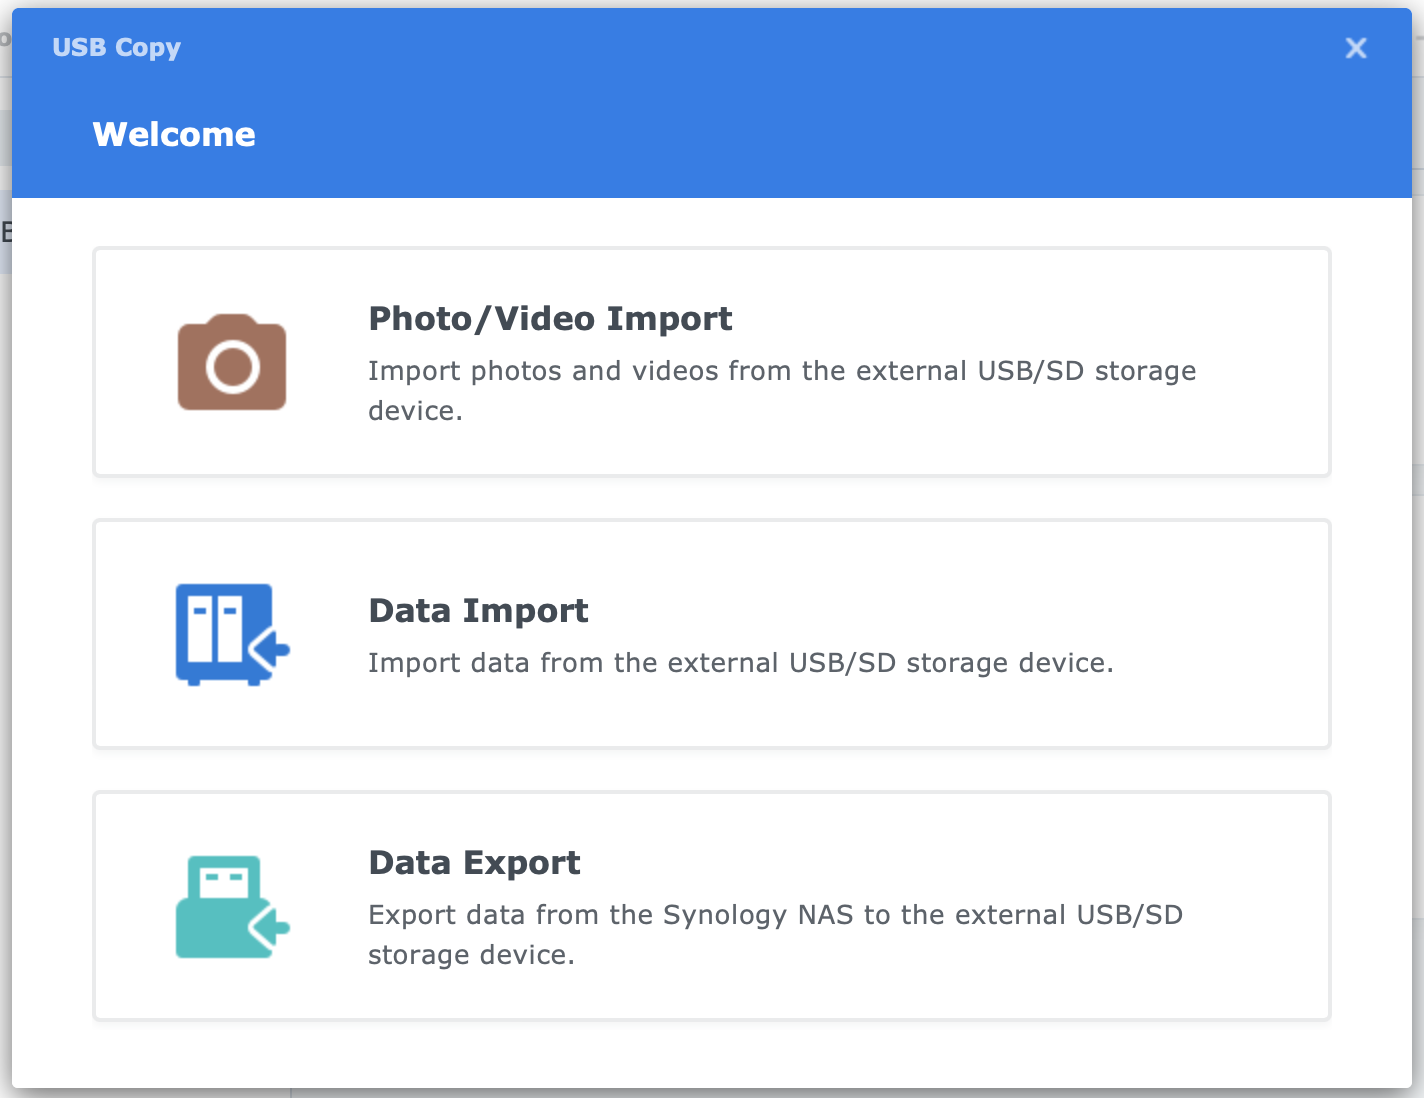
There are two main task types: Data Import and Data Export.
- Data Import (DI)
- Photo/Video Import (PVI)
- Copy Button (CB)
- Data Export (DE)
The Data Import task has two subcategories: Photo/Video Import and Copy Button. Both are custom import tasks. As mentioned, the Copy Button (CB) task is only available on selected models with the Copy Button at the front and preconfigured in USB Copy.
Source/Destination – Import/Export
With each task, you define a source and destination. This is the USB disk on one hand and a folder on the NAS on the other. The folder can be a shared folder or a subfolder on your NAS. Depending on the direction of the data flow, a task is an import or export task.
- with an import task, the source is the USB device and the destination a folder
- with an export task, the source is a folder and the USB device the destination
You can not select multiple (shared) folders in a single task. A task is a 1-to-1 relationship between source and destination.
Copy Modes
The Data Import and Data Export tasks run in a copy mode you select. When you create a task, you can choose between:
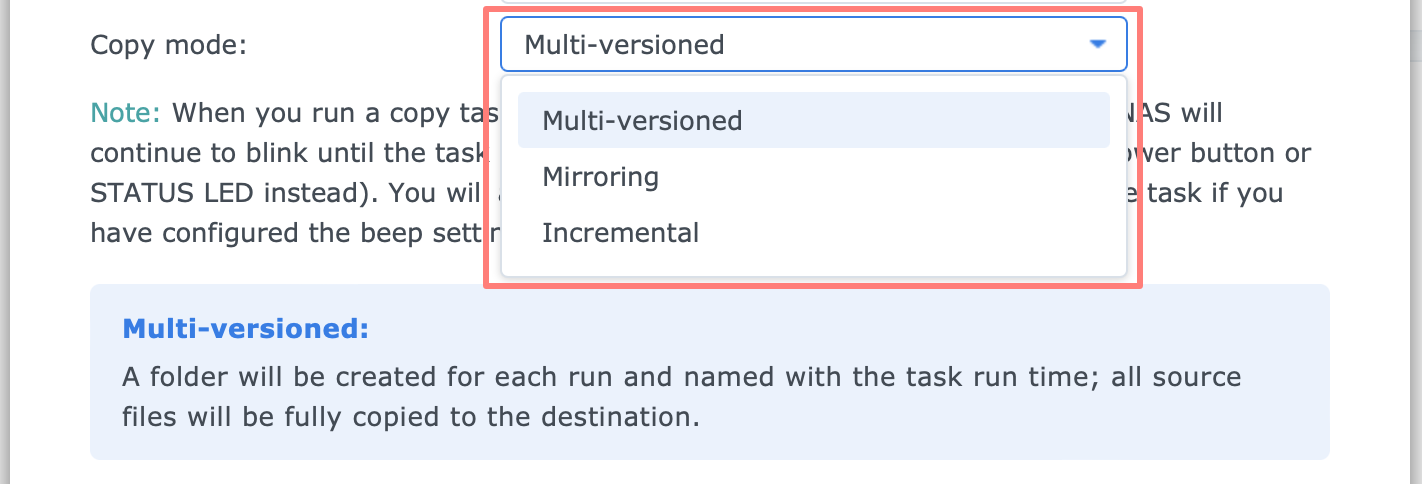
- multi-versioned
- mirroring
- incremental
The Photo/Video Import (PVI) task is multi-versioned, and the Copy Button (CB) task is incremental. You can not change that.
Copy modes per task type
The copy modes with the task types they apply to are:
- multi-versioned (DI/DE/CB)
the task creates a folder during each run; the folder is named after the task run-time; all source files will be entirely copied to the destination; you can configure backup rotation - mirroring (DI/DE)
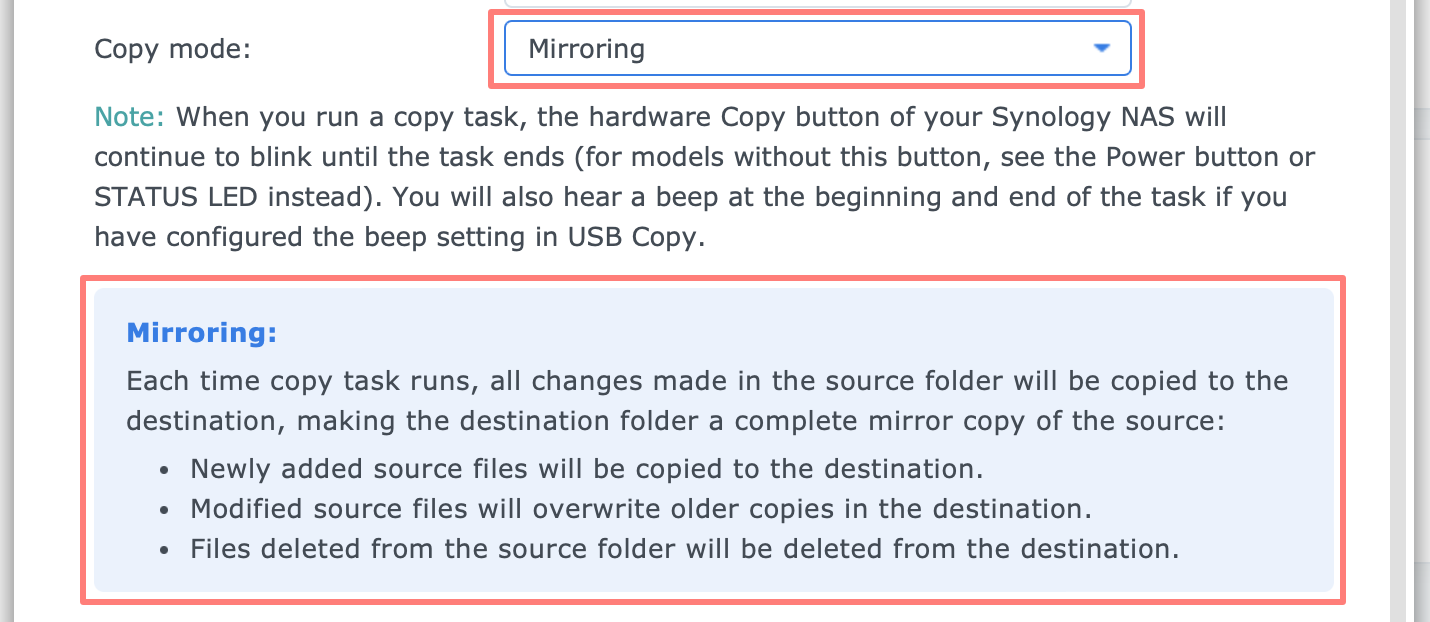
each time the task runs, all changes made in the source folder are copied to the destination, making the destination folder a complete mirror of the source:- newly added source files will be copied to the destination
- modified source files will overwrite older copies in the destination
- files deleted from the source folder will be deleted from the destination
- incremental (PVI/DI/DE)
each time the task runs, newly added and modified files in the source folder are copied to the destination- modified source files will overwrite older copies in the destination
- files deleted from the source folder will not be deleted in the destination
The mirroring and incremental modes are almost identical. The main difference is that with mirroring, files deleted from the source are also deleted from the destination. The incremental mode does not delete files in the destination folder.
On the other hand, incremental mode has additional features regarding flattening the file structure, renaming, and deleting files from the source. See below about the incremental modes extras.
The multi-versioned mode is entirely different. It always makes a full copy of the source to the destination into a new folder at each run. This mode also has a backup rotation feature. You can turn the rotation on/off and define several versions and rotation methods.
Incremental mode extras
The incremental copy mode has a few extra options that mirroring and multi-versioned modes do not have. These features are turned off by default with the DI or DE tasks. With the PVI task, they are enabled. There are three options, and some with sub-options.
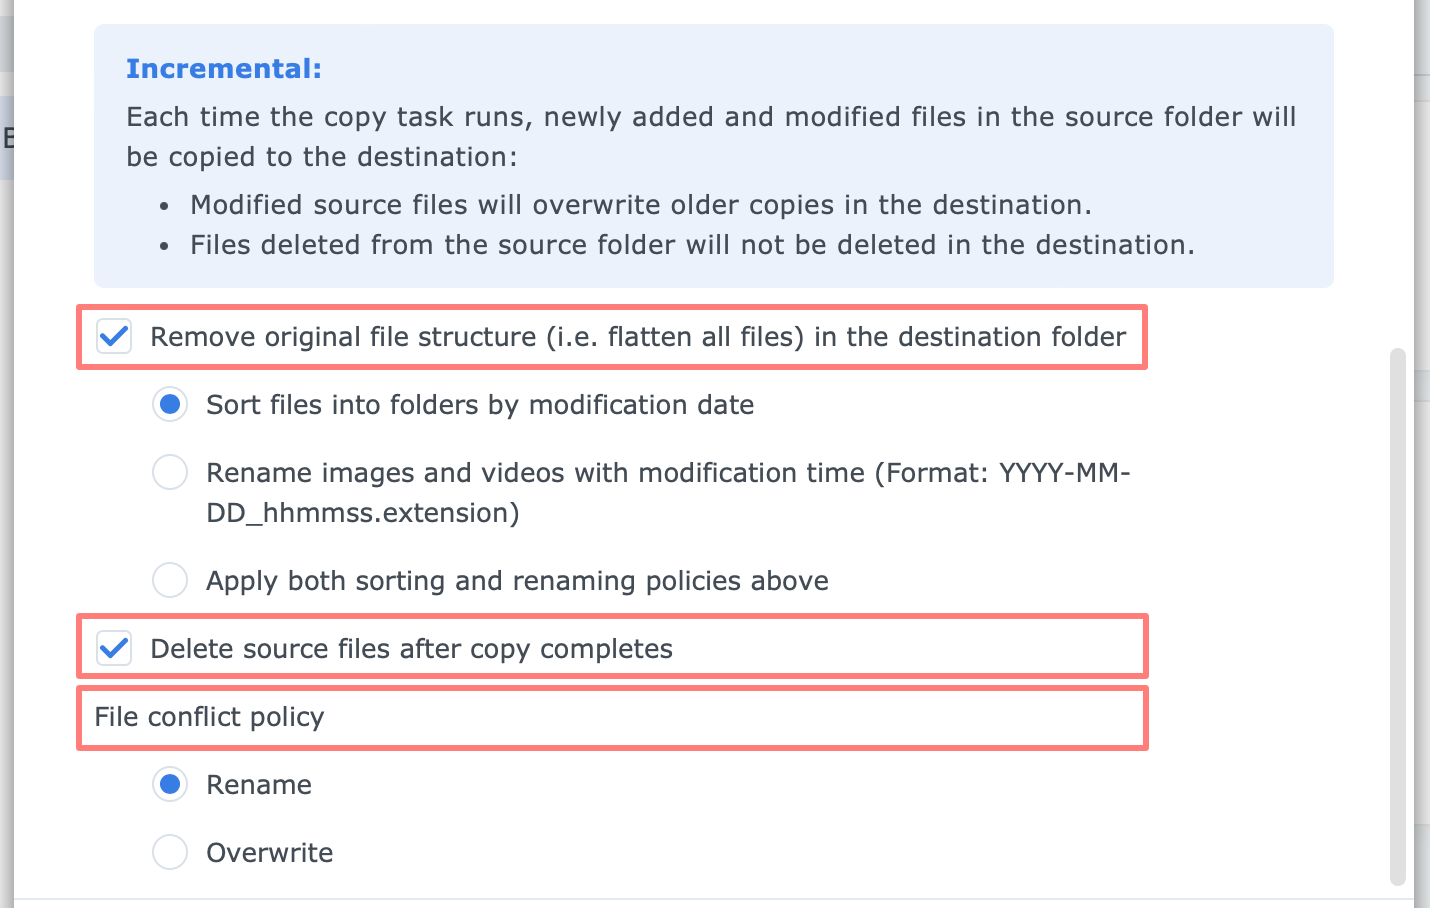
- Remove the original file structure in the destination folder
when on the source, the files are in several subfolders, and the files are copied to a single folder; when you enable these options, choose either one of the three sub-options (radio buttons)- Sort files into folders by modification data
- Rename images and video with modification time (YYYY-MM-DD-hhmmss.ext)
- Apply both sorting and renaming policies above
- Delete source files after the copy completes
- File conflict policy
this option is always active for either of the two sub-options- Rename
- Overwrite
With its extras, the incremental mode is very suitable for photo and video import. The Photo/Video Import task type always uses the incremental copy mode.
Triggers
In addition to creating tasks, you define triggers for each task. For the task types PVI/DI/DE triggers to start are when connected, scheduled, or both.
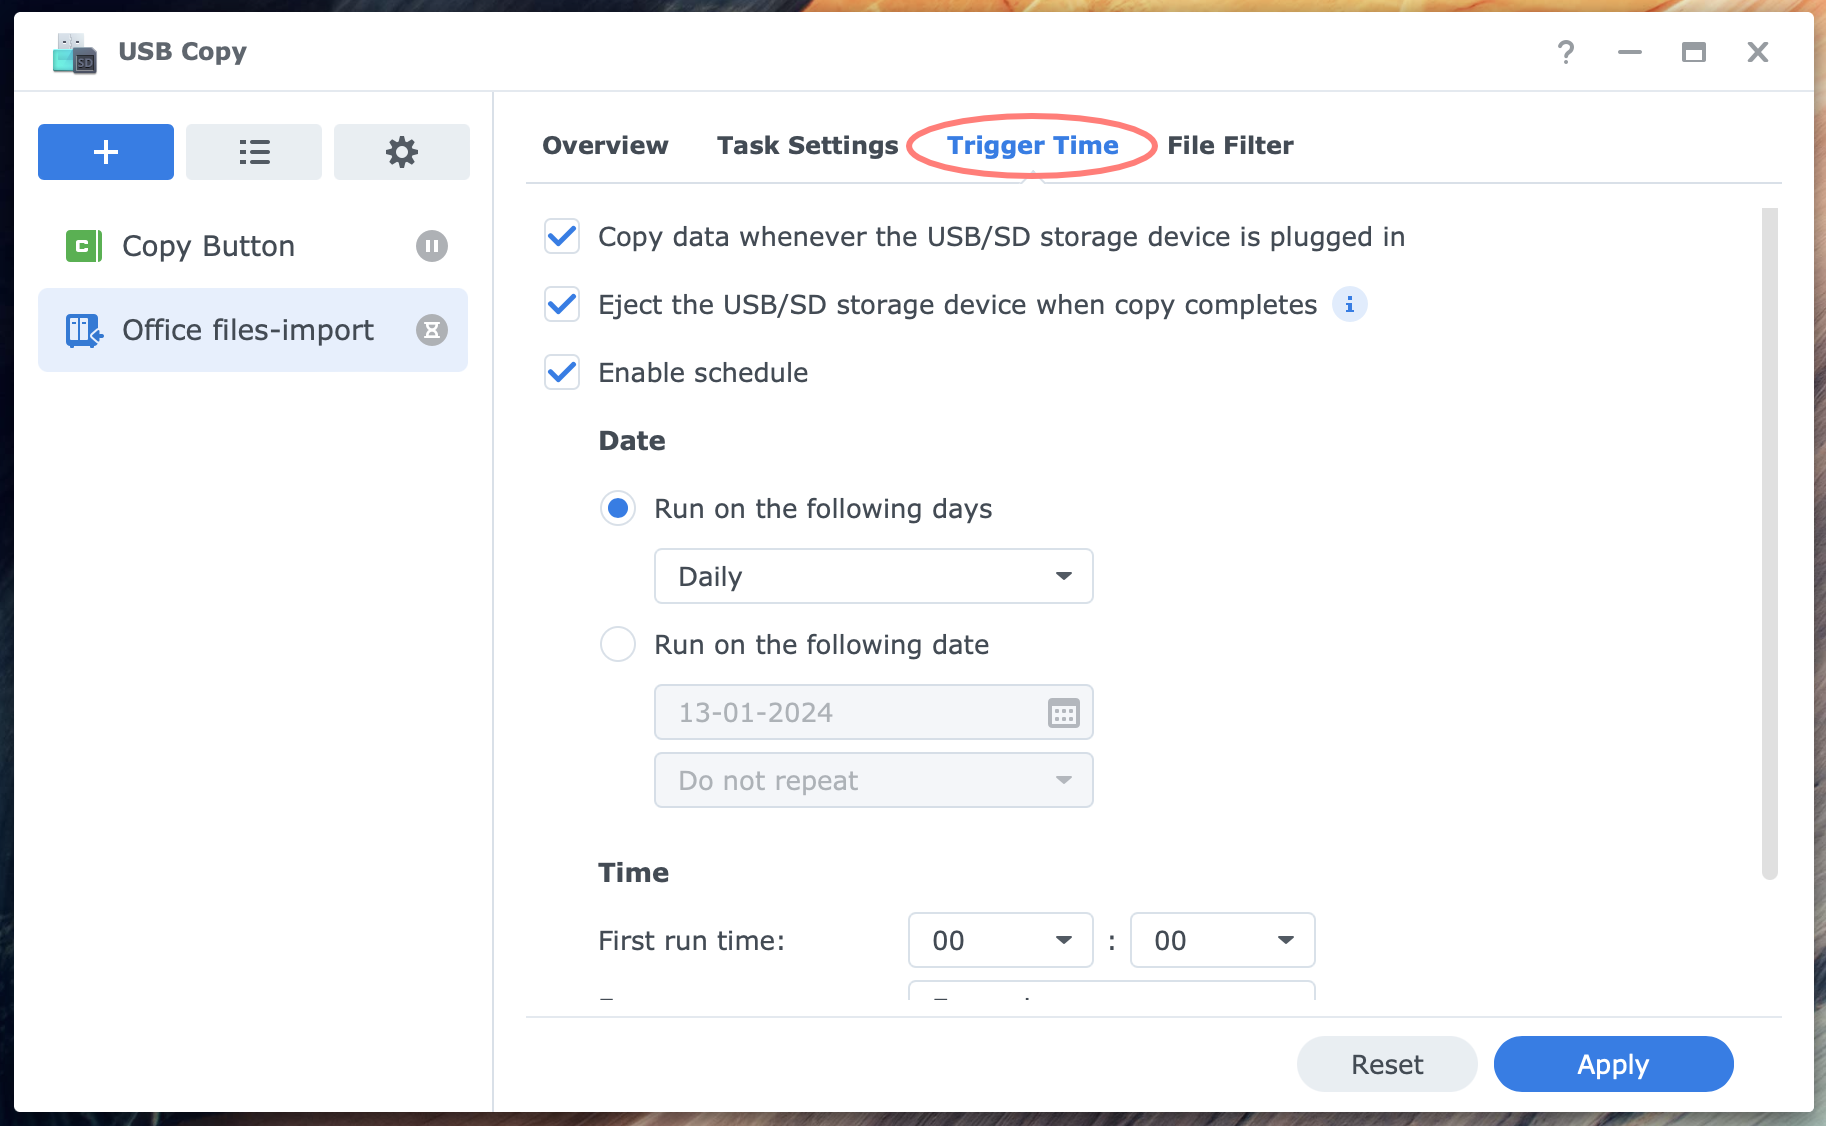
The Copy Button task does not have these triggers. It is the Copy button on the NAS that triggers the copy process. Note that the Copy button on the NAS can optionally start other tasks.
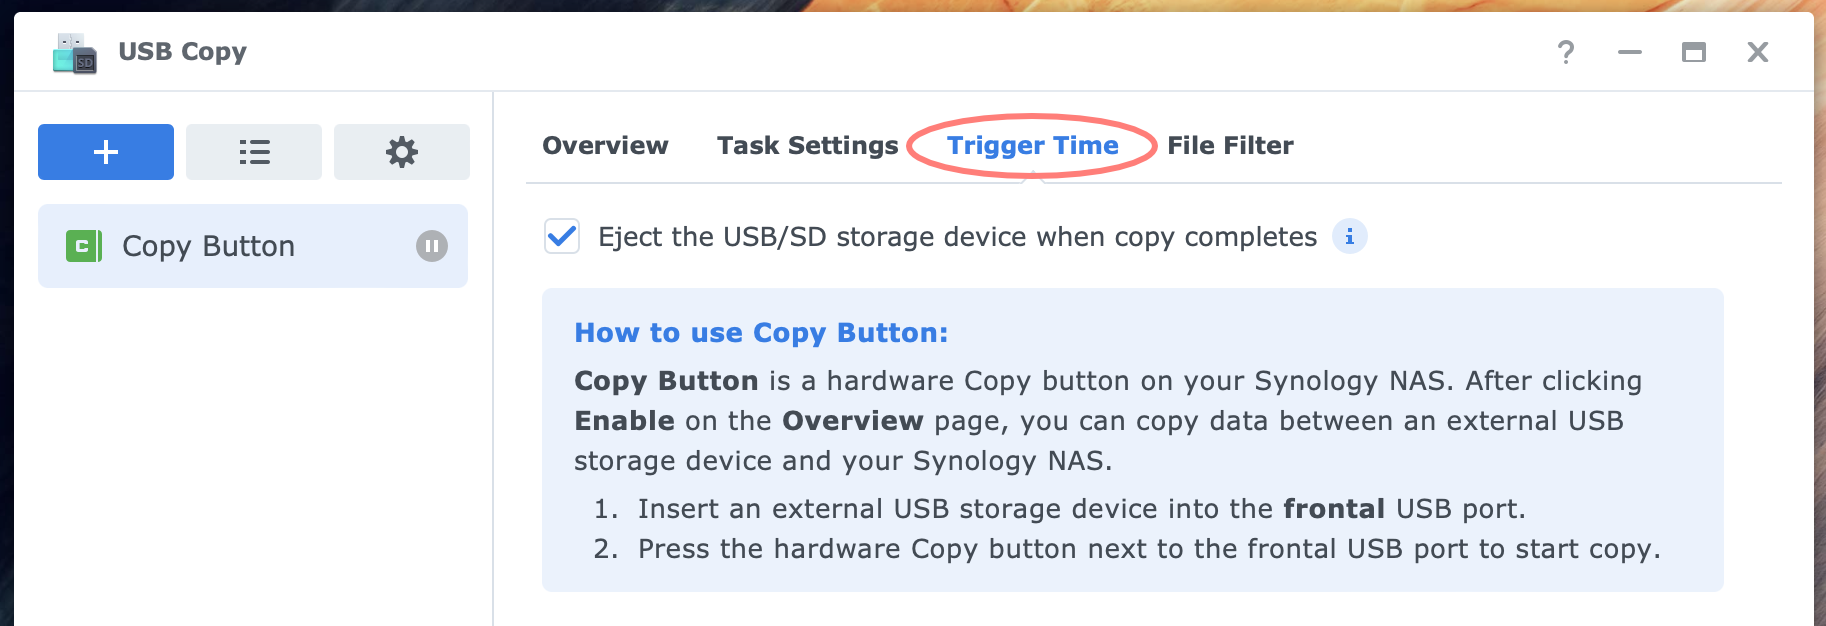
All task types can eject the USB disk when ready if you like.
Signals
The NAS can give visible and audible clues about the copy operation with USB Copy. A quote from the USB Copy application:
When you run a copy task, the hardware Copy button of your Synology NAS will continue to blink until the task ends (for models without this button, see the Power button or Status LED instead). You will also hear a beep at the beginning and end of the task if you have configured the beep setting in USB Copy.
On my DS923+, I get two beeps when the task starts, and the Status LED blinks alternating green-orange. I hear two beeps when the task ends, and the Status LED is continuously lit.
On my DS218+, a model with a Copy button, the button blinks during operation, not the Status LED.
File filter
You can use a filter in all task types to prevent certain file types from being copied.

Note that the Photo/Video Import task type has a predefined filter tailored for photo and video files. You can change this.
Discussing Task Types In Detail
At first glance, all the different task types are a bit overwhelming. Below, I discuss each type to help you decide which task is best for you.
Data Import (DI) task
A DI task mode is multi-versioned, mirroring, or incremental. You select the copy mode when you create the task. Afterward, you can not alter the mode but can configure its details.

Multi-versioned is the default for a DI task. After creating the task, you can change the backup rotation settings. Files and folders are stored in a folder at the destination location. The folder has a name like USB Copy_2023-12-27_144717, where you recognize the date and time.
The mirroring copy mode does not have any settings to configure. You are warned that files can be deleted on the destination when deleted on the source.
The incremental mode is similar to the mirroring mode, but no data is deleted at the destination. Changed files overwrite older versions.
After task creation, you can configure whether or not to remove the original file structure and file conflict policy.
Data Export (DE) task
A DE task mode is identical in features to the DI task, except that now the USB disk is the destination.
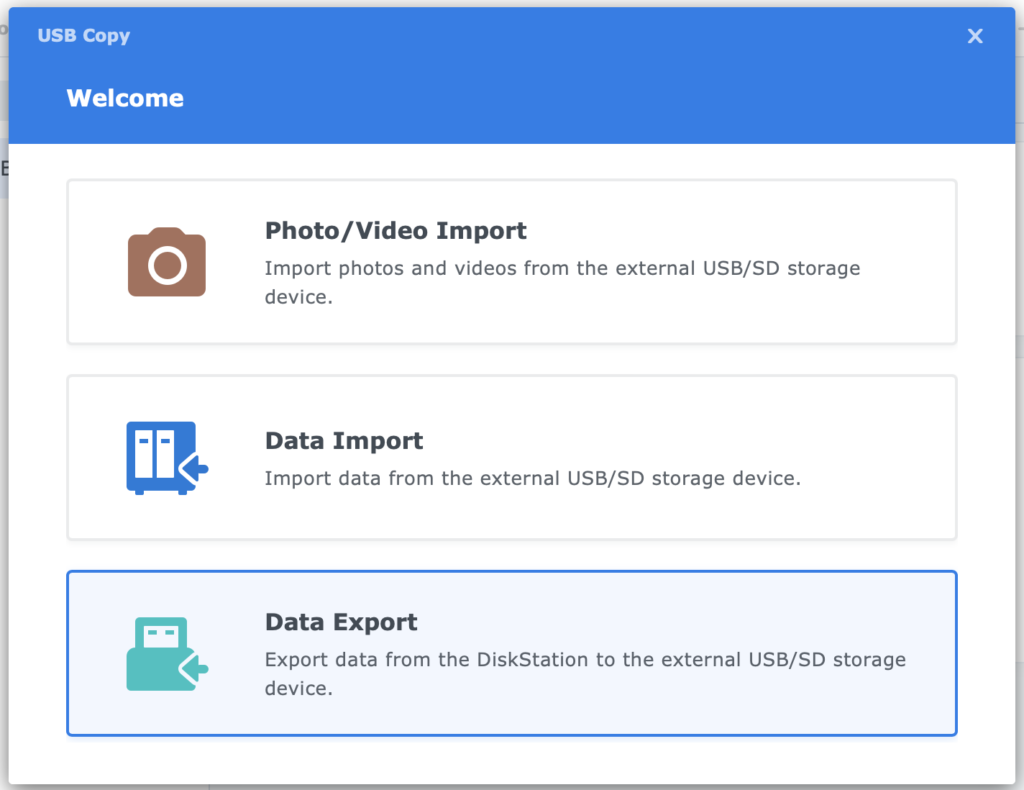
For all other aspects, please refer to the DI task.
Photo/Video Import (PVI) task
A PVI task‘s copy mode is incremental. The tasks start when on connect or scheduled. A PVI task differs from a DI task in looking for a DCIM folder for files and skips the rest. As with other task types, you can filter on file type. By default, only image and video types are enabled in the filter.
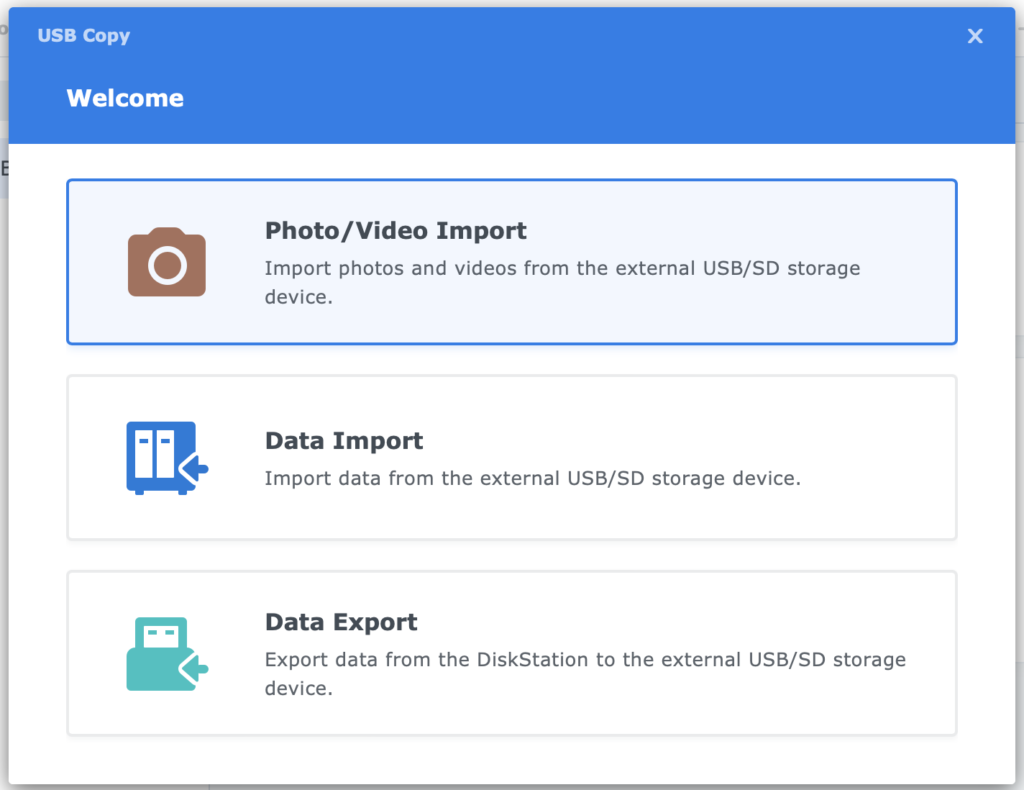
Comments during the creation of the task:
- Files will be sorted into folders by modification date
- Files will be renamed with the modification time (Format: YYYY-MM-DD_hhmmss.extension)
In my experience, the renaming does not work correctly. Please test with your hardware.
After you created the PVI task, you can run the task or go to:
- Task Settings
to fine-tune the copy mode under the Advanced Settings button, like sorting and renaming - Trigger Time
to configure a schedule - File Filter
to tweak the default filter
With a PVI task, you can import other file formats from the entire source disk, but you must configure the file filter.
Copy Button (CB) task
I discuss this task in a separate chapter below.
The Copy Button
Some DiskStation models have a hardware Copy button. This button works with the USB Copy application, the USB port next to the button in general, and the Copy Button task.
Supported models
You typically find the Copy button on 2-bay DS models in the Plus and Value series. Some examples are:
- DS211 – 212 – 213 – 216 – 218 – 223
- DS214play
- DS210+ – 211+ – 212+ – 213+ – 216+/216+II – 218+ – 220+ – 224+
- DS710+ – 712+ – 713+ – 716+/716+II – 718+ (not on DS720+ and later)
On these models, USB Copy may be installed by default.
Note that a front USB port without the Copy button exists in many models, typically 2- to 5-bay models in the Plus series, 2- and 4-bay in the Value series, and a 4-bay in the J series. This section does not apply to these models.
Copy button task
A Copy Button task is automatically created in the USB Copy application on the supported models with a Copy button. You can not change the name of this particular task or delete it. You can turn the task on and off. By default, it is disabled.
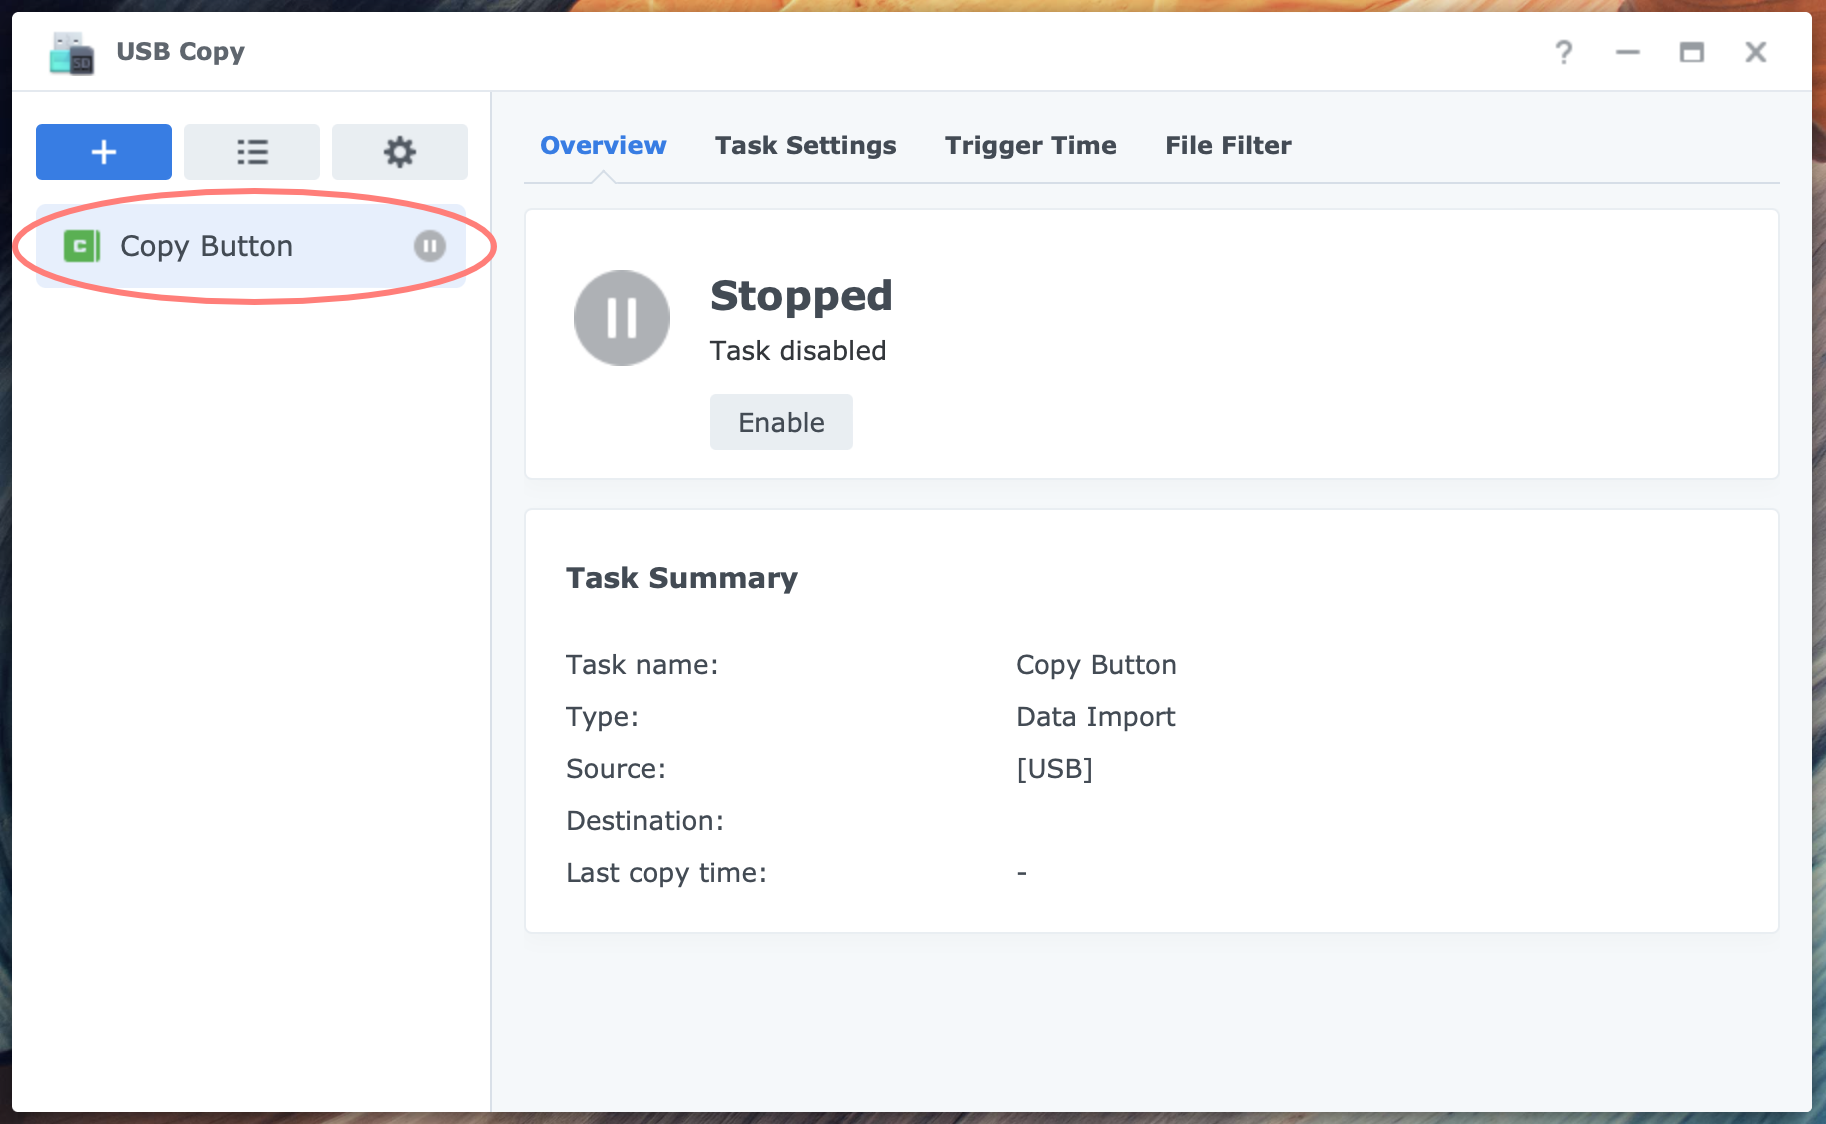
This is the only task you can configure without mounting an external storage device because it does not care. The Copy Button task accepts any USB disk in the front USB port.
This contrasts with other task types, DI/DE/PVI, where you define a specific source and destination. The task will not run with another USB disk as a source.
The task is a Data Import task type, and the copy mode is multi-versioned. Start the task with the Copy button or with USB Copy > Run button. There is no schedule or start on insert. For the task to work, please select the destination folder (Task Settings tab) and enable it (Overview tab).
When you insert the USB device next to the Copy button at the front of the NAS, a green LED lights up when the USB device is mounted. Press the Copy button with the green C. It beeps twice (start), the green light flashes (running), again two beeps (end), and the light goes out, meaning that the USB device is ejected, according to the definition in the task.
Because this task is multi-versioned, it creates a folder like USB Copy_2023-12-27_144717 (format: YYYY-MM-DD_hhmmss) in the destination folder during each run. That folder contains the entire USB device, or a filtering selection applies.
The Copy Button as a trigger in general
Any USB disk linked to another task as the source you may insert in any USB port, front or back. The task trigger (scheduled, auto start on insert) will work, and the Copy button will also trigger the task for each USB stick.
To summarize, put the stick for the Copy Button task in the front port to trigger the task (or trigger from DSM). For any other task, it does not matter which port you use to start the task manually; the Copy button works when the Copy Button task is disabled.
SD Card And Card Reader
There is a difference between how Control Panel and USB Copy identify a card plus card reader combination. Control Panel identifies the reader and USB Copy the card.
Control Panel displays the shared folder name as it was configured. The name goes with the reader.
USB Copy identifies the card, independent from the card reader you use. Card identification is relevant as this is what USB Copy uses to run the proper task linked to the card. Renaming the shared folder name of a card reader does not affect USB Copy as it identifies the card, not the reader.
The disadvantage of card identification from USB Copy is that if you change cards, the Photo/Video Import task will not run as the card is different. Most photographers use multiple cards. You could create a task for each card you have but can not assign the same destination to other tasks.
This limitation of USB Copy makes it challenging to use it in a workflow with multiple cards unless you create a different destination folder for each card.
Tip
When you use a card with a card reader, insert the card in the reader first. Next, connect the card with the reader combination into the NAS. If you connect the reader first and insert the card second, the card may not be readable by the NAS.
Maintenance
From a maintenance perspective, there are a few items to pay attention to, like the database and backing it up, logging, and notification.
Database and backup
USB Copy keeps track of all actions in a database. When uninstalling USB Copy, you can optionally clear the database. With Hyper Backup, you can back up the database. Go to the Applications tab and select USB Copy in the backup task.
Logging and notification
There is a log in the USB Copy application and notifications as configured in Control Panel.

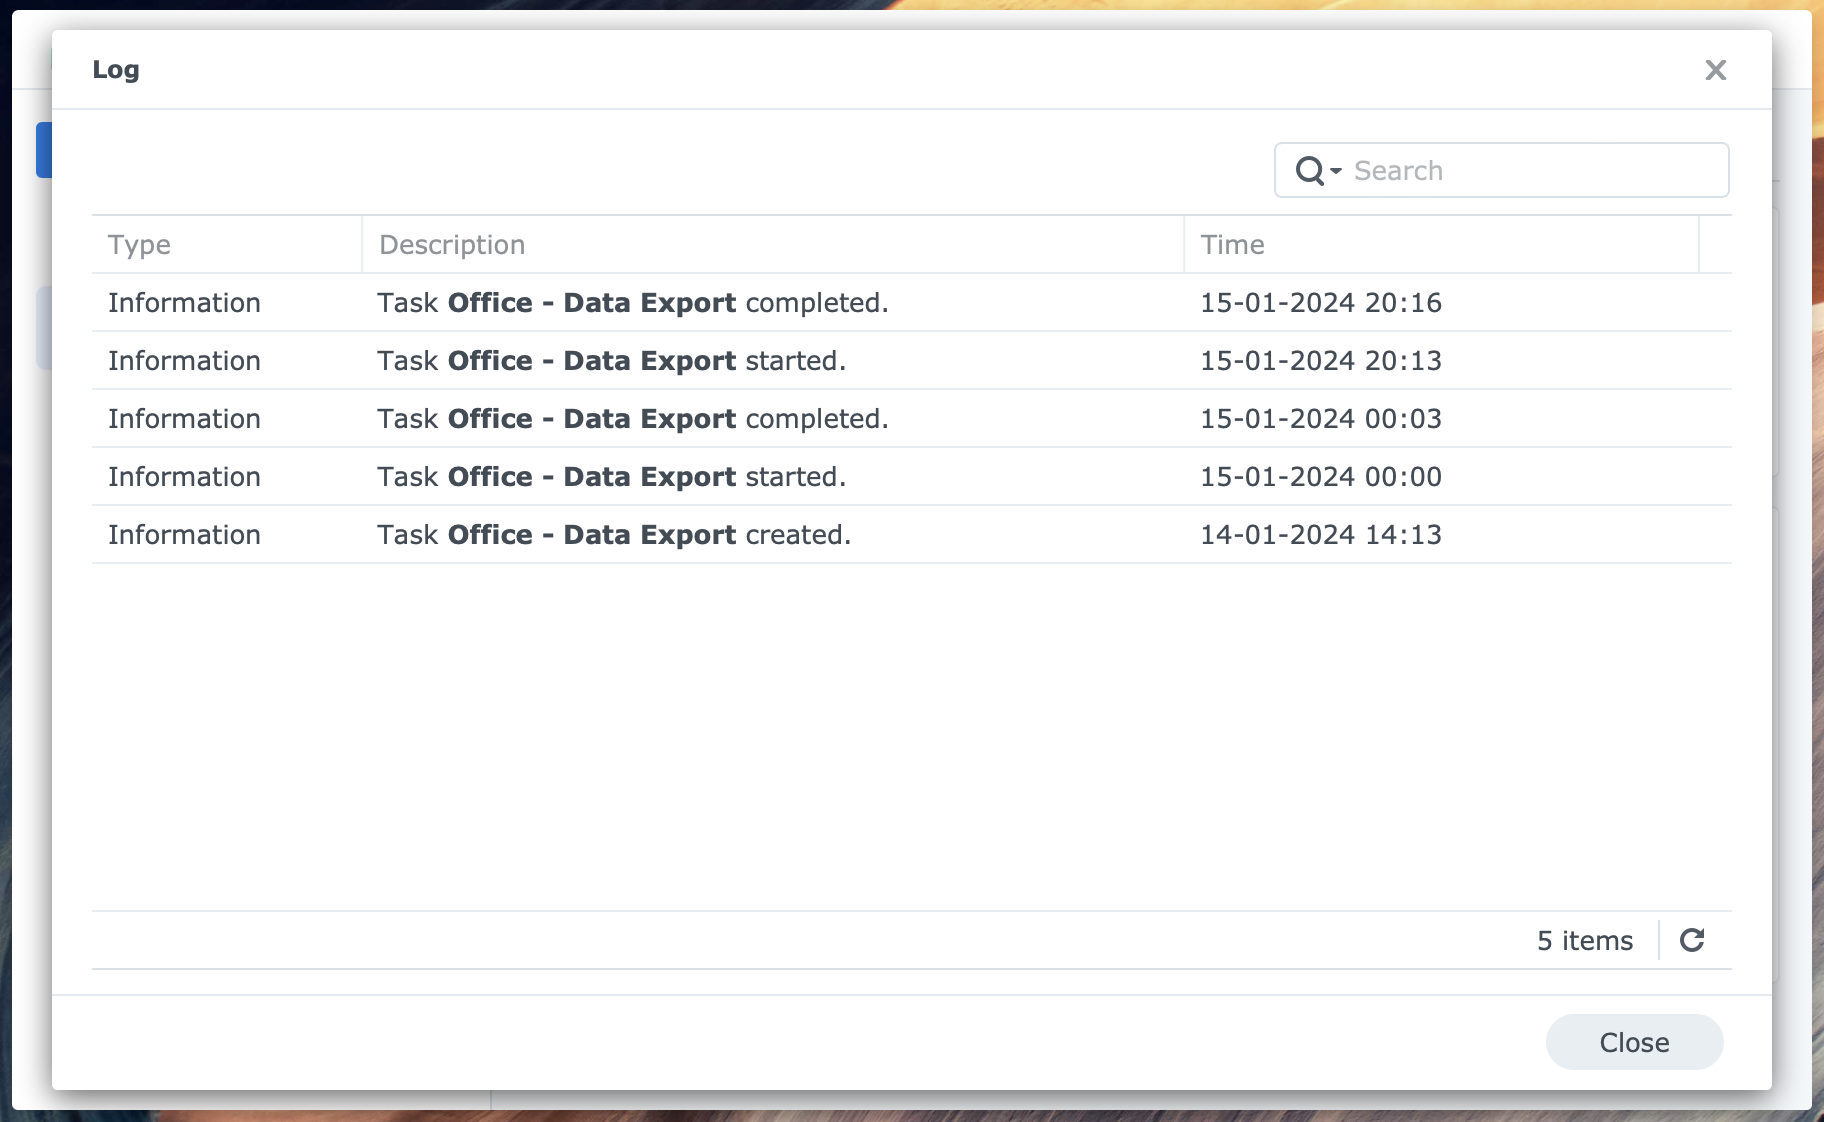
To review the log, click on the Log button in USB Copy. The log records events like when a task starts and is completed.
You get notifications in your email or via text on your phone.
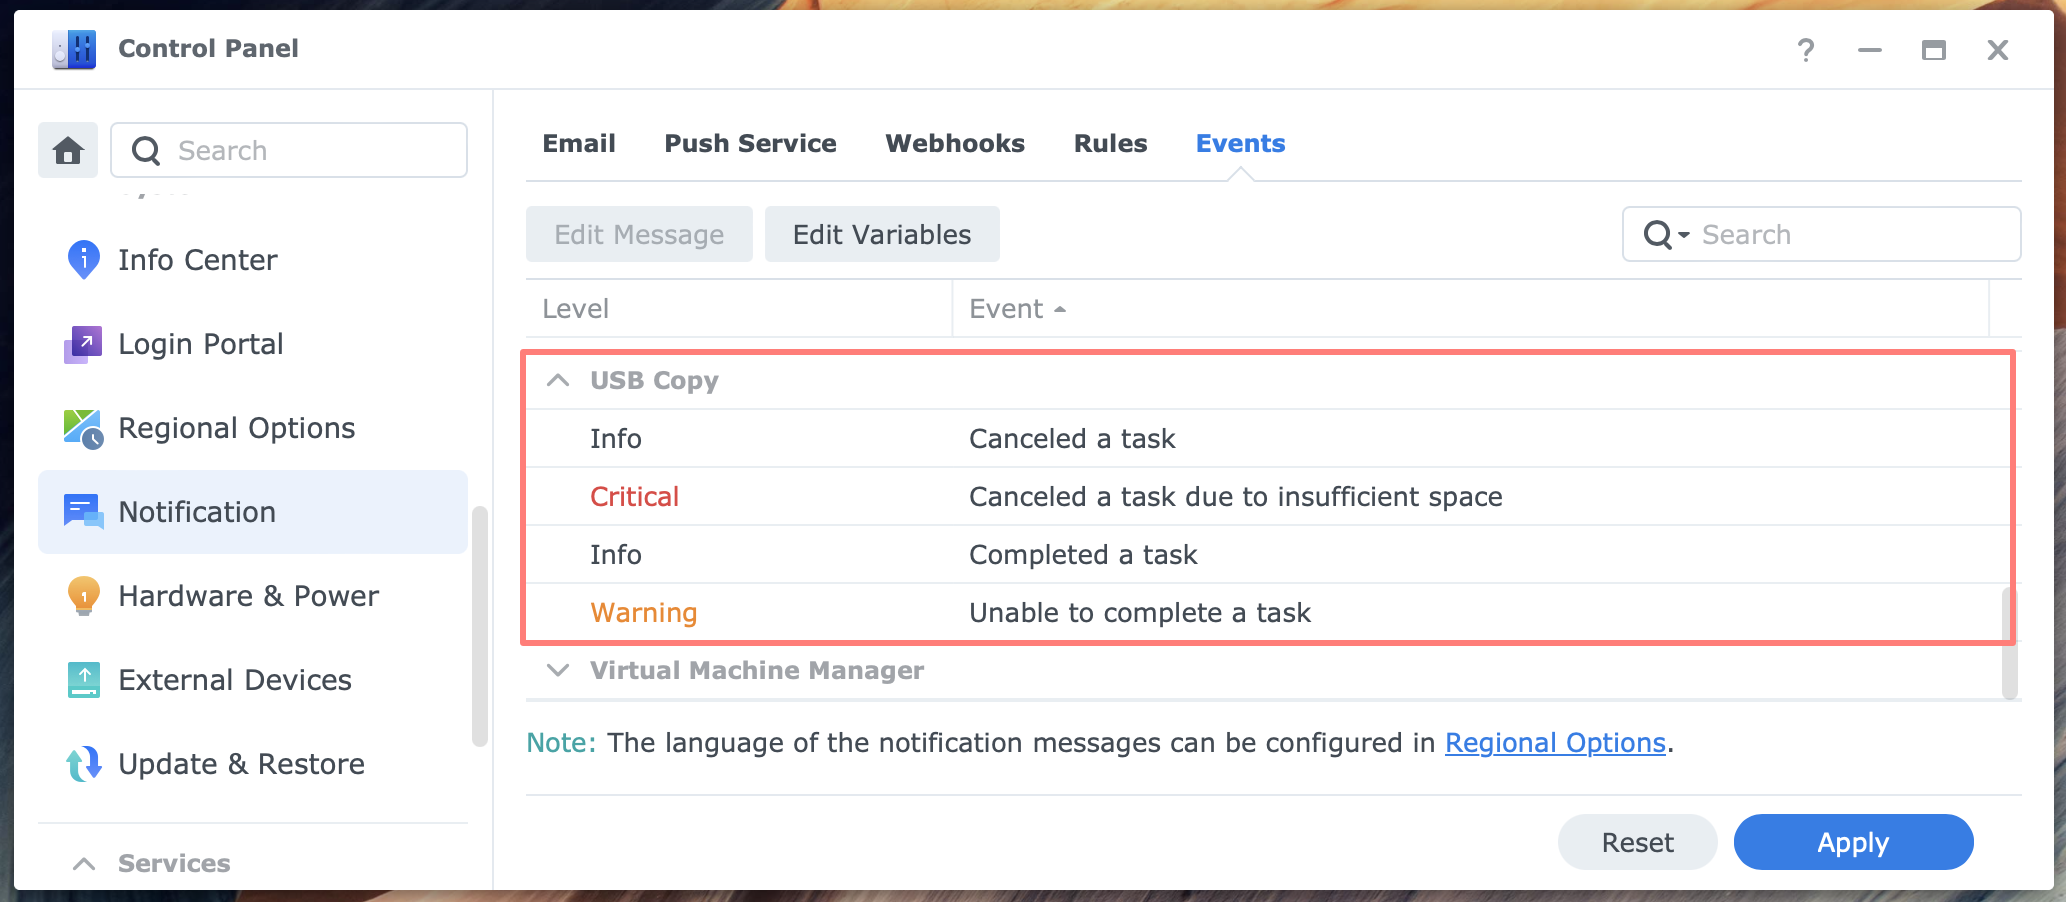
In Control Panel > Notification > Events tab, you see the USB Copy events you receive notifications for.
Thanks for reading
This post is donation-ware, and I made it to help you. Please consider leaving a comment or even buying me a coffee if it did. I will be eternally grateful.
Paul Steunebrink / Storage Alchemist

Is there a way to reorder the tasks list?
Example, added ‘Restore’ jobs to recover. Now, ‘Backup’ jobs appear at the bottom as I create them.
Not ideal.
Hi Yur,
There is indeed no option to change the order of tasks. I assume that your wish to reorder is esthetically and not functionally since each task has its own trigger?
Best regards,
Paul Steunebrink / Storage Alchemist
I know this is all contingent on how the data is structured within folders and laid out on the array. Curious though if there is a way to create a backup to multiple usb drives when the array volume is significantly larger than the backup usb device? If now, what tools are available to do this? I have some ideas, but do not necessarily wish to recreate the wheel if not necessary. thanks!
Hi Damon,
If I had to use USB Copy where the total amount of data exceeds the capacity of each of the USB storage devices, I would create multiple tasks, divide the data over the different tasks and link each task to another USB disk. Perhaps you will find a different solution.
Best, Paul Steunebrink / Storage Alchemist
Hello, my external disk is running out of space, so <i bought a bigger disk, How can I copy the data from usb1 to usb2?
Hi Bertin, you could copy the data from one USB disk to another with File Station. Right-click the source parent folder and select the Copy to/Move to > Copy to command and select the destination.
Best regards, Paul Steunebrink / Storage Alchemist
Super-helpful explanations. Thanks for taking the time to share your learnings in plain language. There’s nothing inherently complex about all this Synology stuff, but the distillation helped me save a lot of time.
Thanks Jim, good to hear it helped you. Enjoy your Synology.
Best regards, Paul Steunebrink / Storage Alchemist