Synchronization means that when the source changes, the destination changes accordingly. That includes deleting files. Shared Folder Sync does just that for shared folders between two Synology NASs. In using shared folder sync you learn how to set this up.
Using Shared Folder Sync
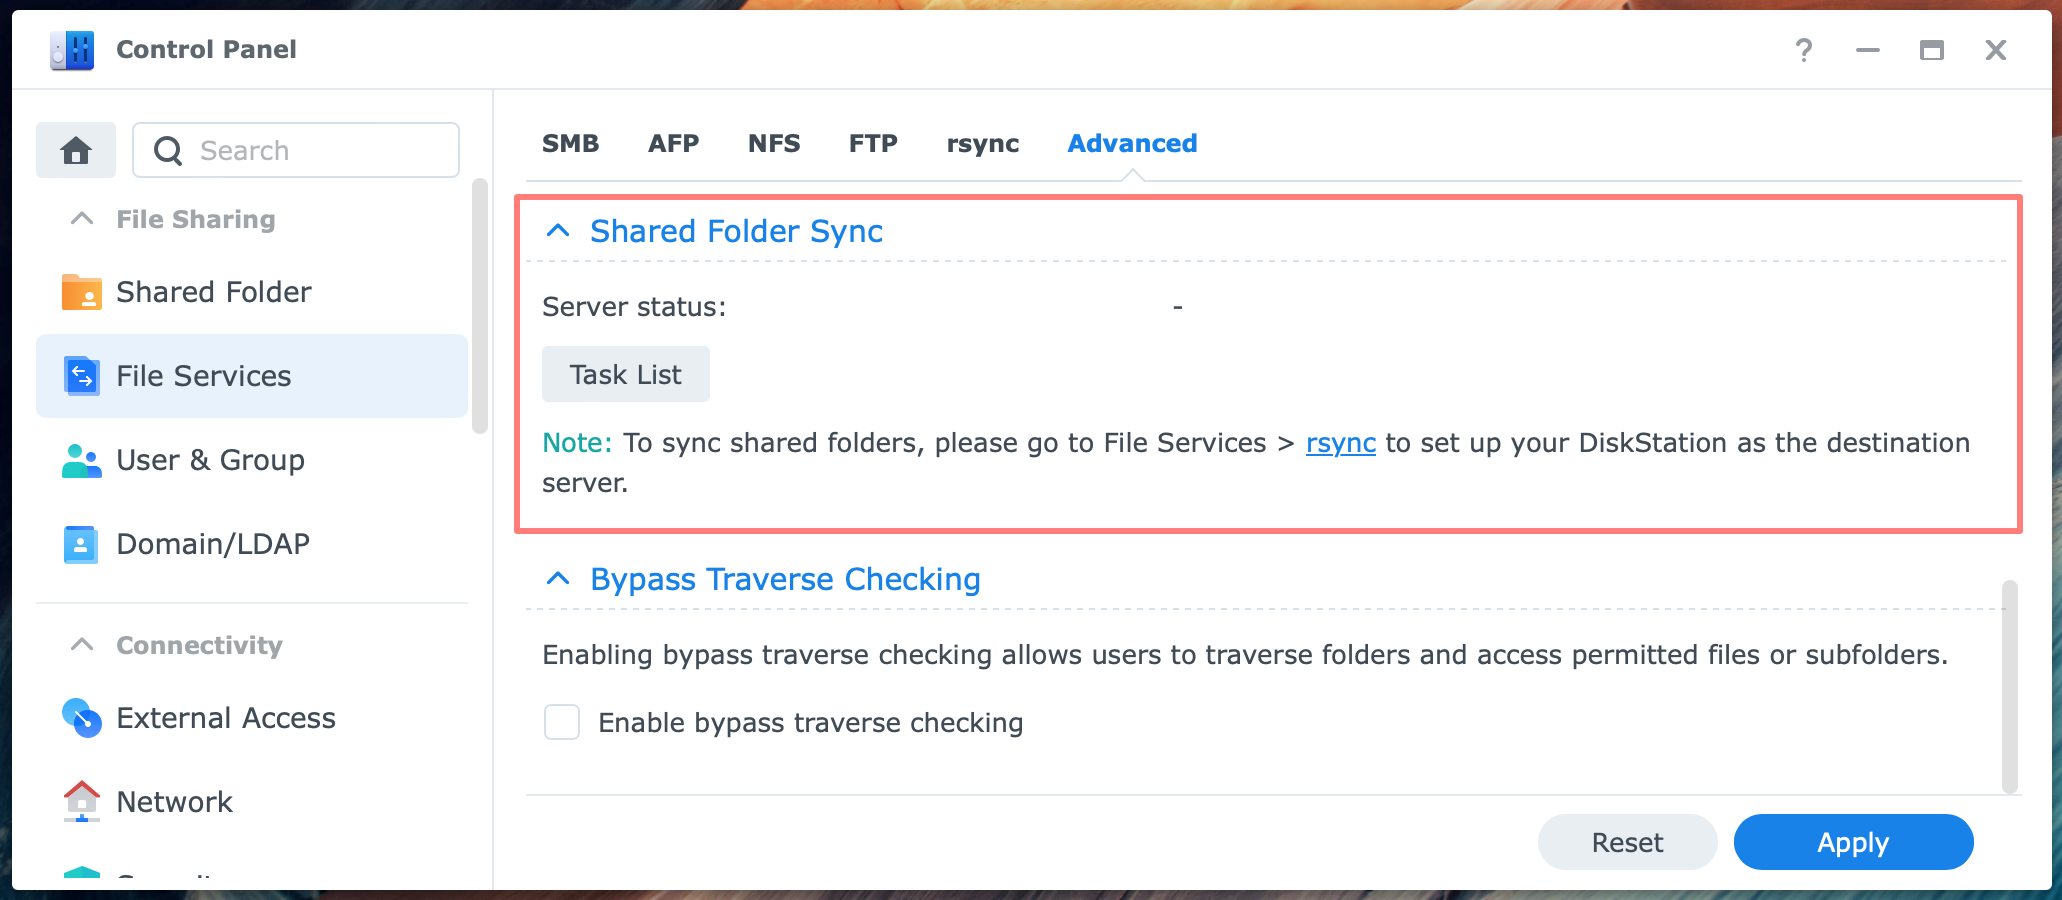
Shared Folder Sync synchronizes selected shared folders from one Synology NAS to another. It does not work with other brand NAS devices. Shared Folder Sync uses the rsync file service. It is a user-friendly Synology-made implementation of the Unix/Linux rsync synchronization feature.
No backup
Shared Folder Sync is not a backup. Although you make a copy, you are not protected against accidental deletions or ransomware attacks and have no revision history. It creates an exact copy of a shared folder and its contents on the destination NAS in a readable format.
However, you can use Shared Folder Sync in your 3-2-1 backup strategy. In addition to a Hyper Backup backup, you could make a copy with Shared Folder Sync to another NAS in another location.
Use case
I find Shared Folder Sync helpful in copying data from selected shared folders to a new NAS. The advantage of this method is that during the synchronization, the old NAS remains in service while all data is transferred. Next, I deny all users access to the old NAS and let the last files sync. When all synchronization finishes, I let the users connect to the new NAS to continue working where they left off.
A typical scenario for using Shared Folder Sync is to have a second NAS ready for use in case the primary NAS fails. This is a medium-availability solution.
According to Synology, shared folder synchronization is for data that does not change often, such as cold storage.
Alternatives
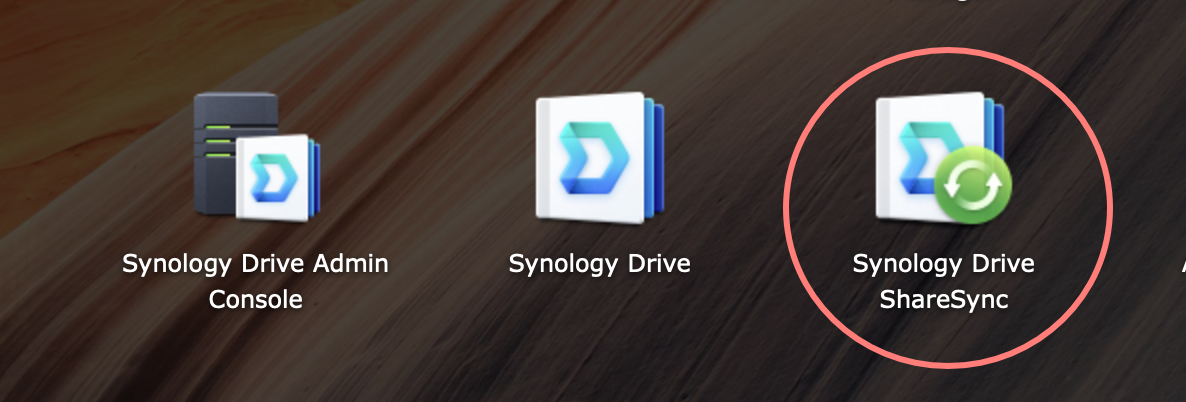
If you need a two-way sync, synchronization with versioning, subfolder selection, file filters, or different directions of one-way sync, look at Synology Drive ShareSync.
Limitations
Please note that Shared Folder Sync has some limitations. Let’s compare it with Synology Drive ShareSync, an alternative solution.
No volume selection
With Shared Folder Sync, you can not select the volume on the destination NAS where it creates the shared folder. Shared Folder Sync will save the shared folder and data on volume 1 if the destination has multiple volumes.
With Synology Drive ShareSync, you select a predefined shared folder, which gives you control over the volume on the destination NAS.
No progress bar
As with many sync solutions, Shared Folder Sync does not have a progress bar and offers limited options for monitoring and troubleshooting. However, Synology Drive ShareSync does have some monitoring with a log.
No subfolder selection
When you sync a shared folder with Shared Folder Sync, all its subfolders and files are synchronized. With Synology Drive ShareSync, you can (de)select subfolders to sync.
No two-way sync
Shared Folder Sync is a one-way sync only. For a two-way sync, use Synology Drive ShareSync.
No access during sync
On the destination NAS, Shared Folder Sync automatically creates the shared folder on the first sync, but users can not access that shared folder due to Advanced Share Permissions.
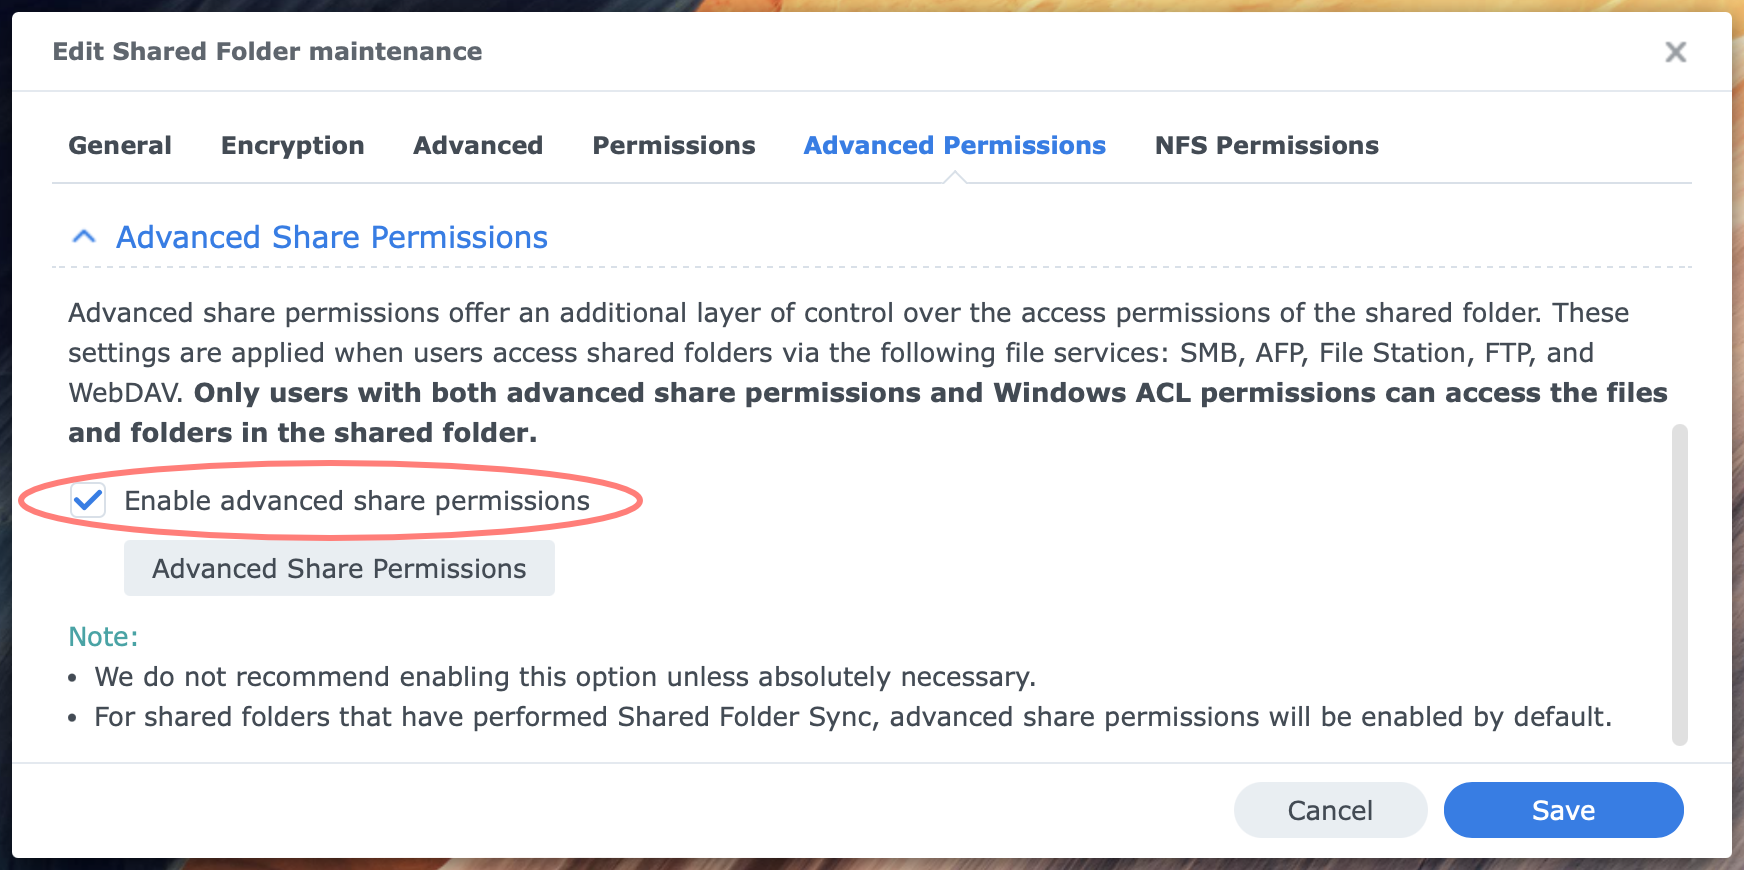
If you want to use the synced shared folders on the destination NAS, for example, after synchronization finishes, disable the Advanced Share Permissions first in the Control Panel. With Synology Drive ShareSync, you can use the synced folder, and it can sync changes back to the other NAS.
No versioning
With Shared Folder Sync, there is no versioning. Synology Drive ShareSync, however, supports versioning and a retention policy.
To summarize, Shared Folder Sync is a rather essential tool, but that is also its beauty: it has no unnecessary bells and whistles. Which of the two solutions mentioned is the best depends on the situation.
Installation
The installation takes place on the destination NAS. No software package installation is required, as the feature is built into the DSM software. You enable the rsync service and create a dedicated user account for the Shared Folder Sync service.
Encryption
File transfer with rsync can be encrypted or not. Encryption is recommended for transfers over the Internet, but either option will do for synchronization over the local network.
The decision to encrypt a task or not is made later at the source NAS, but you configure the network port at the destination NAS.
Review the status
Before you enable rsync, review the current status of the Shared Folder Sync service.
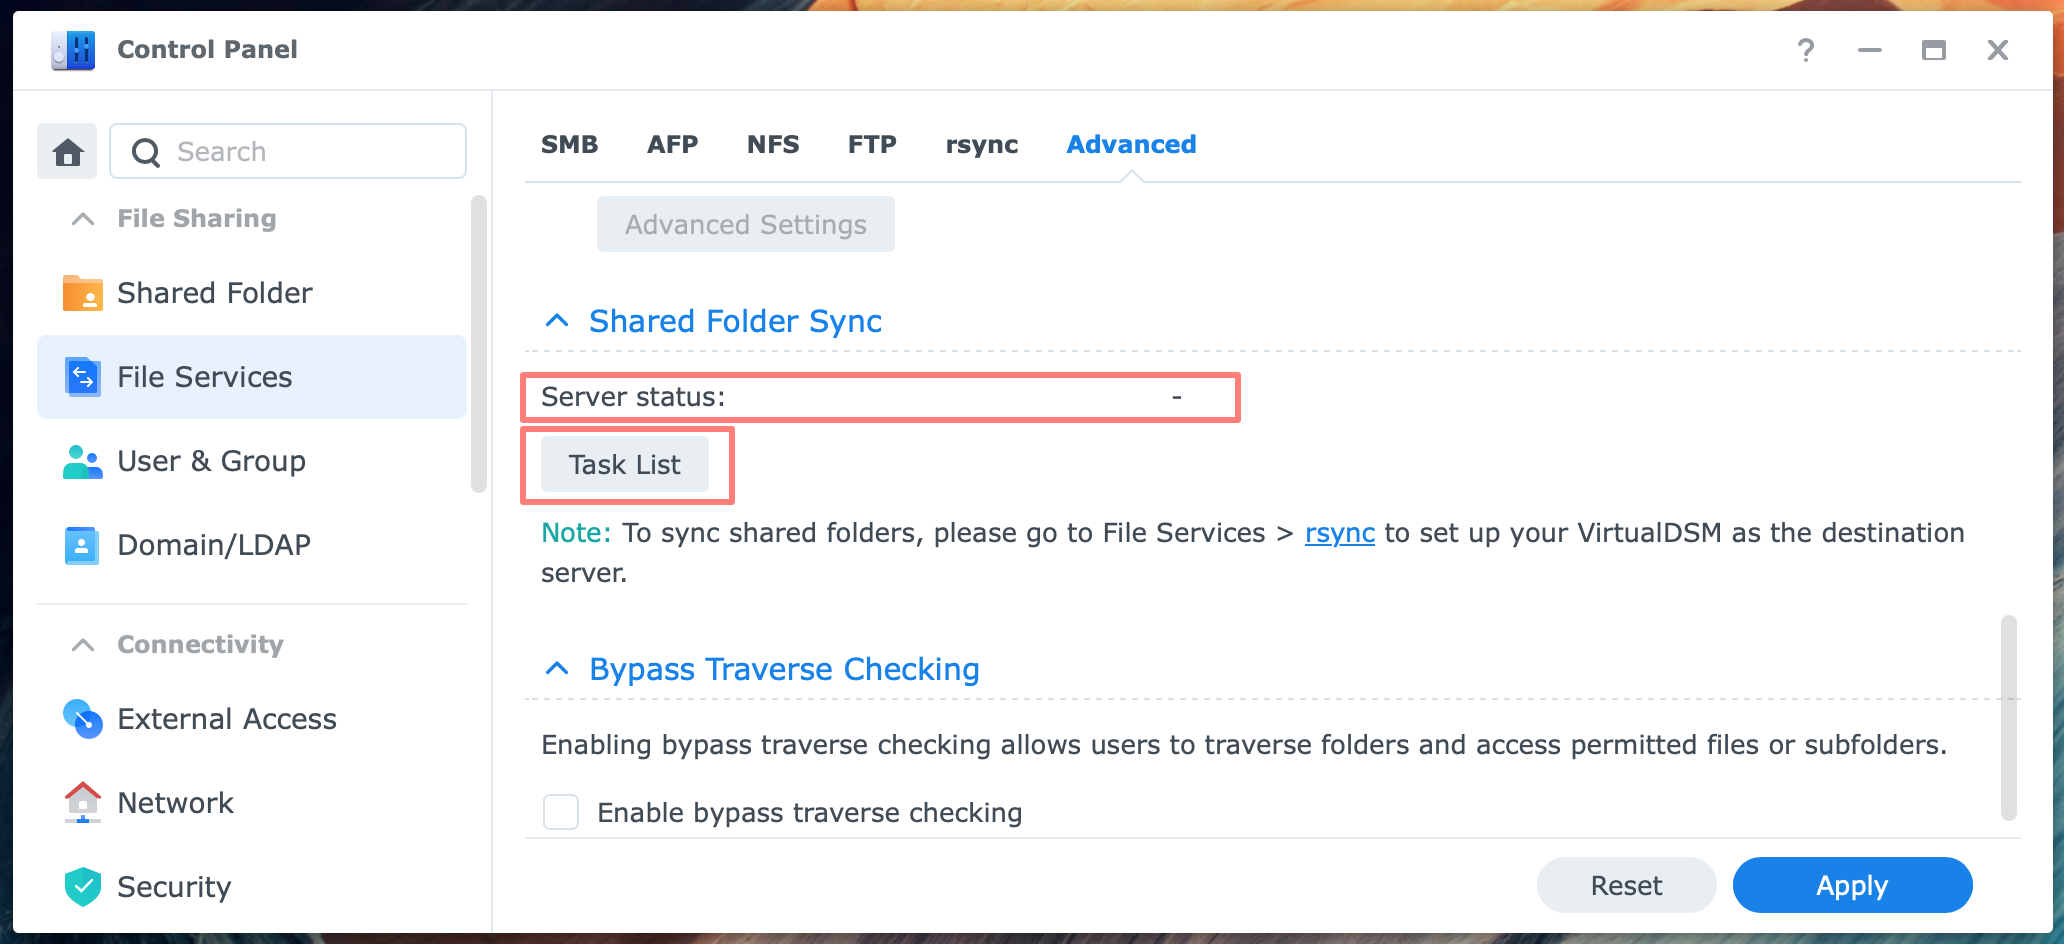
Log in to DSM at the destination NAS with administrative privileges. Open Control Panel > File Services > Advanced tab > Shared Folder Sync. Notice the Task List button and that no Server status is displayed. This indicates that rsync and Shared Folder Sync are not configured.
If there is also a Connection List button, rsync is already enabled on the NAS.
Enable rsync
Open Control Panel > File Services > Rsync tab. Enable the rsync file service, and click Apply. Do not configure any rsync account here.
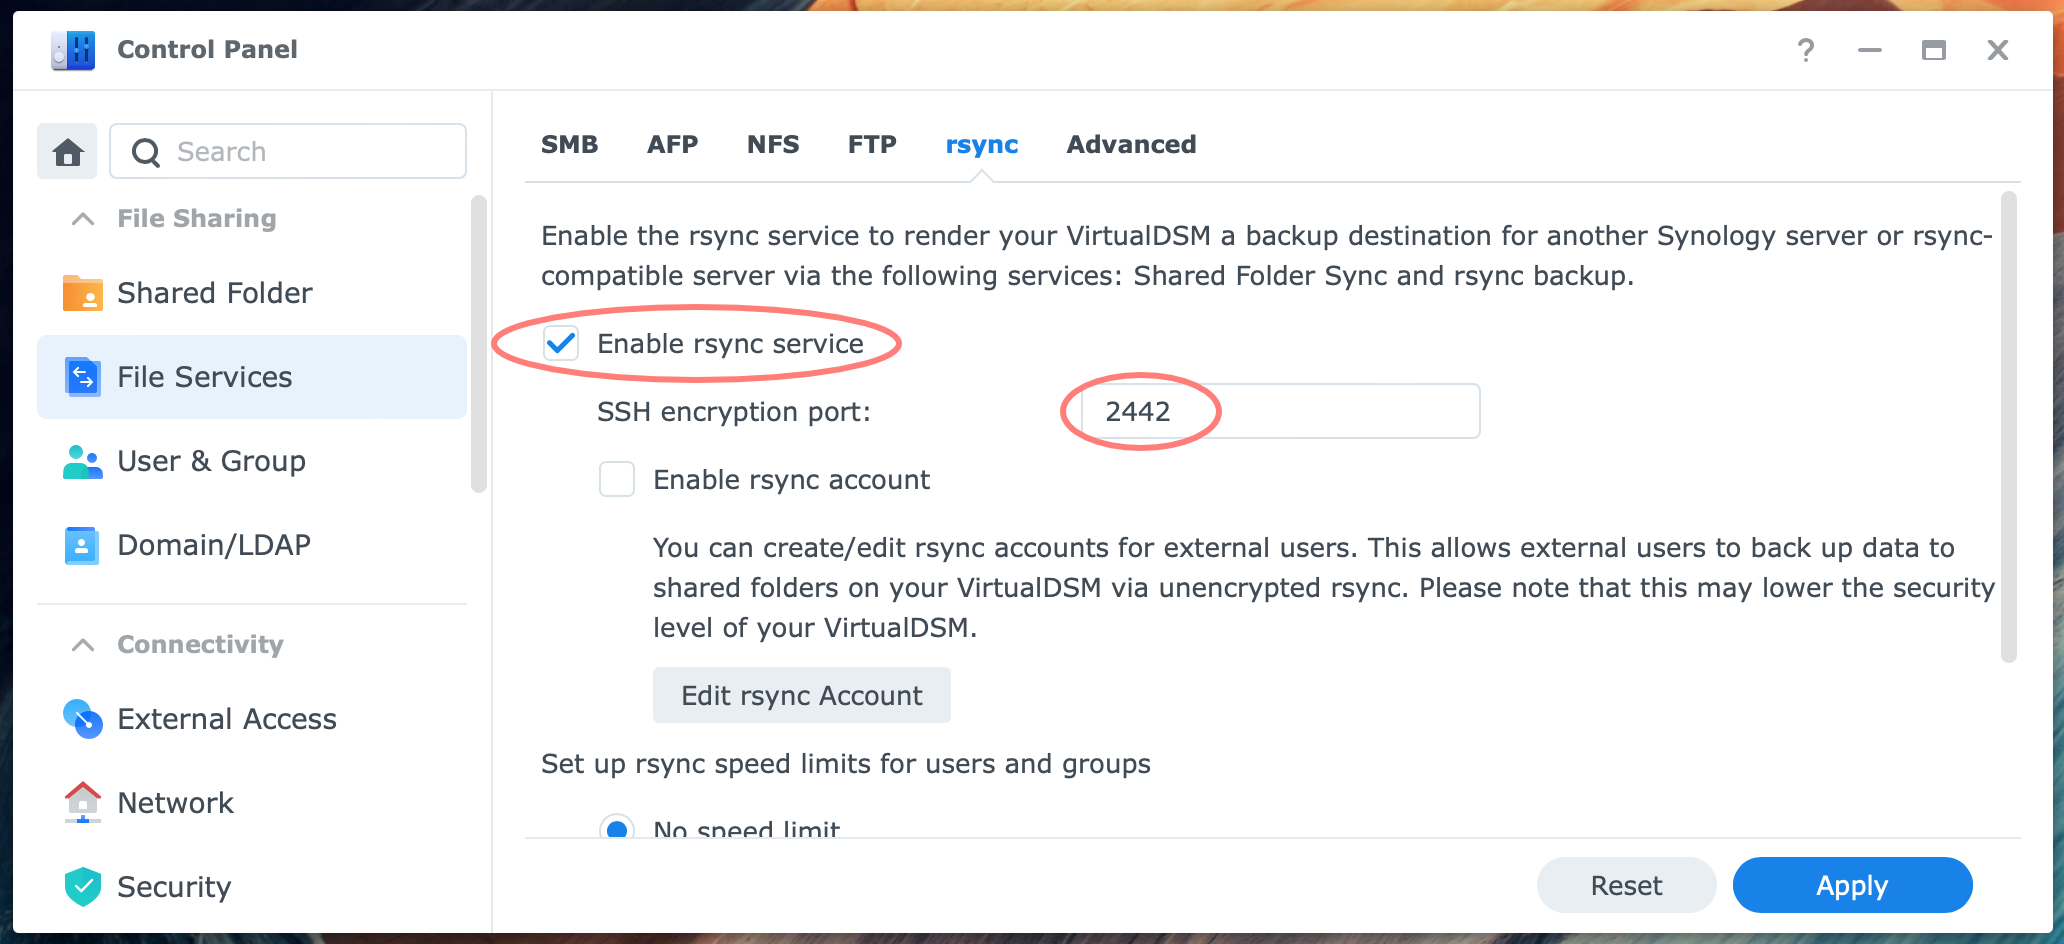
Notice the SSH encryption port. The default is 22. I suggest never using port 22, as this is the default port for maintenance through SSH. Instead, use an alternative port, like 2442. Remember the port number as you need it later.
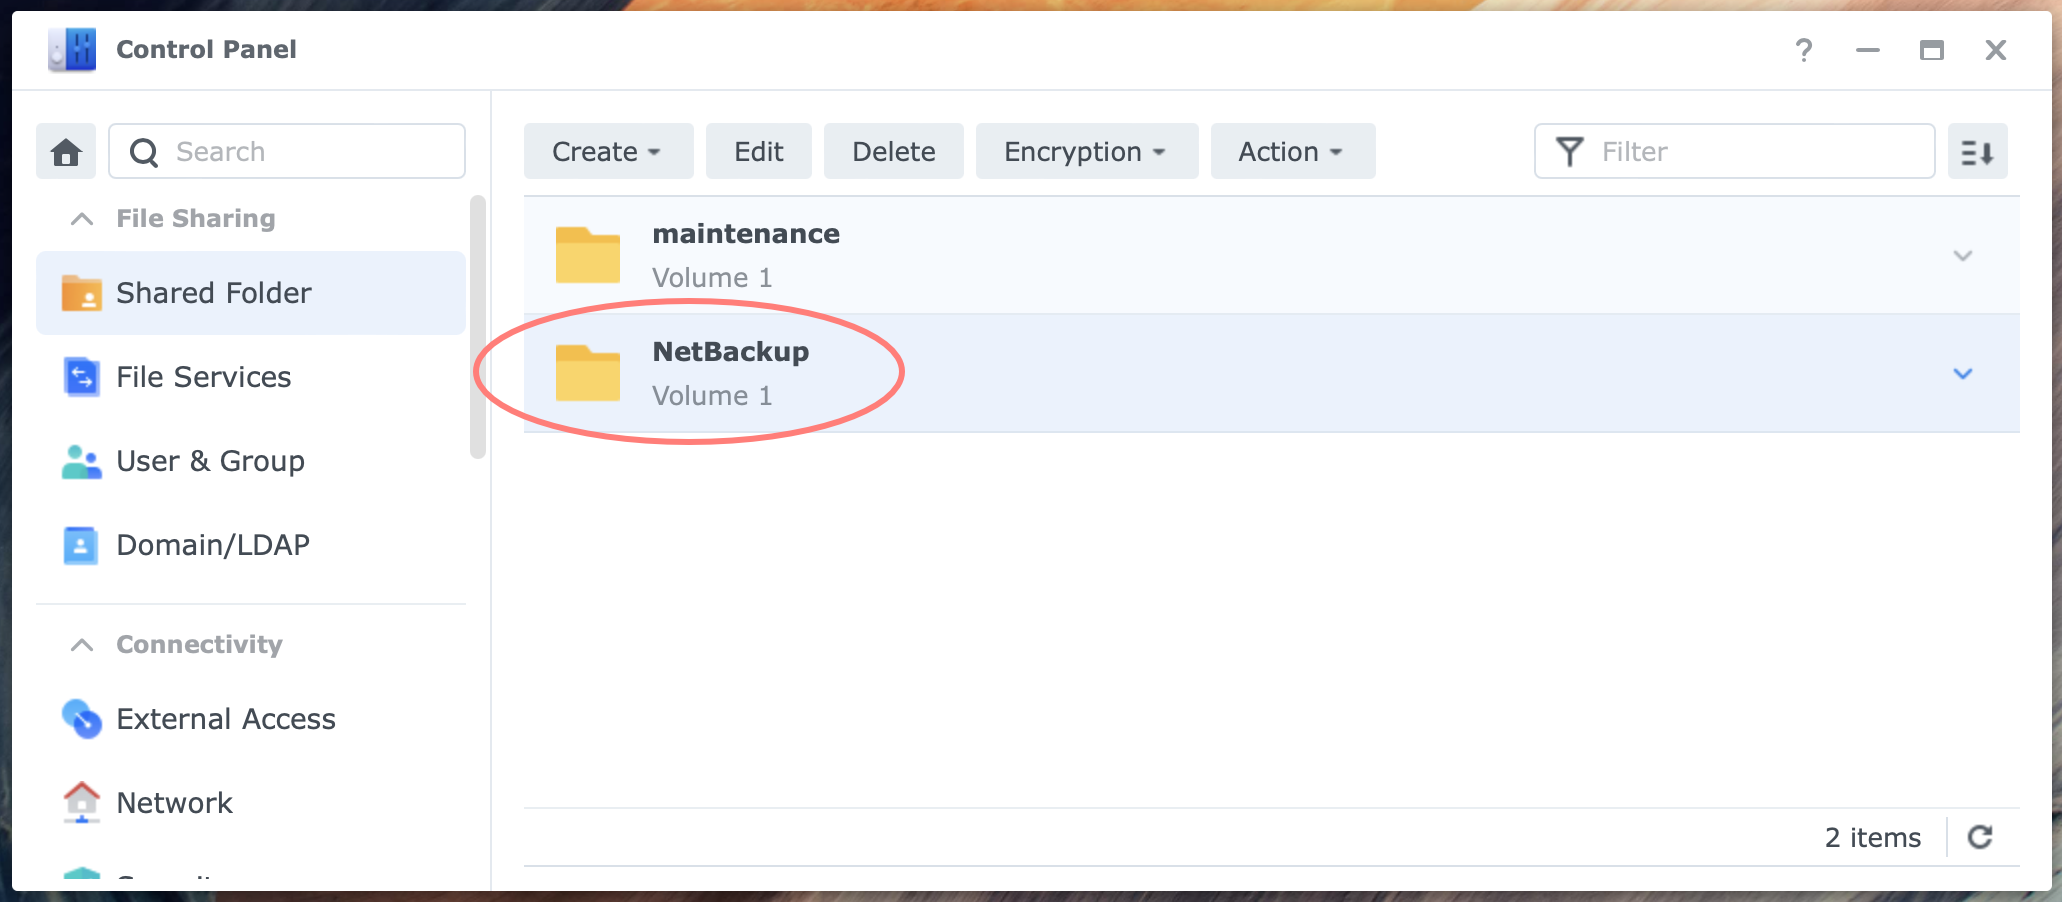
Note that when enabling rsync, DSM creates the NetBackup shared folder. You can neglect this folder, but do not remove it. It is intended for other purposes of rsync.
Firewall
If the firewall on the NAS is enabled, you may get a pop-up asking you to open port 22, or the custom port you assigned, and port 873 for unencrypted traffic. Allow these ports or configure them manually.
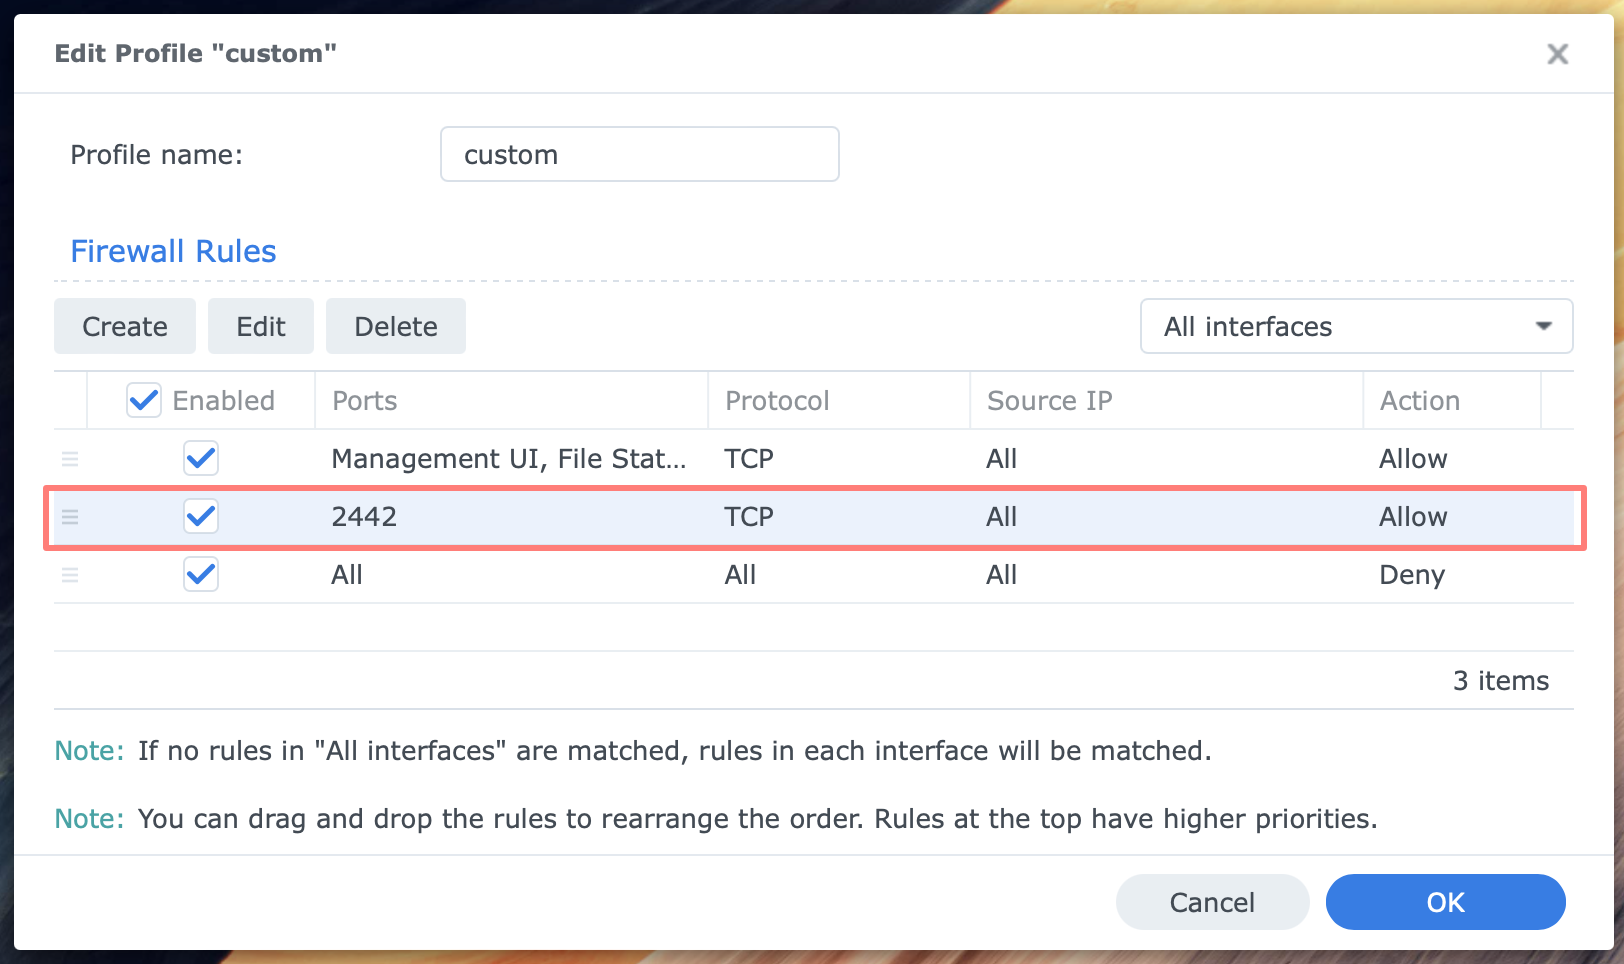
I prefer to configure the firewall with a custom rule to optimize safety.
Check the Connection List button
Open Control Panel > File Services > Advanced tab > Shared Folder Sync, Connection List button. This button appears when you enable the rsync file service. Notice that the Server status is Idle, and the server is not paired with any source NAS.
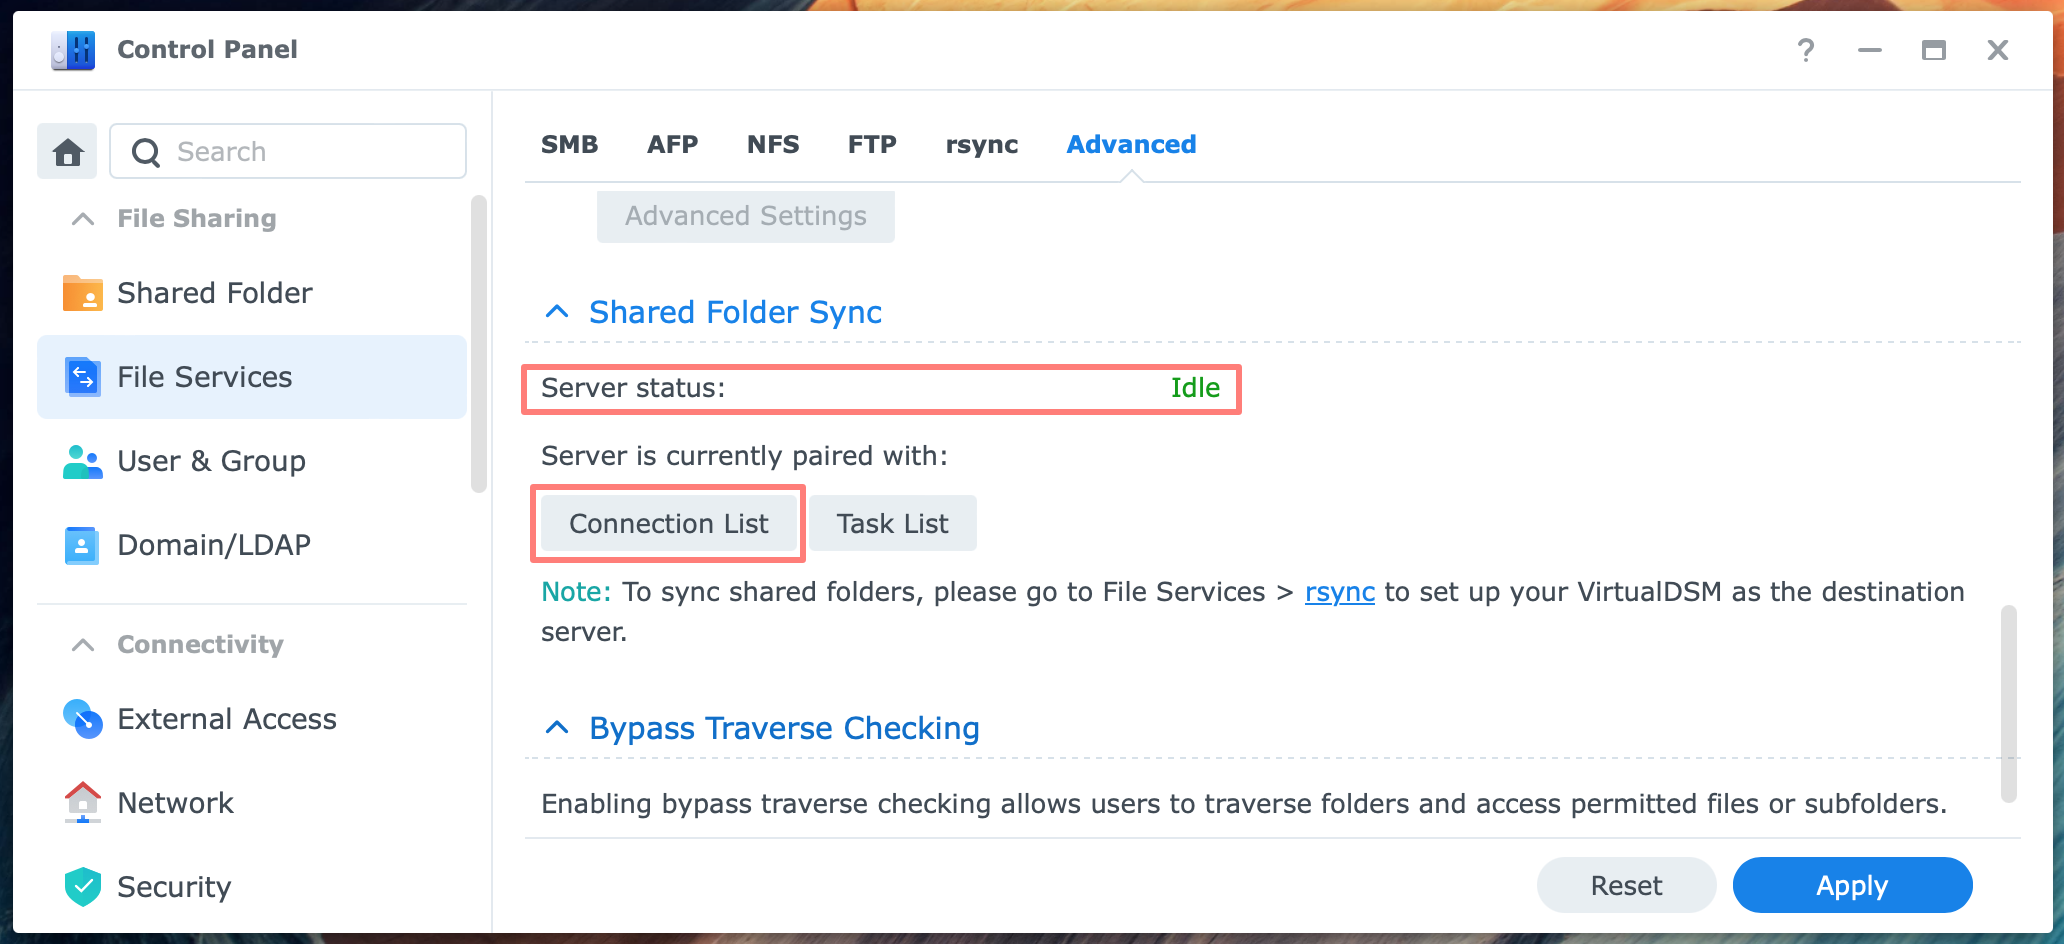
This list is empty as you have not yet configured a connection. We will do that in the next step on the source NAS.
Create service account
Instead of using an existing account, create a separate service account, such as sfs-user. You will use this account and its credentials later on the source NAS while configuring a Shared Folder Sync task.
Go to Control Panel > User & Group > User tab > Create.
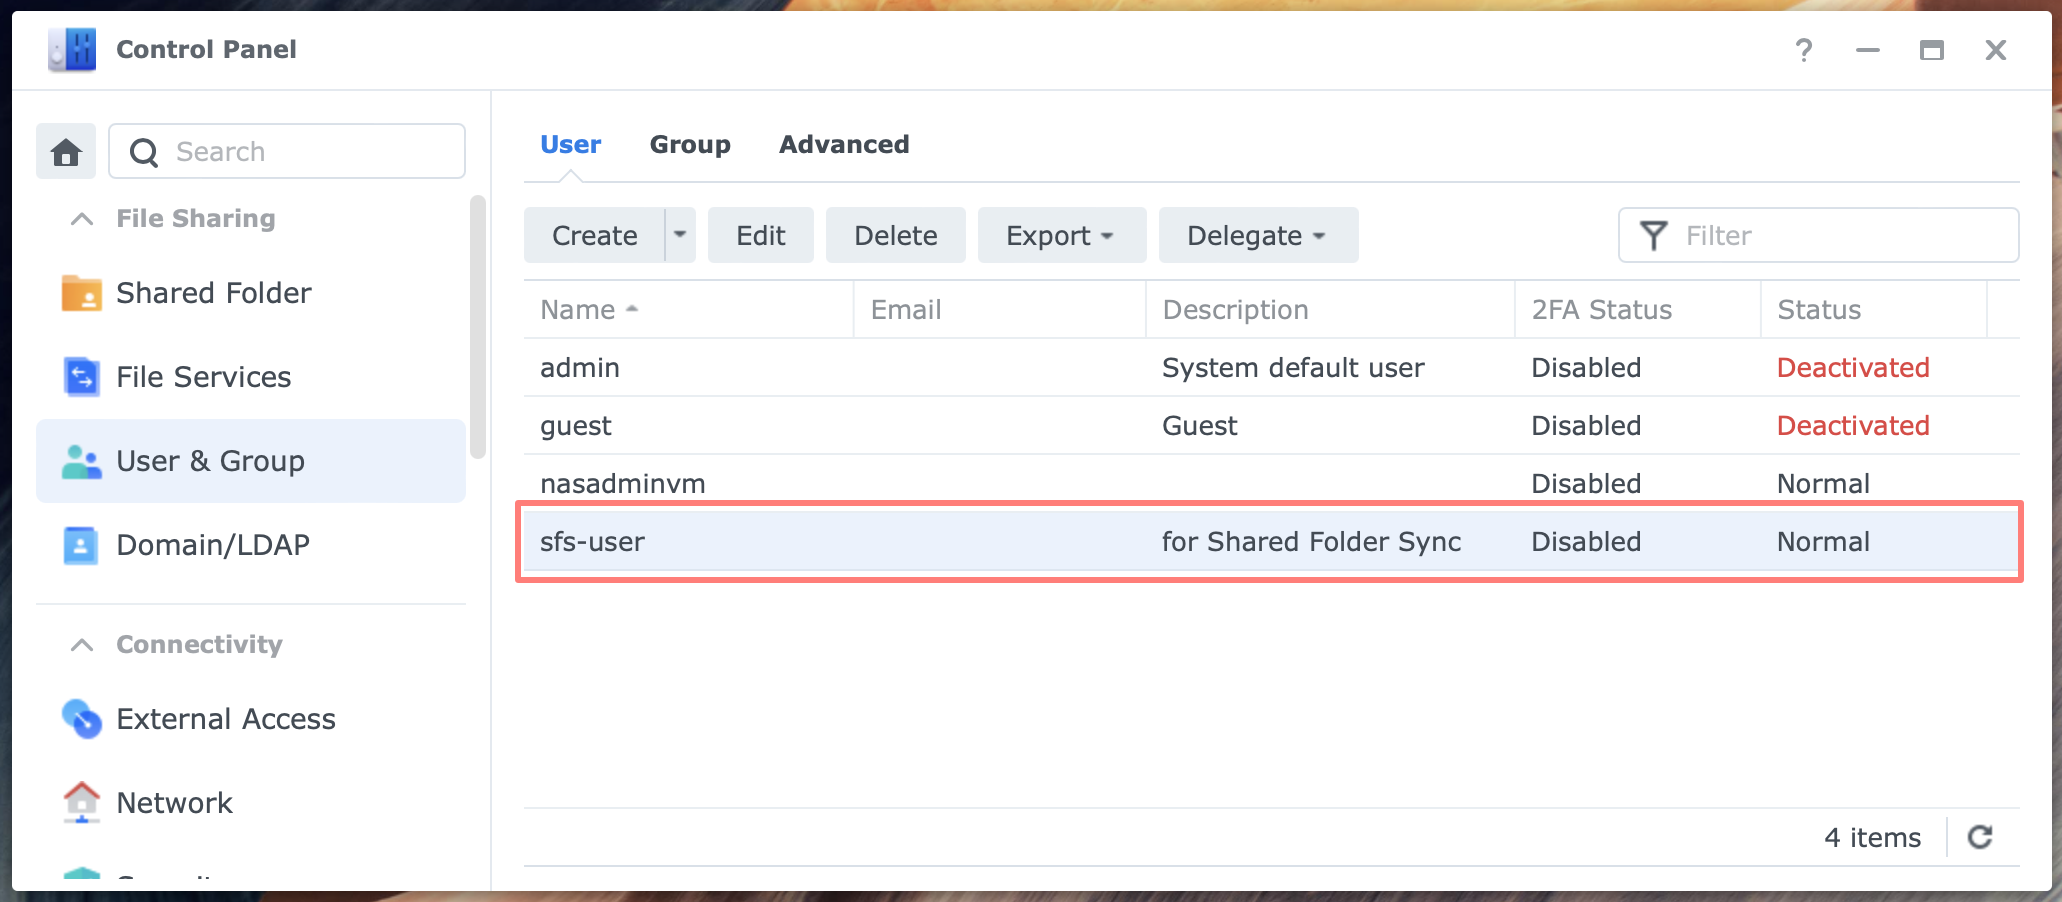
Enter the user information screen
- name: sfs-user
- description: account for Shared Folder Sync
- email: n/a
- password: generate a strong password and store it safely
- disallow the user to change password: enable
Join groups
- administrators, users
Applications
- allow: rsync
- deny: all other applications
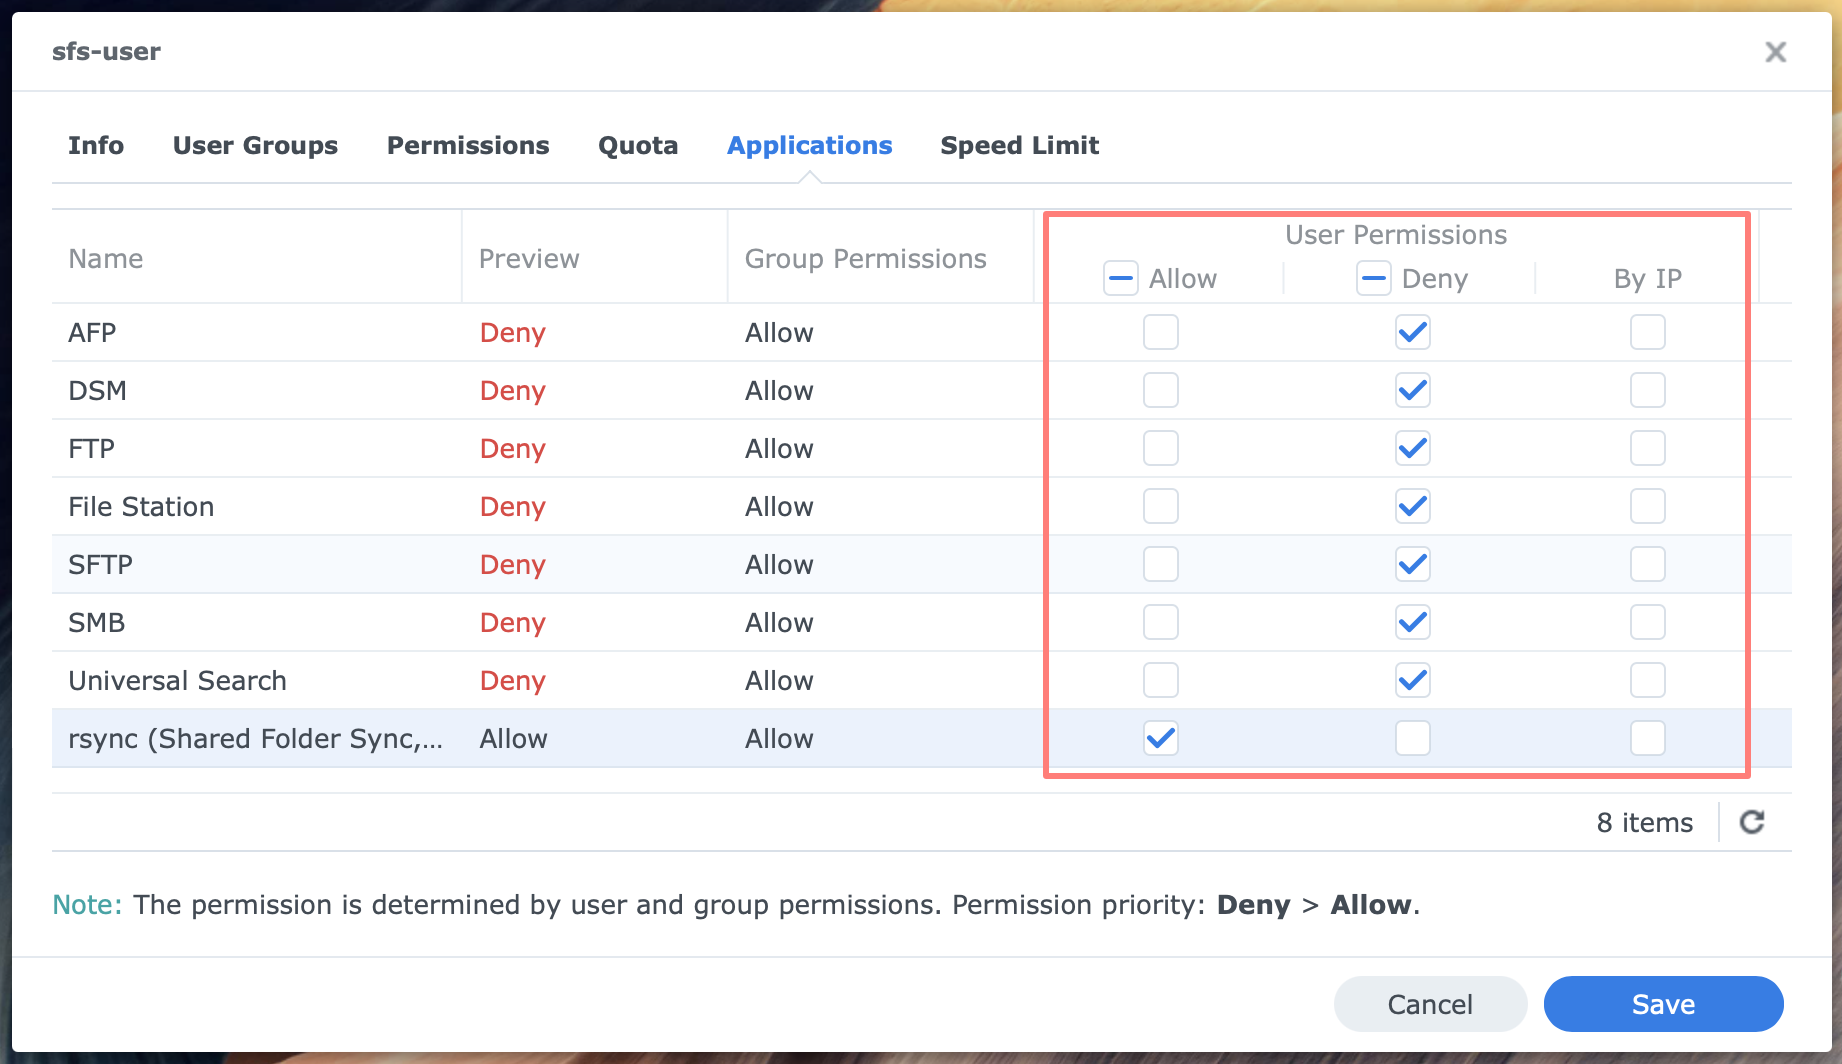
For more about service accounts on your Synology NAS, please refer to How To Create A Service Account.
This ends the installation process on the destination NAS.
Creating A Sync Task
You create a file sync task on the source NAS. You can create multiple tasks that connect to the same or different rsync servers. In a sync task, you define the shared folder to sync, destination, transit parameters (encryption, compression), and sync schedule.
Enabling the rsync file service on the source NAS is not necessary for Shared Folder Sync; this is only required on the destination NAS.
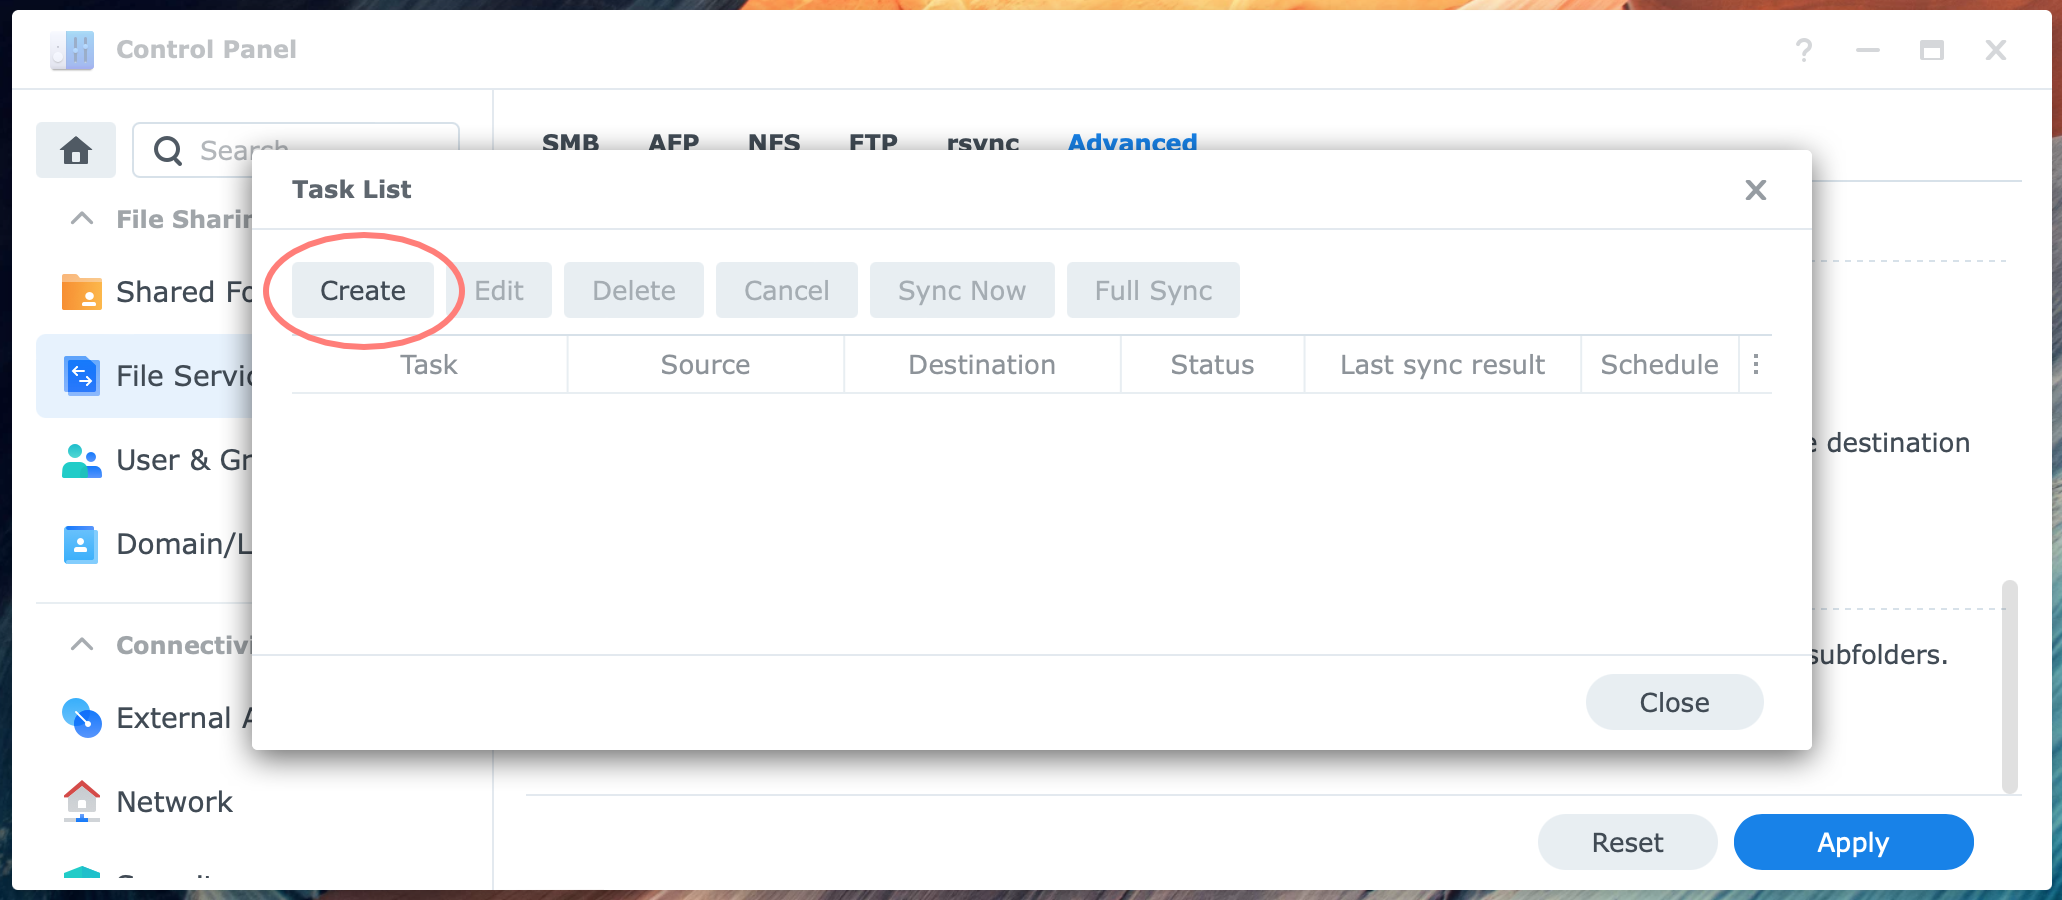
Open Control Panel > File Services > Advanced tab > Shared Folder Sync, and click the Task List button. The Task List opens. Click on the Create button. The Shared Folder Sync Wizard starts. Each task contains the following information:
Create a sync task
- Task name
- give the task a sensible name to recognize it later
Select the source to sync
- select all shared folders you would like to include in this task; note that you can create separate tasks for different shared folders from the same source NAS, with varying schedules, for example
- check the message about understanding identical names as source folders; rsync will create the shared folder for you at the destination unless the name already exists, it will append a number to the name.
Set the sync destination
- Server name or IP address
- if the connection to the destination NAS is local, a server name or IP address is sufficient; if the connection is remote, a (D)DNS name is more appropriate
- User name/password of the sfs-user on destination NAS
- please refer to Create a service account above
- Connection timeout (sec.): 600 (default)
- leave at the default value unless you have a reason to deviate from it
- Customize SSH encryption port for encrypted shared folder sync: (port number)
- optional; fill in the port number that you configured at the destination NAS; if you enable the next option
- Enable SSH transfer encryption
- optional, but I prefer to enable it
- Enable transfer compression
- optional, but I prefer to enable it
- Enable block-level synchronization
- optional: uses bandwidth more efficiently when synchronizing changes
- Sync remote mounted folders
- optional: if you have mounted remote folders in File Station, you can include these in the synchronization
- Button: Test connection
- recommended to test before you click Next
Set up schedule
Choose the schedule option that fits your needs.
- Run sync on modification
- every modification is synchronized immediately
- Run sync manually
- manually control when sync occurs
- Advanced schedule: create a Schedule Plan
- run synchronization automatically according to a predefined schedule
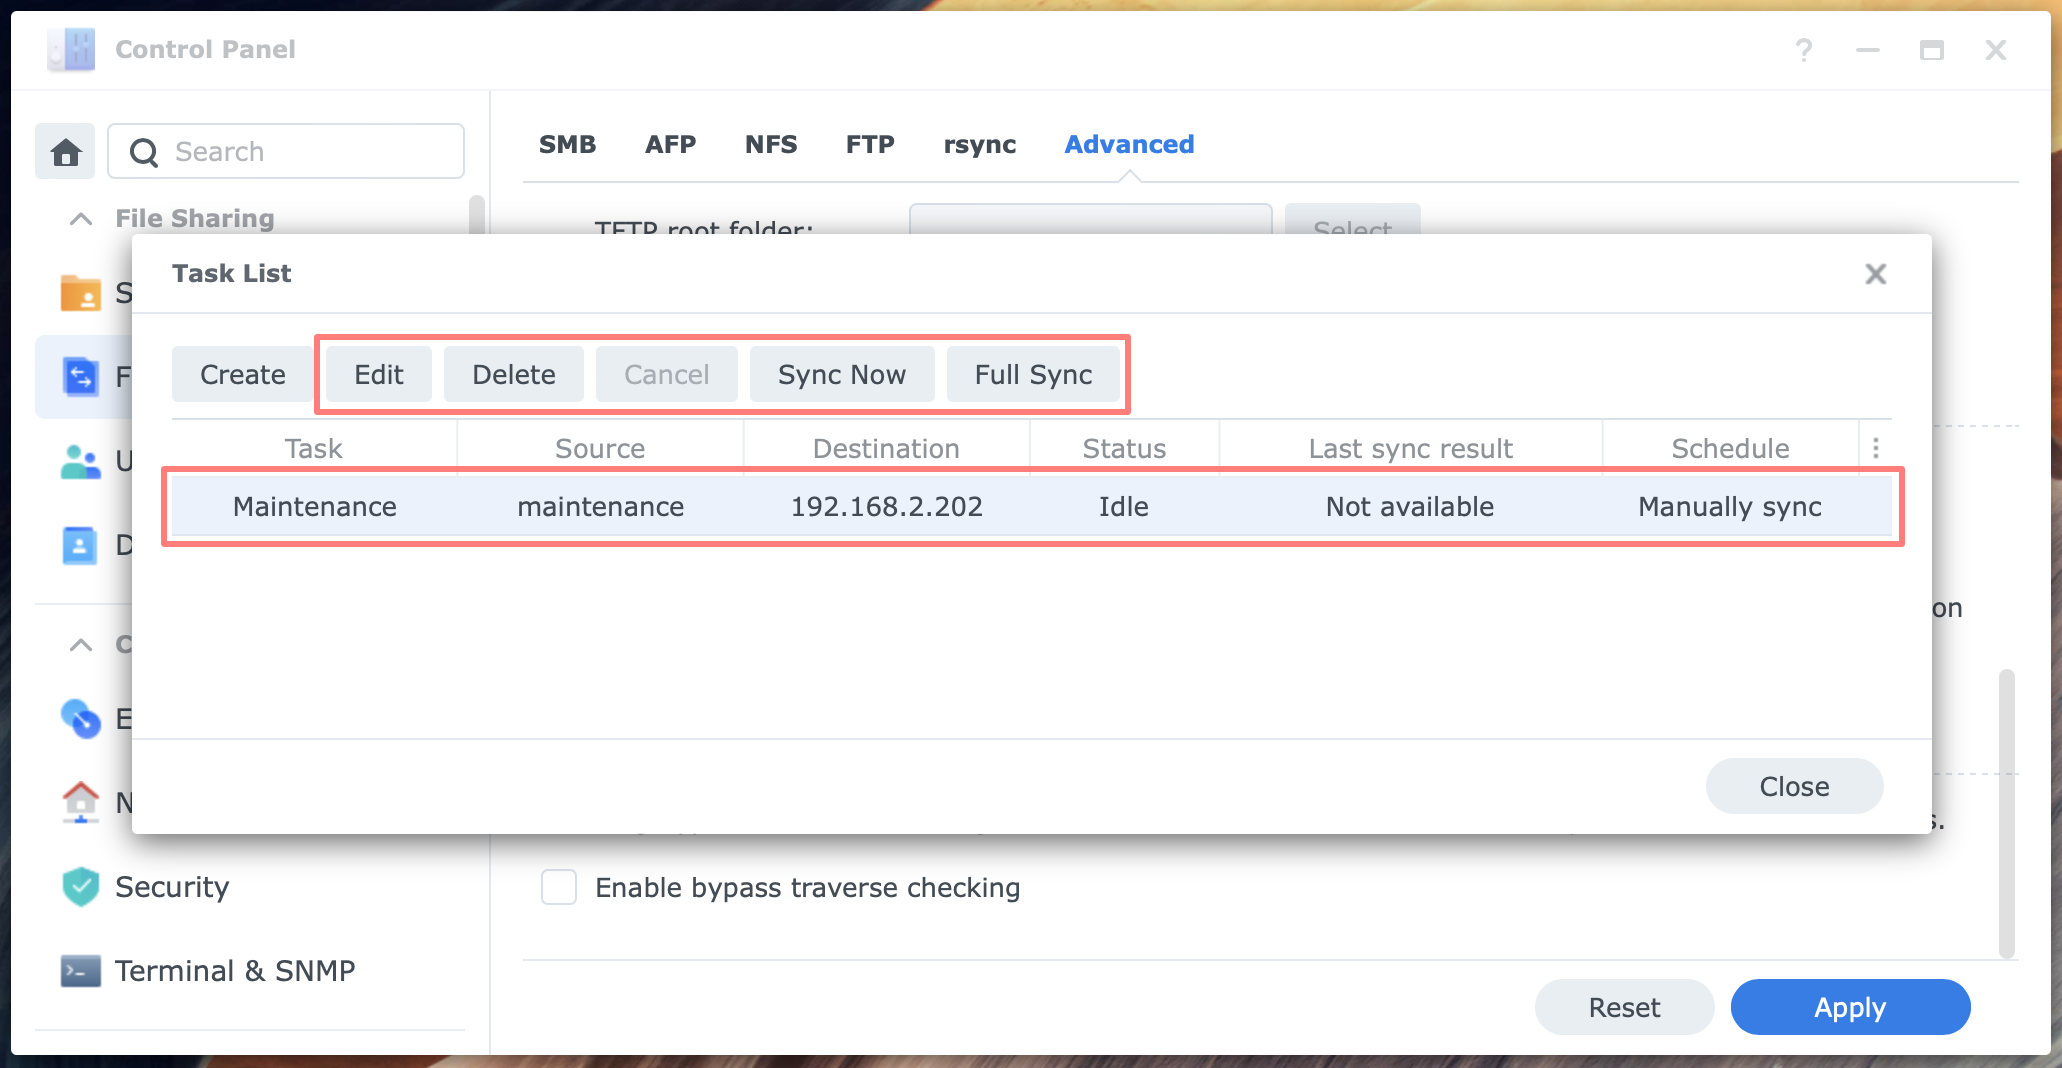
In the Task List, you can manage tasks. Select the task and notice the buttons at the top to become active.
Review the result
The first sync is always a full sync, and successive syncs are incremental. On the destination NAS, open Control Panel > File Services > Advanced tab, Shared Folder Sync, and notice the paired server.
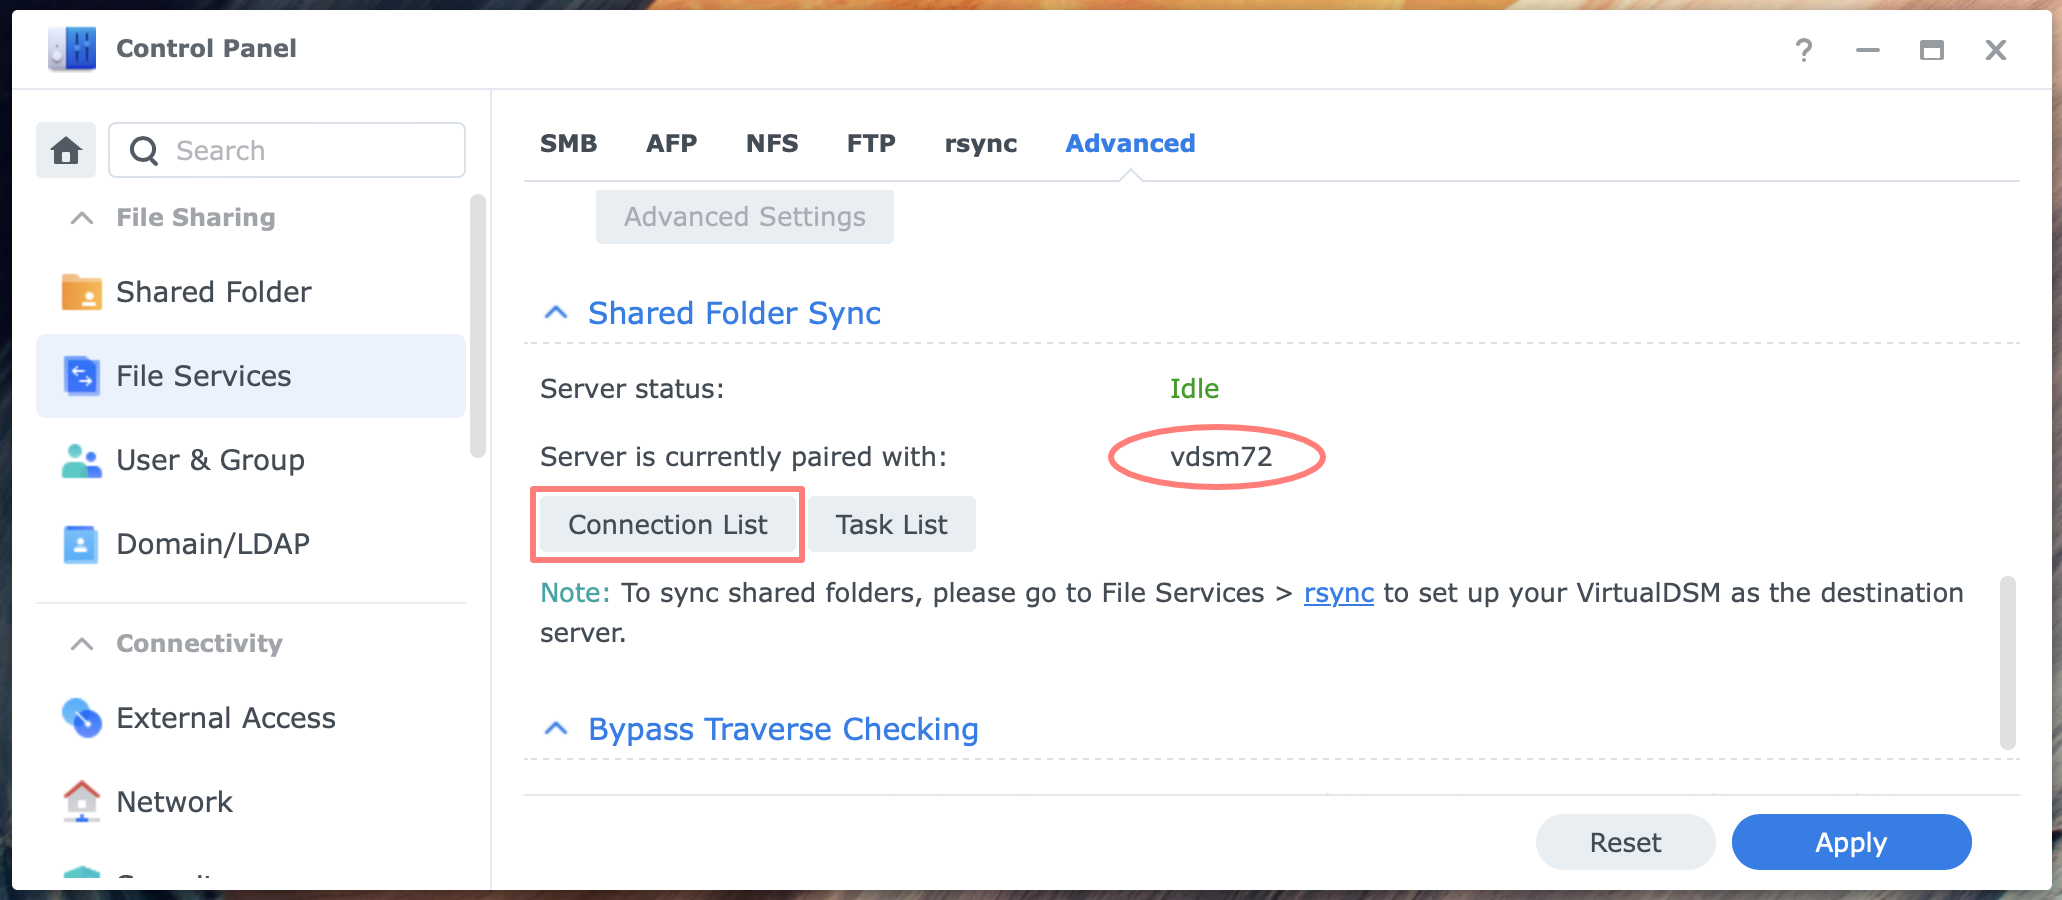
Click the Connection List button to monitor the connection.
Also, on the destination NAS, open File Manager and monitor the result of the first sync. Is the same shared folder from the source NAS also on the destination NAS?
Open Control Panel > Shared Folders and select the newly created shared folders. Give users or groups the proper access permissions. By default, no one has permissions unless there is an identical user name on the source and destination NAS.
Connection And Task Lists
Before you start using Shared Folder Sync, you will find the Task List button in the Shared Folder Sync section in Control Panel. The source NAS will only have the Task List button when configuring and using Shared Folder Sync. You can create multiple tasks for different destinations or the same destination with different schedules.
Connection List
As mentioned earlier, as soon as you enable the rsync file service on the destination NAS, it will have a Connection List button next to the Task List button.
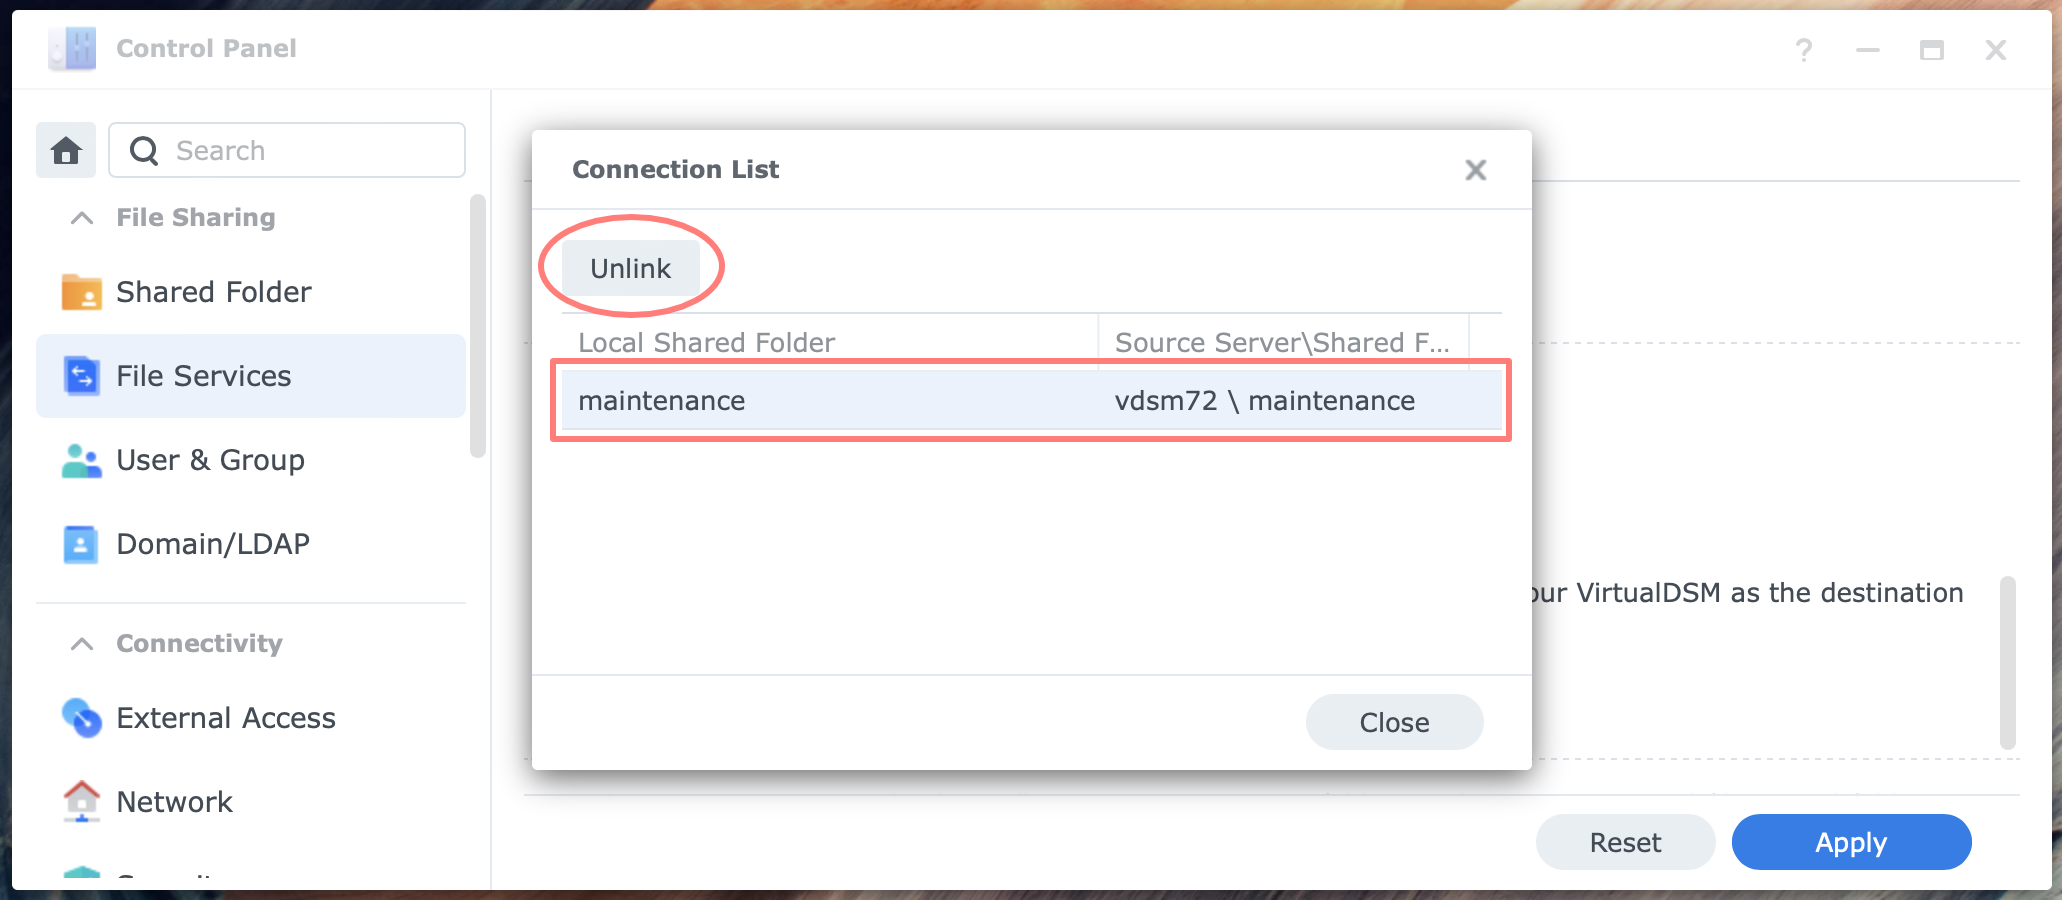
The Connection List shows the link between the Local Shared Folder on the destination NAS and the Source Server Shared Folder. You can unlink each entry. Note that a connection appears in the Connection List after a task has its first sync.
You best unlink a connection at the destination NAS after you stop syncing a specific shared folder at the source NAS.
Editing a sync task
You can edit an existing task when it is Idle; you cannot do so during synchronization. Editing a task includes adding or removing shared folders, changing the destination parameters, compression and encryption, and the task’s schedule.
Select the task in the Task List and click the Edit button. The Edit screen opens. In this screen, you have three tabs:
- Source
- Destination
- Schedule
The screens are identical to those of the wizard that creates a new task. When you are finished editing the task, click the OK button. Note that the NAS tests the connection similarly to when creating the task.
Manual and Full Sync
When you set your task schedule to sync manually, you might notice that the Sync Now button becomes active when you select the task. With this button, you initiate a manual sync.
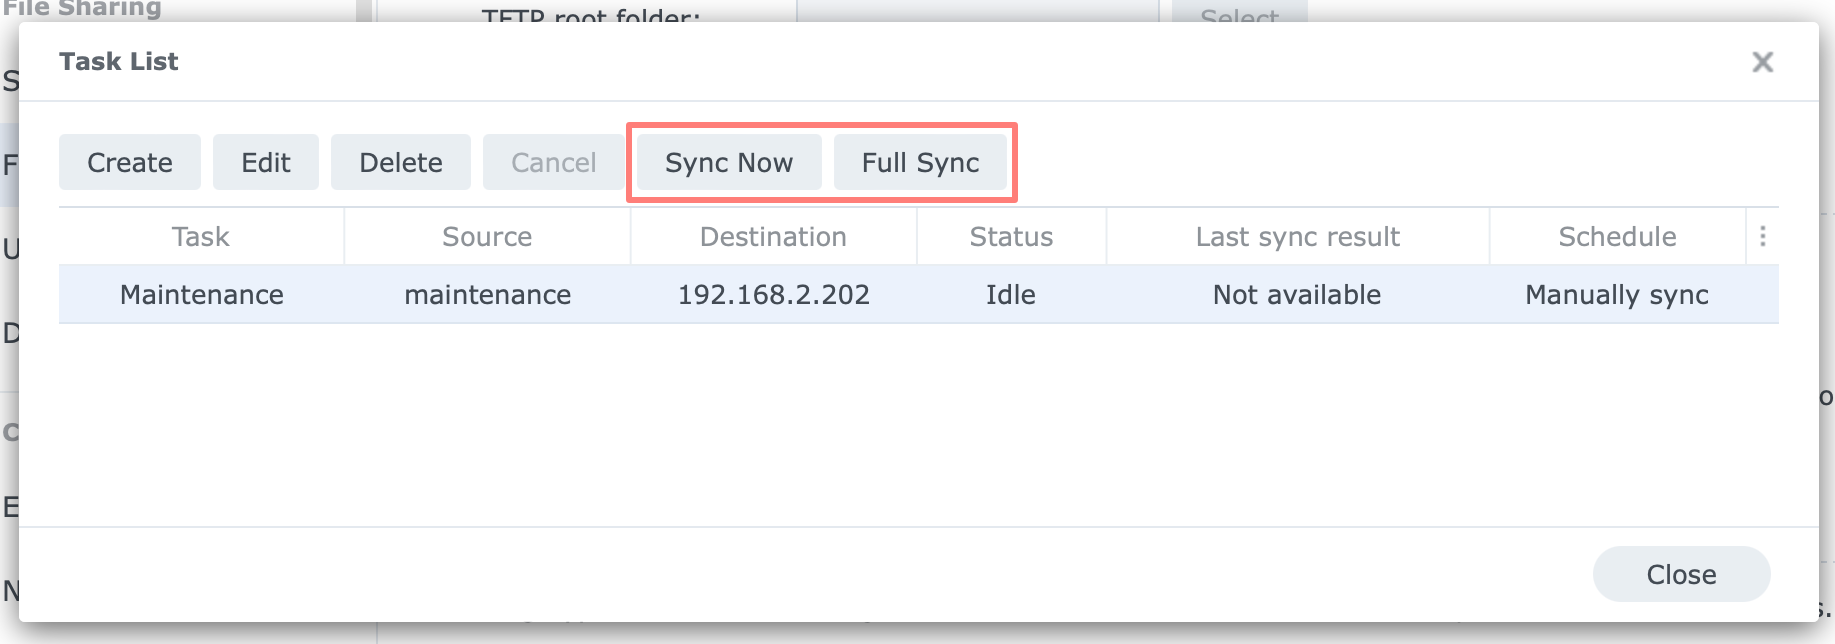
With the Full Sync button, you can initiate a full sync of the selected task, independent of its schedule. Typically, only the initial sync is a full sync.
Canceling a sync task
You can stop a task that is scheduled to run manually during sync. Select the task and click the Cancel button. Its status will change to Idle, and the last sync result will be Cancel—resume synchronization with the Sync Now button.
Monitoring
You can monitor the status of each sync task at the source NAS. At the destination, you can monitor the status of any paired server. A source NAS is a paired server at the destination NAS.
You monitor the status from the Control Panel > Shared Folder Sync section, where you earlier configured the sync task at the source or reviewed the Connection List at the destination.
Monitoring tasks
Click the Task List button on the source NAS to open the list. You will see all the tasks you have created, their status, and the Last sync result.
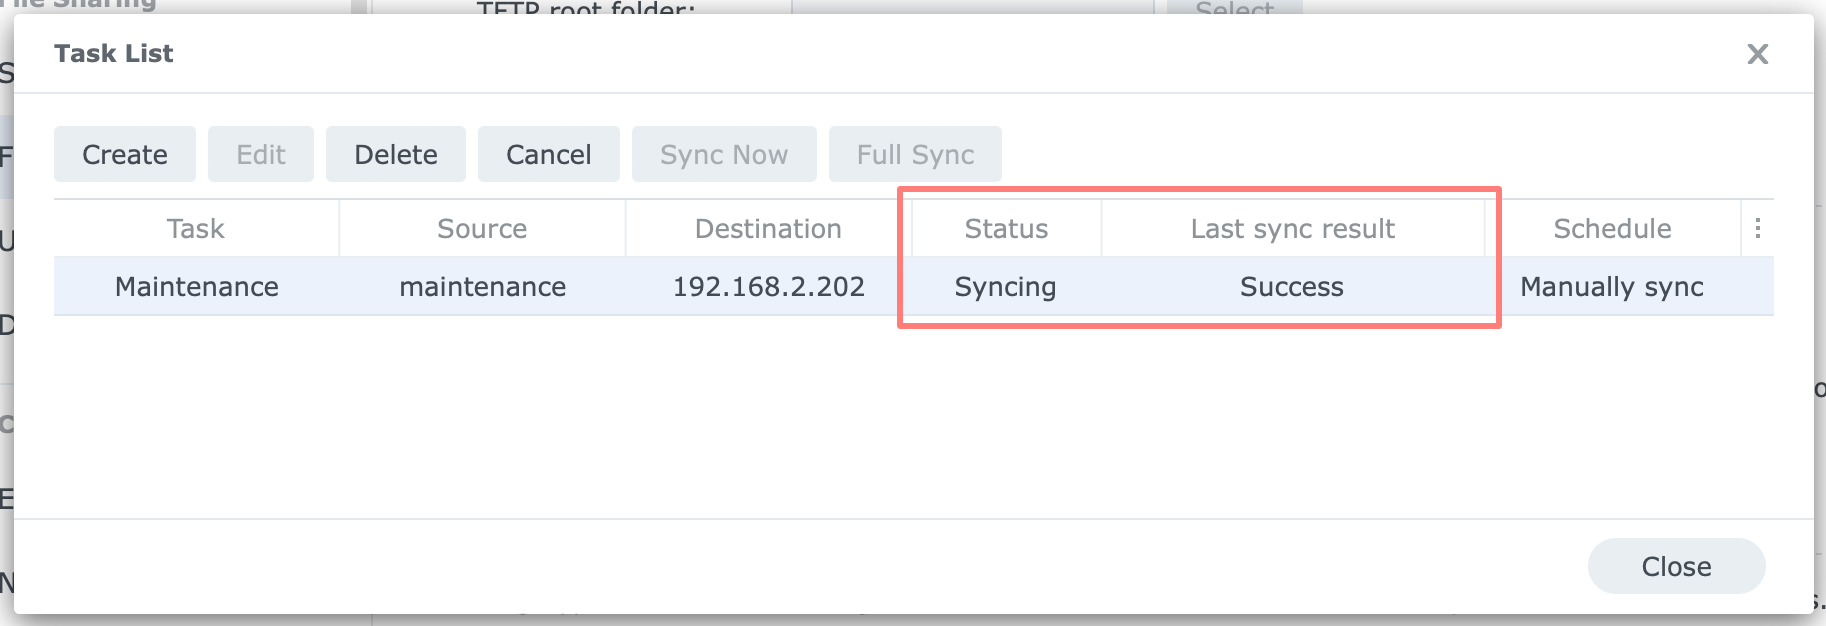
For example, a status can be Idle or Syncing, and the Last sync result can be either Not available, Success, or Failed. The status tells you whether a task has ended successfully.
Monitoring servers
You can read the server status on the destination NAS. The status can be Idle or Syncing. Note that this status refers to the destination NAS, not any source NAS it is paired with.
In addition to its status, you can review all servers the destination server is currently paired with. As you can see in the Connection List, once a source NAS synchronizes a shared folder with the destination, it is paired with it.
Note that this is an overall status report and does not give you any indication of which task is running, from which server, its progress, or when it will finish. Such fancy features are not part of the Shared Folder Sync skill set.
It is an essential tool, and its simplicity is part of its beauty.
Logging And Notification
Yes, there is logging in the General log at the source NAS and notification from that same NAS. Start and finish are logged as Info events, and a failed sync as an Error event.

Notice the events for the start and finish of a manual sync task and the Network Backup in the Log column.
When a task finishes, you get a notification from the source NAS. For more about setting up notifications, please refer to How To Configure Email Notifications.
Ending Shared Folder Sync
In some scenarios, using Shared Folder Sync is an ongoing process. In other scenarios where you planned to move data to another NAS, you might want to end a specific sync task but not Shared Folder Sync entirely.
Ending Shared Folder Sync comes in three stages.
Stage 1 – stop synchronization of the shared folder
At the source NAS, stop scheduled synchronization for all tasks on the Task List for which you intend to stop the synchronization. If you do not wish to regain synchronization in the future between the source and destination NAS for a specific shared folder, go to the destination NAS and unlink the connection.
Last, open Control Panel > Shared Folder at the destination NAS, select the shared folder you finished syncing, and remove the Advanced Permissions to make it readable. Optionally, assign proper permissions to users and groups to the shared folder.
Repeat this process for every shared folder it applies to.
Stage 2 – stop using Shared Folder Sync on source NAS
As discussed above, go through the steps in Step 1 for all shared folders on the Task List. Likewise, unlink all connections for that NAS on the destination NASs. Finally, delete all tasks in the Task List at the source NAS.
The source NAS is no longer connected to any destination NAS.
Stage 3 – stop using Shared Folder Sync on destination NAS
Before you stop Shared Folder Sync on a destination NAS, use the Connection List to trace and remove all connections from source NASs to that destination NAS. When the Connection List is empty, turn off the rsync file service.
Please know that rsync can be used for other processes like Hyper Backup.
When you disable rsync, you can delete the NetBackup shared folder unless there is data in that folder. Note that Shared Folder Sync does not use that shared folder.
Next, remove the firewall rules related to rsync unless rsync is used for another purpose. Last, disable or delete the dedicated user account, sfs-user, which, in our case, is used for Shared Folder Sync.
Troubleshooting Shared Folder Sync
There are a few scenarios that can affect a proper sync.
- a shared folder name already exists on the destination
- this is solved automatically with a number suffix to the shared folder name
- user credentials have changed (different password, account disabled, no admin privileges)
- use a dedicated user account
- connection is broken (IP address, domain name, external connection, port forwarding, firewall port)
- use fixed IP addresses where possible, check port forwarding at the destination, check or temporarily disable the firewall at the destination
Notes
While working with Shared Folder Sync, I noticed some facts worth sharing.
Date-time stamps
With Shared Folder Sync, the files and folders have the original date and time stamps; Synology Drive ShareSync has the date and time from synchronization.
Data checksum
If Shared Folder Sync syncs to a destination NAS with a Btrfs volume, the shared folder that it creates has data checksum enabled. This setting is independent of the source NAS. A shared folder on the source without data checksum or from an Ext4 volume will have data checksum enabled on the destination if the volume is Btrfs.
Complex sync configurations
Although the basic configuration covers synchronization from a single source NAS to a single destination NAS, more complex setups are possible, like one-to-many, many-to-one, and extended synchronization.
You can have multiple sources sync to a single destination. The rsync service handles potential folder name conflicts with a number suffix to the shared folder name.
You can also have a single source sync to multiple destinations. Just create separate tasks for each destination. I am not sure whether you can sync a single shared folder on the source NAS to multiple destination NASs
Finally, a NAS can act as both a source and a destination NAS for shared folder synchronization.
Recycle bin
The recycle bin settings of a shared folder are not synchronized. The new shared folder on the destination NAS does not have a recycle bin, so you must enable it manually.
Encrypted shared folder
You can sync an encrypted shared folder in both mounted and unmounted state on the source NAS. On the destination NAS, the folder is encrypted again and unmounted. You can mount it with the same key as the original folder.
Shared folders with the WriteOnce option enabled are excluded from synchronization with Shared Folder Sync.
Encrypted and compressed transfer
In a brief test, I did the same sync without encryption and compression compared to one with both options enabled. The CPU went from approximately 30% to 65%, and the transfer took considerably longer as the output was lower.
Transfer compression is applicable if the source NAS has a powerful processor and the connection has a low bandwidth. Encryption is appropriate when data is transferred over an unsecured network like the Internet.
Different DSM versions
Shared Folder Sync and rsync should work without issues between NASs with different DSM versions. This makes it very suitable to sync between an old NAS you plan to replace with a new model and the latest version of DSM.
External access
Shared Folder Sync can work in conjunction with external access like DDNS. I did not test for VPN, but it should be possible. It does not work with QuickConnect.
Same permissions
When using Shared Folder Sync to replace a NAS, I found it helpful to be able to maintain the user permissions on the new NAS.
I achieved this by restoring the configuration backup from the source NAS to the destination NAS for users and groups. Consecutively, Shared Folder Sync will assign the same permissions to the destination and the source.
Thanks for reading
This post is donation-ware, and I made it to help you. Please consider leaving a comment or even buying me a coffee if it did. I will be eternally grateful.
Paul Steunebrink / Storage Alchemist
