QuickConnect is by far the quickest and easiest way to connect your DiskStation to the internet for external access. Learn how to set it up, when to use it, and what the pros and cons are.
Using QuickConnect With Synology NAS
QuickConnect is by far the quickest and easiest way to connect your DiskStation to the internet for external access. But why would you do that, external access?
Either because you like to access your DiskStation when outside, or to share something on the NAS with someone outside, or both.
QuickConnect is quick and easy to set up. In contrast to other solutions, you do not have to deal with domain names, certificates, IP addresses, and port forwarding.
It is not quick in terms of performance, on the contrary. It is slow because all traffic is relayed through Synology servers.
How QuickConnect works
QuickConnect uses to make it easy to set up because it creates an established connection to the Synology server once you set it up. This is an outbound connection. Let me explain that to you.
Outbound connections and firewall
The inbound connection that you experience as external access is a reply or answer to that outbound connection. In other words, your NAS started the connection first. It initiated the connection.
This is a way to work around the firewall of your internet router that prevents incoming connections initiated from the outside. As a result, you do not have to configure your router, like opening network ports, installing a certificate, or giving your DiskStation a fixed IP address.
In addition to the connection, QuickConnect creates a DNS name for your DiskStation. DNS or Domain Name System is like a telephone directory for the internet with names and IP addresses. The DNS name works even if your router’s outside IP address is dynamic, as is the case with most home internet connections. Hence the name Dynamic DNS or DDNS for short.
To summarize, QuickConnect is a combination of DDNS and established connections. I suggest you use QuickConnect if time or skills are missing for other safer and faster solutions that are more convoluted to set up or that you do not control the router for internet access at your location.
Security
That also imposes the question of security. Is Synology safe enough for you to relay all your data? And is it safe to expose your DiskStation to the world? You can control access to applications but not to users or by source address.
Without getting too nervous about security, which I take very seriously, my take is that QuickConnect is great for occasional use. For day-to-day practice, I suggest more robust solutions based on reverse proxy or VPN Server.
Prepare for QuickConnect
To set up QuickConnect, you need two items that you create yourself.
- QuickConnect ID
- your Synology account
You set up QuickConnect from the DiskStation Manager (DSM) of your Synology NAS.
A QuickConnect ID is something you create yourself. It will be added as a prefix to the QuickConnect DNS name. It has to be unique, meaning nobody else uses this as a name for QuickConnect. If your ID is already taken, you get a warning when you attempt to enable QuickConnect.
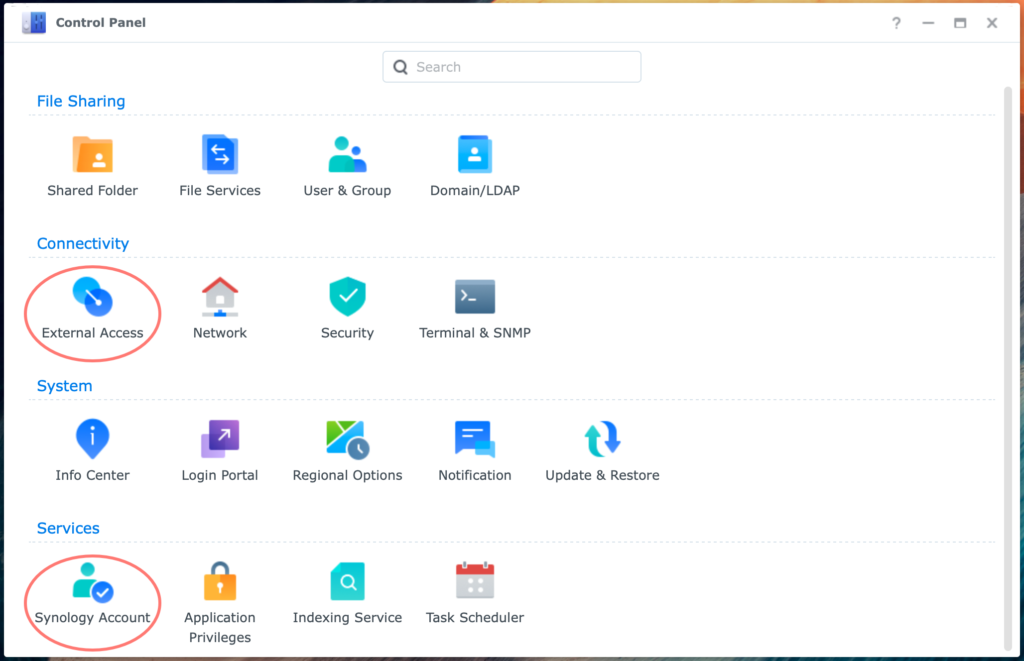
You may already have registered a Synology account and use it here. If not, you can do it from the Control Panel in DSM or from the Synology website. You use this account also for Synology support or when you subscribe to a webinar.
In the next sections, I will discuss how to set up QuickConnect in both DSM6 and DSM7.
Set Up QuickConnect In DSM6
Your first step in using QuickConnect with Synology NAS is to check that your DiskStation is linked with your Synology account. Log in with a browser to the DiskStation Manager (DSM) of your NAS as an administrator.
Note
A Synology account is registered with Synology. Please do not confuse it with a user account that you have on your DiskStation.
Check your Synology account
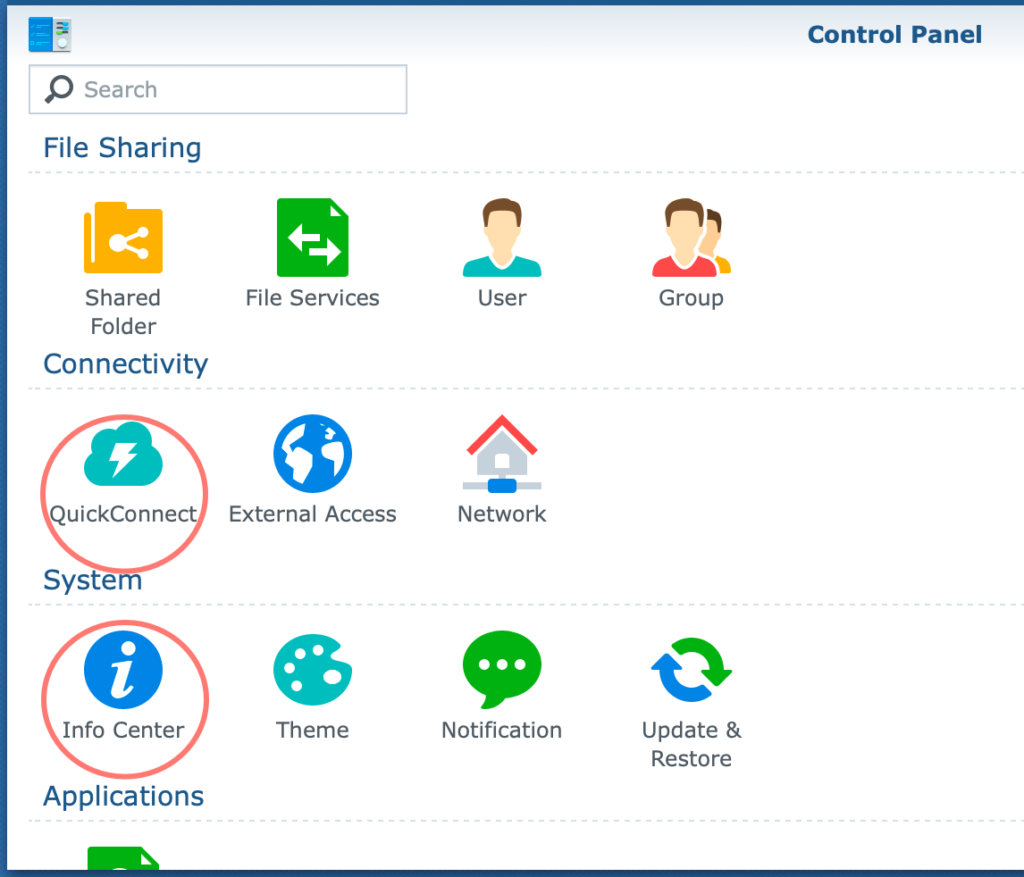
In DSM, open Control Panel and open Info Center in the System section. In the right pane, go to the last tab, Synology Account.
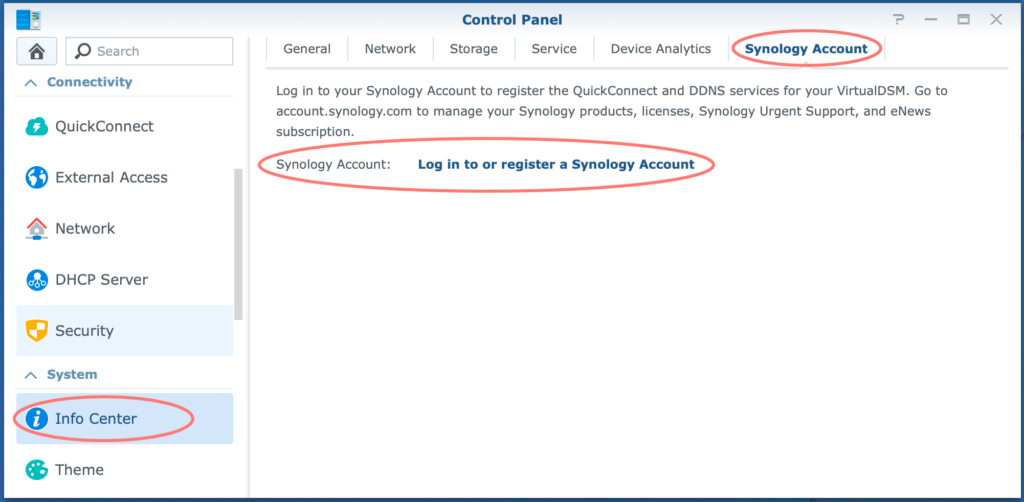
If there is an account and it is the right account, then you are ready here. Continue with the next step.
If you like to change the account, click on the Change Account button. The Sign In window appears when you can log in to your account.
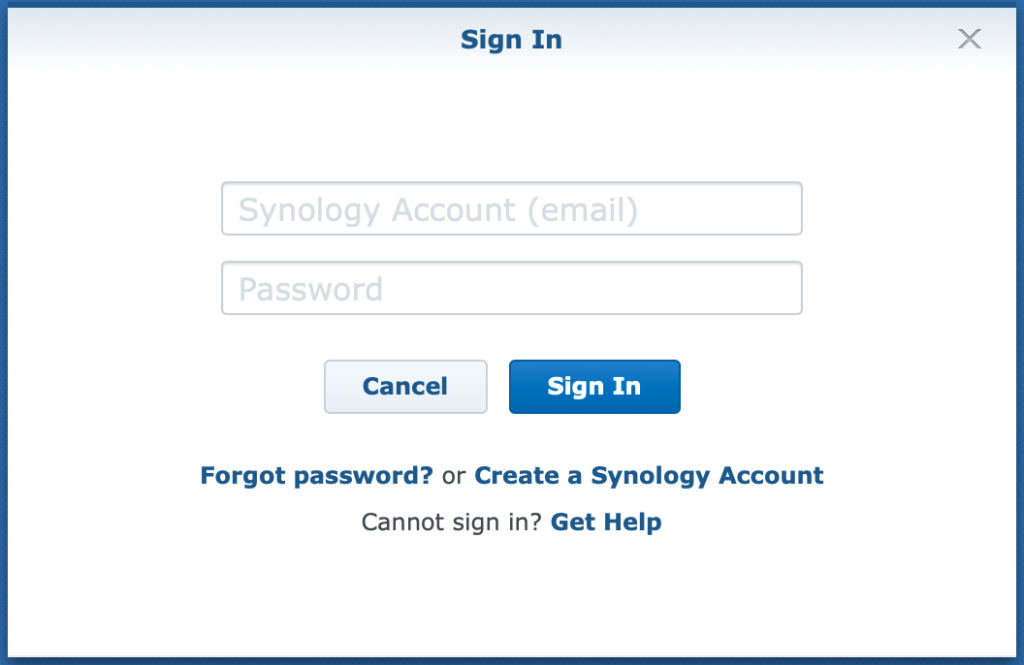
If there is no account yet, click on Log in to or register a Synology Account, click on the text, and log in or create an account in the Sign In window. Click the Apply button when you are done.
Enable QuickConnect
Continue in Control Panel and open QuickConnect in the Connectivity section. In the right pane, the General tab, notice your Synology Account.
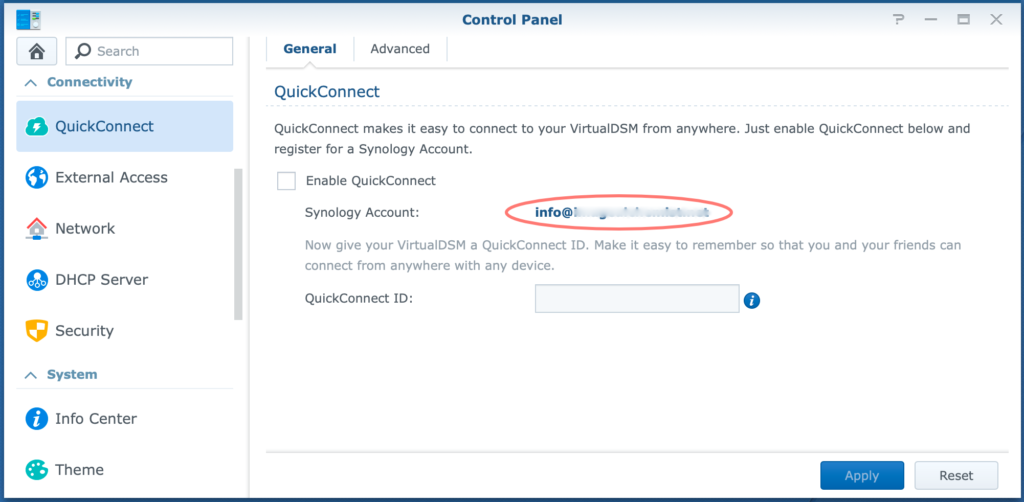
Tick the checkbox Enable QuickConnect and type your QuickConnect ID in the box. For this demonstration, I chose quickconnect-demo. Think of a sensible name for yourself.
Agree with the Terms of Service and the Privacy Policy. Click on the Apply button.
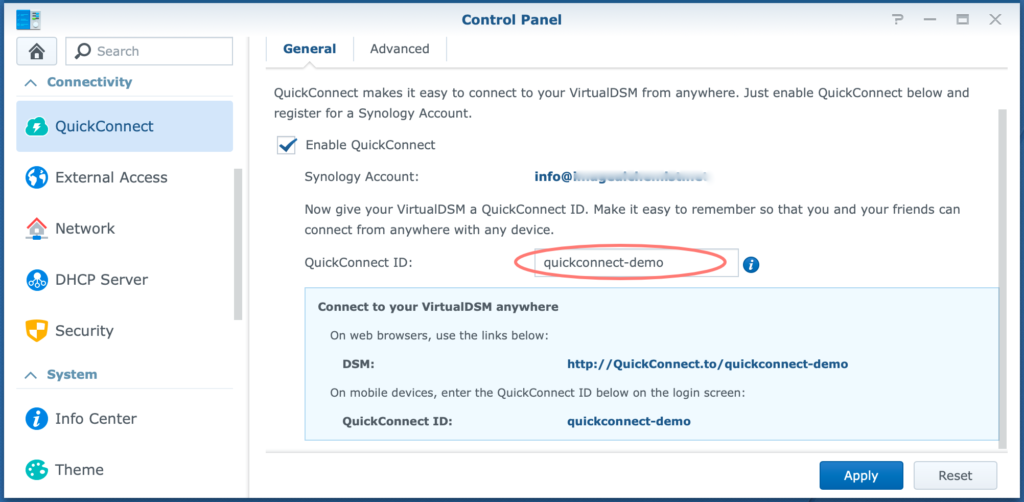
Notice that you can now access your DiskStation with the address:
- http://QuickConnect.to/quickconnectID
And you log in to your NAS from mobile devices with:
- QuickConnectID
Note
You log in to your DiskStation with a regular NAS account, not the Synology account.
Set Up QuickConnect In DSM7
The procedure for using QuickConnect in DSM7 is technically identical to DSM6, but the screens in Control Panel are all different. Therefore, let’s drill down the steps for DSM7.

Login with a browser to the DiskStation Manager (DSM) of your NAS as an administrator. Our first step is to check that your DiskStation is linked with your Synology account.
Note
A Synology account is registered with Synology. Please do not confuse it with a user account that you have on your DiskStation.
Check your Synology account
In DSM, open Control Panel and open Synology Account in the Services section. In the right pane, you see your Synology Account, or you see the text Sign in to or sign up for a Synology Account.
If there is an account and it is the right account, then you are ready here. Continue with the next step.
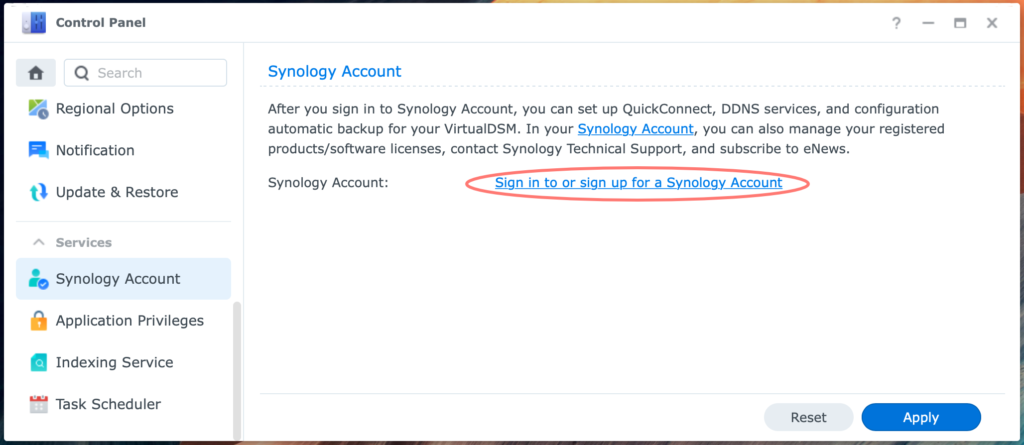
In case it is the wrong account, click on the Sign Out button. Otherwise, click on the link and sign in or sign up.
Enable QuickConnect
Continue in Control Panel, and open External Access in the Connectivity section.
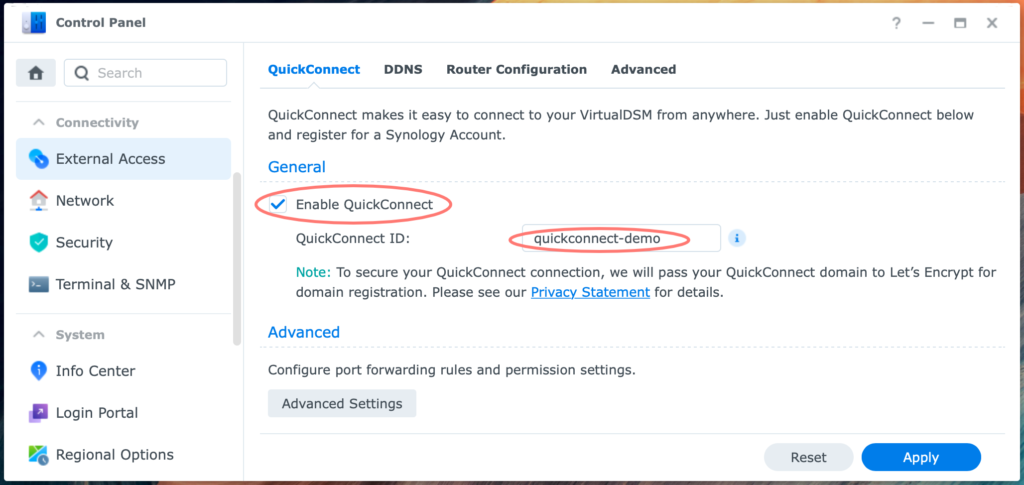
In the right pane, the QuickConnect tab, tick the checkbox Enable QuickConnect and type your QuickConnect ID in the box. Click on the Apply button. For this demonstration, I chose for quickconnect-demo. Think of a sensible name for yourself.
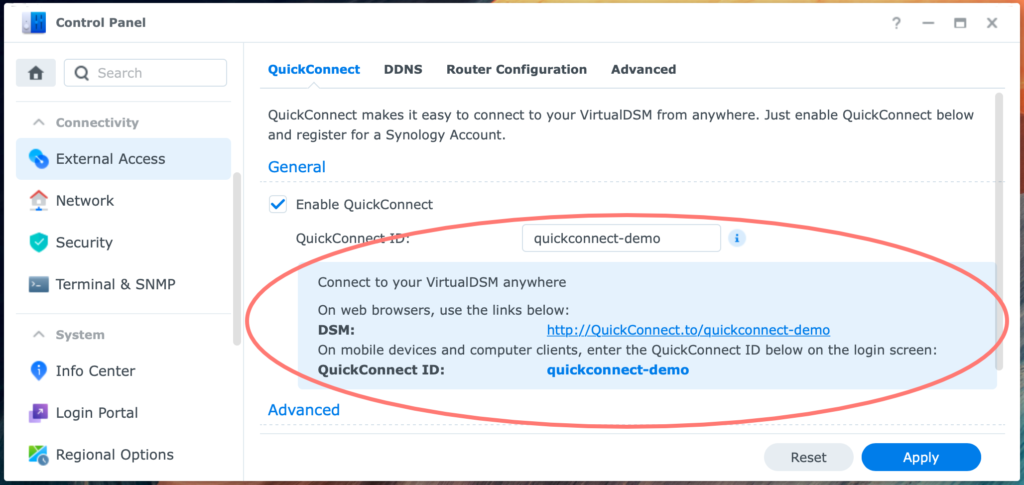
Notice that you can now access your DiskStation with the address:
- http://QuickConnect.to/quickconnectID
And you log in to mobile devices with:
- QuickConnectID
Note that you log in to your DiskStation with a regular NAS account, not the Synology account.
Note
When you are logged in to DSM via QuickConnect, you can not alter the QuickConnect settings. They are greyed out.
Advanced QuickConnect Setup
The preparations for using QuickConnect with Synology NAS are rather straightforward. You can improve the QuickConnect configuration with Advanced Settings, which comprises Options and Permission.
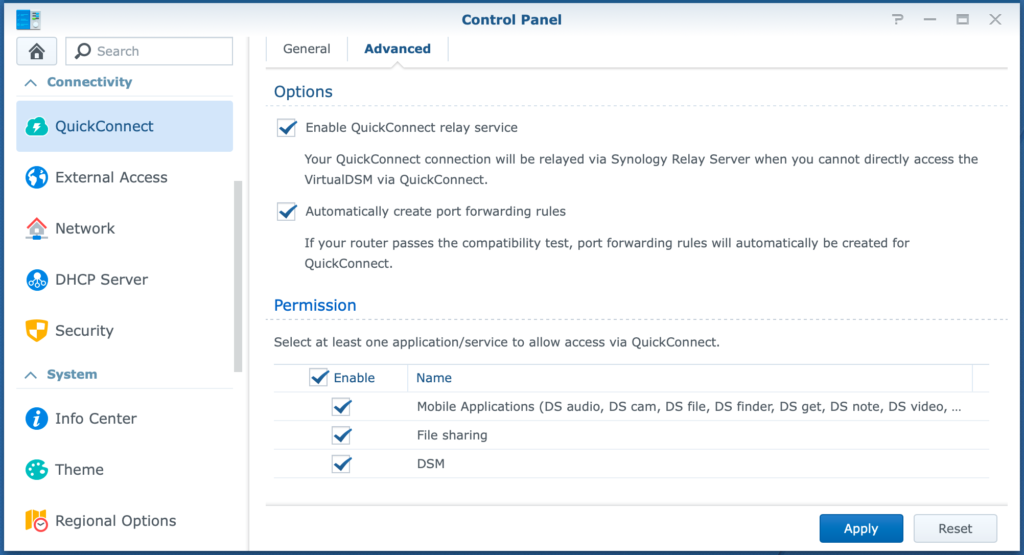
In DSM6, open Control Panel and go to QuickConnect > Advanced tab. In DSM7, open Control Panel, External Access, QuickConnect tab, Advanced section with a button at the bottom.
Under Options, you have two checkboxes. Both are ticked by default.
- Enable QuickConnect relay service
- Automatically create port forwarding rules
Under Permission, you can determine what a user via QuickConnect can do.
QuickConnect relay service
The Enable QuickConnect relay service is what I discussed earlier and makes QuickConnect easy to set up but slow and less secure. It makes an outbound connection to the Synology servers, and you tap into that connection. As a result, you do not need to configure your router with port forwarding rules.
However, if you can configure your router with port forwarding rules, you can skip the relay service and disable this option. QuickConnect is now essentially only a DDNS service. It is more secure and faster with this option disabled, but it requires necessary changes to the router.
Automatically create port forwarding rules
The second tick box is for UPnP-enabled routers that your Synology NAS supports. What it does is that your DiskStation opens port forwarding for designated ports on your router. This saves you the burden of manually configuring it yourself.
My router is not supported, so I will leave this option blank and configure the router manually.
However, please note that if you can configure your router, you might better skip QuickConnect altogether and move over to DDNS. This is beyond the scope of this post and saved for another time.
Permission
Under Permission, you should have at least one application selected. By default, all boxes are ticked.
For example, you can disable access to your DSM but allow Photo Station or vice versa. You can enable or disable the use of mobile apps as well. File sharing is a feature that I discuss separately below.
This section is the only way of access control you have with QuickConnect. The connection opens your DiskStation to the world. The only option you have is to choose which application you can access remotely carefully.
File Sharing
You can share a file or folder with others via a link or URL. If you have no external access defined via QuickConnect, you get an URL with a local network address, like:
https://192.168.9.100:5001/sharing/MupPPRXfb
With QuickConnect enabled, you will get a link with gofile.me, like:
http://gofile.me/ag4Km/SFNA3krgb
To summarize, enabling external access with QuickConnect to your NAS also extends the file and folder sharing capabilities.
Synology Account
Once you enable QuickConnect on your DiskStation, the QuickConnect ID is registered with Synology on your Synology account. It remains registered even if you disable QuickConnect on your DiskStation so that you can use it again later.
You can view and unregister any QuickConnect ID when you log in to your Synology account.
This ends my post on using QuickConnect with Synology NAS.
Thanks for reading
This post is donation-ware, and I made it to help you. Please consider leaving a comment or even buying me a coffee if it did. I will be eternally grateful.
Paul Steunebrink / Storage Alchemist
