When you use your NAS as a file server, you create shared folders as the main entry point for users to access the data on the NAS. The NAS administrator assigns permissions to each shared folder to control access. Although this works very well in most cases, users might want to have a dedicated folder where they have full access to store their data. The solution is a home folder for each user.
Using Home Folders On Synology NAS
What is the difference between a shared folder and a user’s home folder? When do you need home folders, and how do you set them up? This and more you find covered in this post on home folders.
Home folder
The idea of a user and his folder has existed in computers for years and is available on your Synology NAS: the home folder. Via the User Home service, DSM creates a home folder for every user and assigns the right permissions to each home folder.
All home folders in a single shared folder
The User Home service controls the availability of home folders. This service is disabled by default. Once enabled, DSM creates the homes shared folder that will contain all the user’s home folders.
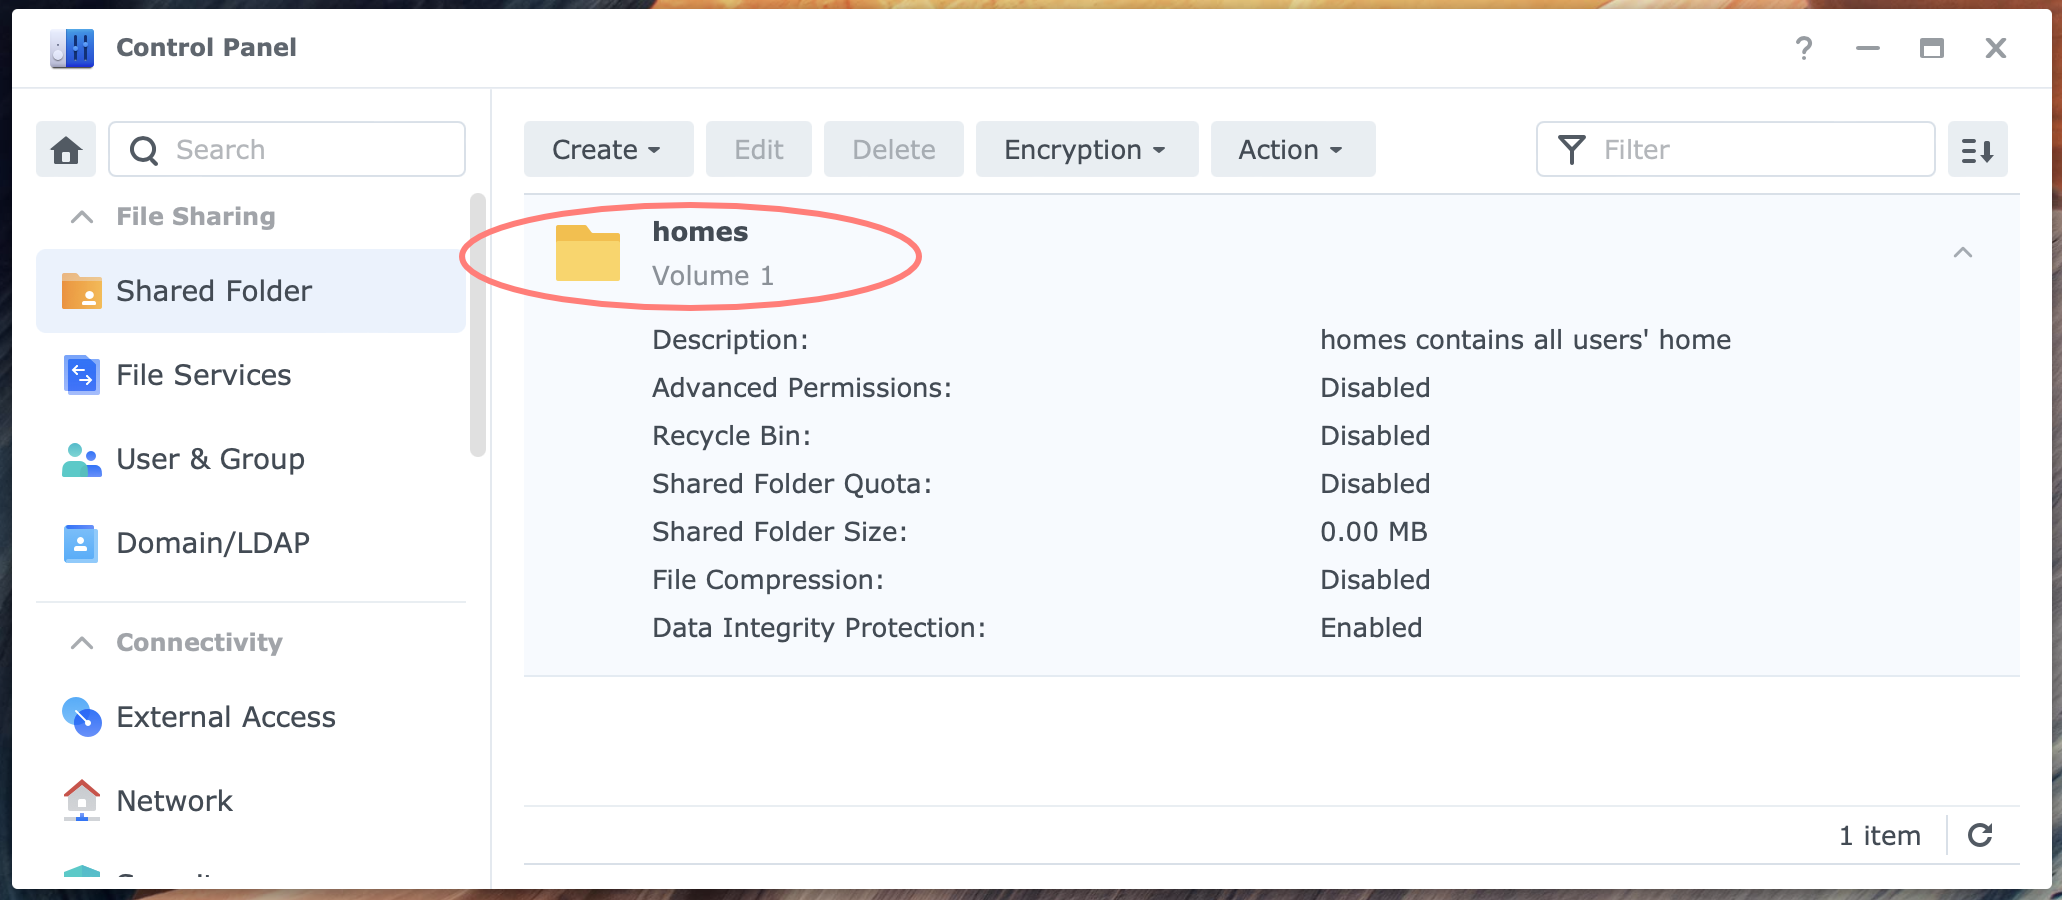
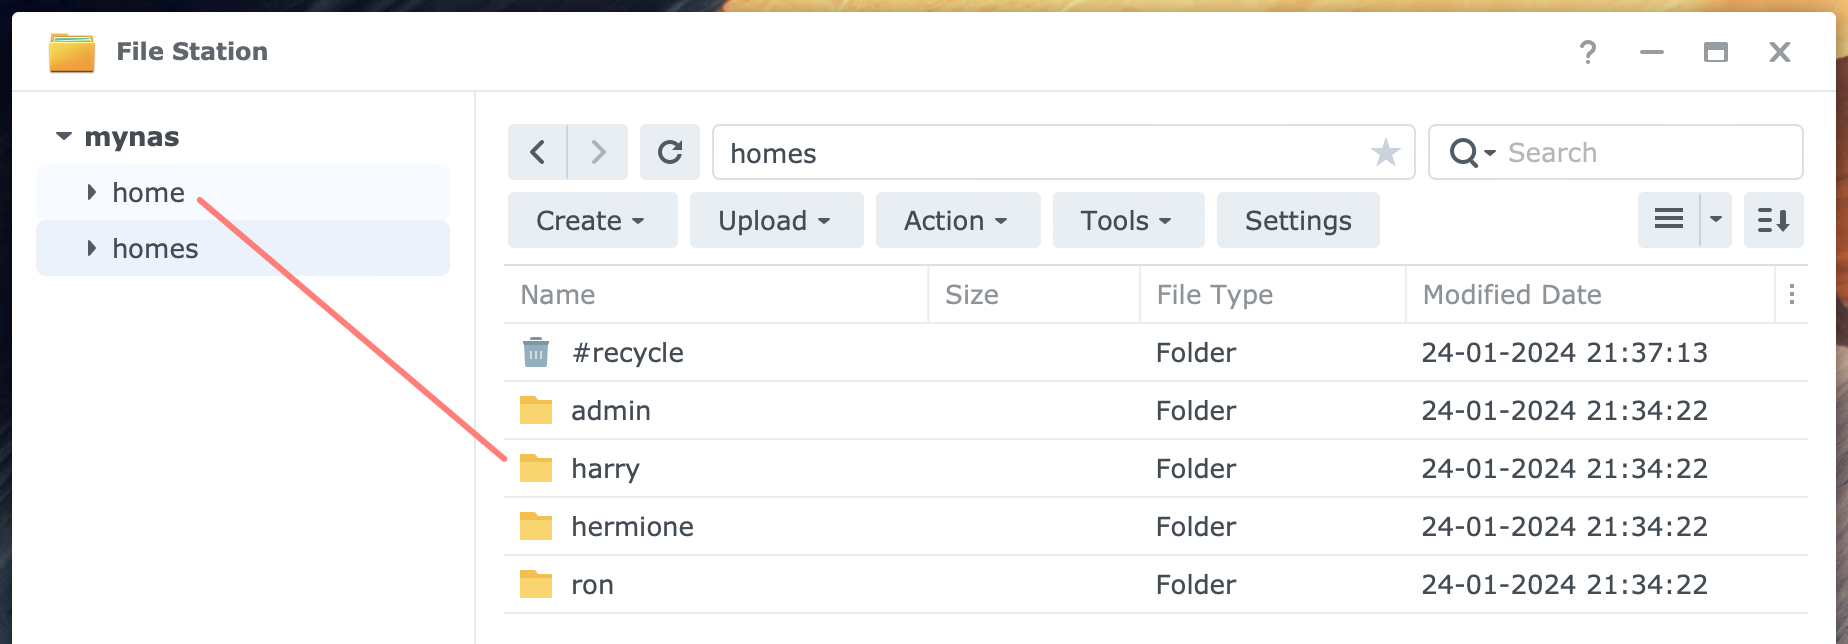
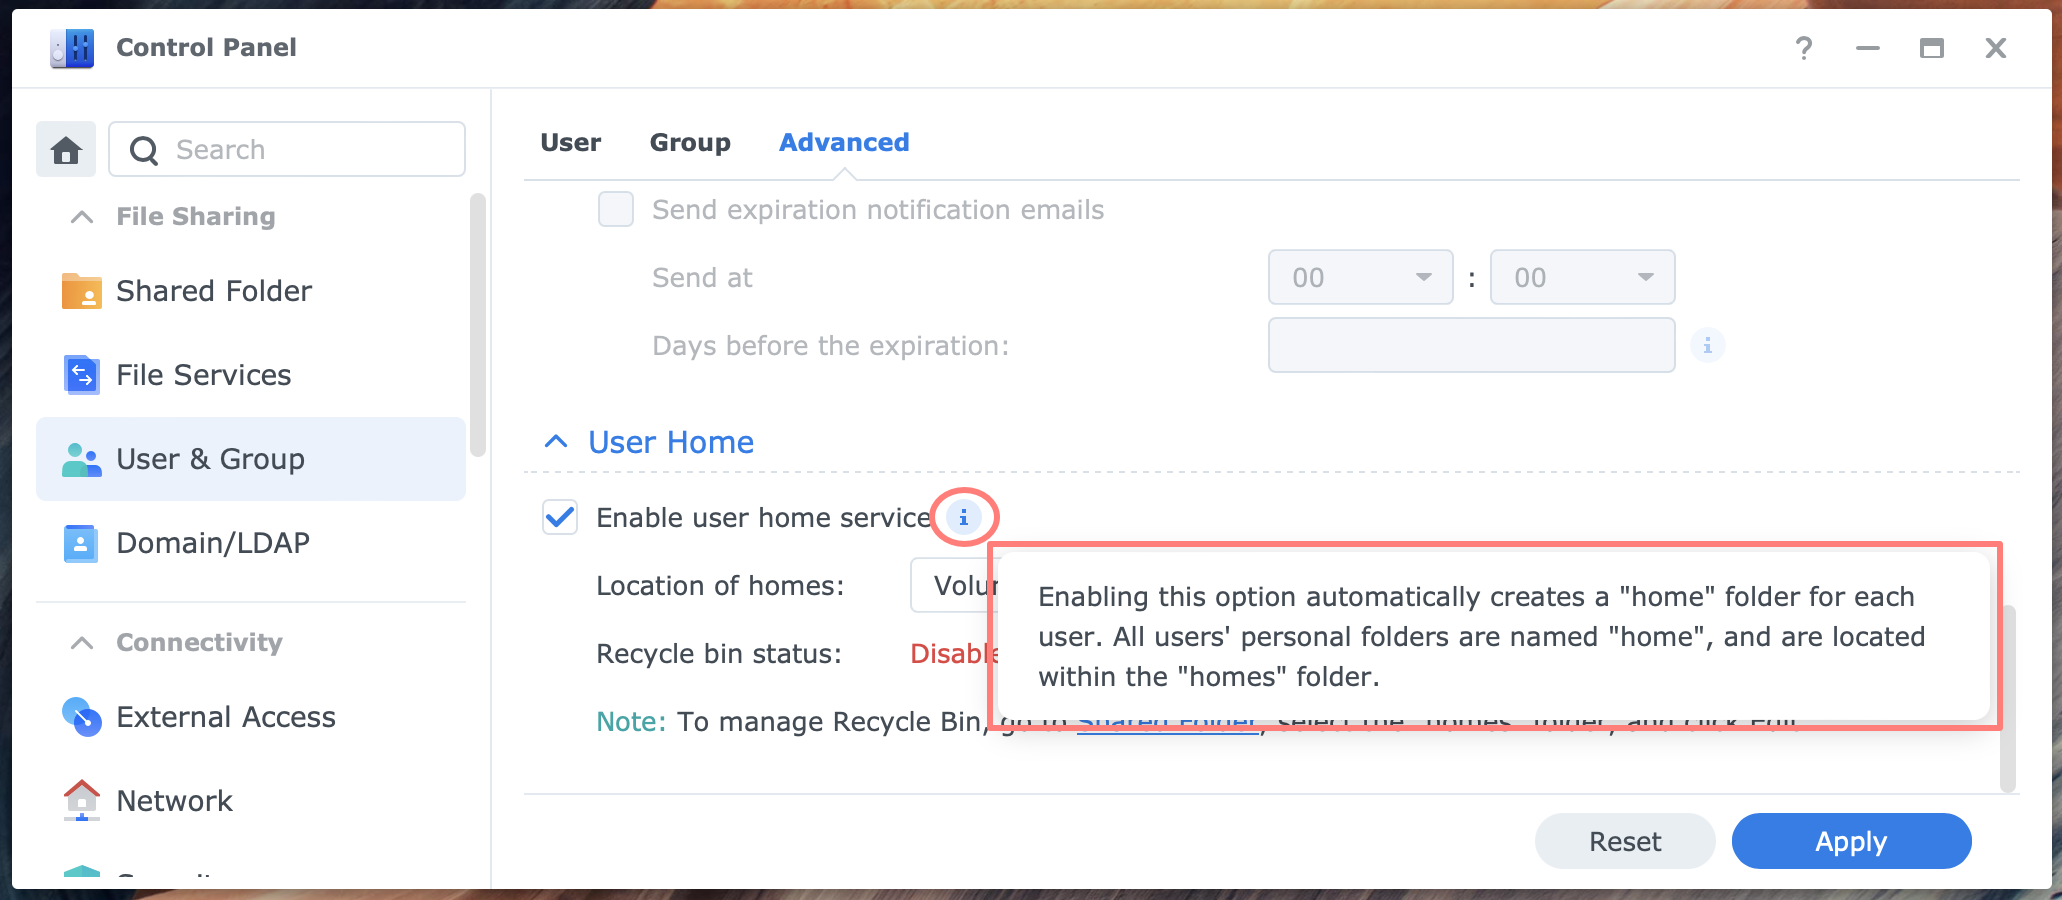
The /homes folder is a shared folder that contains the home folders of every user on the NAS. However, the home folder, without the -s, is not a shared folder. You won’t see it in Control Panel > Shared Folder. It is a virtual folder that links to the /homes/user_name folder of the logged-in user_name.
The automatic creation of a home folder for every user on the NAS saves the NAS administrator time because it does not have to create a shared folder to store personal files.
If you disable the User Home service later, the /homes shared folder and subsequent user folders inside it will remain in place and accessible. If desired, you can remove the /homes shared folder after disabling the User Home service.
Note
Every member of the administrators’ group can see the contents of all user’s home folders. You can not prevent this. For help in setting up users on your NAS, please refer to Better Synology User Management
Enabling Home Folders
You can enable and disable the User Home service. As an administrator, log in to DSM. Next, go to Control Panel > User & Group > Advanced tab > User Home section. Here, you can enable and disable the service.
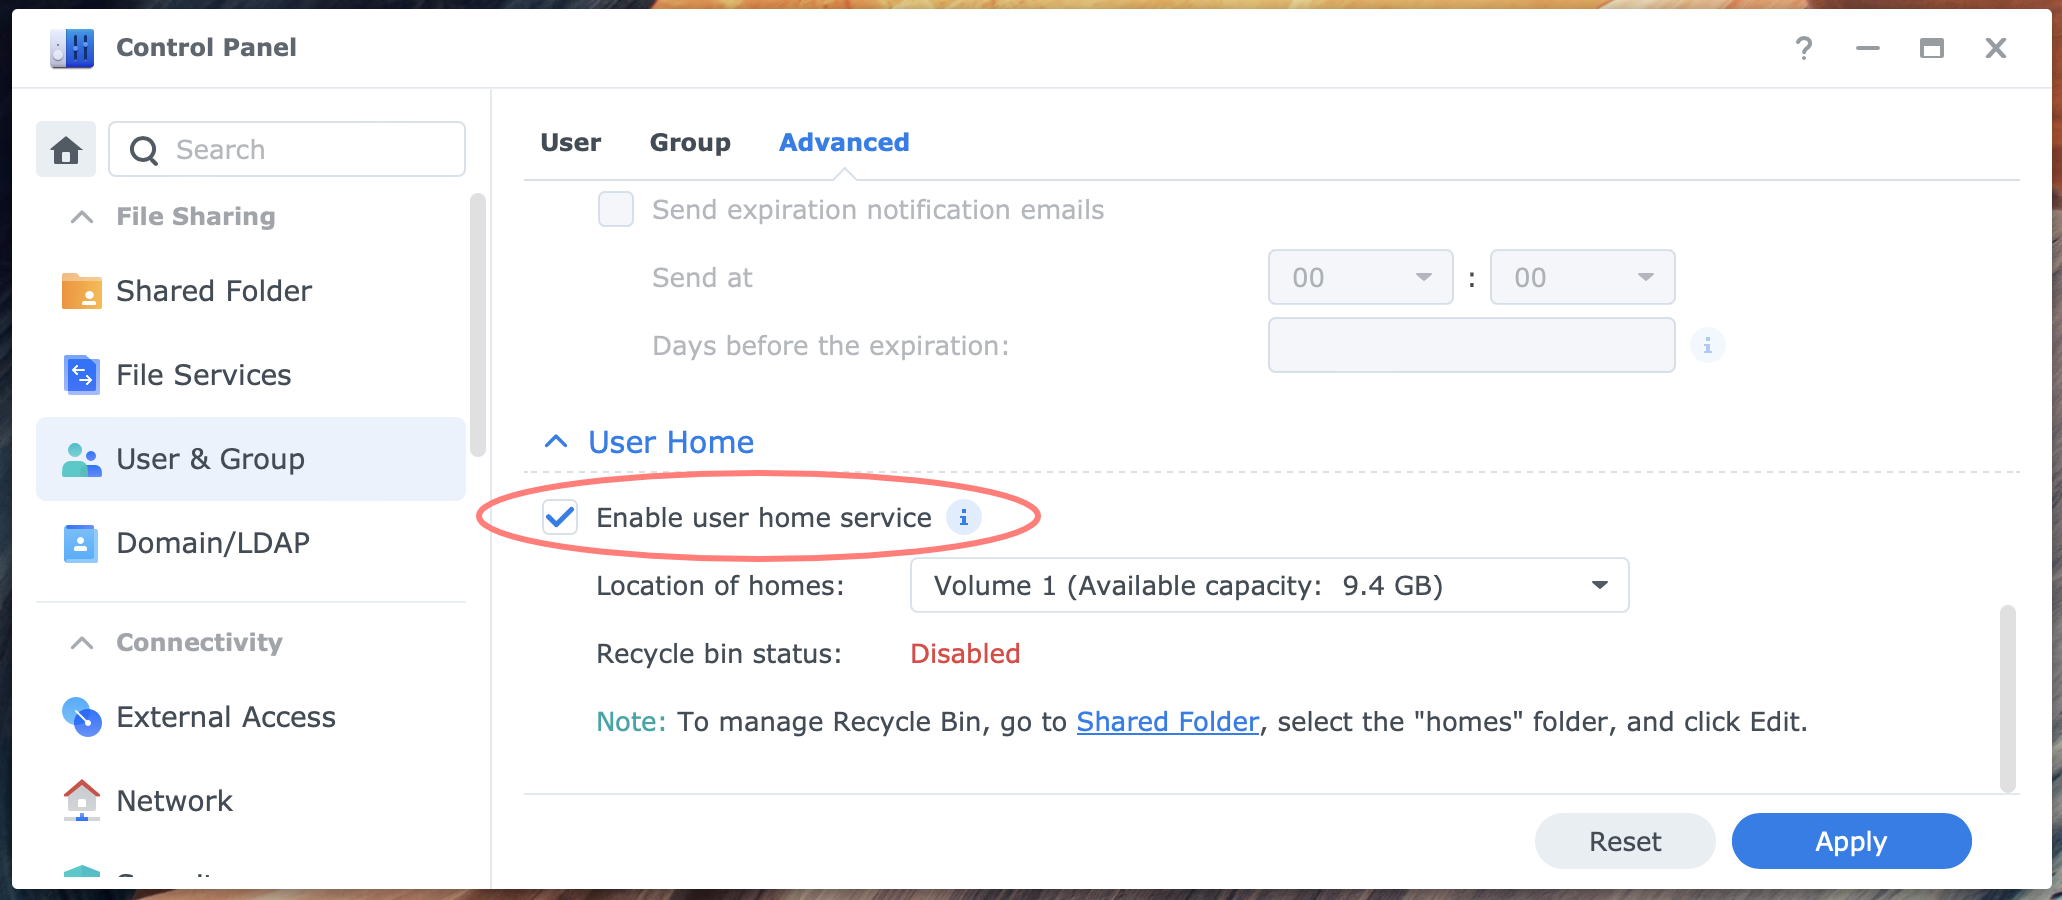
When you enable the service, you can select the volume for the /homes shared folder if you have multiple volumes on your NAS. Note that if you add a volume later, you can move the /homes folder to that volume.
Once enabled, the User Home service creates a /homes shared folder, a subfolder for each user on the NAS, and a home folder.
Fine-tuning
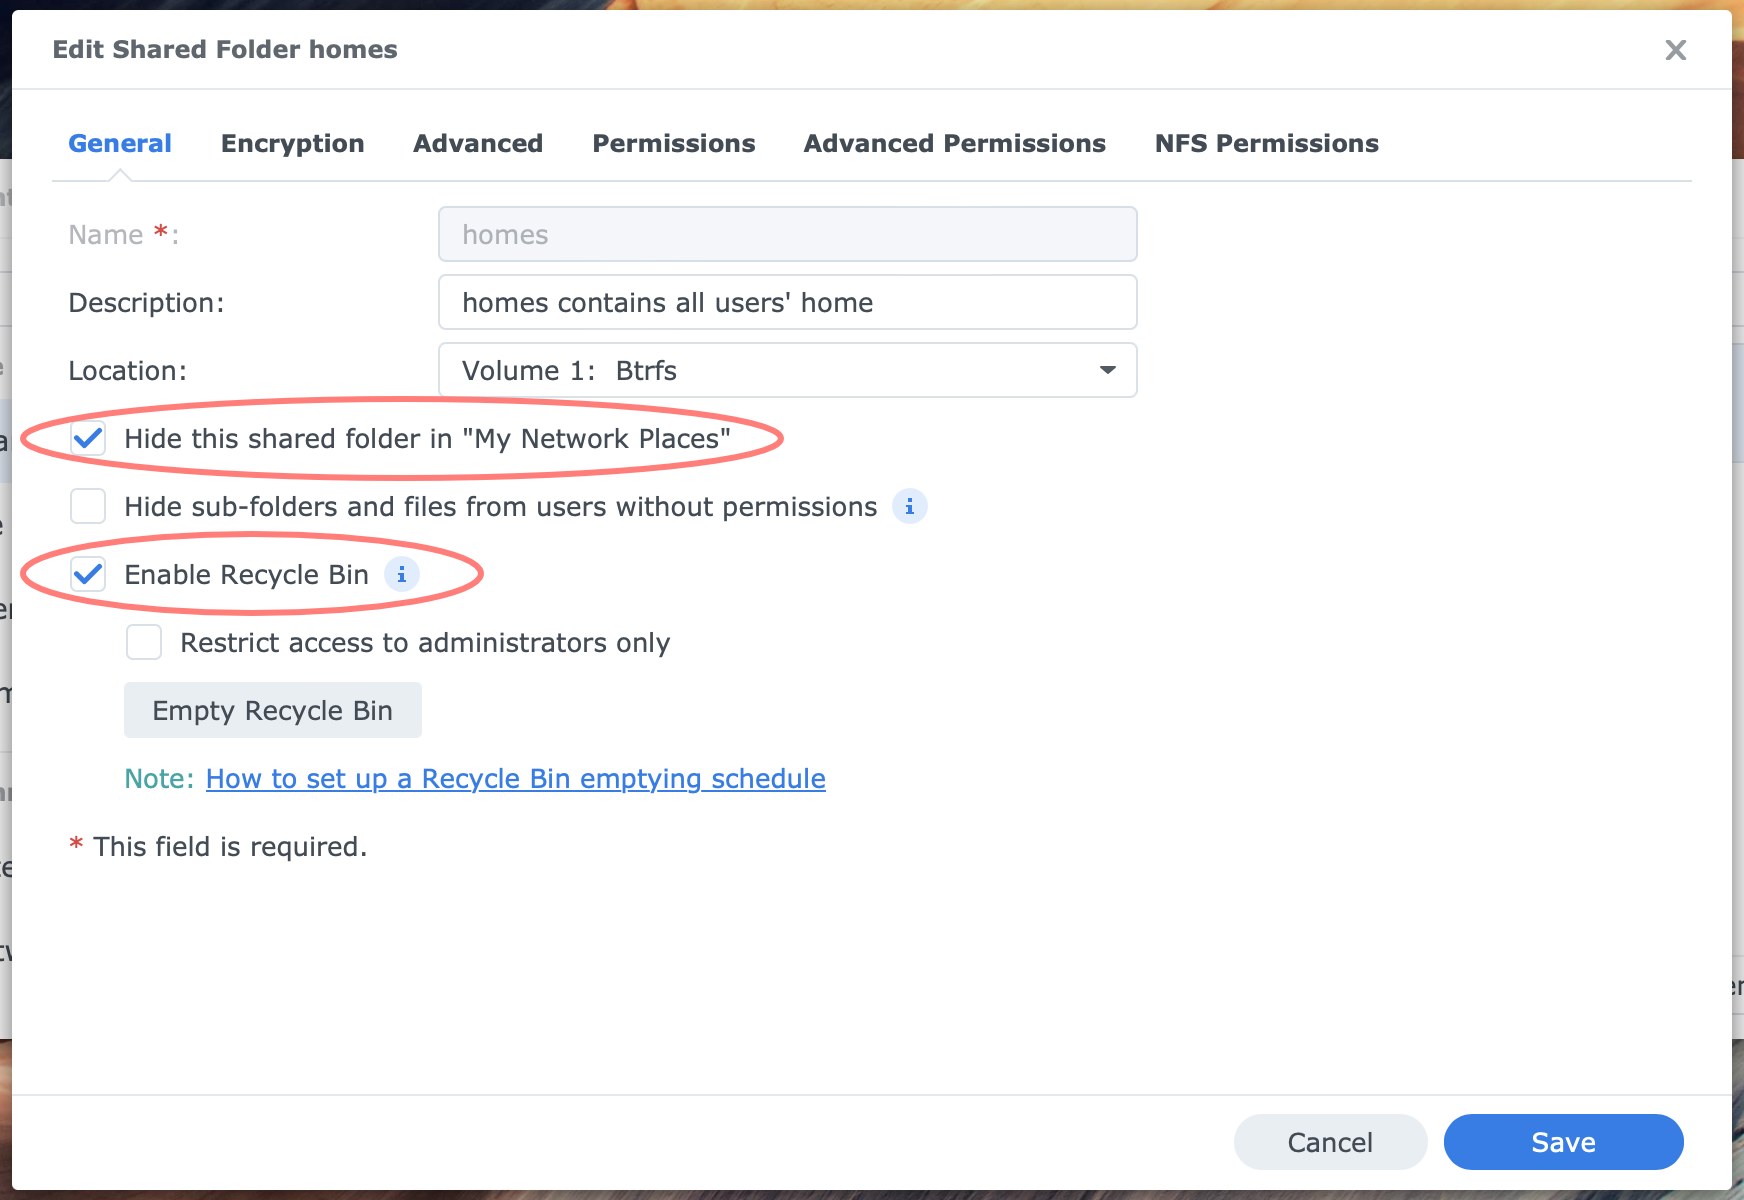
You can enable or disable the recycle bin from Control Panel > Shared Folders. Select the homes shared folder and click the Edit button. The following options are recommended:
- Hide
enable Hide this shared folder… to suppress the Homes folder for non-admin users; see explanation below. - Location
optionally, you can change the volume for the homes shared folder; this is the same setting as in the User Home section mentioned above. - Recycle Bin
set the recycle bin option as desired; it creates a recycle bin in homes and every subfolder for every user.
Only administrators can access the /homes shared folder and all user folders inside that shared folder. There is no option to prevent members of the administrators group from accessing the user’s home folders.
Tips
It is a best practice to hide the /homes shared folder from Network Places in Control Panel. As a result, users will only see their /home folder and not the /homes folder they can not access, preventing confusion.
Do not save any files in the /homes folder, and do not create a folder in /homes. This will disrupt the homes/home construction.
The Homes And Home Folders Confusion
The shared folder /homes is the parent for all the individual user’s home folders. DSM creates for all users a subfolder under /homes. DSM, and every other Linux system, you leave it there, letting users browse for their subfolder, with full access permissions for the logged-in user. But Linux and DSM took it one step further.

First, it limits access to /homes to administrators. Users can not access the /homes shared folder. Next, when a user logs on to the NAS via SMB from his computer or via DSM desktop and File Station, the user is presented with a /home folder. It looks like a shared folder, but it is a mapping of the /homes/subfolder for that user.
In the screenshot above, assuming harry is the logged-on user, the /homes/harry folder is mapped to the /home folder.
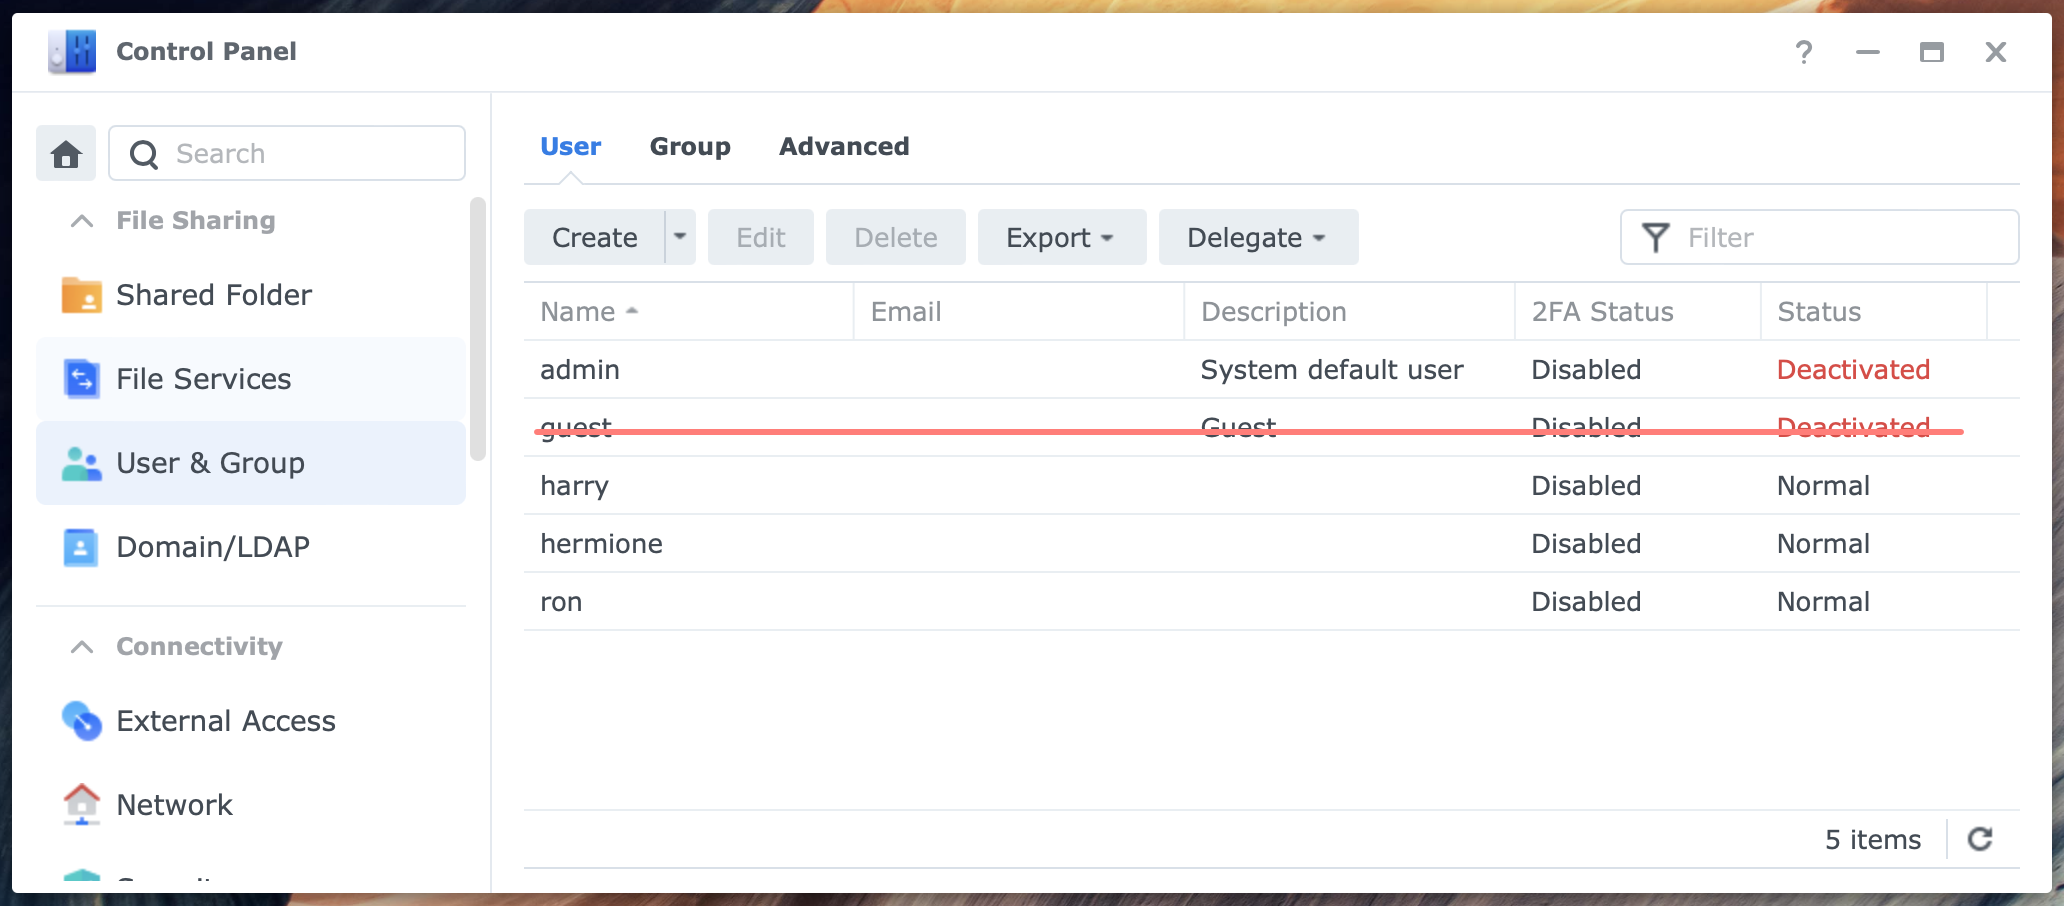
Each user gets a home folder, except for the guest user.
Applications
Users and applications benefit from the home folders, if available. The applications this applies to are:
- Audio Station
if you plan to create a personal library, enable the User Home service, and Audio Station creates your library in the /home/music folder - Synology Drive Server / Synology Office
when you enable the User Home service, Synology Drive Server automatically makes it a My Drive Team Folder that synchronizes with Drive clients - Synology Photos
when the User Home service is enabled, Synology Photos automatically creates the Personal Space that stores images in the user’s home/Photos folder - Web Station
if you would like to create a personal website, enable the User Home service, and Web Station creates your website in the /home/web folder
Secure Shell (SSH)
As an administrator, you can manage your NAS from the command line via SSH. For SSH, you might want to activate the User Home service. The user saves its security keys in its private folder /home/.ssh.
Thanks for reading
This post is donation-ware, and I made it to help you. Please consider leaving a comment or even buying me a coffee if it did. I will be eternally grateful.
Paul Steunebrink / Storage Alchemist

Ik snap nog steeds niet het verschil tussen de Home map en de Homes map. Ik heb een aantal users aangemaakt en rechten gegeven. Echter zij kunnen allemaal elkaars home mappen zien via de Homes map. Dat is niet wenselijk. Ik wil niet dat User A alles kan zien en aanpassen van User B. Echter als ik een user geen rechten geef voor de Homes map dan kan hij ook niet meer bij zijn eigen Home map. Dat is toch krom? Hoe kan ik dit oplossen?
I still don’t understand the difference between the Home folder and the Homes folder. I have created a number of users and given them rights. However, they can all see each other’s home folders via the Homes folder. That is not desirable. I don’t want User A to be able to see and edit everything from User B. However, if I don’t give a user rights to the Homes folder, he can no longer access his own Home folder. That’s crooked, isn’t it? How can I solve this?
Hans,
Als je de User Home service aanzet, zal DSM zelf de mappen aanmaken voor de gebruikers plus de benodigde rechten. Het is belangrijk zelf geen rechten toe te kennen aan de /homes gedeelde map of de gebruikersmappen daarin. Dit gebeurt automatisch en raakt verstoord als je zelf rechten toekent.
Gebruikers kunnen enkel de eigen map (in)zien, tenzij een gebruiker lid is van de groep ‘administrators’.
Vriendelijke groet,
Paul Steunebrink / Storage Alchemist
If you enable the User Home service, DSM will create the folders for the users and the necessary rights. It is important not to grant rights to the /homes shared folder or the user folders therein. This happens automatically and is disrupted if you grant rights yourself.
Users can only view their own folder, unless a user is a member of the ‘administrators’ group.
Kind regards,
Paul Steunebrink / Storage Alchemist