Making a Time Machine backup from your Mac to a Synology NAS is very convenient and easy to setup. With are a few tricks like quotas and backing up multiple Macs you create a smooth and reliable experience. Both background and a step-by-step guidance are included in this post.

Time Machine Backup To Synology NAS
Time Machine is the backup solution built into macOS. For storing your backup, you can use an external disk that you attach directly to your computer. If you have network-attached storage or NAS, you could use this instead.
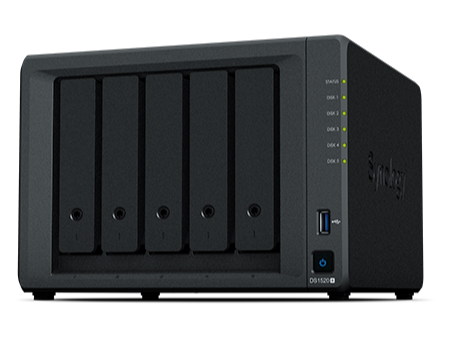
A Synology DiskStation is a popular NAS device. I have two of them myself, and I am pleased with them. A DiskStation is very well equipped for storing your Time Machine backups. To be successful, however, you need to consider a few settings.
This post first explains what to configure and why. Next, you will find detailed step-by-step instructions with screenshots.
Notes
This post was published earlier on our other website, the Image Alchemist.
In December 2022, Synology released an update to their backup solution, Active Backup for Business. This update now supports macOS clients and is, therefore, an alternative to Time Machine.
Contents Overview
I know that there are quite some posts about this topic on the web. My reason for adding my version is threefold.
- DSM, the software on the Synology NAS, is progressing. This makes some publications outdated. The time of this publication marks the end of the DSM 6 era, but I updated it for DSM 7
- Second, most publications do not take the different setups into account. It is not the same setup for every user. There are several differences that I will highlight here.
- Lastly, I wanted to set it up myself, so why not share it with you?
The basic configuration of a Time Machine backup to a Synology NAS is relatively straightforward. I outline it in the Generic configuration section below.
In some additional Background notes, I discuss several differences and exceptions that may or may not apply to you. It also helps you to understand what you are doing while setting up your Time Machine backup to your NAS.
I advise you to review them and determine whether they apply to your setup.
Generic configuration
Setting up a Time Machine backup to your Synology DiskStation involves several steps on both the NAS and the Mac.
On the NAS, you take the following steps:
- you create a shared folder on your NAS exclusively for the backups
- next, you create a user account on your NAS exclusively for the backups
- finally, you enable and optimize a file service for the Time Machine backup
The steps on the Mac are:
- you connect to the shared folder on the NAS that you created earlier
- next, you direct the Time Machine to that shared folder
- optionally, you can exclude folders on your Mac from being backed up
- last, you start the backup and set it to run automatically
Background Notes
To help you better understand what you are doing and highlight differences in the setup, I add some background notes to the generic configuration overview above.
File system
The storage on your Synology DiskStation is configured as a Volume with a file system. This file system is either Btrfs or EXT4. Both are fine for our purpose. However, they work differently concerning a quota we configure along the way. For more about quota, please reference Using quota on Synology NAS.
You can check your file system from Storage Manager, an application you find when logging in to the DiskStation Manager or DSM. Select the volume and check your file system.
The Btrfs file system, which you find primarily on each DiskStation Plus series model, allows you to set a quota per shared folder and user or group for each shared folder. We will use the last option (per user or group).
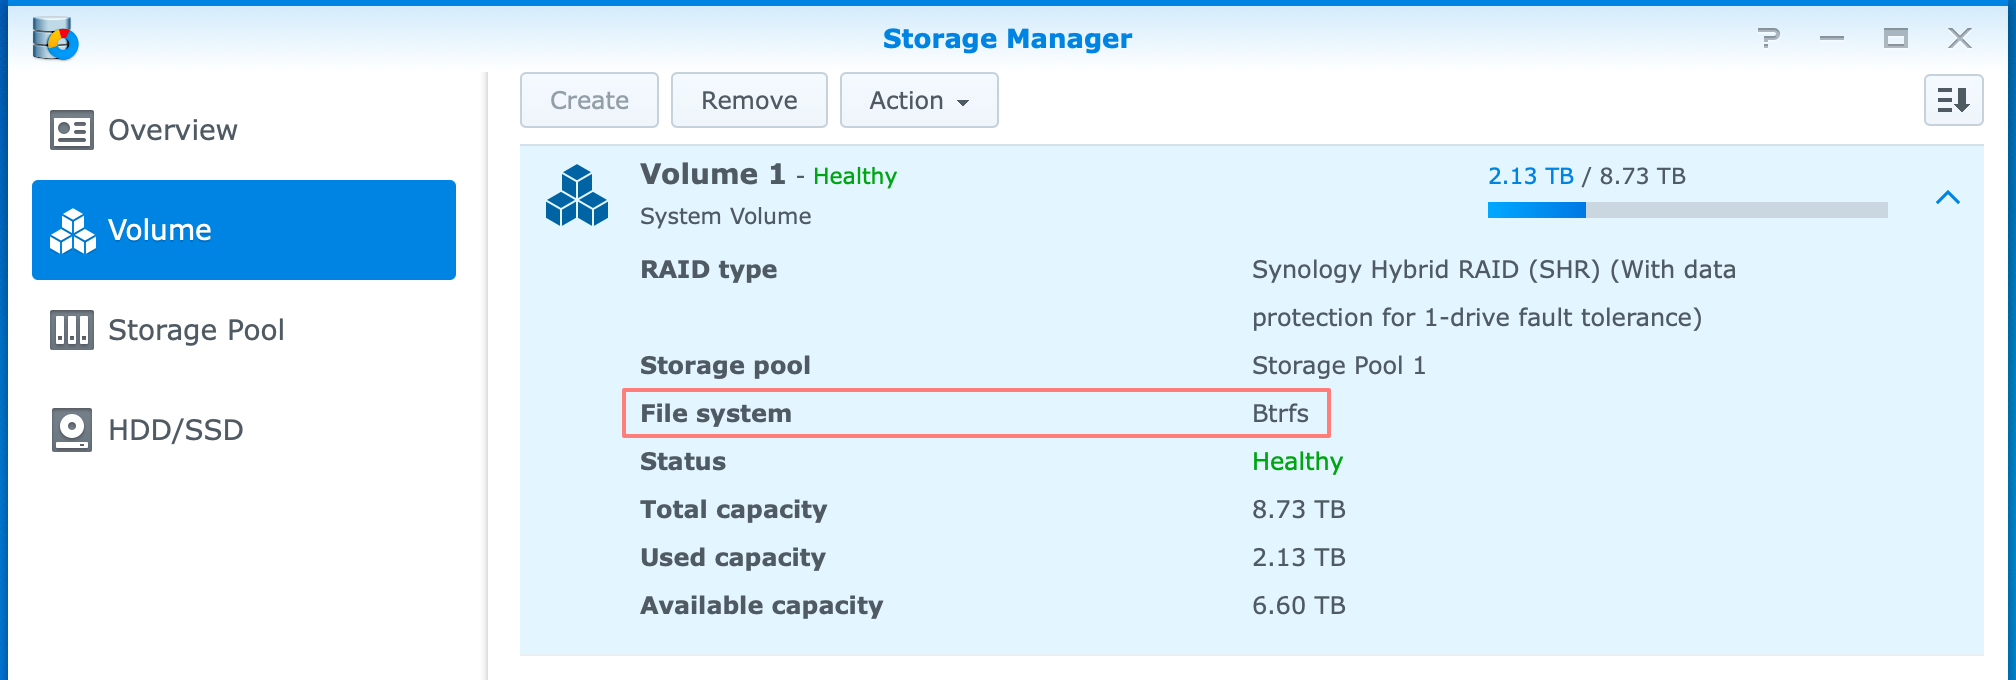
The EXT4 file system is available on all DiskStation models but is the only option on the Value series models. This file system has fewer options for quota management.
A volume with the EXT4 file system lacks quota on a shared folder. You can define a quota for a user or group for the entire volume, not per shared folder, as with Btrfs.
I will cover both the Btrfs and the EXT4 file systems when defining quotas in my step-by-step instructions.
File service
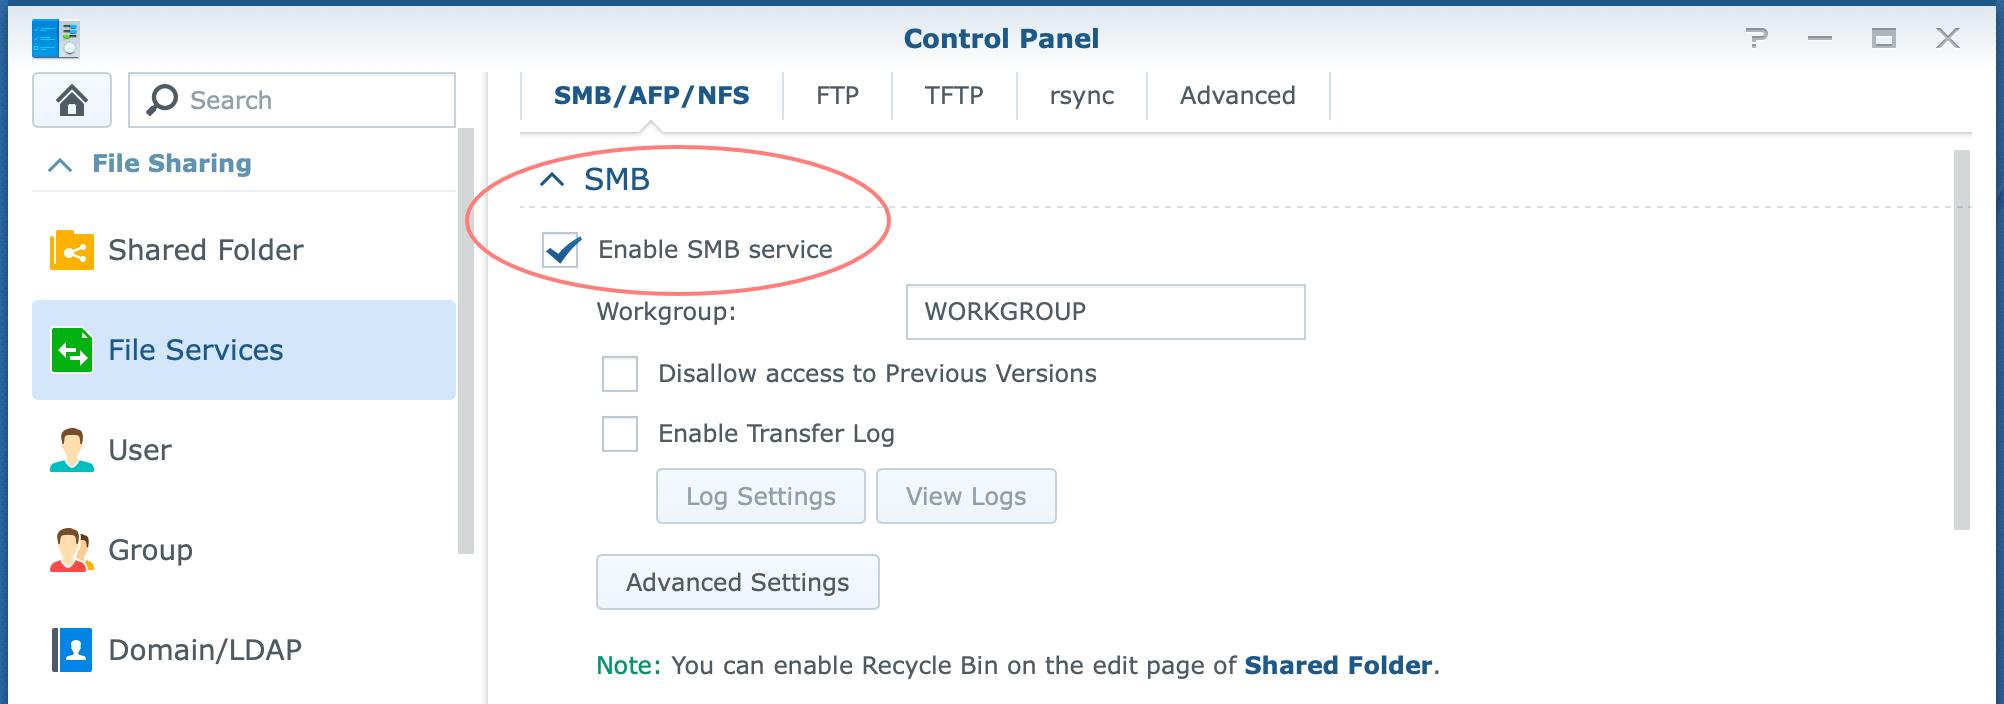
Your Synology DiskStation and Mac use standard file services such as SMB and AFP. Besides, both are enabled on either device by default.
It is less common to choose only one file service unless you need both for different purposes. Yes, fewer file services improve performance and stability.
Since AFP stands for Apple Filing Protocol, it sounds like a safe bet to most Mac users. Unfortunately, it is not.
AFP is an outdated and deprecated protocol and should be avoided. Apple adapted SMB a long time ago. In fact, since macOS Sierra 10.12, Time Machine backup runs over SMB if you allow it to.
Hence my advice is to disable AFP on your NAS and exclusively use SMB unless you have an older version of OS X (10.11 and older are called OS X, not macOS) or an application that needs AFP.
DiskStation Manager version
Because the technology progresses rapidly, I include the DiskStation Manager (DSM) version in this post. The layout of application pages changes, and options often expand with newer versions.
For example, before DSM 6.1, you could only assign a single Time Machine folder in your file services configuration. Now you can assign multiple folders, and the location of that option has moved to a different tab.
With DSM 6.2.4 current and DSM 7 in beta, I made some additional notes for the beta. DSM 7 does not change much about the current setup. Only a few screens have a different layout.
However, note that a version of Active Backup for Mac is expected after DSM 7 is released. This might make Time Machine obsolete. Please note that the current range of Active Backup packages is unavailable for DiskStation models from the Value and J series. These models will likely keep using Time Machine to back up their Macs.
Quota for storage space
Time Machine creates a multi-generation backup. It continuously adds to the backup what is new and changed on your Mac. It will use all available space in the long run, after which it will start deleting old backups. The Time Machine screen on your Mac states it clearly.
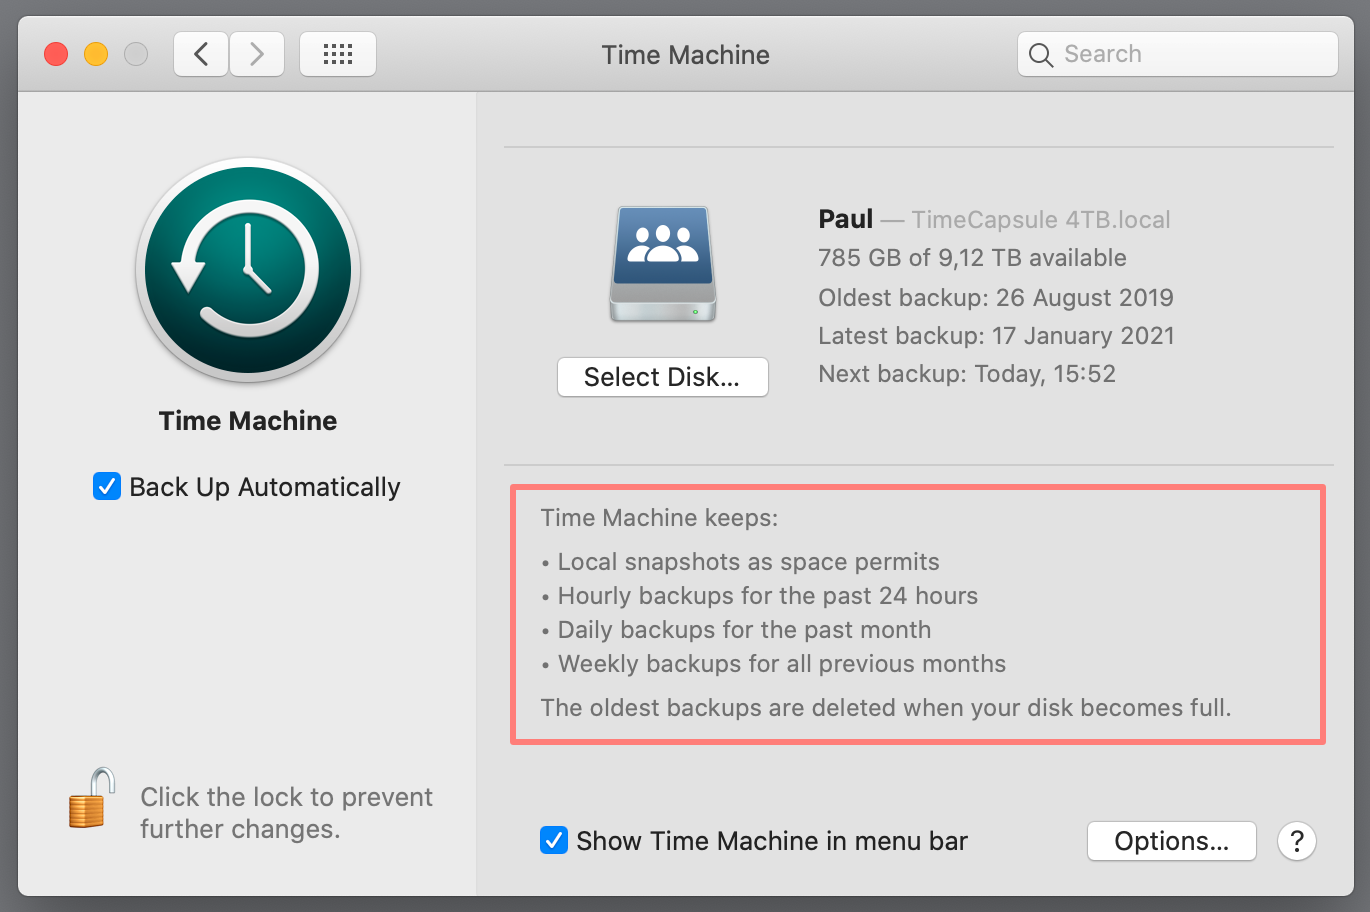
To tell Time Machine to start deleting the oldest backups, enable a space limit through a quota.
Alternatively, you can define a separate volume on your NAS for Time Machine backups to limit disk space. I do not cover that option here.
Multiple Macs
Most descriptions of a Time Machine backup to a Synology DiskStation do not cover how to backup multiple Macs. Should you create separate shared folders, separate user accounts, or both? How do you manage the necessary quotas?
Since each Mac with Time Machine creates a separate backup file, there is technically no need to create a separate shared folder for each Mac. All backups from your respective Macs can go into the same shared folder for Time Machine backups.
Because you must limit the maximum size of your backup with a quota, and we assign quotas to the TimeMachineUser account that we use for the backup, I advise you to create a user account per Mac for its Time Machine backup. It makes sense to include your Mac’s name in that user account for easy identification.
You can, however, create multiple shared folders, one for each Mac. The benefit of this additional step is a complete separation, assuming you only give one TimeMachineUser access to each shared folder. Now, no TimeMachineUser account can affect (read: delete, change) another Time Machine backup file.
Continue Time Machine
If you already run Time Machine on another device, you have three options:
- you continue with that backup on your Synology NAS, retaining your backup history
- also, you have the option to use both locations; Time Machine will alternate between locations
- start with a new backup on your Synology NAS.
I will assume the last option but also cover the other two in the step-by-step guide.
Configure Your DiskStation
Okay, let’s get started. Open your browser, point it to your Synology DiskStation with its IP address or server name and log in to DSM with an account with administrative privileges.
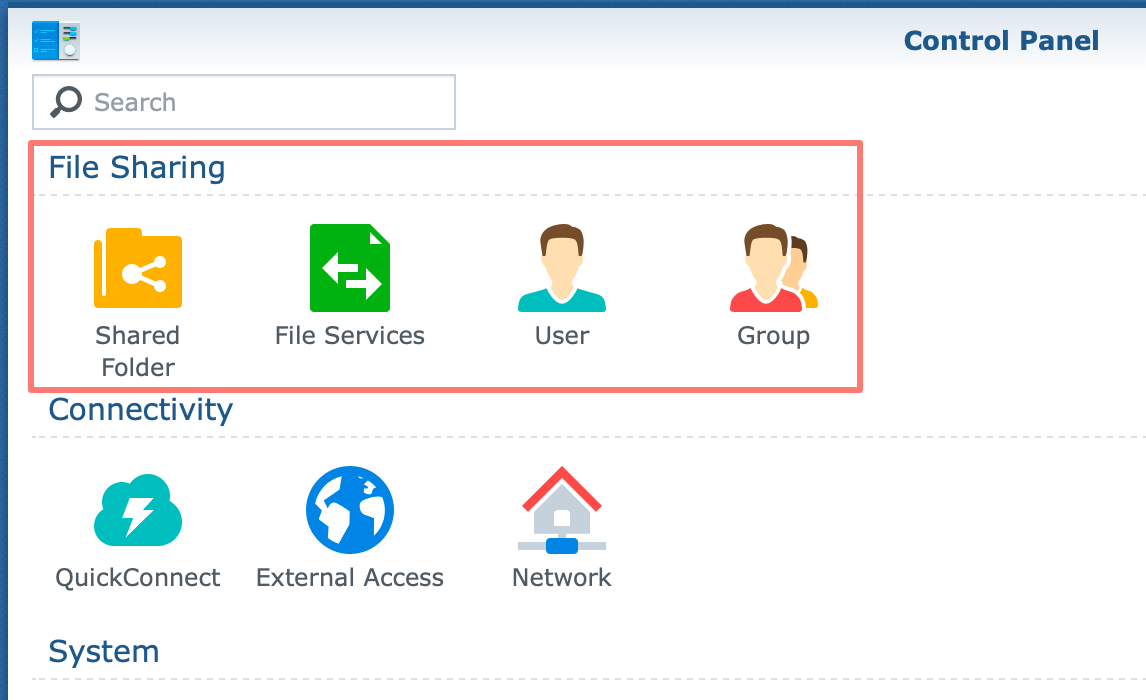
You only need the Control Panel application, and an icon is probably on your DSM desktop. In Control Panel, we will only use the top row of icons.
Create a shared folder
Open Control Panel and click on Shared Folder. Click Create button to create a shared folder. Give the shared folder a name like TimeMachineBackup and a description like for Time Machine backups.
Note that I prefer not to use spaces in folder names, but you are free to do so. Select the location if you have multiple volumes on your NAS.
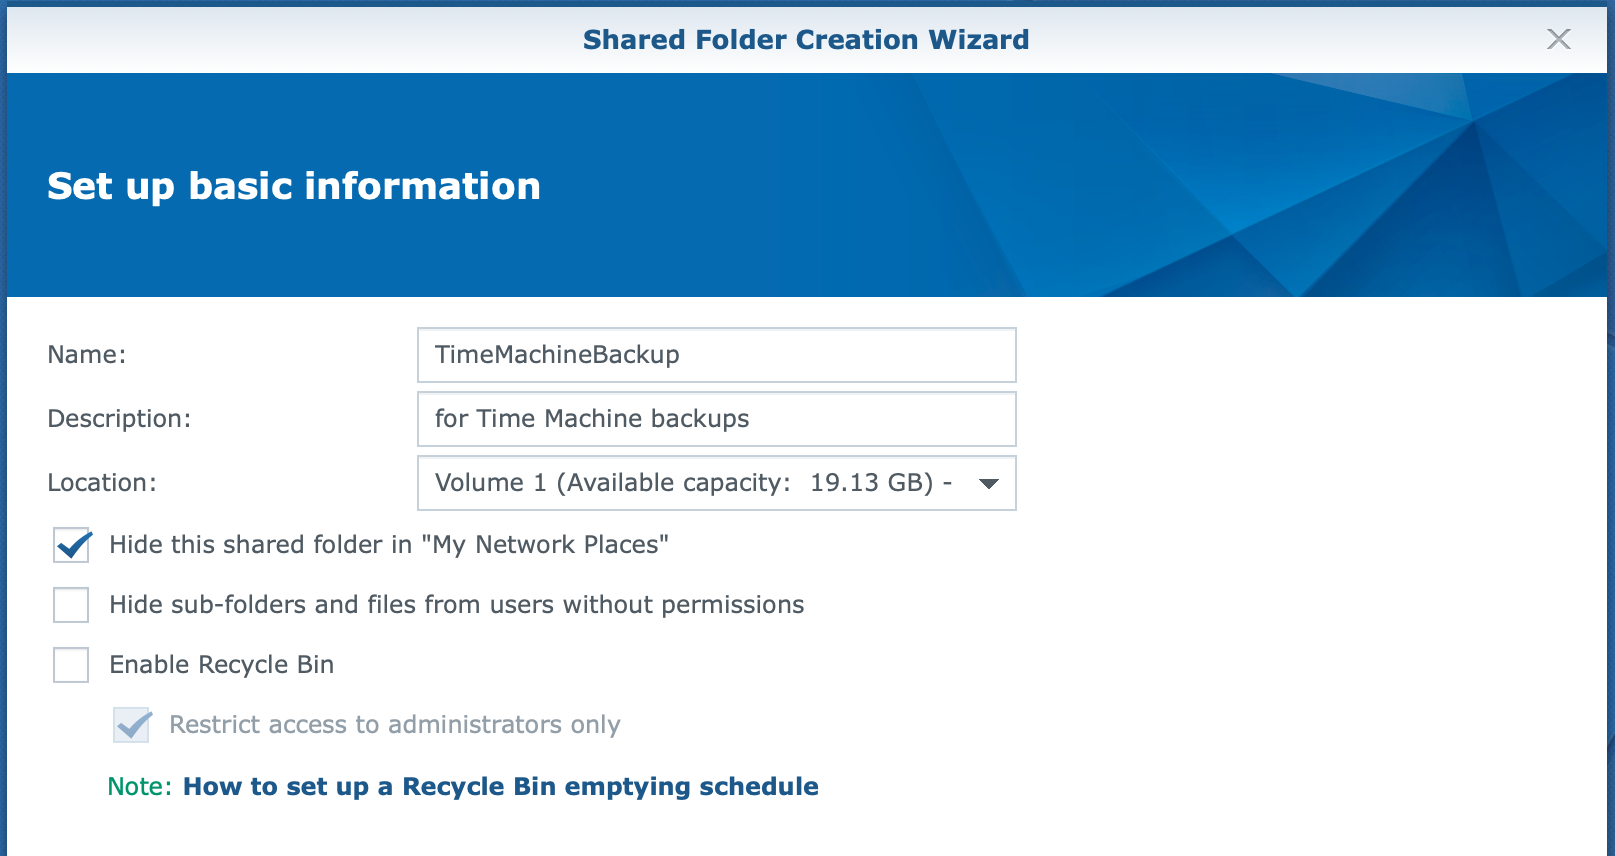
Enable Hide the shared folder in “My Network Places” as you won’t interactively access the folder as any other user. This does not affect any functionality or the ability of Time Machine to find and use the folder.
Do not enable the Recycle Bin as you won’t delete individual files from the backup.
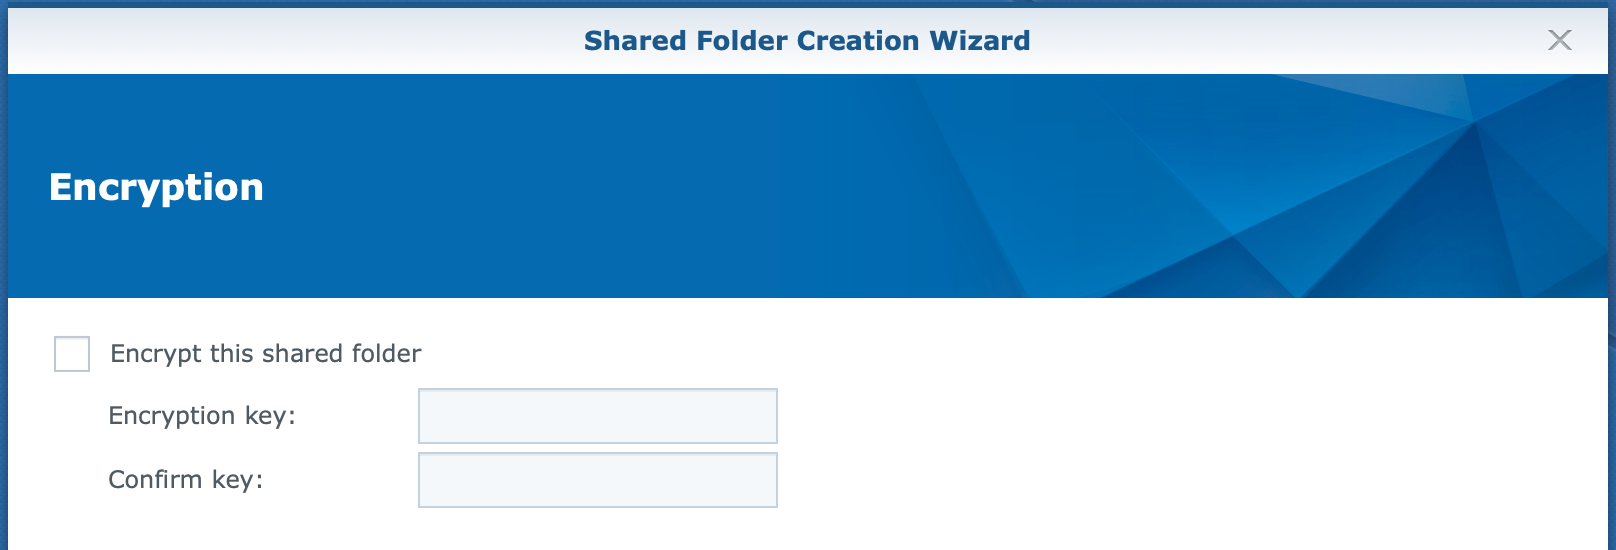
Do not encrypt this shared folder. If you need encryption, use the Time Machine option for encryption. I will show you that option later in this post.
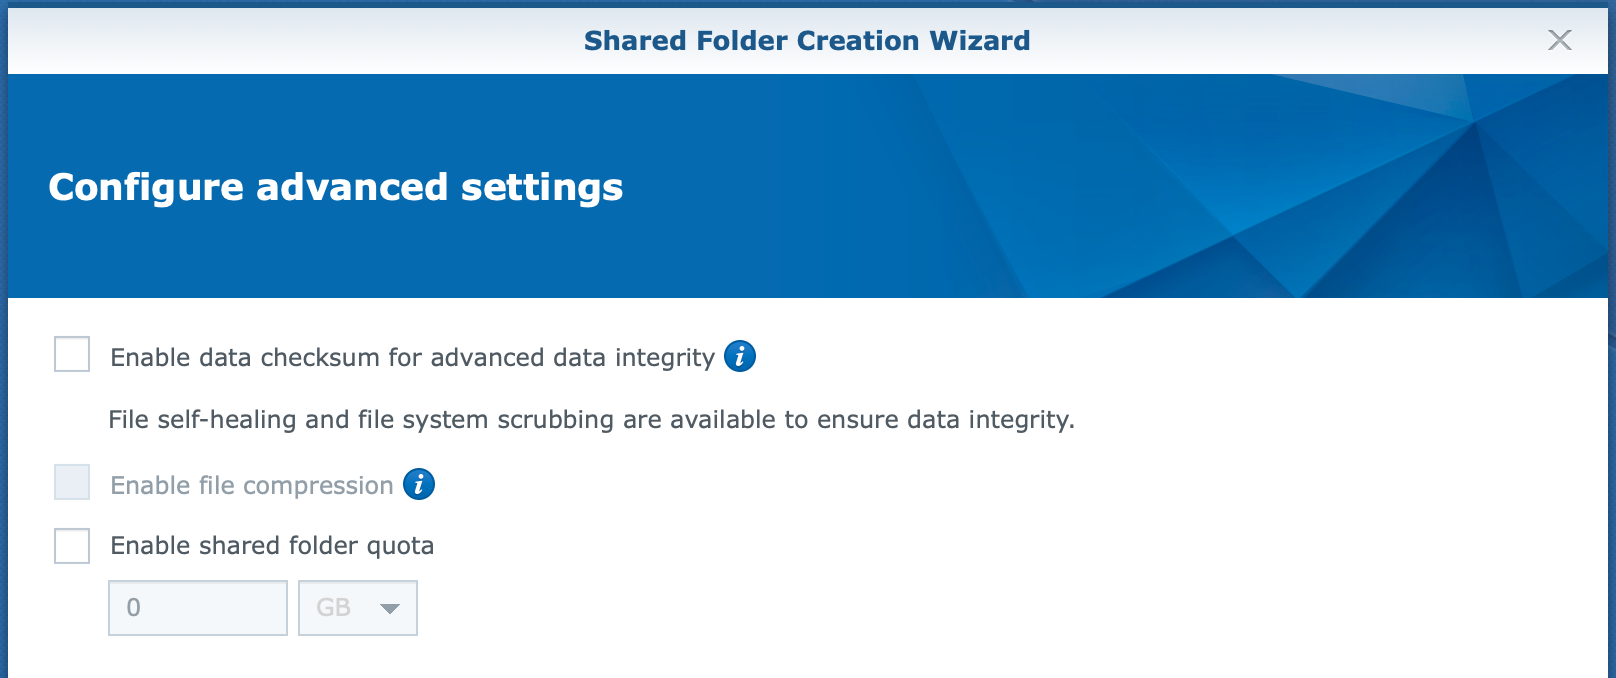
Set the advanced settings (available on volumes with Btrfs only) to your preferences. I suggest not to use file compression and shared folder quota. We will define a quota for the user later, and file compression asks for many resources from your NAS.
Data checksum is an option. It takes additional resources from your NAS. Note that you can not disable it later.
Tip: if you are not sure how either compression and data checksum affect the performance of your NAS, do a test run and open Resource Monitor from the DSM desktop. If you have a separate storage pool with dedicated disks for this purpose and a powerful processor, you can safely use these options, either one or both.

Skip the screen to set the Shared Folder permissions and click OK. Review the result as in the screenshot above.
Sidestep
If you plan to create multiple shared folders for different Macs, I suggest you include the Mac name in the shared folder name. As I mentioned, you can store backups from other Macs in the same shared folder and use different user accounts for each Mac.
Multiple shared folders for each backup create a complete separation of backups and user accounts with access to these backups. It is the safest option and perhaps a best practice in larger environments.
We create a user account in the next step.
Create a user account
Continue in Control Panel and click on User. Click Create to create a new user. In the User information screen, fill in the name like TimeMachineUser.
If you have multiple Macs, I suggest creating multiple accounts with a name like TimeMachineUser_MBP15AZ, where MBP15AZ is the computer name.
Add a description like for Time Machine backup or for Time Machine backup of MBP15AZ.
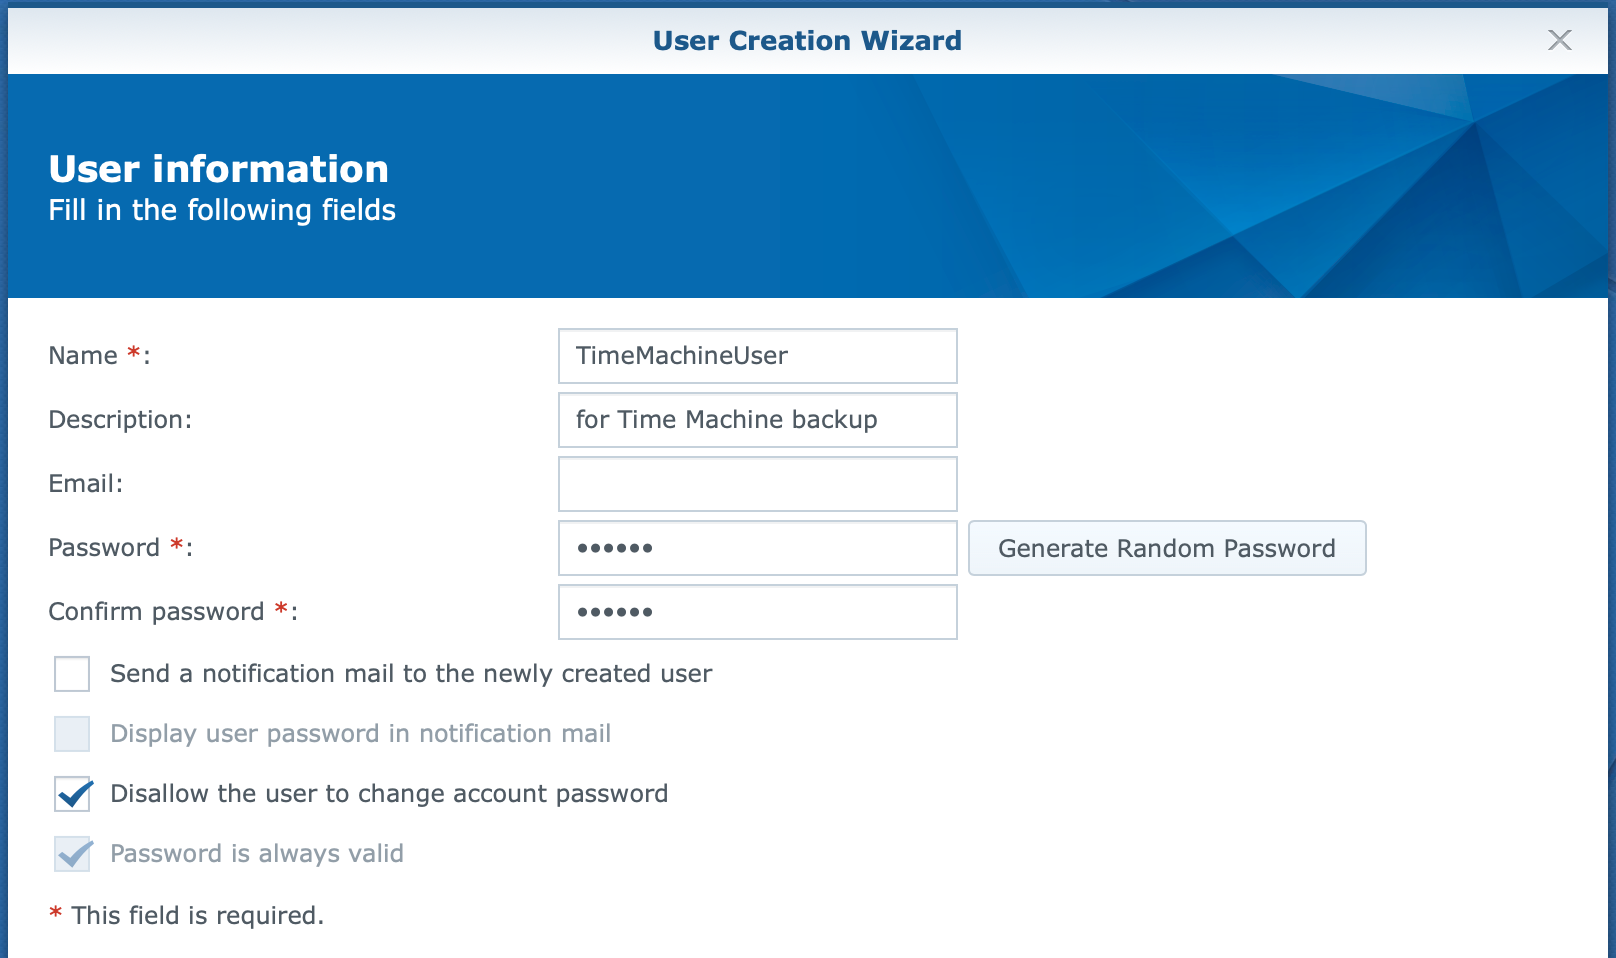
Enter a password or use password generation here, a great feature but limited to a six-character password unless you change the default password settings in Control Panel.
Copy and paste the password into a file or note. I prefer to use a password manager for that purpose. Make sure you use a strong and unique password as you never have to type it in, and you won’t change it often.
Check the box for Disallow the user to change account password. This ensures that the password will not accidentally change, as this will disrupt your backup process.
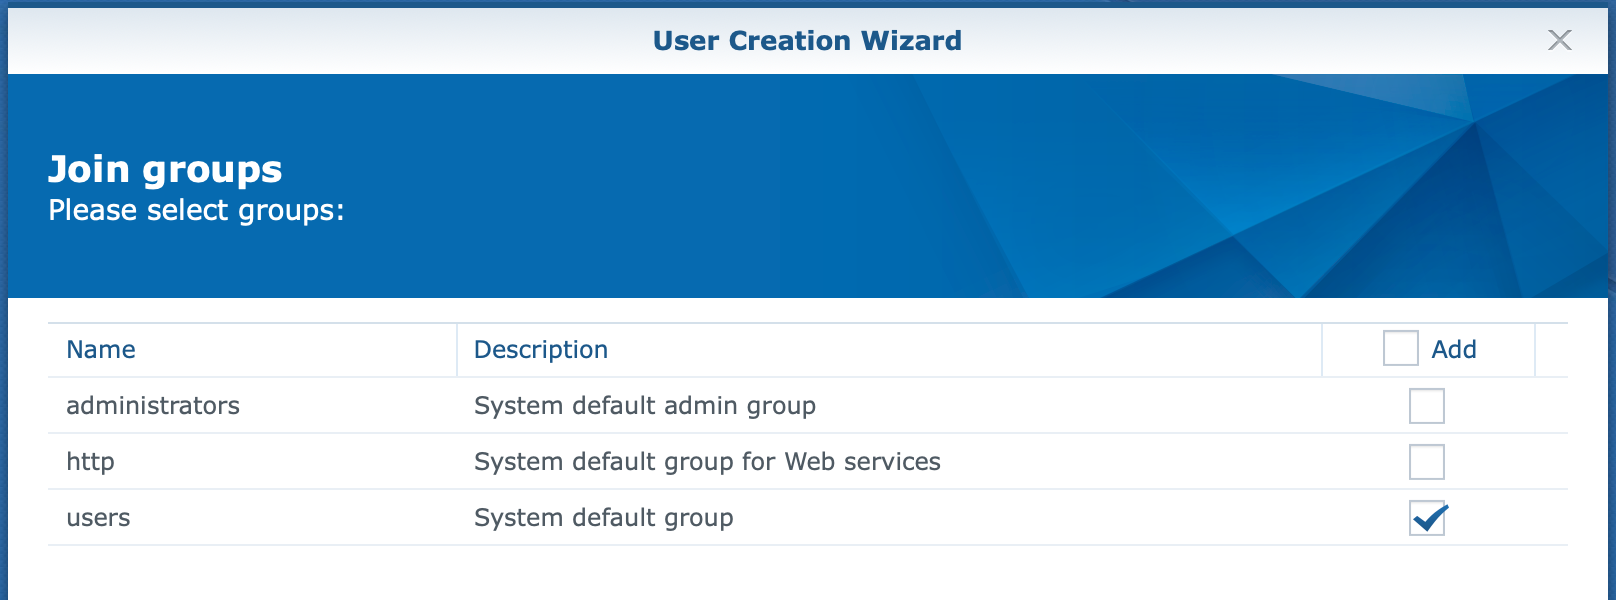
Let the user only join the Users group (default). Do not make this user a member of the Administrators group. Quota settings are not enforced on members of the Administrators group.

Give the user Read/Write access to the TimeMachineBackup folder you created earlier.
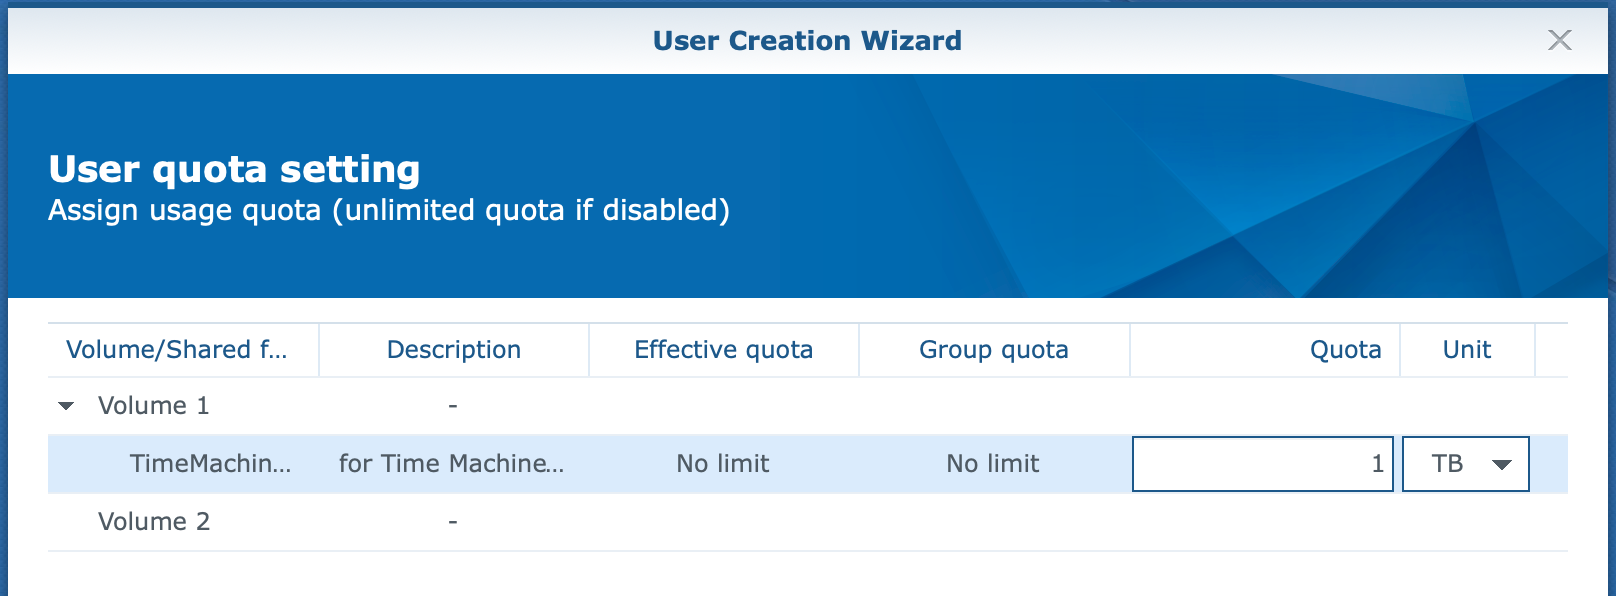
Set the quota for the user. A rule of thumb for the amount is between 2 and 3 times the computer’s hard disk size. For a 500MB drive, I set the quota to 1 TB. Note that larger quotas give a more detailed backup history.
The screen above is for a volume with the Btrfs file system. If you have the EXT4 file system, only the volume(s) is listed. Use the same quota values for the user. Select the volume that contains the Time Machine shared folder if you have more than one volume.
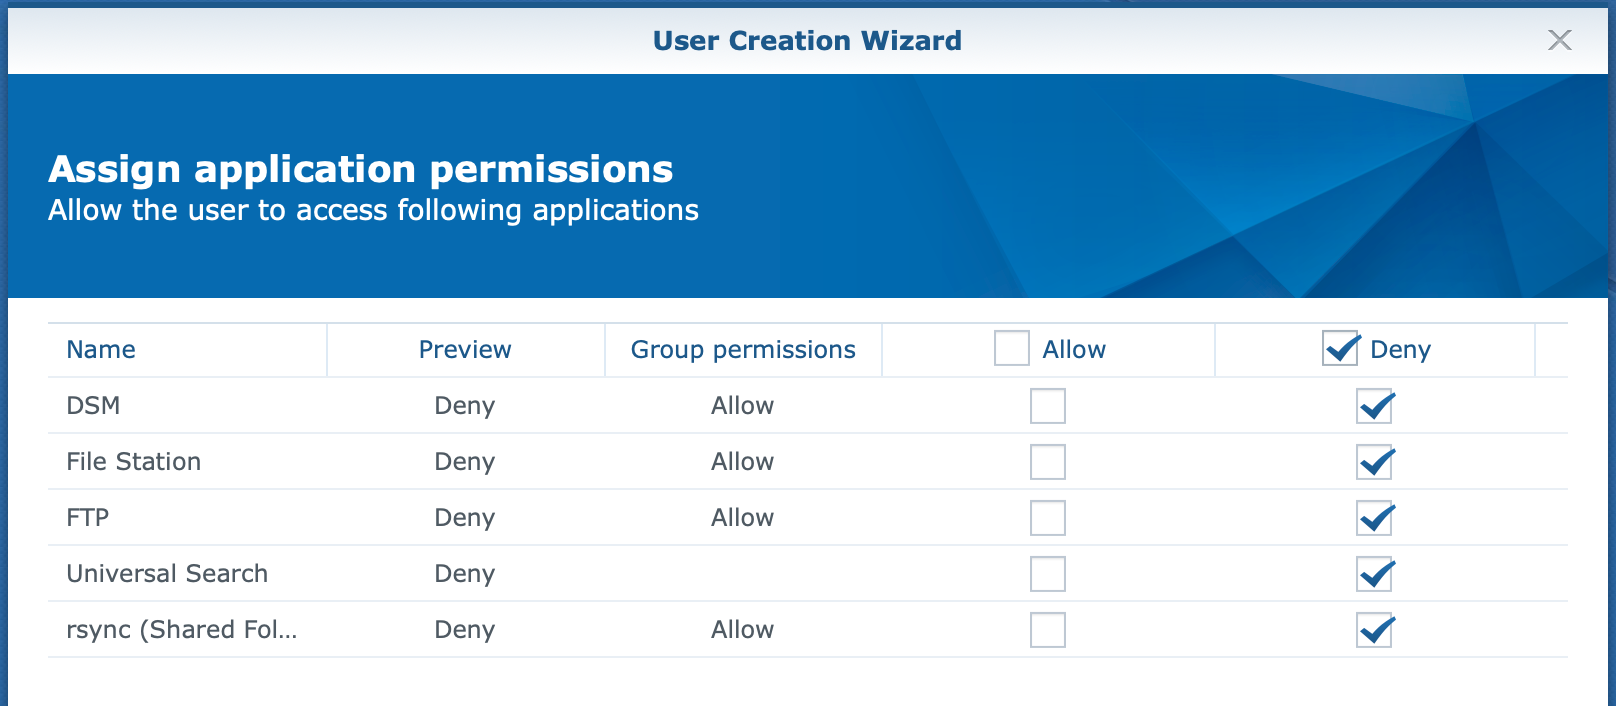
The next step is optional. In the Assign application permissions screen, I deny all application permission in my setup because the backup account will not use any application on the Synology NAS. This also limits the potential abuse of this account.
Please note that in DSM 7, the SMB service is in this list of applications. Because you need SMB, set a checkmark in the Allow column for SMB.
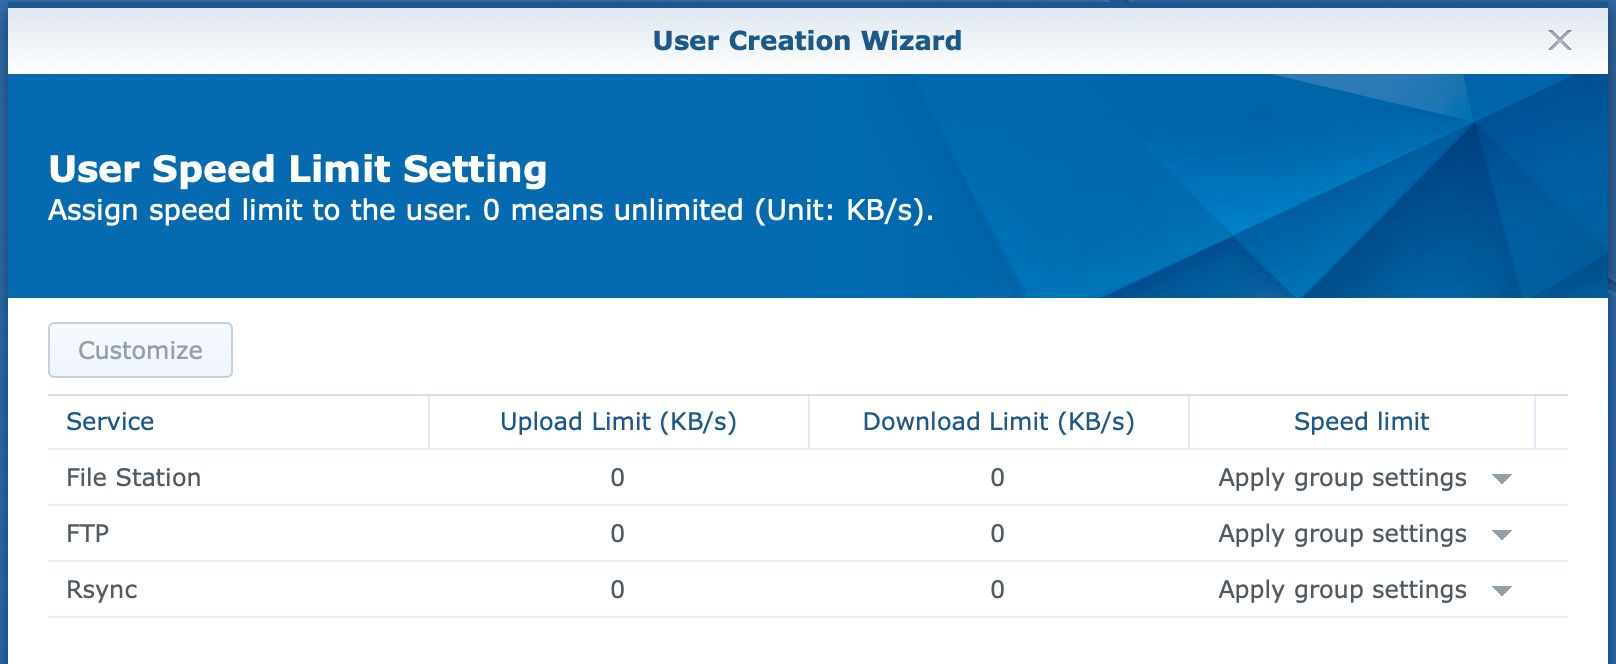
Skip the settings for User Speed Limit.

Review the result of your work in Control Panel > User.
Congrats, you created the Shared Folder and the User. In the next and last step of the configuration of your DiskStation, we look at the File Services.
Sidestep
If you plan to create multiple users for many Macs, I suggest creating a group named TimeMachineGroup and making all Time Machine user accounts a member of this group.
Continue in Control Panel and click on Group. Click Create to create a new group.
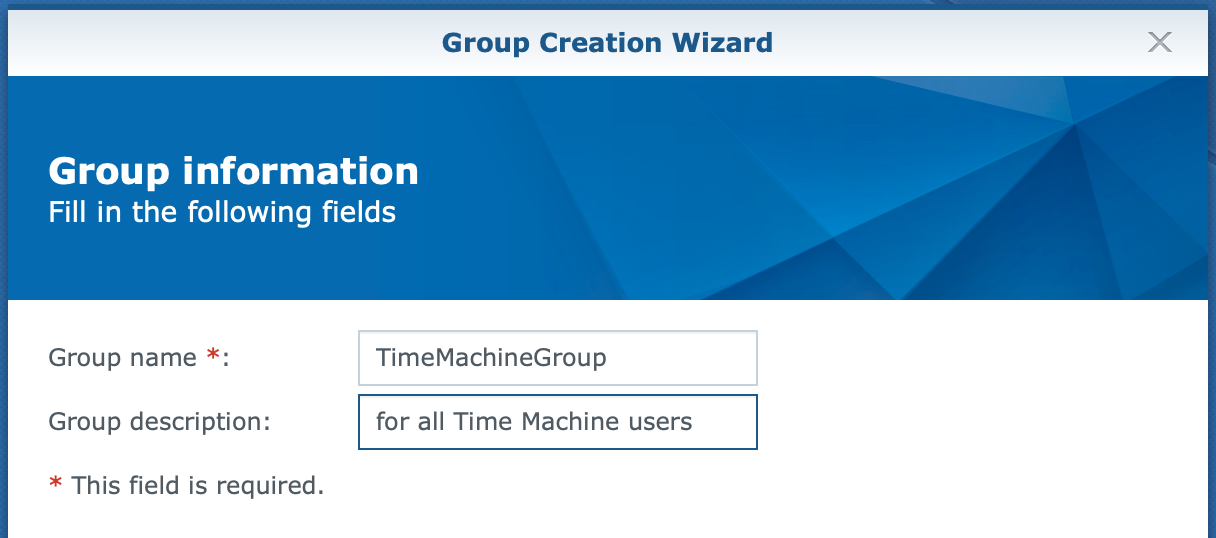
Give this group Read/Write permissions to the TimeMachineBackup shared folder instead of the users.
Next, you could assign a quota to the group instead of the user accounts, but not all Macs have the same size hard drive. Hence they require different quotas. Therefore it is better to assign quotas to the user account.
Next, you assign the deny application permissions, as mentioned earlier, to the group instead of the user accounts for easier maintenance.
Configure file services
Continue in Control Panel, click on File Services and select the SMB/AFP/NFS tab if you use DSM 6. On DSM 7, each file service has its tab.
I assume you use macOS 10.12 Sierra or later and will use SMB, not AFP. If you prefer to use AFP, read that instead of SMB in the first two steps, screenshots, and the Enable Bonjour Time Machine broadcast setting.

Under SMB, check Enable SMB service if it was not enabled already and disable the AFP file service on the same page.

Next, click the Advanced tab.
Under Bonjour, set a checkmark for Enable Bonjour service discovery (default). Next, do the same for Enable Bonjour Time Machine Broadcast via SMB. Click on the Apply button.
A message may appear that notifies you that the Bonjour Time Machine broadcast via SMB also enables SMB3 Windows file service, Opportunistic Locking, SMB durable handles, and SMB2 lease.
These are advanced SMB settings that we will review in a minute. Click on the Yes button.

Click on the Set Time Machine Folders button and enable the TimeMachineBackup shared folder that you created earlier. In case you created multiple Time Machine folders, enable them all. Click Apply.
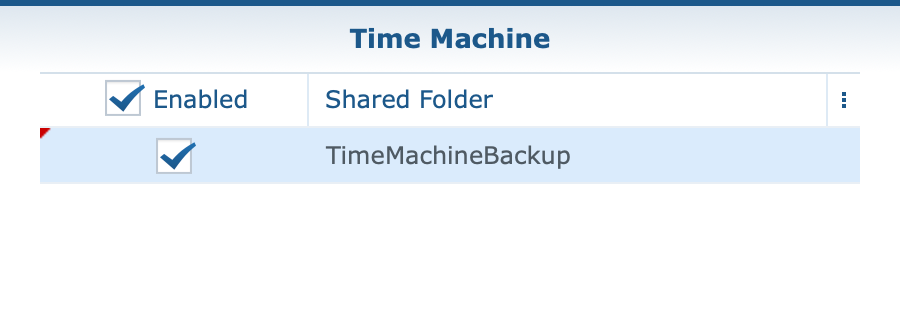
Go back to the SMB/AFP/NFS tab in DSM 6 or the SMB tab in DSM 7. Skip this step if you use AFP.
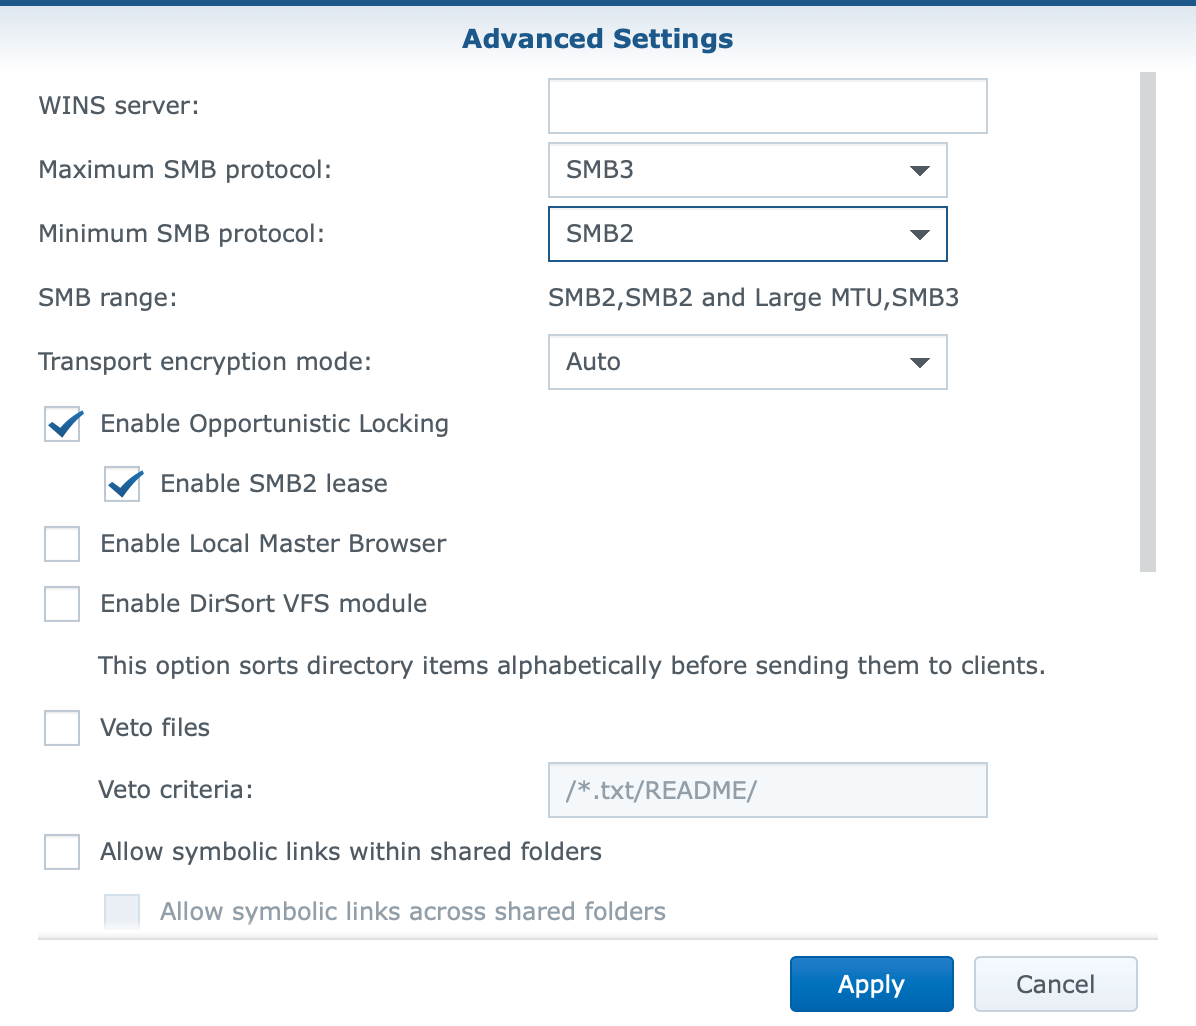
Under SMB, click on the Advanced Settings button. Review the settings that the Bonjour setting enabled earlier. Note that the minimum SMB protocol is still SMB1. Increase that to SMB2, and click Apply.
Note: only ancient Windows clients like Windows XP use SMB1. Most Windows and macOS computers use SMB2 or SMB3, which are more secure.
Sidestep
Unless you have an older Mac that runs OS X 10.11 El Capitan or earlier, there is no need to use AFP, and I encourage you to switch it off and only enable SMB. You can do that from the SMB/AFP/NFS tab under AFP in DSM 6 or the AFP tab in DSM 7.
Note that if you connected over AFP earlier from your Mac to shared folders on your NAS, you might have to reconnect over SMB.
Configure Your Mac
Now that you have set up your Synology DiskStation, it is time to get your Mac ready. Most of the work is done in System Preferences > Time Machine. We also use the Finder for a moment.
Stop Time Machine backup
If you already use Time Machine to back up your Mac to another device, I suggest you stop Time Machine first before you continue. If it is currently running, either wait until it is finished or stop the backup from the Time Machine icon in the menu bar.
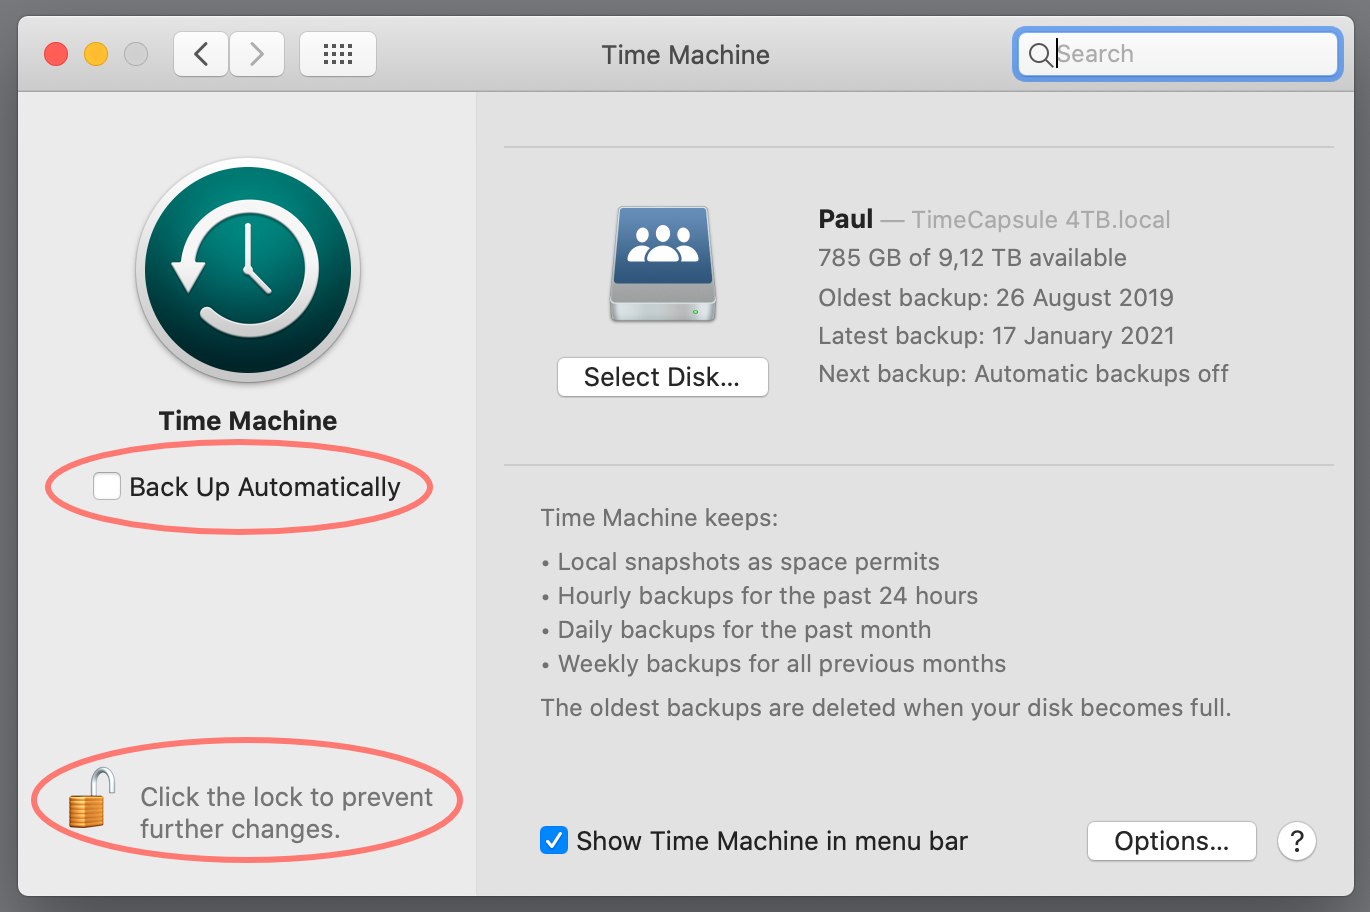
Next, uncheck the option Back Up Automatically. We will enable this again when we are finished. Any running backup will stop. If this option is greyed out, you must authenticate as an administrator first. Click the lock and authenticate to unlock it.
Sidestep
It is possible to continue your current Time Machine backup in its new location on your NAS. Alternatively, you can start fresh with a clean slate on your NAS.
If you like to continue with your current backup, copy the backup file from the old to the new location on the NAS now. Make sure Time Machine does not back up during copying. Only when copying is finished you continue with the next step.
Connect user to NAS
The next step is to make a connection from the Mac to your NAS. You connect to the dedicated shared folder TimeMachineBackup with the specific user TimeMachineUser you created earlier.
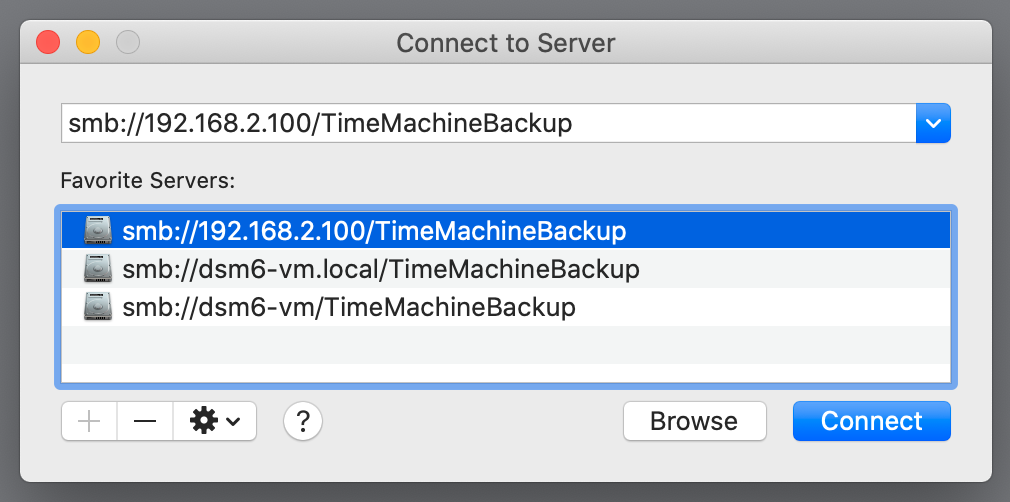
From Finder > Go > Connect to Server, type:
smb://nas_name_or_IP_address/shared_folder_name
If you have set up the NAS file service to AFP instead of SMB, replace smb:// with afp:// in the command above.
Notice in the screenshot above that I saved three different syntaxes for the same server. Time Machine defaults to the nas_name.local syntax.
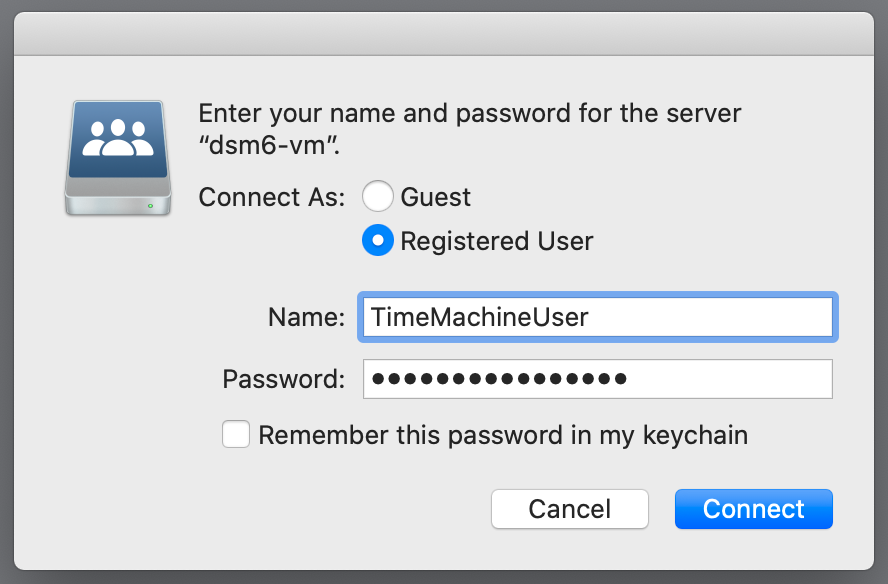
Next, you get the authentication screen. Enter the name and password of the TimeMachineUser you created on the NAS. In case you created more users for different Macs, enter the credentials for the right user here. I suggest not saving the credentials in your keychain unless you prefer to store the password there.
The purpose of this connection is to help the Time Machine connect in the next step. My experience is that this step is not necessary if the Time Machine folder is configured for Bonjour on your Synology DiskStation, and the computer and NAS are on the same IP subnet (same address range in plain English).
Summary: it may help and does not hurt.
Sidestep
Initially, I failed to connect with the new user from my Mac. I had disconnected my regular user account from the NAS as I was aware that two different user connections from the same Mac would not work anyway.
However, on the Mac, you do not always get a dialog for entering a username and password. It automatically uses my everyday credentials stored in the Mac’s Keychain.
I finally made it work with a trick. The trick is to use a different syntax for the nas_name. Normally, I use something like mynas. If you use the mynas.local name, or the IP address, macOS handles it as a new connection, offering a connection dialog that asks for a username and password.
Connect Time Machine to NAS
It is time to connect and tell Time Machine about the new backup location on your NAS. Open System Preferences > Time Machine on your Mac. Click on the Select Backup Disk… button.
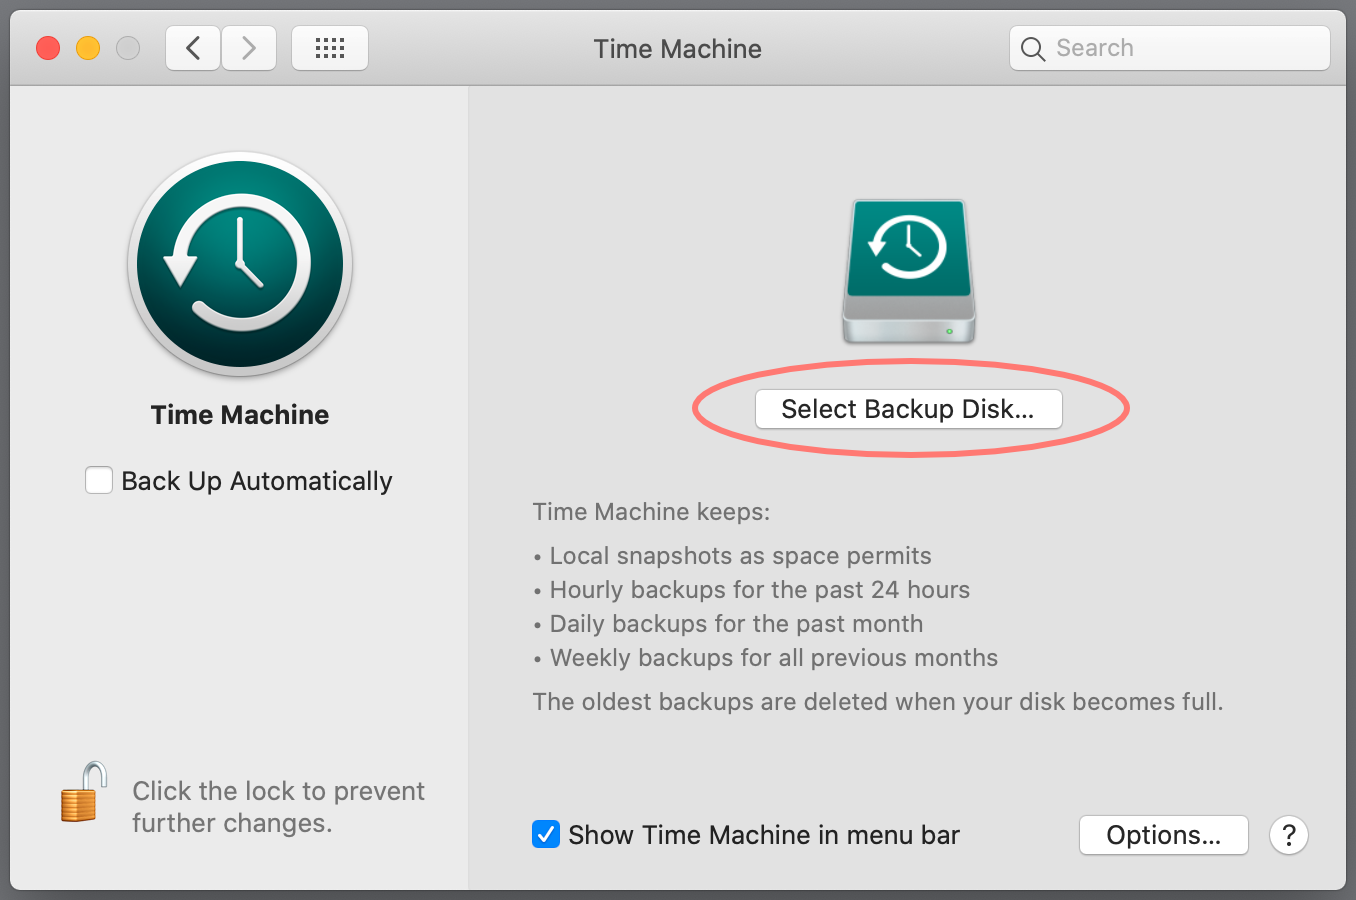
Assuming you currently have no disk selected for the Time Machine backup, select the prepared shared folder on your NAS.
Note the Encrypt backups option. Enable it if you need backup encryption. As you might remember, we did not enable encryption on the shared folder on the NAS. Your computer processor is more powerful than the one in your NAS. It is, therefore, better to let your computer do the heavy lifting for encryption.
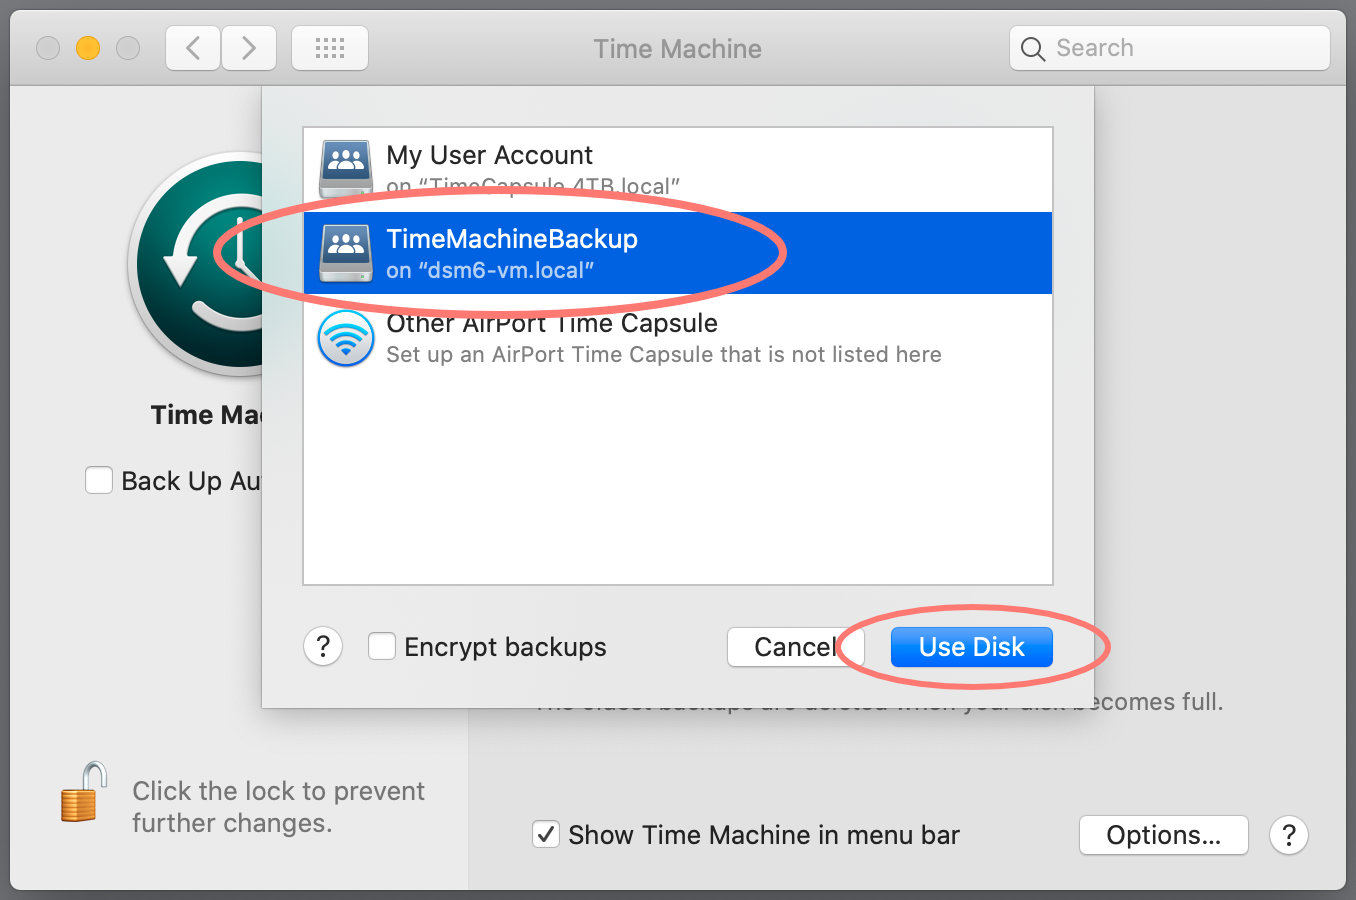
Click on the Use Disk button to confirm the backup location. You are now asked for a username and password. Fill in the TimeMachineUser name and password you created on your Synology NAS.
Sidestep
If you are currently using another disk, click the Select Disk button, select the location and click the Remove Disk button.
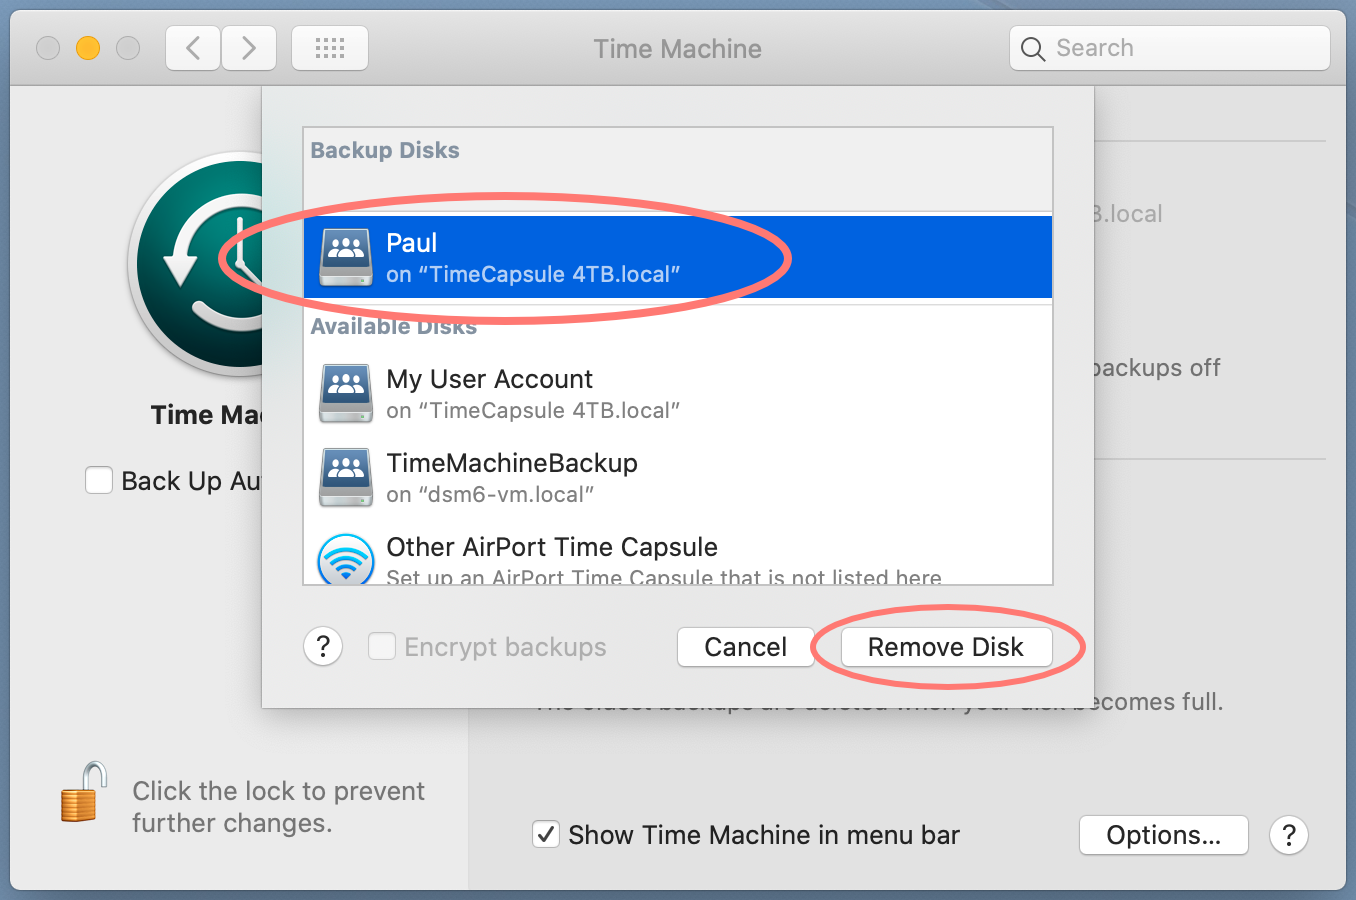
Optionally, you can leave the current setup as is. When you select a new location, you get the following question:
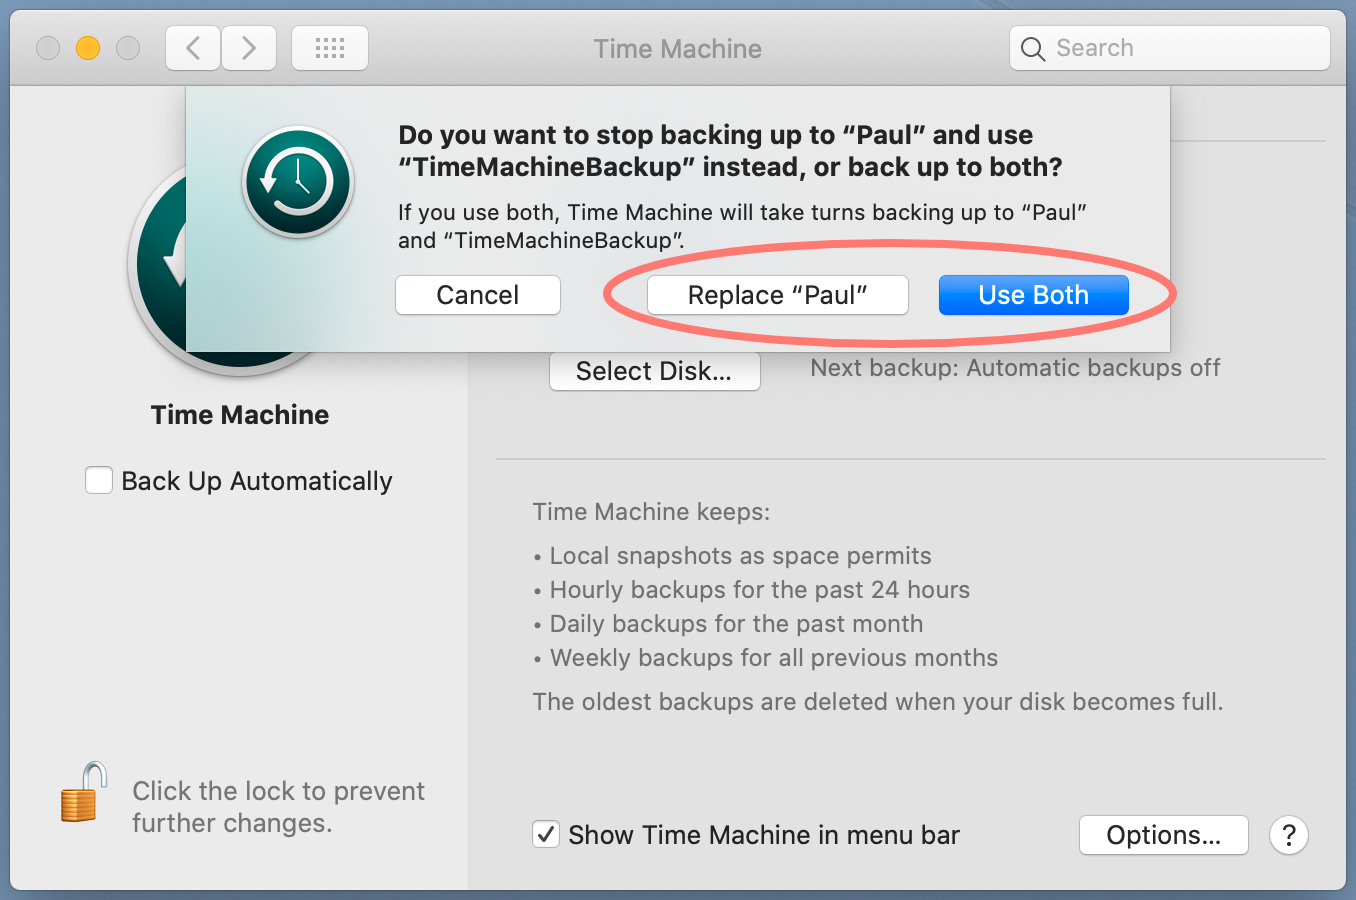
Now you can replace the original location, similar to the Remove Disk option, or use both locations.
Start Time Machine
Now that all is set and done, it is time to start your Time Machine backup. Enable the Back Up Automatically setting that we disabled at the start. I suggest you also enable Show Time Machine in menu bar in the Time Machine preferences.
Note that you can also manually start and stop a backup at any time from the Time Machine icon in the system tray area in the menu bar.
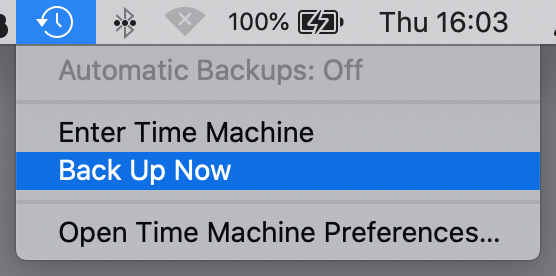
Note that the first backup may take quite some time. You may want to disable power saving for the computer temporarily and only let the display go to sleep.
Sidestep
In Time Machine, you can exclude items from the backup. In System Preferences > Time Machine on your Mac, click the Options… button.
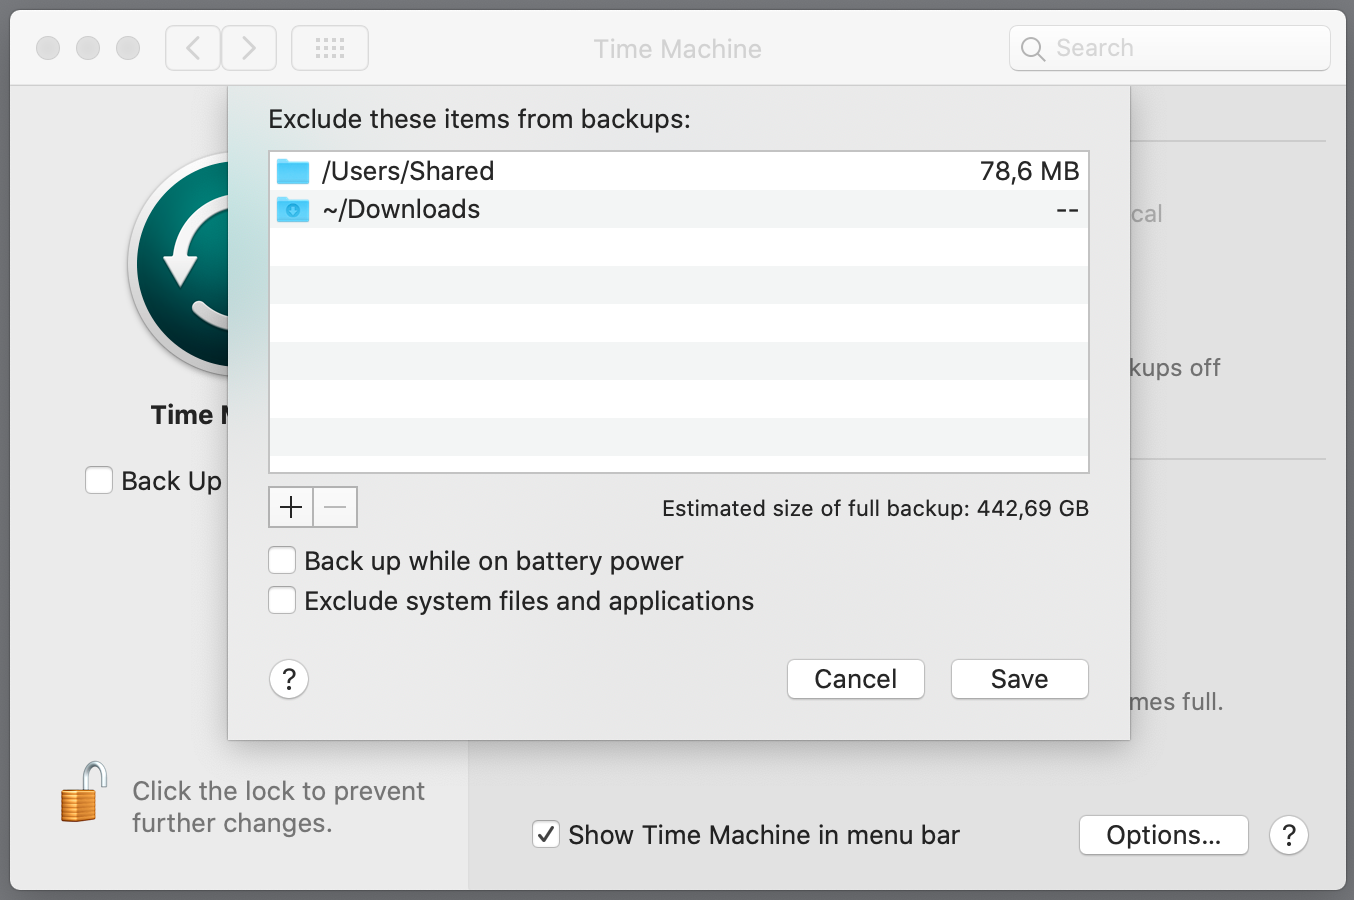
If you have multiple users on your Mac, note that each user can add a folder to the exclude list.
You can enable Exclude system files and applications to make the backup smaller and enable Backup while on battery power.
Thank you
This post is donation-ware, and I made it to help you. Please consider leaving a comment or even buying me a coffee if it did. I will be eternally grateful.
Paul Steunebrink / Storage Alchemist

Thank you so much for sharing this content! Easy to follow and worked like a charm.
Thank you Tim for your feedback and coffee support. Much appreciated.
Best regards, Paul Steunebrink / Image Alchemist
This is a great article, thank you so much for sharing. It’s been very helpful! One question: What is Time Machine actually backing up? I have data stored locally on my Mac (mostly music) and I also have other data stored on one of my Synology drives (mostly pictures). I had assumed that when I ran Time Machine from my Mac it would only backup the data on my Mac. However when I enter Time Machine I can see the pictures that are on my Synology. When I got to Time Machine preferences I can see, based on the available space, it has just backed up the music files. Should I use Hyper Backup for the pictures on my Synology (even though I can see them in TM)?
Hi Ringo,
A Time Machine (TM) backup saves only data from your Mac. That you also see images in your TM backup could be caused by the fact that you temporarily had these images on your Mac drive.
Apart from the backup of your Mac, I strongly encourage you to make a backup of your NAS to another device or cloud service.
Best regards, Paul Steunebrink / Storage Alchemist
Thanks so much for this, I wasn’t sure how I was going to back up my wife Mac, and mine. I do have a question though. In your sidestep after creating the TimeMachineGroup, it says to give that group Read/Write permissions to the folder. What if you have, as in my case, two separate folders, do I assign the Read/Write permission at the user level in that case?
Thanks again.
Hi Wil,
Happy to hear this post helped you. If you have two different TM accounts and two TM folders for the backup of the respective Macs, you can assign read/write permissions at the user level for the separate TM accounts. One account accesses one folder, the other account the other folder.
Best regards, Paul Steunebrink / StorageAlchemist
Thanks so much, Paul, this has really helped.
Did everything you said and still get “The selected network backup disk does not support the required capabilities. Please choose a different network backup disk.”
Difficult to diagnose. First time I hear this error. You can contact me directly on address alchemist (at) storagealchemist (dot) com
THANK YOU! I have struggled with backing up my families Macs to a NAS (WDPR2100) for years. After I read you article I bought a Synology DS220+ and followed your instructions. … and I worked first off. …. and has continued to work flawlessly for the last 4 months. Thank you for taking the time to publish this… Synology should pay you a commission (and I’ll buy you a beer)
Thank you Dave,
I highly value your feedback and the bunch of coffees you bought me.
Best regards, Paul Steunebrink / Storage Alchemist
Great tutorial! I followed your steps to set up Time Machine with my Synology NAS, and it worked flawlessly. Thank you for the clear instructions and screenshots!