Synology user management is both a primary and advanced skill. Setting up user access is vital for a smooth and safe operation of your NAS and the data stored on it. Learn the concepts and some tricks to properly set up users on your NAS.

Synology User Management
On a NAS, you find resources like shared folders and applications versus users and groups that access these resources. To control the use of resources, DSM has built-in user management. User management is about what a user can do: which resources they can access and what kind of access you grant to the users?
When you log into DSM, you find in Control Panel, the tool for user management. It allows you to assign specific storage quotas, speed limits, and access privileges to individual users and groups.
Before diving into details and getting our hands dirty, let us first become familiar with user management’s leading parts and concepts. Let us also acknowledge that for a small setup with a few users, as a family, the requirements are much simpler than a company with thousands of employees. But the concepts are the same.
Scope
This post applies to DSM 6 and DSM 7 and discusses local users and groups. Domain and LDAP users and groups are out of the scope of this tutorial. However, much of what I discuss in this post also applies to them.
Basics Of User Management
As I mentioned in the introduction, you have resources like shared folders and applications versus users that use these resources on your NAS.
Users and groups
To use any resource on the NAS, you need a user account and can give each user access to a resource. Not all users need the same level of access, also called permission or privilege. You can assign access per user individually or make users with similar needs a group member. Next, you give access to that group.

A group makes managing multiple users a lot easier. When you add a new user, you only have to make it a member of the proper groups.
Shared Folders
You create shared folders when you use your NAS as a file server. Depending on how you set up your NAS, there may be a few shared folders on a new NAS, or there is no shared folder.

Some applications create a dedicated shared folder. For example, Audio Station creates the /music folder, and Web Station the /web folder. You might have installed some of these applications during the initial setup of your NAS, the so-called recommended applications.
Home Folders
A special shared folder is the Homes folder, which contains each user’s home folder.
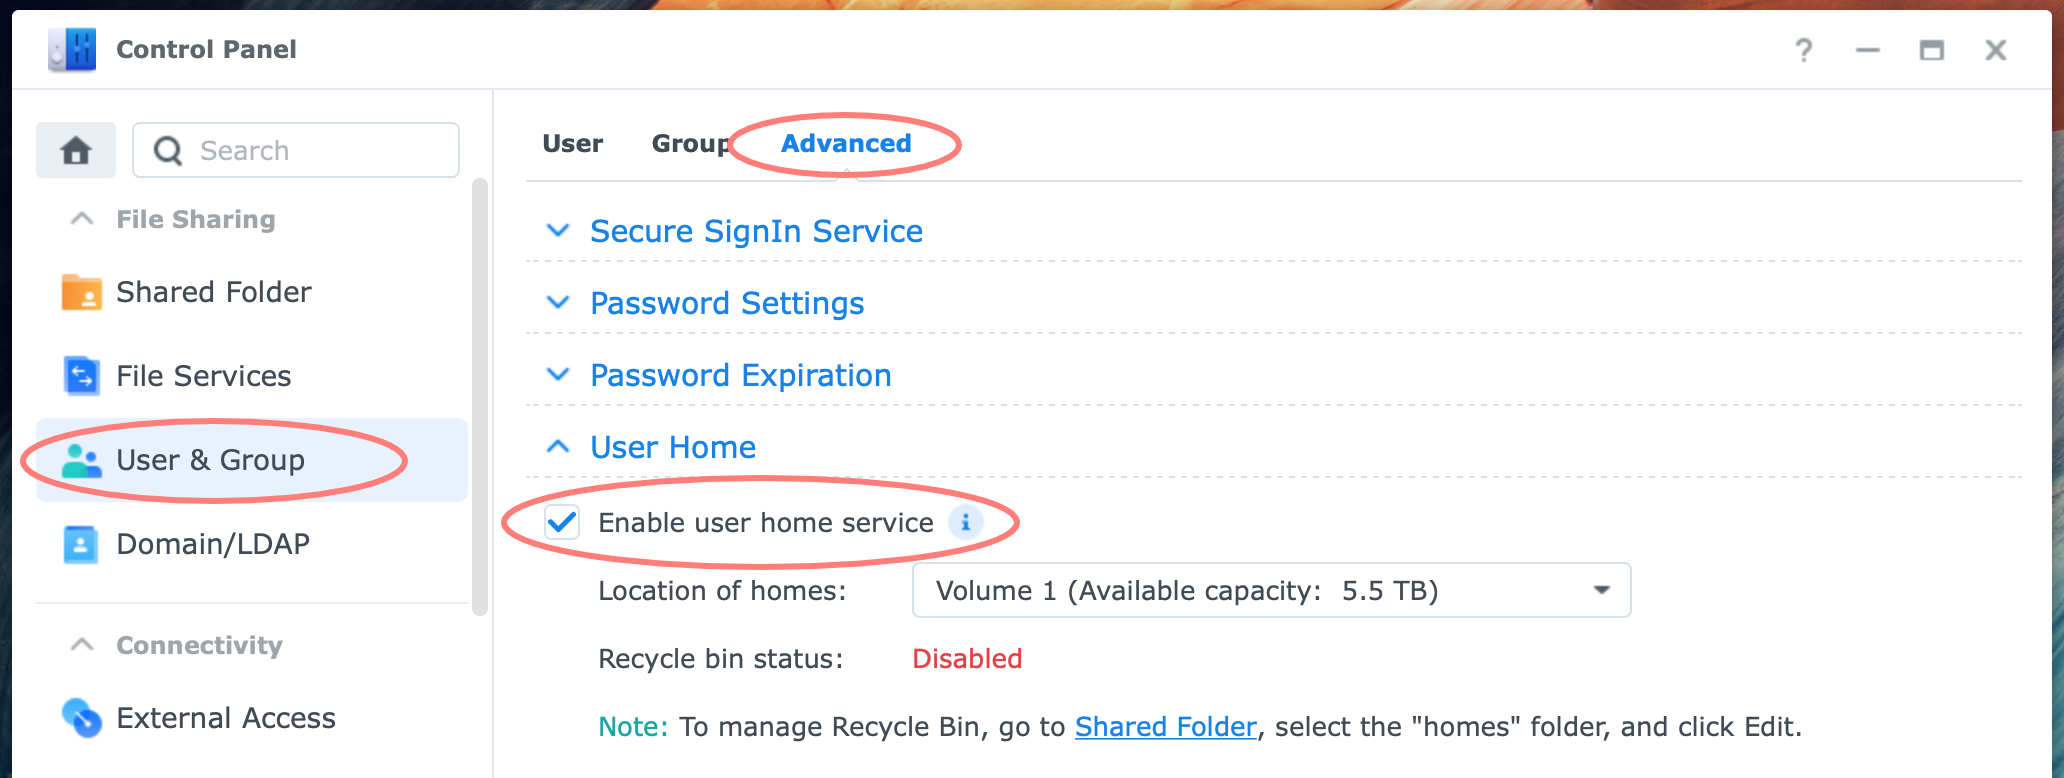
You must enable the User Home service on your NAS for the Homes folders to appear.
Applications
Next to folders, you can run many excellent applications on your NAS. Some applications are accessible to all users, others to members of the administrators group only. Access to an application is called a privilege.
For those applications that potentially all users can access, you can define whether or not the privilege for an application is granted to all users. This setting is called the default privilege. Next, you can deviate from this default for a user or group of users.
Explore Users And Resources
Let us open Control Panel and look at what I just explained. The idea is to see the concepts in the real world. After you grasp this, you are ready and prepared to start managing users and resources on your NAS.
Log in to DSM or DiskStation Manager from your browser. Open Control Panel from your DSM desktop or the main menu, marked by the four-squares icon top left corner.
Groups
You see a User and a Group icon in the Control Panel > File Sharing section at the top. Click on the Group icon. Notice the groups on your NAS. You have at least the administrators and users group, which are system default groups.
Select the administrators group and click on the button Edit Members at the top. Review the members. There is at least the admin and optionally (and hopefully) at least one other user name. Close the dialog with the Finish button.

Select the users group. Notice that the button Edit Members becomes gray. You can not edit members of this group because every user on your NAS is a member of the users group.
Why groups? Because it makes managing users so much easier. It may not make sense if you have just a few users, but even for a handful of users, it already helps. Give a group a sensible name, for example, Finances-read, so its purpose and permissions are apparent.
Users
Leave the Group section and select the User icon in the left column. Review the users on your NAS. There is at least the admin and guest account, and probably another account you made during the initial setup (although with older systems, this was not mandatory).
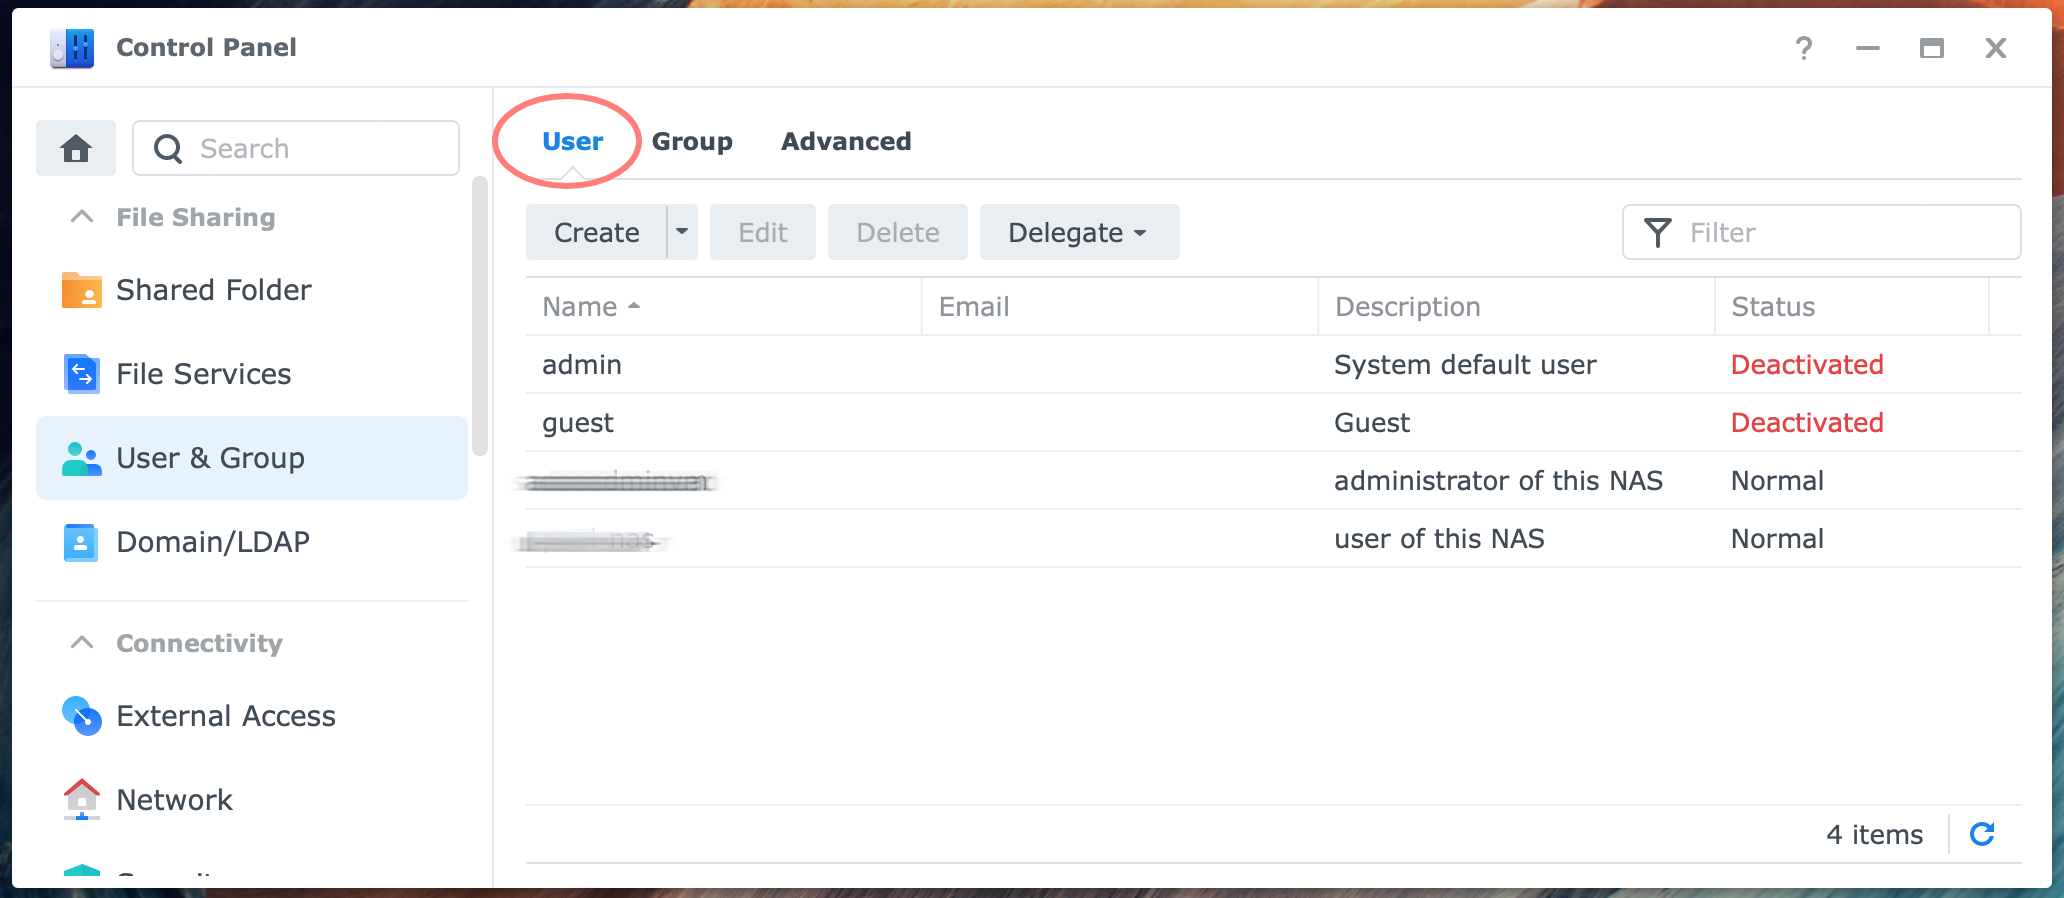
Review the status of the accounts, Normal or Disabled. Select an account and click the Edit button. A new screen opens. Click on the User Groups tab and review the group that the account is a member of. Close the dialog with the Cancel button as you did not change anything or at least did not intend to change something. Repeat the last steps for other accounts to review their group membership.
Let us leave the users and groups and explore the resources, shared folders, and applications.
Shared Folder
Leave the User section and select the Shared Folder icon in the left column. Review the shared folders on your NAS. There could be no shared folders on a brand new NAS without any application installed. In any other case, review the shared folders.
Select a shared folder and click on the Edit button. A property sheet with tabs of that shared folder opens. Select the Permissions tab and review the settings.
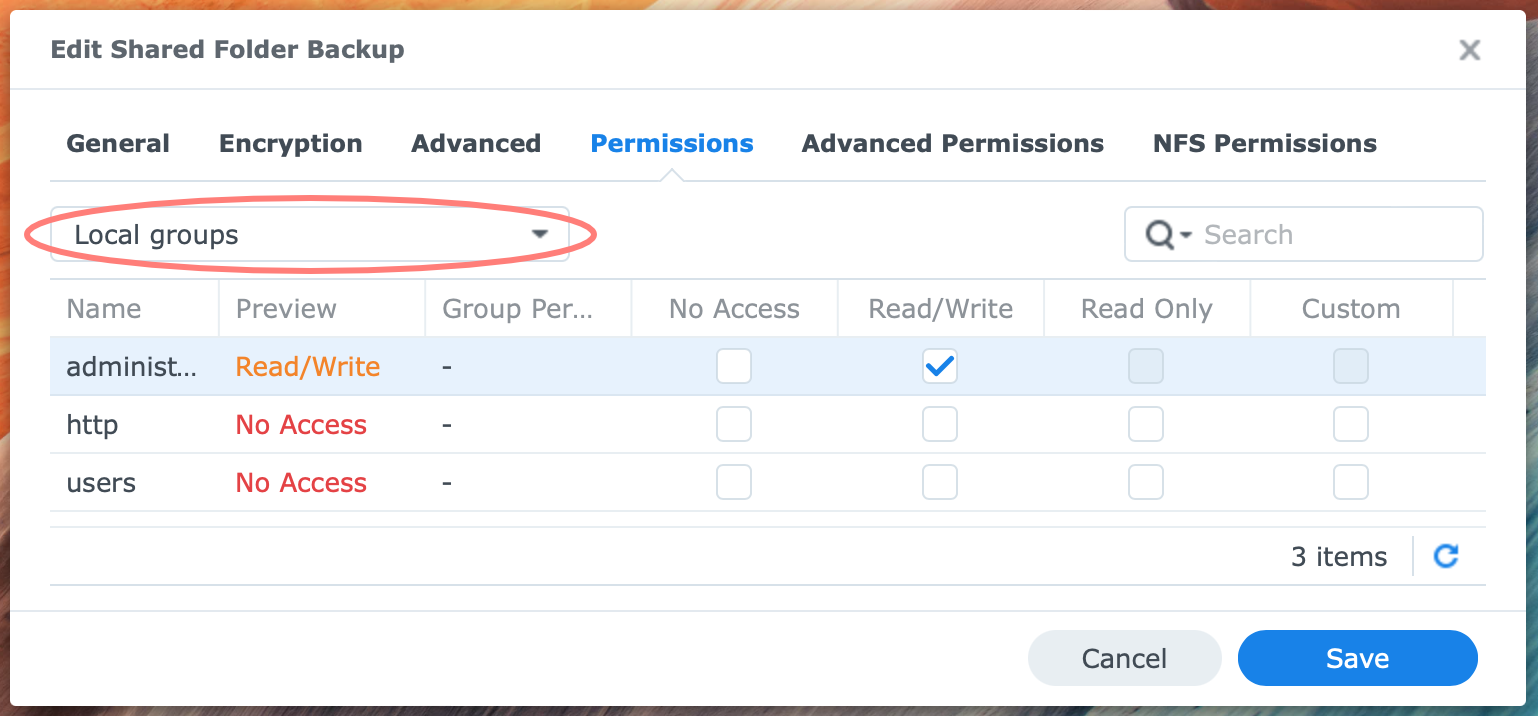
Notice the drop-down list in the top-right corner. Change the selection from Local users to Local groups and back to Local users.
Notice the different columns with permissions No access, Read/write, Read-only, and Custom. Close the properties sheet with the Cancel button because you do not intend to save any changes.
Applications
You use Control Panel to manage privileges to use the application. Leave the File Sharing section and browse below to the Application (DSM6) or Services (DSM7) section. There you find the Privileges (DSM6) or Application Privileges (DSM7) icon. When you select this icon, you see a page with applications and services and the default application privileges in the column at the right.
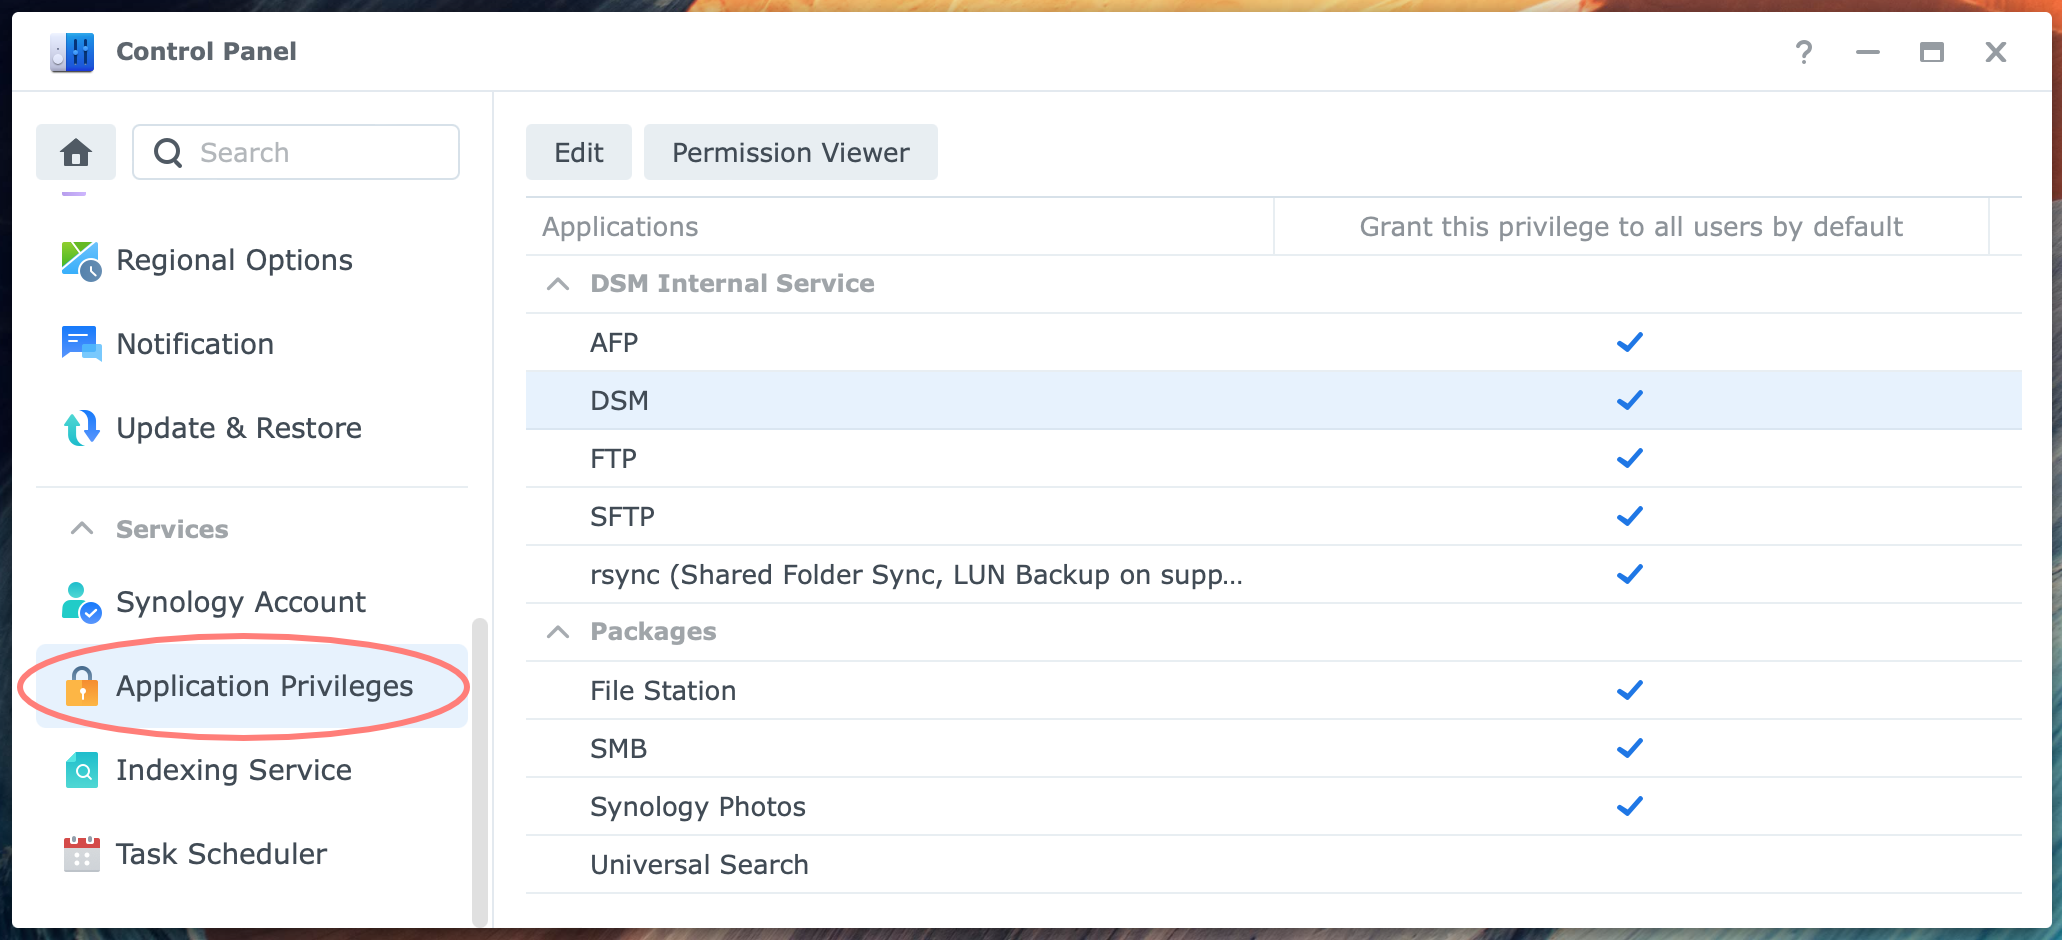
For example, DSM, FTP, and File Station grant this privilege to all users by default. Which applications show up in this list depends on what applications you have installed on your NAS. Select File Station and click on the Edit button. The property sheet for File Station opens.
Select the Default privileges tab. Notice that the default privilege for all users is selected. This setting means that all users on the NAS can use File Station unless restricted elsewhere.
Select the Groups tab. Notice that the users group is not checked in the Allow column because this group has already been granted the privileges in the Default privileges tab. Also, notice the three columns Allow, Deny, and By IP. You can specifically allow or deny the right to a group based on the IP address from which the user is accessing the NAS. The purpose of this feature is that you can allow a user more privileges when connecting from a local network address versus a remote connection.
Switch to the Users tab and notice the same features and layout as on the Groups tab.
At the top of the Privileges screen, you see a button, Permission Viewer. Perhaps Privilege Viewer would be a more consistent name. In the Permission Viewer dialog, you can review the privileges for all applications for each user or group with a specific IP address. This viewer is great for checking whether you did not open up too much or have been too restrictive.
Create Users, Groups, And Shared Folders
After discussing the concepts and exploring the tools and menus, we put our knowledge into practice. In this exercise, you create a shared folder with two users and two groups and assign different permissions for these two users to that shared folder.
When creating shared folders, groups, and users, it does not matter which one you create first. My preferred order is group first, the user next, and the shared folder last. You may prefer another order, and that is fine.
Login to the DSM desktop with an administrator account. Open Control Panel > Group. Click Create. The Group Creation Wizard starts. You get some screens, each with its title.
- Group information
notice the required fields marked with a red *; take a second to create a meaningful group name in a format that tells something about its purpose, like Finance-read or Finance-write - Assign shared folder permissions
you can skip this step for now, as we will catch up later when creating the shared folder - User quota settings
you can skip this step - Assign application permissions
you can skip this step - Group Speed Limit Setting
you can skip this step - Confirm settings
you still can go back and change the settings
After clicking on the Apply button, the DiskStation creates the group and returns to the Group screen in the Control Panel.
Open Control Panel > User. Click Create. The User Creation Wizard starts. You get some screens, each with its title.
- User information
notice the required fields marked with a red *; you can use the password generator, but it is only six characters, which is fine for the first password that a user has to alter after first use; before you can send a notification mail to the new user, you must first enable the email notification service. - Join groups
let this new user only join the users group and not the administrators or http group (default) - Assign shared folder permissions
the shared folder we created earlier is listed, and we can assign permissions for this user to that shared folder; however, we already give the user group permissions, which makes that we can skip this step - User quota setting
you can skip this step for now; if necessary, you can assign a quota later - Assign application permissions
you can skip this step for now; if required, you can set application permissions later - User Speed Limit Setting
you can skip this step - Confirm settings
you still can go back and change the settings
After clicking the Apply button, the DiskStation creates the user and returns to the User screen in the Control Panel.
Open Control Panel > Shared Folder. Click on the Create button at the top to create a new shared folder. The Shared Folder Creation Wizard starts and consecutively displays the following screens:
- Set up basic information
provide Name and Description for the shared folder; note the other options, in particular, the recycle bin that you can enable or disable - Encryption
unless you particularly need this, I suggest skipping this step; you can enable this later - Configure advanced settings
unless you particularly need data checksum or folder quota, I suggest skipping this step; you can enable this later - Confirm settings
you still can go back and change the settings
After clicking the Apply button, the DiskStation creates the shared folder and opens the Permissions tab. Change the drop-down list at the right from Local users to Local groups. Give the group users Read/Write permissions. Click OK to close the dialog.
Best Practices
In this section, I share tips on user management that you can use in your everyday life with your NAS.
- create a custom admin account
- enforce strong passwords
- enable two-factor authentication (2FA)
- enable Home service
- create a non-default user group
- create service accounts
Custom admin account
Every NAS comes with a built-in administrator account named admin. You would typically use this account with older versions of DSM for administrative purposes. Later, the installation of DSM included the creation of a custom administrator-level account. The default admin account is disabled and only enabled during a Mode 1 reset. Since DSM 6.2.4, you get a notification if you still use the default admin account because of the security risks.
The risk of using the default admin is a brute-force attack. You can mitigate this risk with a strong password and two-factor authentication. True, but half of the secret – the account’s name – is already exposed. However, the bottom line is that security-aware people who use these countermeasures abandoned the default admin in the first place for the same reason and vice versa.
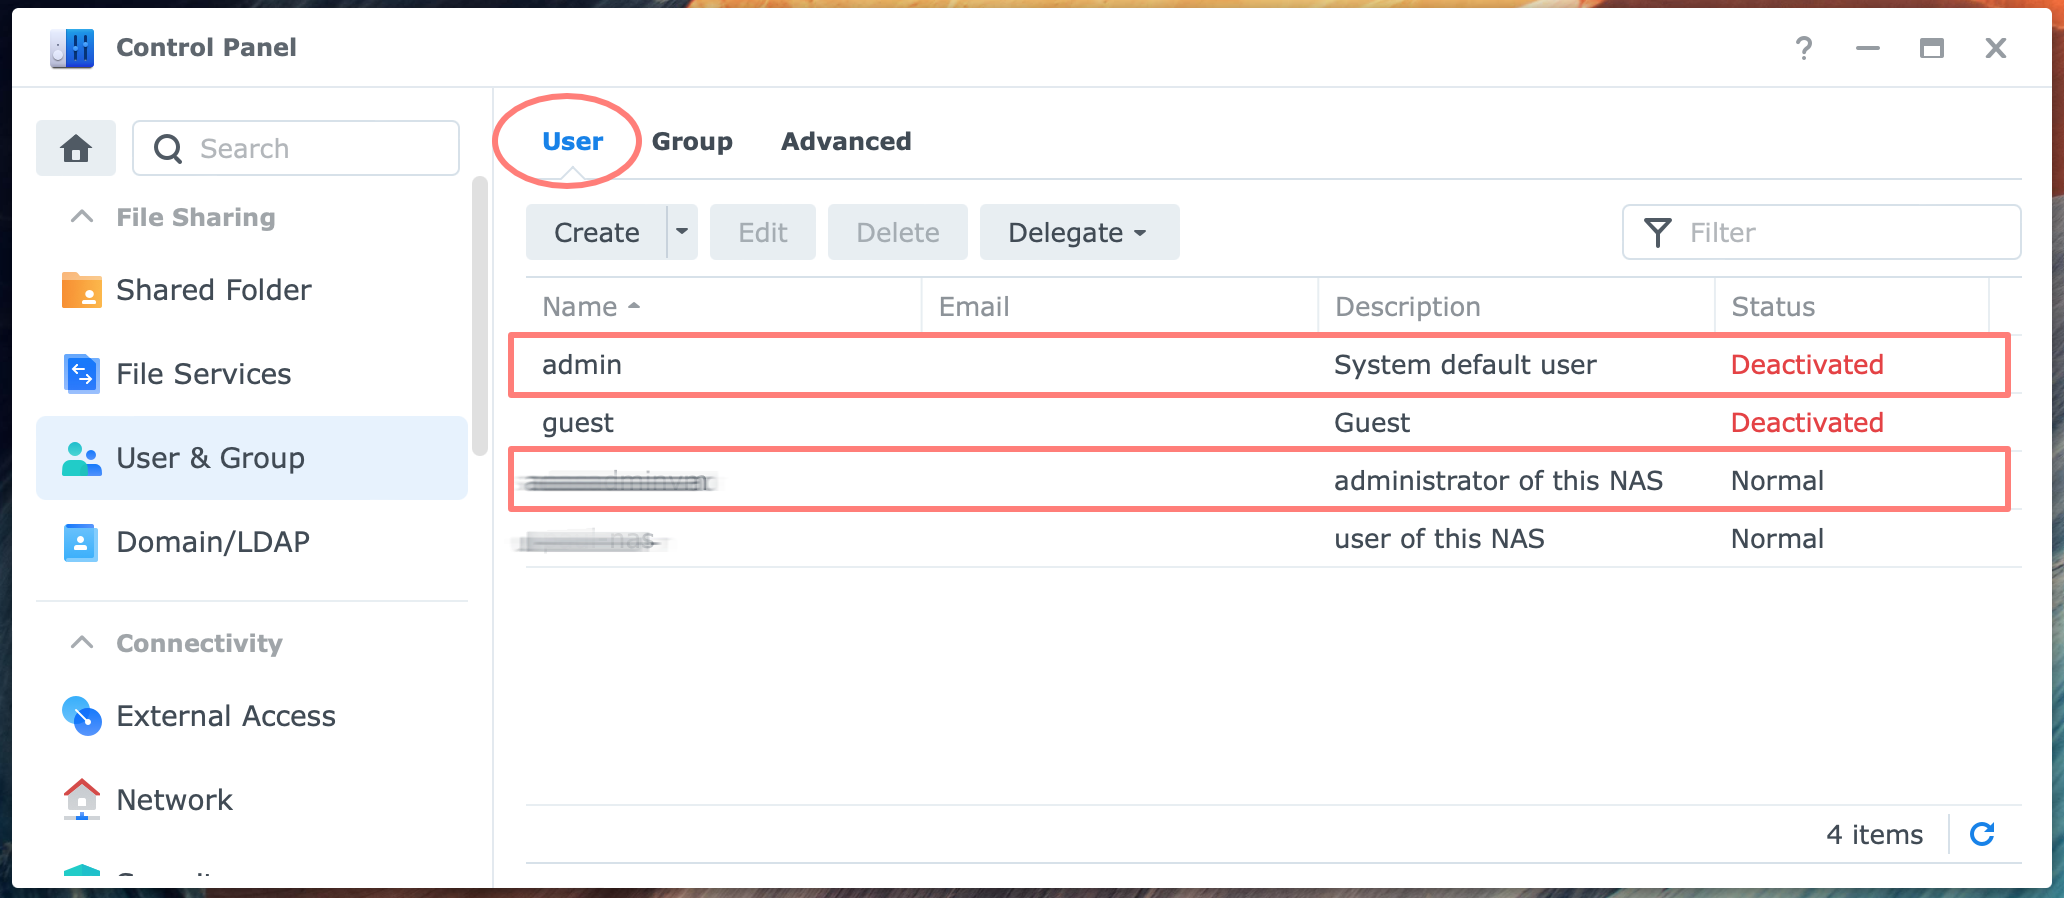
It is good practice not to use the standard administrator account on any device or computer. Period.
Please create a new account, make it a member of the administrator, give it a strong and unique password, enable two-factor authentication, and safely store the password. I highly recommend using a password manager.
You will find detailed help on creating a custom administrator account in How to disable default admin account.
And last but not least, if you are the administrator of a NAS or your NAS, do yourself a favor. Create a regular user account without administrative privileges for everyday use. This way can always work safely, and you can test how other users perceive the NAS if they have questions.
Strong passwords
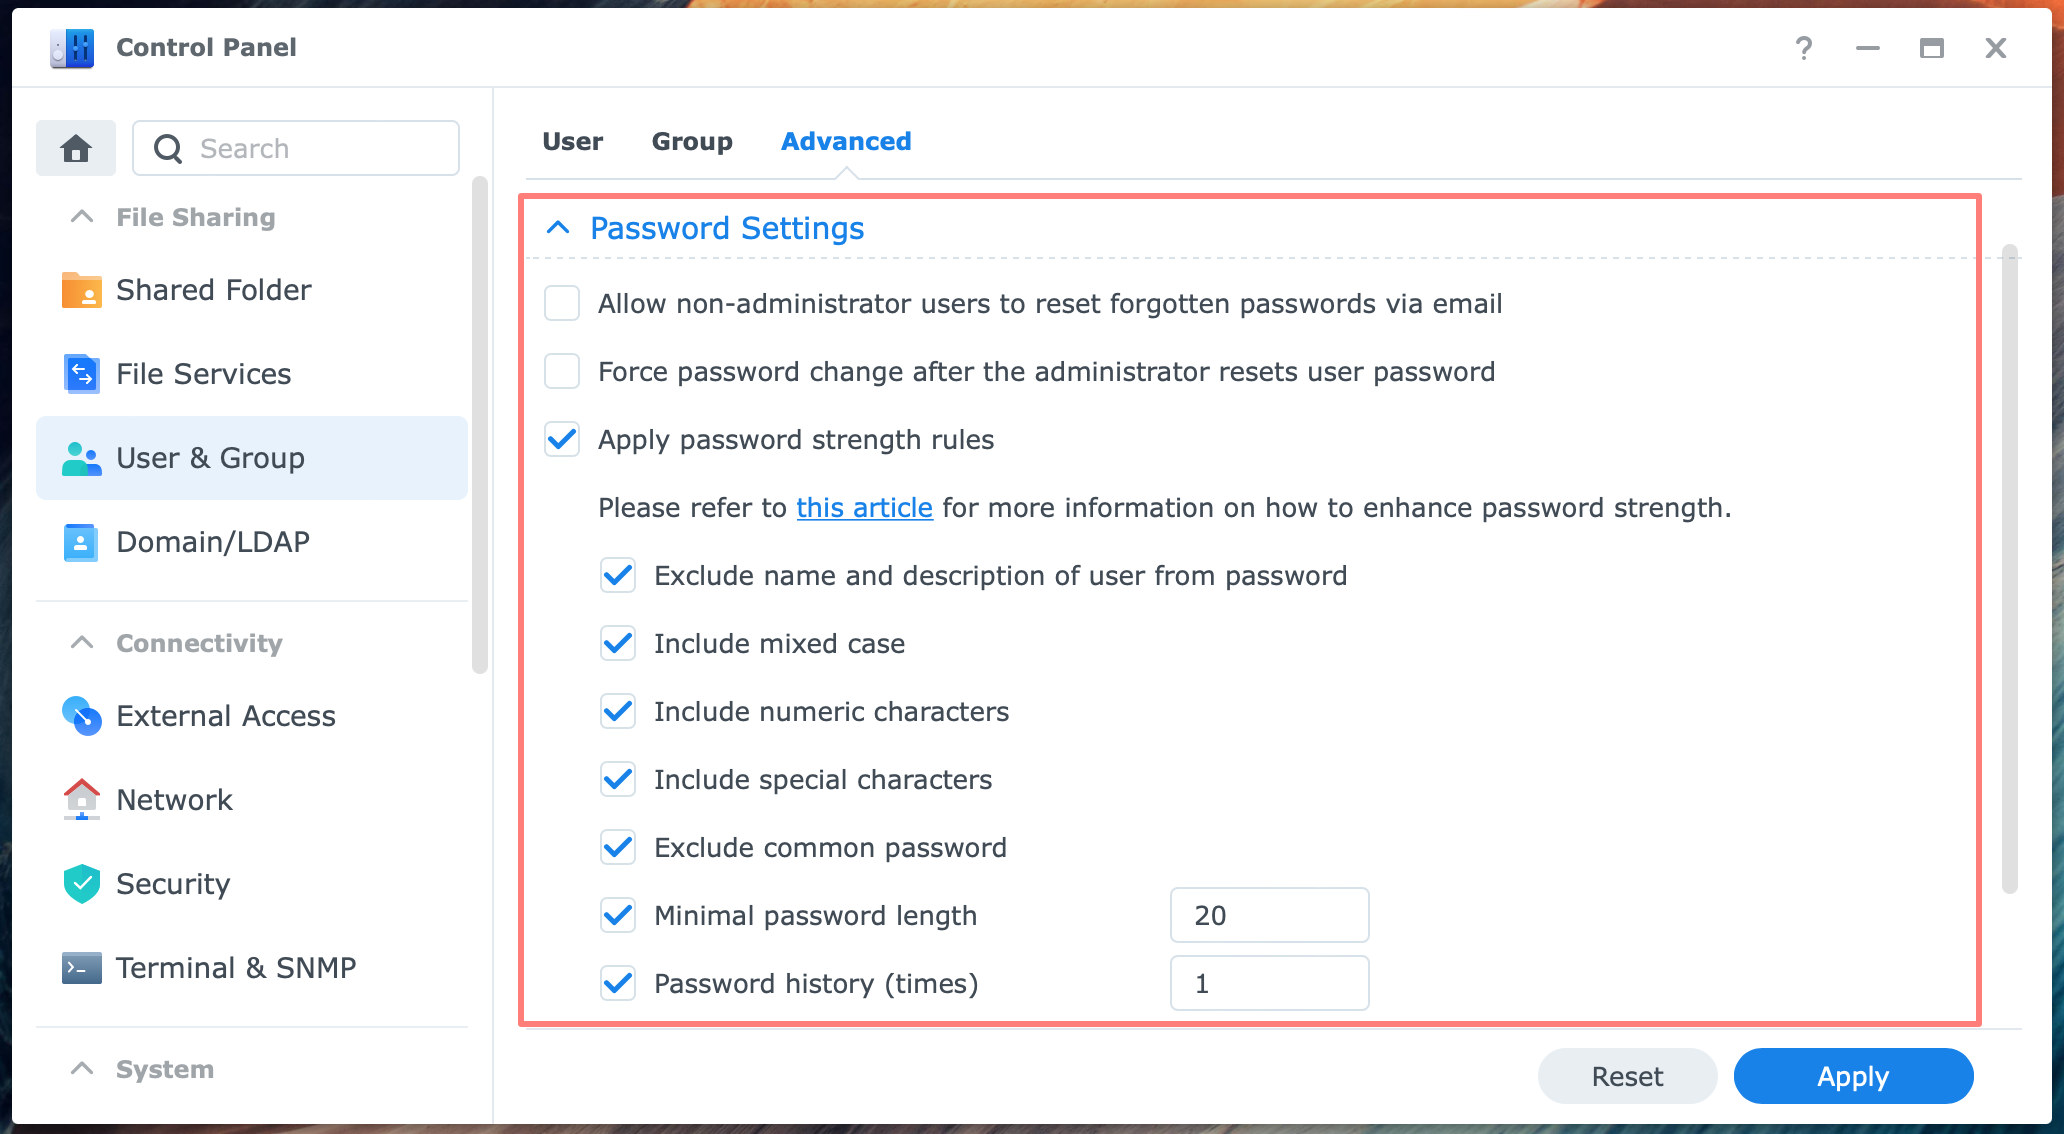
I mentioned strong passwords in the previous item, but you should enforce strong passwords for all users. You can enable this via Control Panel > User > Advanced tab. Also, encourage users to create a unique password not used anywhere else. This policy is only successful with the help of a password manager.
Password settings that I prefer are:
Two-factor authentication
Or, as Synology calls it in DSM 6, two-step verification. The idea is that authentication, or logging on, is not based on a single factor, like knowledge. You know your username and password so you can log in, and knowledge is relatively easy to steal.
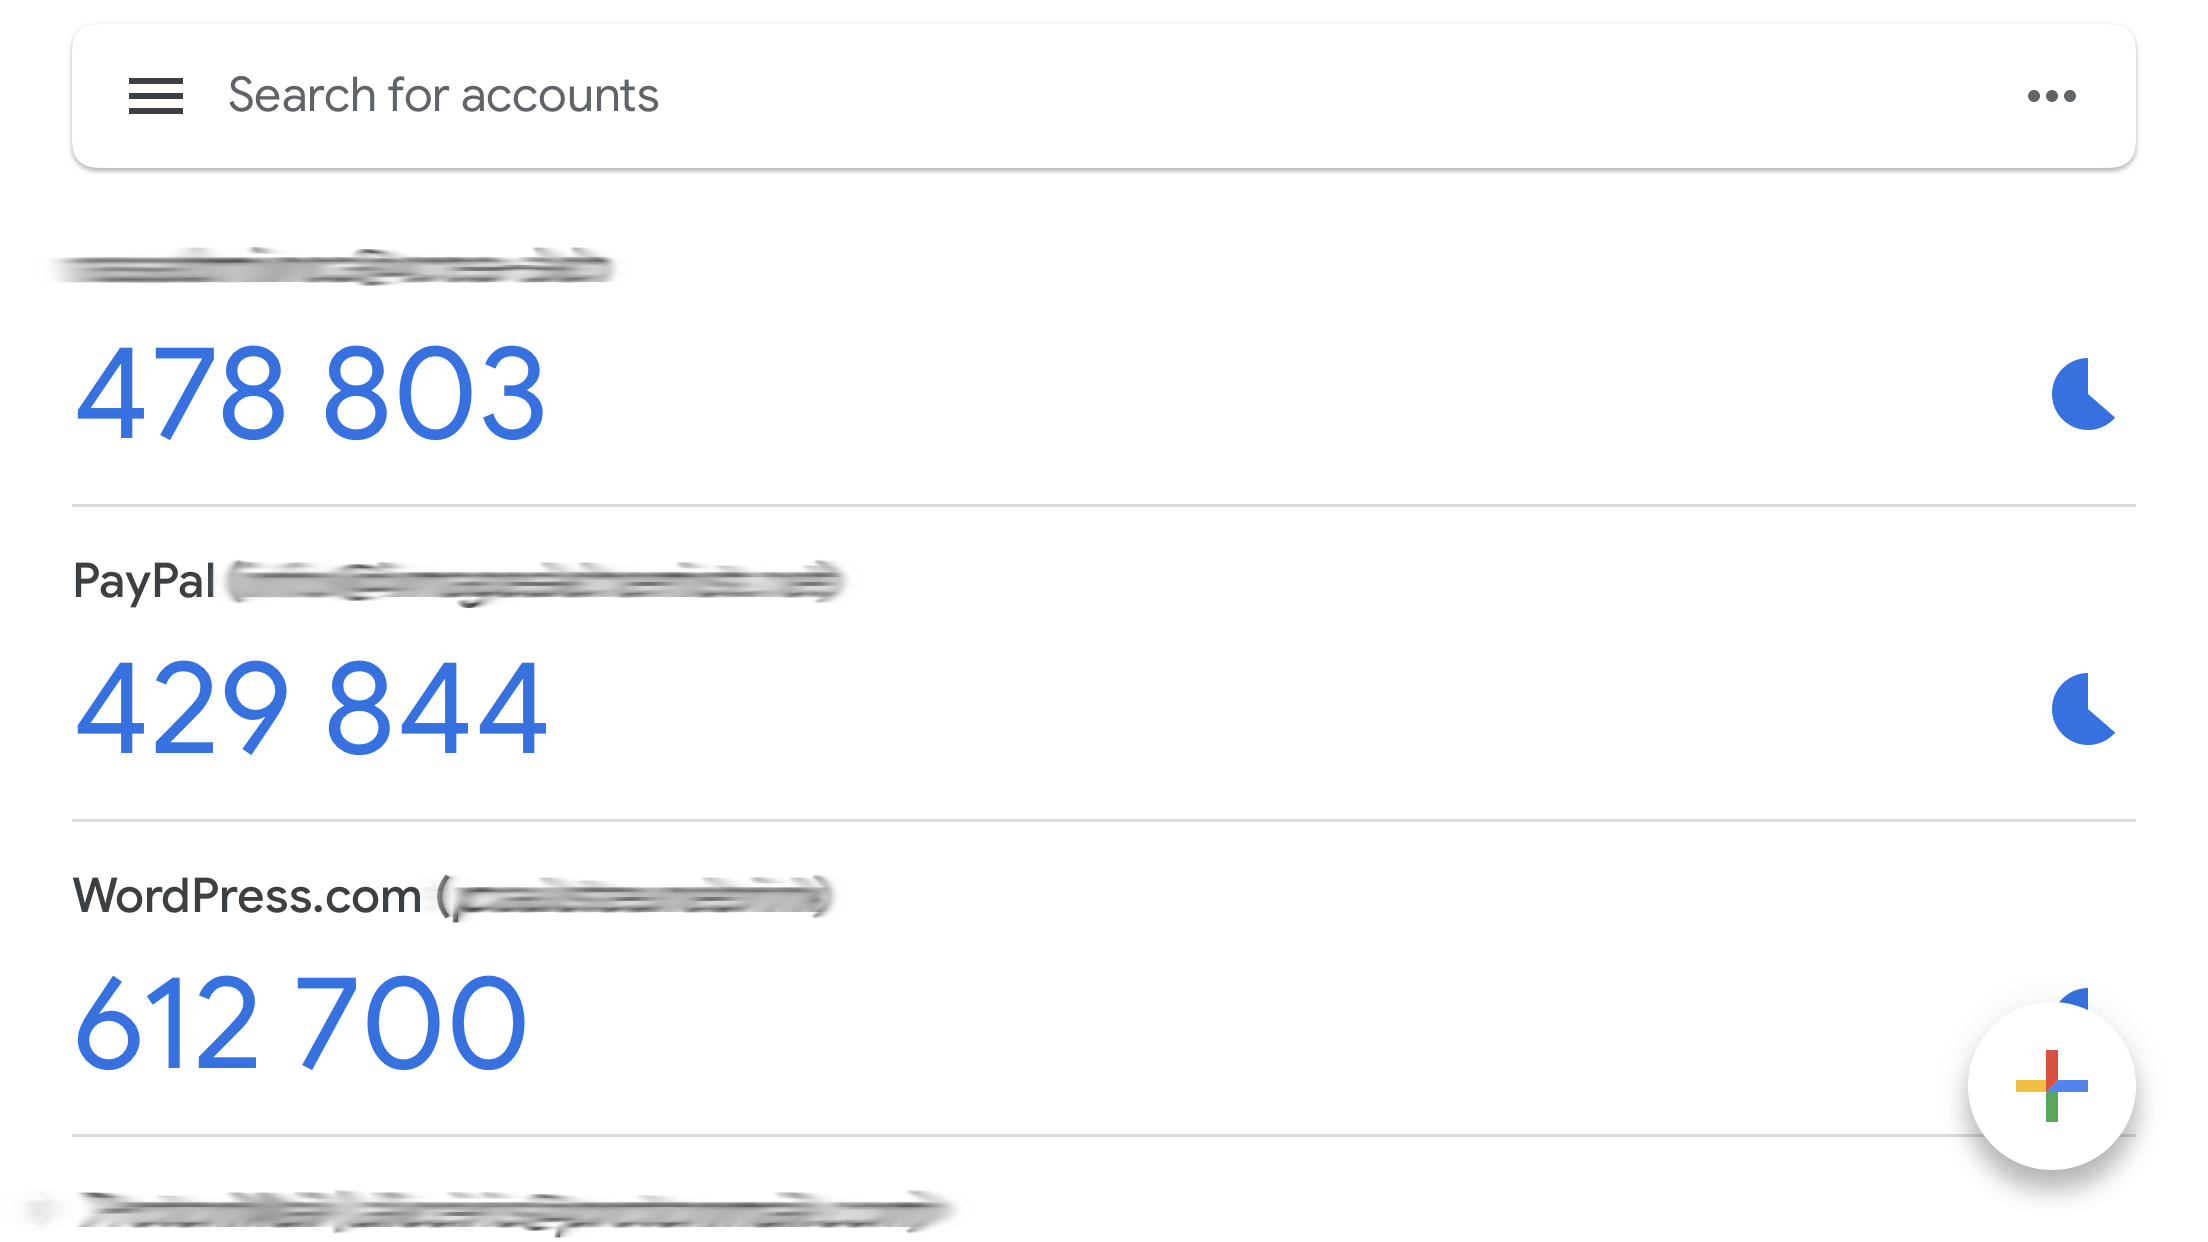
Another factor is something you possess, like a device that generates a one-time password every minute. A trendy device is your smartphone, and an app like Google Authenticator is a password generator you link to your NAS account.
By combining knowledge and possession in authentication, you create a two-factor authentication. Since this takes place in two consecutive authentication steps, it is also called two-step authentication.
You can enable this feature via Control Panel > User > Advanced tab > 2-step verification. I suggest always enabling this for administrators. If you open up your NAS to the internet via QuickConnect or other external access forms and host a website, I suggest enabling 2-step authentication for all users. See also my other post on How to enable 2-factor authentication.
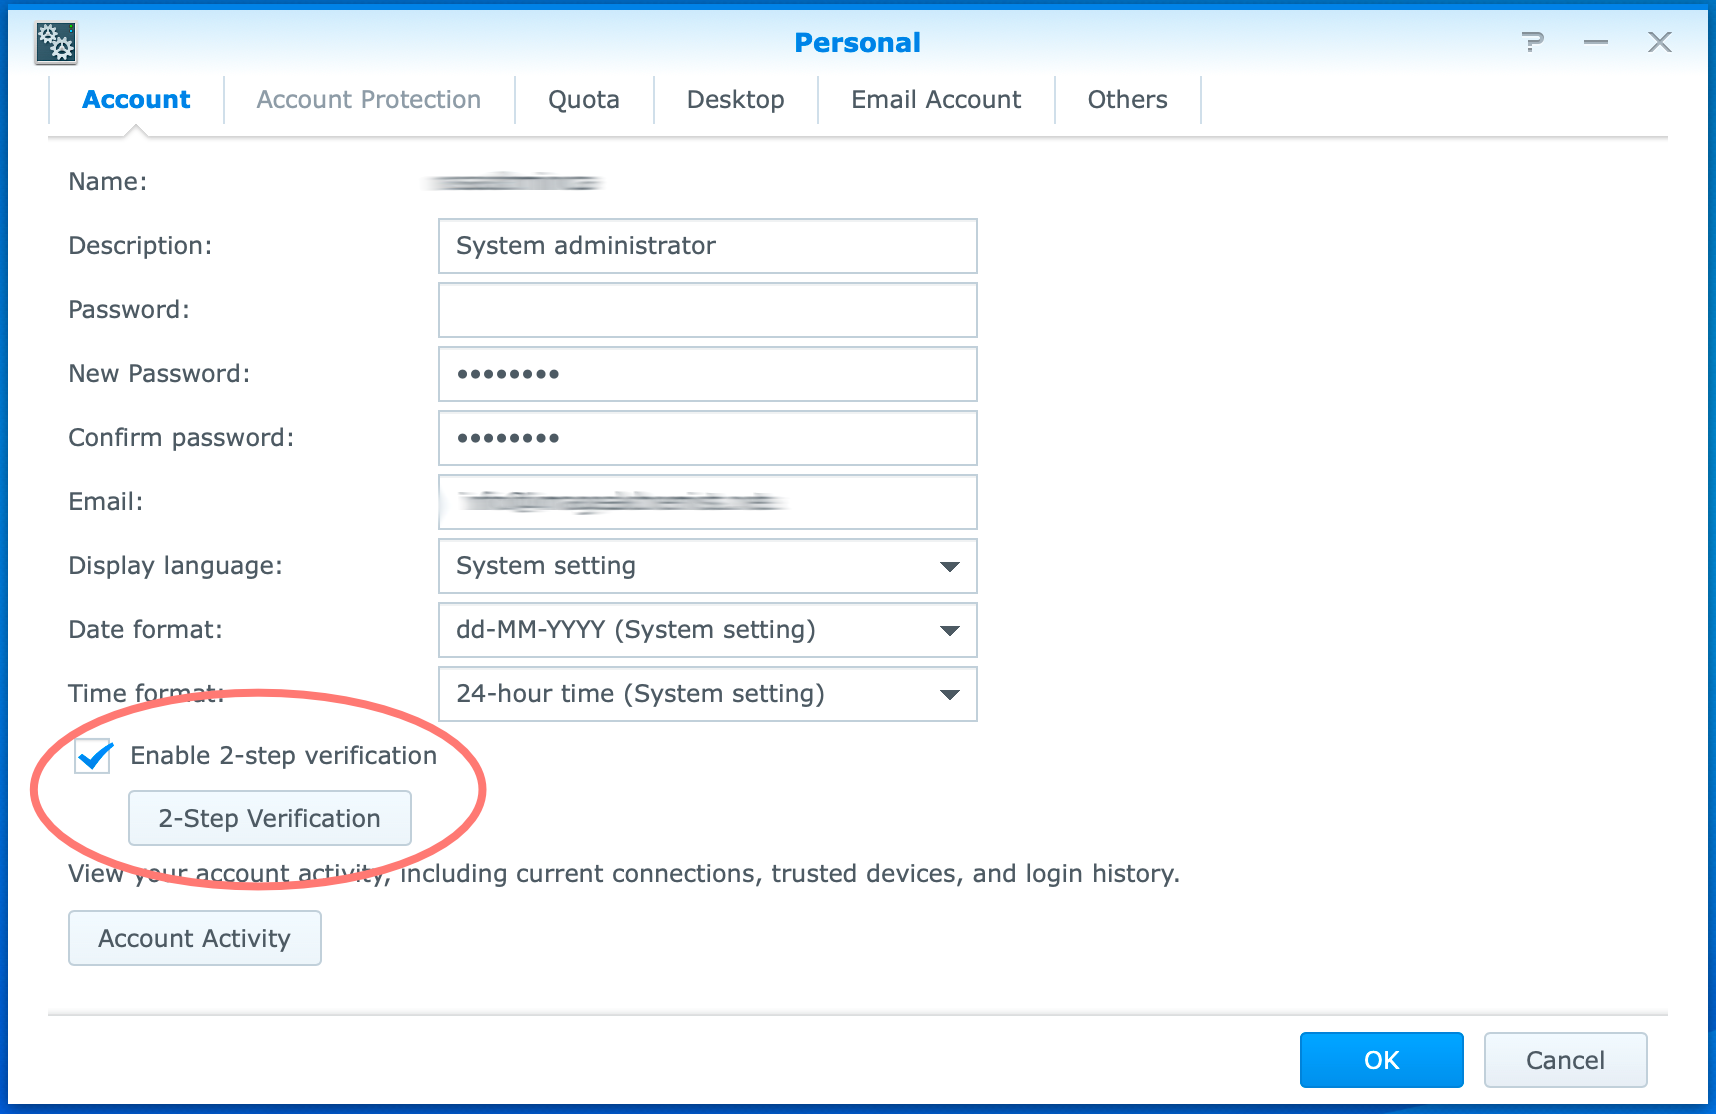
When you enable it, you receive directions on how to proceed. Note that there is an escape via your email address if you lose or forget your smartphone and need to log in.
You will find detailed help setting up two-factor authentication in How to enable 2-factor authentication.
Note: another authenticating factor is something you are, like a fingerprint or the iris of your eye. This method is also called biometric authentication.
User Home service
When I discussed the shared folders, I briefly mentioned the home folder for each user individually. You can enable this feature in DSM, as it is disabled by default, and the feature is called the User Home service.
In Control Panel > User > Advanced tab > User Home. Here you can enable the feature, choose a volume if you have multiple volumes in your NAS, and enable the recycle bin.

When you enable the user home service, DSM creates the homes shared folder. This folder contains all the user folders. You find this homes folder in both Control Panel > Shared Folder as in File Station.
In File Station, you also see the home folder. This folder is a link to the homes/[logged_in_user] folder. This is the entry the user uses to access their home folder. The homes folder is there to neglect for the user.
Non-default user group
Every user is a member of the default users group, which is not a problem unless you intend to remove all users except administrators’ right to login to DSM. Since each administrator is also a member of the users group, you can not remove the DSM right from that group. You can, but then you can not log in to DSM as an administrator. Not something you like to experience.

If you like configuring application privileges, setting up a new user group, such as Family or Employees, is more manageable. Next, you remove the DSM right from that group, and you make every user that does not need to log in to DSM a member of this group. You exclude administrators from that group, so they can still log in to DSM.
Service accounts
Some applications work in the background without interacting with a user. There are countless examples, but a few need a user account to do their job. Typically, backup and sync services are good examples.
Whether or not these accounts need administrator or just regular user-level access, they do not need access to resources on your NAS in general, no need to login to DSM, just access to a single application or shared folder.
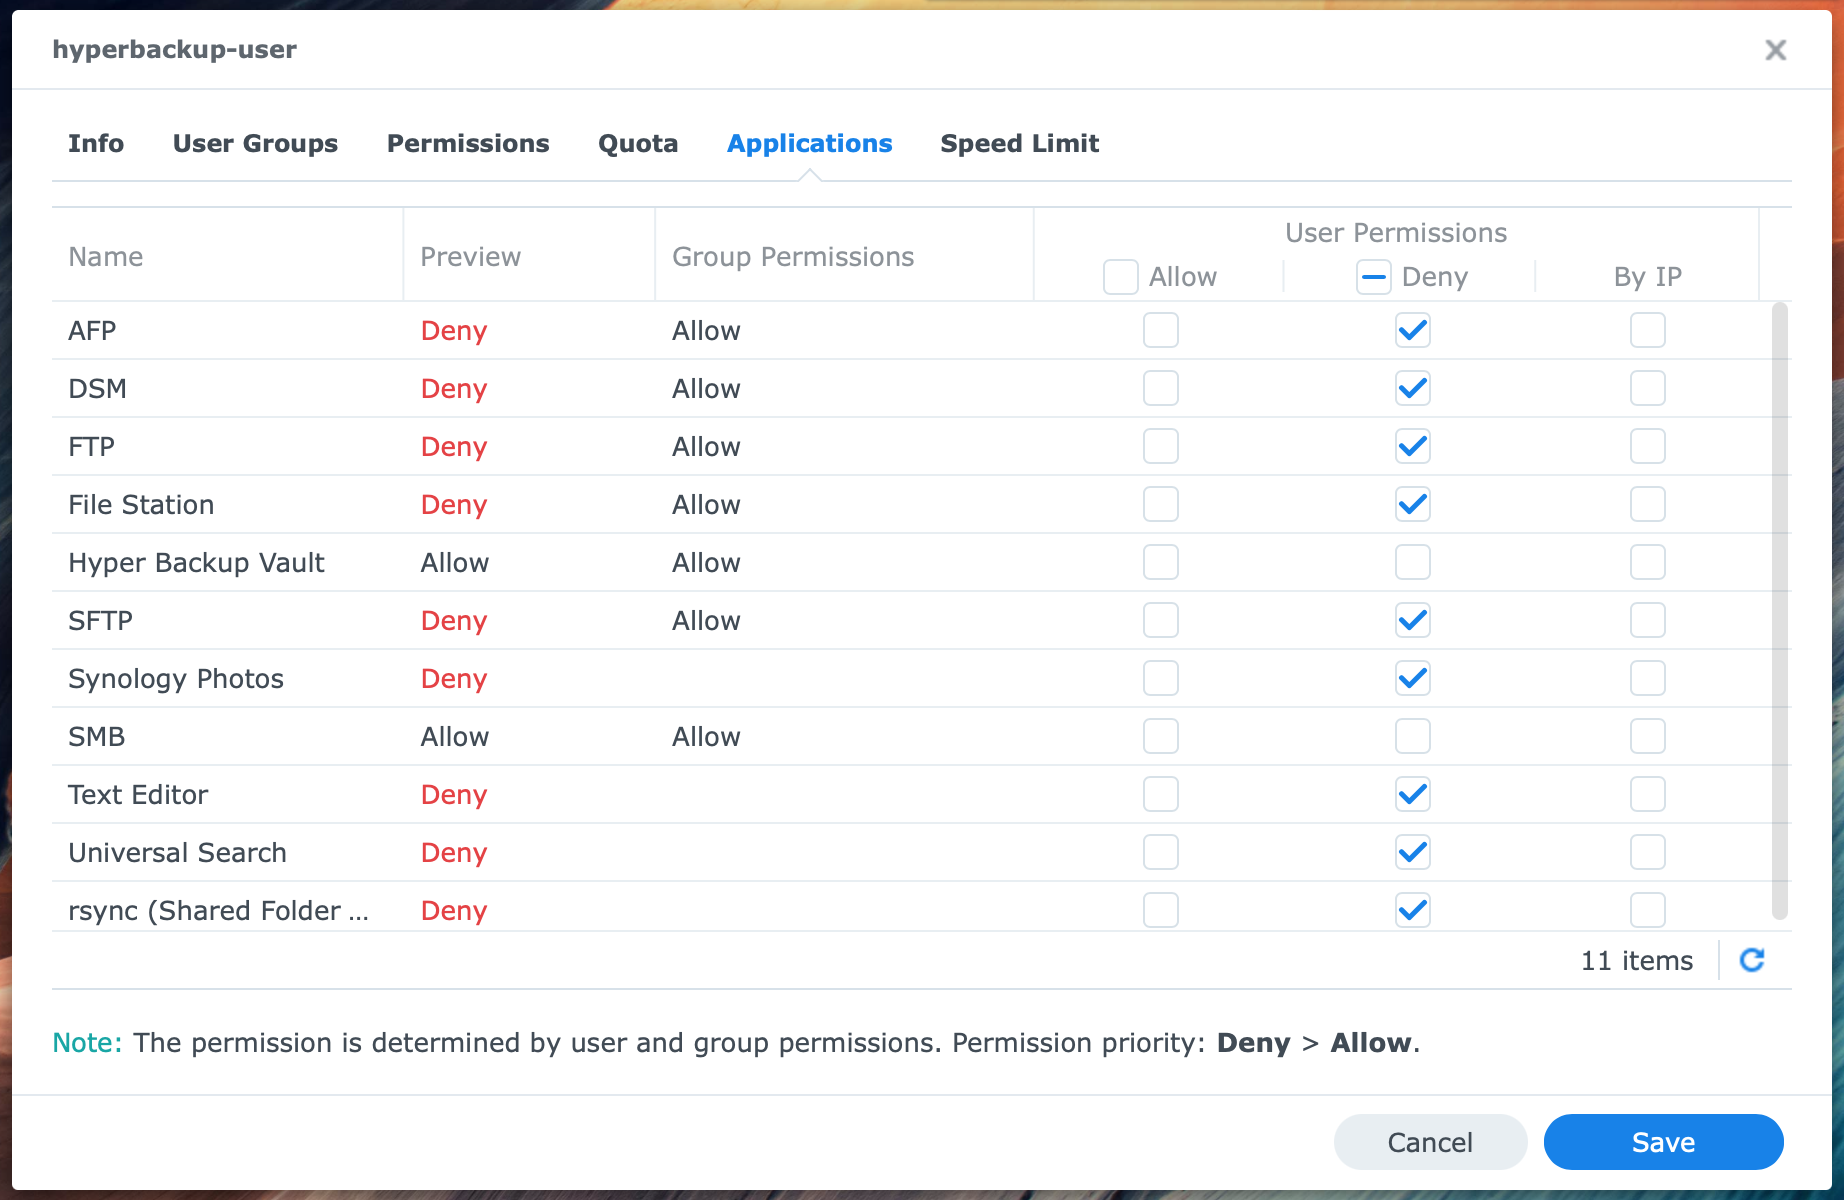
With the knowledge you collected from this post, including the tip of the non-default user group, you can give these special accounts the proper authorization. Please make sure these accounts can not interactively change their password. That would interrupt the service they provide. You can configure this for each account via Control Panel > User (DSM6) or Control Panel > User & Group (DSM7). You will find detailed help on creating service accounts in How to create a service account.
References
For reference purposes, please find the following lists below:
- list of applications you can grant user privileges
- different permissions and how they interact or are inherited (in preparation).
Application privileges
Applications that you can install from Package Center in DSM6, with configurable privileges, are (in alphabetical order):
- Audio Station
- Central Management System (CMS)
- Cloud Station Server (DSM6)
- Cloud Sync
- Download Station
- File Station
- Hyper Backup Vault
- Moments
- Note Station
- Presto File Server
- Surveillance Station
- Synology Application Service
- Synology Calendar
- Synology Chat Server
- Synology Contacts
- Synology Drive Server
- Synology Mail Server
- Synology Mail Server Plus
- Synology Photos (DSM7)
- Text Editor
- Universal Search
- Video Station
- Virtual Machine Manager
- WebDAV Server
Permissions and inheritance
Contents to be determined.
Thanks for reading
This post is donation-ware, and I made it to help you. Please consider leaving a comment or even buying me a coffee if it did. I will be eternally grateful.
Paul Steunebrink / Storage Alchemist

Thank you very much for sharing this information with us. It will be extremely helpful as I continue to set up our family’s server.
Jack Conner
Athens, Georgia, USA
Good to hear, Jack. Enjoy your Synology.
Best regards, Paul Steunebrink / Storage Alchemist