In Setting Up Synology Directory Server, you learn how to set up a directory service that unites all users, computers, and servers into a single namespace for easy access and maintenance. This is recommended for networks with Windows and Mac computers and Synology NASs.
Setting Up Synology Directory Server
Setting up a single Synology Directory Server is technically relatively straightforward. However, a directory service requires careful planning, which I will discuss in the next chapter.
- Setting Up Synology Directory Server
- Design Considerations
- Installing Synology Directory Server
- Configuring Synology Directory Server
- Review Your Domain
- Join Computers
- Joining a Mac computer
- Create Users And Groups
- Assign permissions
- Add A Second Domain Controller
- User Home
- Domain Settings
- Leaving The Domain
- Demoting A Domain Controller
- Transferring FSMO Roles
- Logging And Testing
- Thanks for reading
You install the DNS Server and Synology Directory Server packages on your NAS in the following step. The installation adds rules to your firewall if one is running on the NAS. You also configure a backup task for the applications.
Wizard-based configuration
At this stage, the services are installed but not yet operational. You do that in the configuration step. With the help of a wizard, you create your first directory server with a domain and related entries in DNS.
After you celebrate the creation of your first domain, I will guide you through what is new and what has changed. This will help you familiarize yourself with the directory service. You log in to your NAS with your domain account.
Using the directory service
From this point in the process, you can take different directions. Assuming you want to start using the directory service as soon as possible, we will begin by setting up the domain by joining a Windows computer and a Synology NAS, adding users, and assigning permissions to domain users for folders and applications.
Next, I discuss the installation of a second domain controller or read-only domain controller. This process is slightly different from the first, but not much. I can show you how to migrate from an existing Windows Server domain. In addition, I share some best practices for maintenance.
Synology offers a valuable resource in the form of a white paper titled Administrator’s Guide for Synology Directory Server. I highly recommend reading it. Although the guide and this post overlap, they are largely complementary to each other.
Design Considerations
Before we install and set up a Synology Directory Server, I want to share some design considerations with you.
Namespace
You might want to create a single namespace for the entire infrastructure if your network has multiple users, computers, and servers. This will make the network easier to manage and use.
With a single account, the user can access all network resources, log in on the desktop, and access applications and shares on the server. The administrator can centrally manage user access, creating a safer environment.
Domain
The namespace is a directory service, commonly referred to as a domain, which is backed by DNS, or Domain Name System. Both the domain directory and DNS run on a directory server, also known as the domain controller.
A Synology NAS offers two directory services in Package Center.
- LDAP Server
- a lightweight directory service for environments with different operating systems, like macOS, Linux/Unix
- Synology Directory Server
- preferred for Windows-based environments
I will discuss setting up the LDAP Server in a separate post.
Some Synology NAS models might not offer both services in Package Center. For Synology Directory Server, you need a so-called Plus model or higher. These models have an Intel or AMD processor. It appears that the Synology Directory Server is not supported on models with ARM-type processors.
You cannot install Synology Directory Server on a NAS with an LDAP Server running or vice versa.
DNS
As already mentioned, the directory service relies on DNS. I prefer reserving a DNS domain name with an online DNS registrar. It ensures that nobody else can use the name on the Internet, preventing confusion that may harm your directory.
You can also use a .local domain name, such as mydomain.local, which is not available on the Internet. Whatever you do, plan carefully, as you can not change it later without entirely rebuilding your network infrastructure.
Throughout this tutorial, I will use the domain name synodemo.com. I registered this domain for demonstration purposes. Please replace it with your domain in every step where I use this name.
Directory Server
The Synology Directory Server on your NAS utilizes the open-source Samba implementation, which mimics the Microsoft Active Directory domain that runs on a Windows Server.
The primary difference between the two implementations, Microsoft and Synology, is that the Synology implementation is more straightforward in terms of features and comes with Synology hardware, free of license costs.
Microsoft’s implementation is fully featured and requires additional licensing in addition to the purchase of hardware.
Small and medium-sized businesses that already own a Synology NAS may not need the Microsoft package and are satisfied with the Synology Directory Server. In a larger enterprise, the Microsoft solution might be more suitable.
Different domain controllers
When designing your directory service, you determine the number of domain servers and their types.
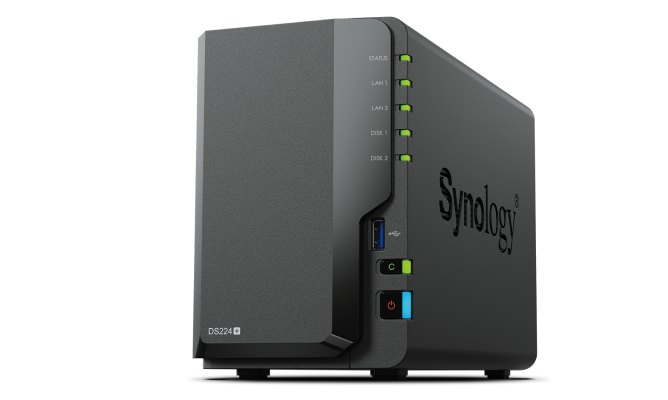
Since DNS and the directory are the backbone of your infrastructure, you may want to consider installing at least two domain controllers for resilience during maintenance or unexpected downtime. Since this service is not resource-intensive, you can use a more affordable model, such as the DS224+.
Suppose your directory server is remote or located in an uncontrolled environment, such as a locked server room. In that case, you can install a read-only domain controller instead of a standard setup.
You can install two domain controllers with Synology Directory Server in a Synology High Availability configuration.
Server name and IP address
Each server that becomes a directory server with DNS needs a fixed or static IP address on at least one LAN interface. I suggest always giving servers a fixed IP address on any LAN interface. Record these settings for future maintenance purposes.
Carefully consider the naming scheme for your servers, particularly when they become a directory and DNS server. It is difficult to change the name later.
If necessary, please refer to How do I change server name when directory server is activated for details.
Synology High-Availability cluster
You can run the Synology Directory Server on a Synology High-Availability (SHA) cluster. However, you can not create a cluster when the directory server runs on the NAS. First, create the SHA cluster and install the Synology Directory Server.
Suppose you create a cluster with an already-in-use NAS. In that case, you should back up the Synology Directory Server using Hyper Backup, delete the service, create the cluster, reinstall the Synology Directory Server, and then restore the backup.
User Home
As a Synology NAS administrator, you are probably familiar with the User Home service. When you enable this service, it creates the /homes shared folder and provides a home folder for every local user of the NAS.
When the NAS joins a domain as a member server or domain controller, you can extend the User Home service to domain users.
From a design perspective, I suggest deciding which server in the domain will provide the user’s home folders.
My design
In this post, I use two DNS and two Synology Directory Server domain controllers with a single domain. Two servers provide the resilience needed in a business environment. I also wanted to investigate the additional configurations that come with this setup.
You can use a single server for each service. Where applicable, replace the names with yours.
- primary DNS server and domain controller (Primary domain controller or PDC)
- hostname: vdsm7-1
- IP address: 192.168.2.201
- secondary DNS server and domain controller, or member server
- hostname: vdsm7-2
- IP address: 192.168.2.202
- domain name
- synodemo.com
The domain synodemo.com is a registered name that I use for demonstration purposes.
Installing Synology Directory Server
Assuming you are happy with the server name and have assigned a fixed IP address to the LAN interface, you can install the first Synology Directory Server in your network.
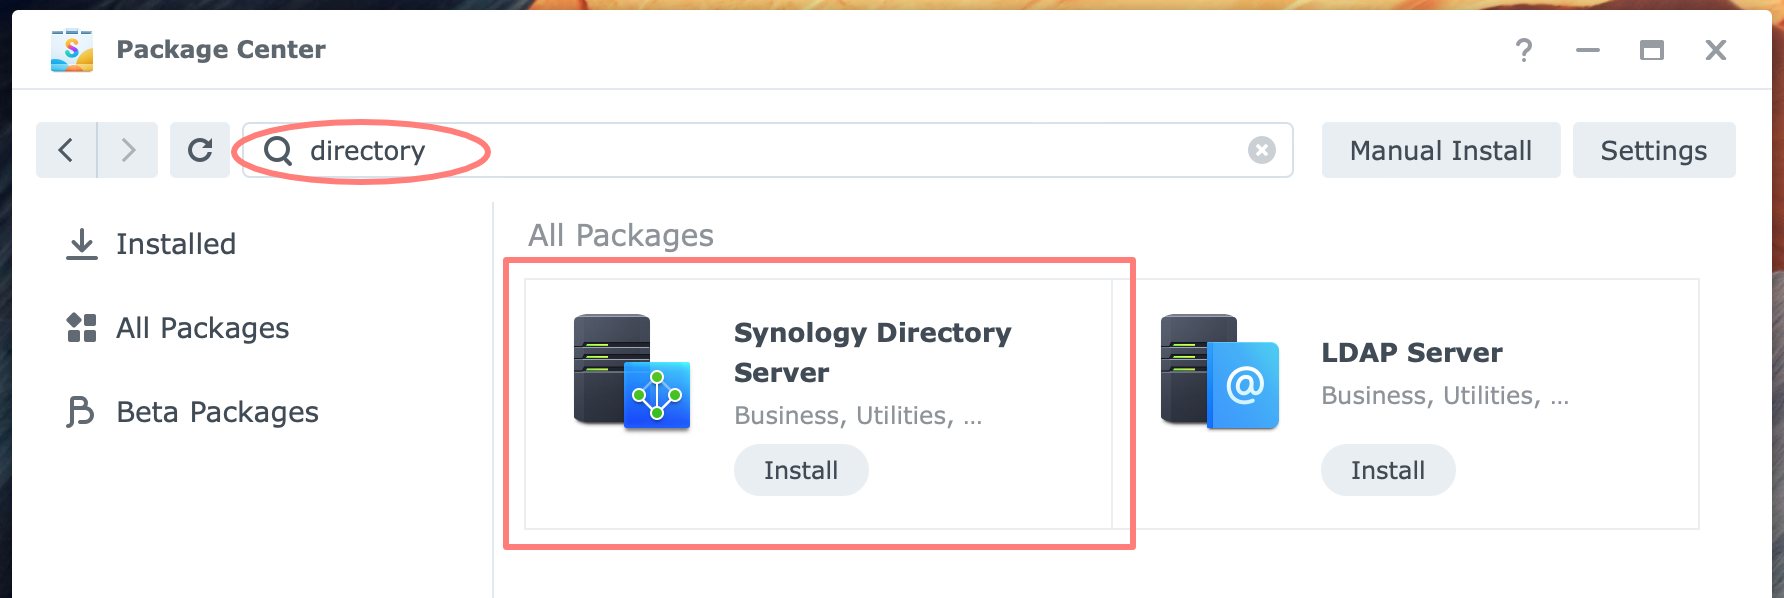
Log in to the DSM desktop as an administrator and open Package Center. Search for directory and install the Synology Directory Server package.
Note that this package automatically installs the DNS Server package if it is not already running on the NAS.
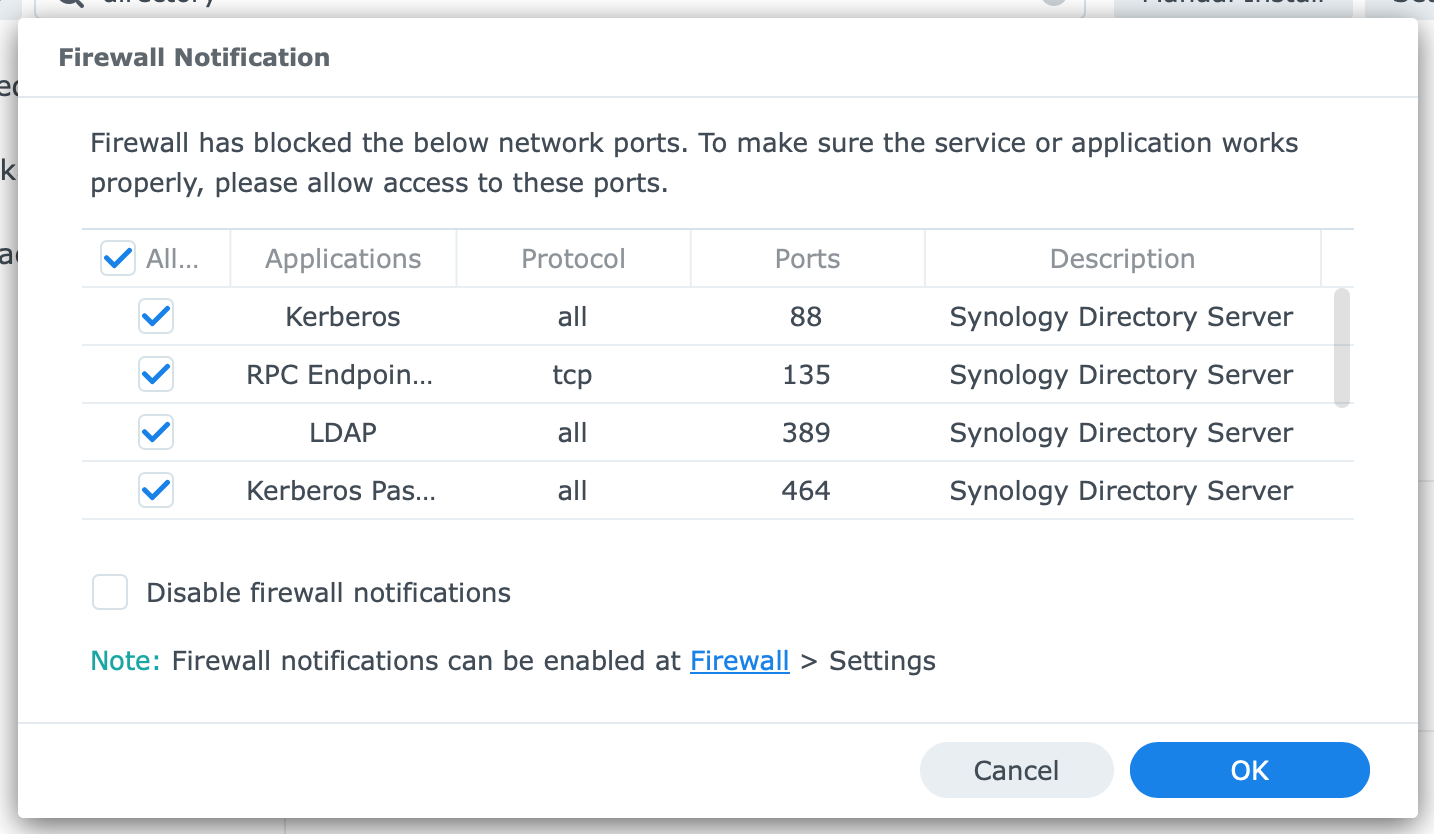
Firewall
If a firewall is running on the NAS, you may receive firewall notifications. Accept both messages and include the rules in the firewall.
Ensure clients can access the Windows file server and NTP service through the firewall on every domain controller.
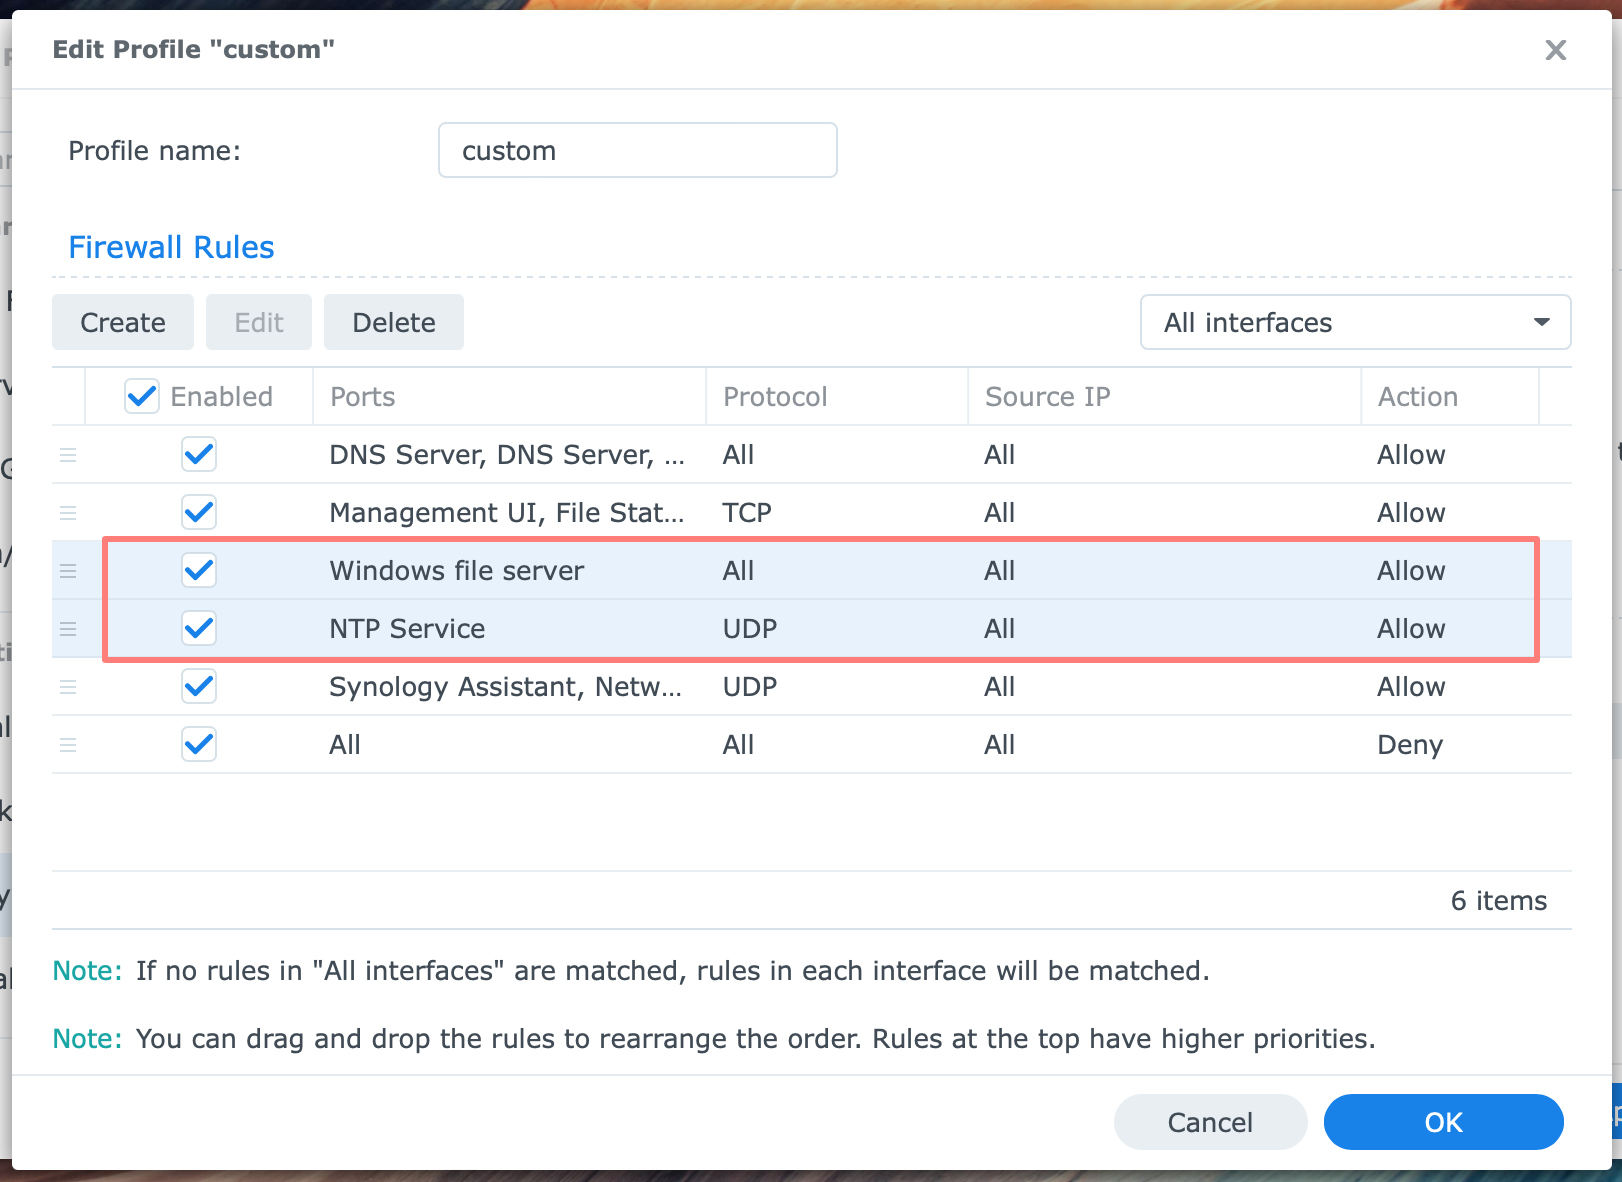
You do not get notifications for these ports, but they are essential.
Certificate
The Synology Directory Server creates a service for the certificate settings during installation—the service links to the default certificate. For details, see Control Panel > Security > Certificate > Settings (button).
As outlined below, a different and self-signed certificate is assigned to the service in the configuration phase.
Backup
If you use Hyper Backup, I encourage you to add the DNS Server and Synology Directory Server applications to an existing task or create a new one.
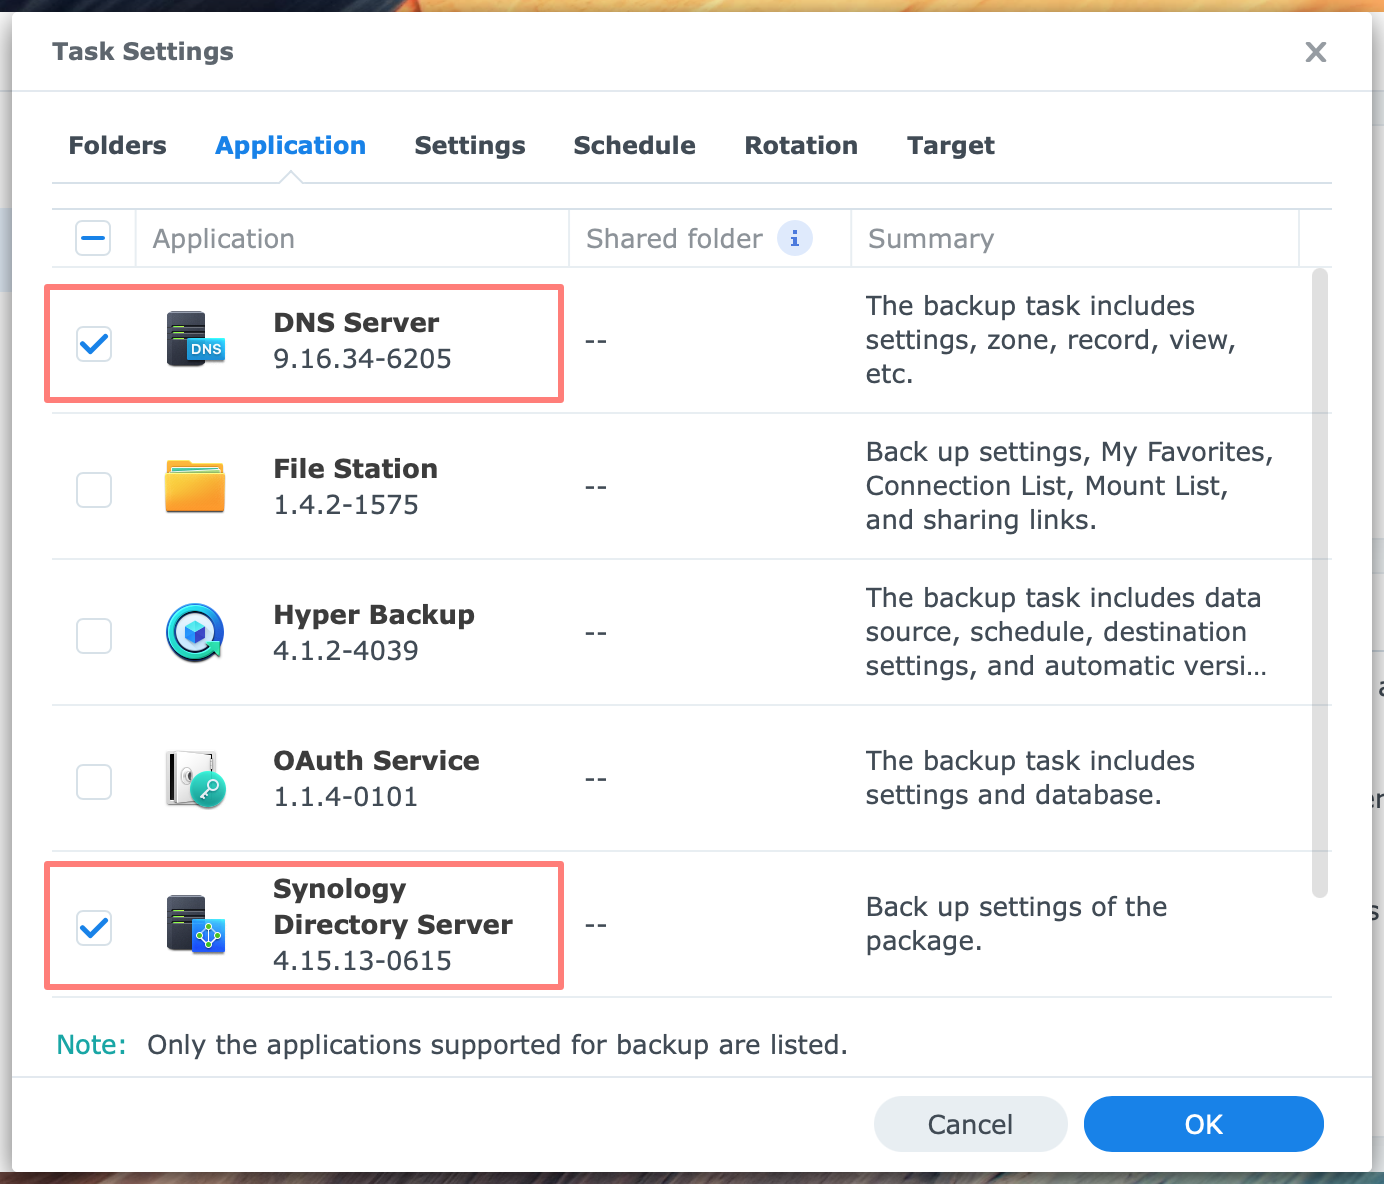
I highly recommend frequent backups since the directory service is vital to your network infrastructure. If necessary, please refer to Understanding Hyper Backup.
Configuring Synology Directory Server
After the installation, you open the Synology Directory Server application from the main menu. The first screen of the Synology Directory Server Setup Wizard welcomes you.
The first screen shows the following options. I added the title of the next screen for each option for information purposes only.
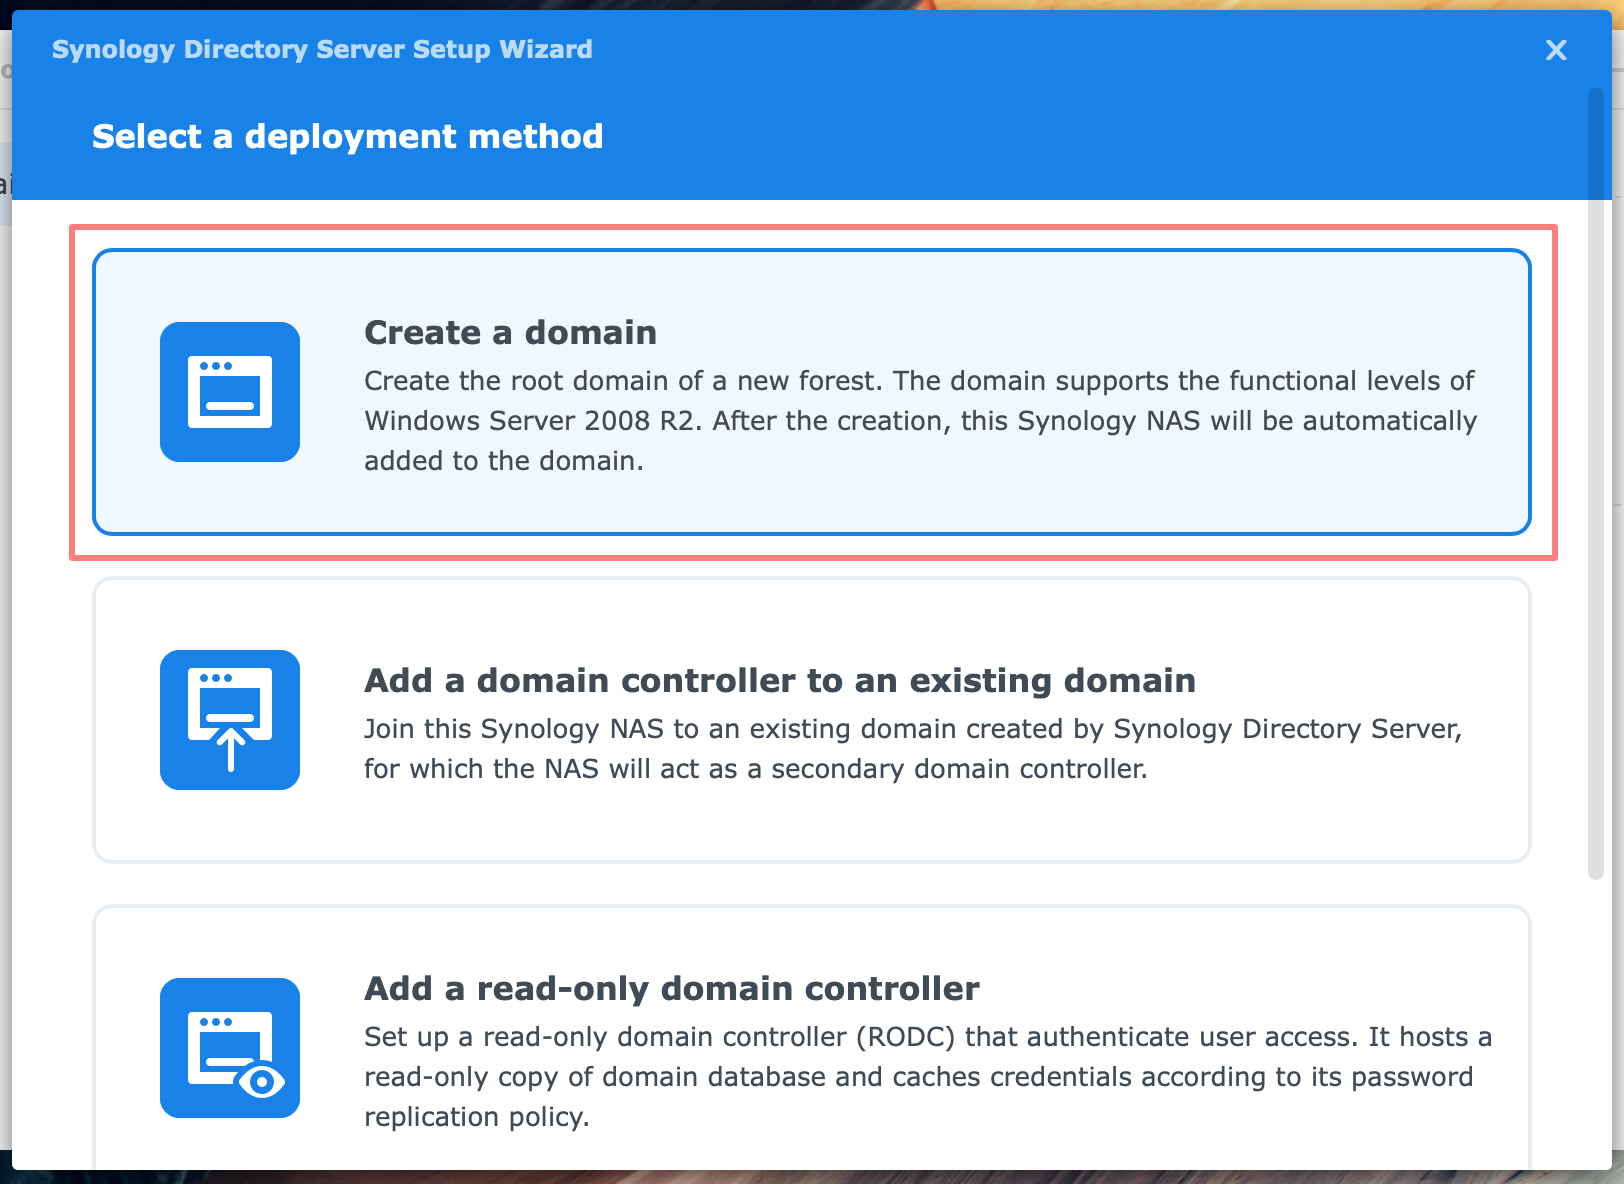
- Select a deployment method
- Create a domain
- Enter domain information
- Add a domain controller to an existing domain
- Specify the target domain
- Add a read-only domain controller
- Specify the target domain
- Migrate from a Windows Server domain
- Specify a Windows Server domain to migrate from
- Create a domain
Because this is the first domain controller we create, we choose the first option, which opens the next screen.
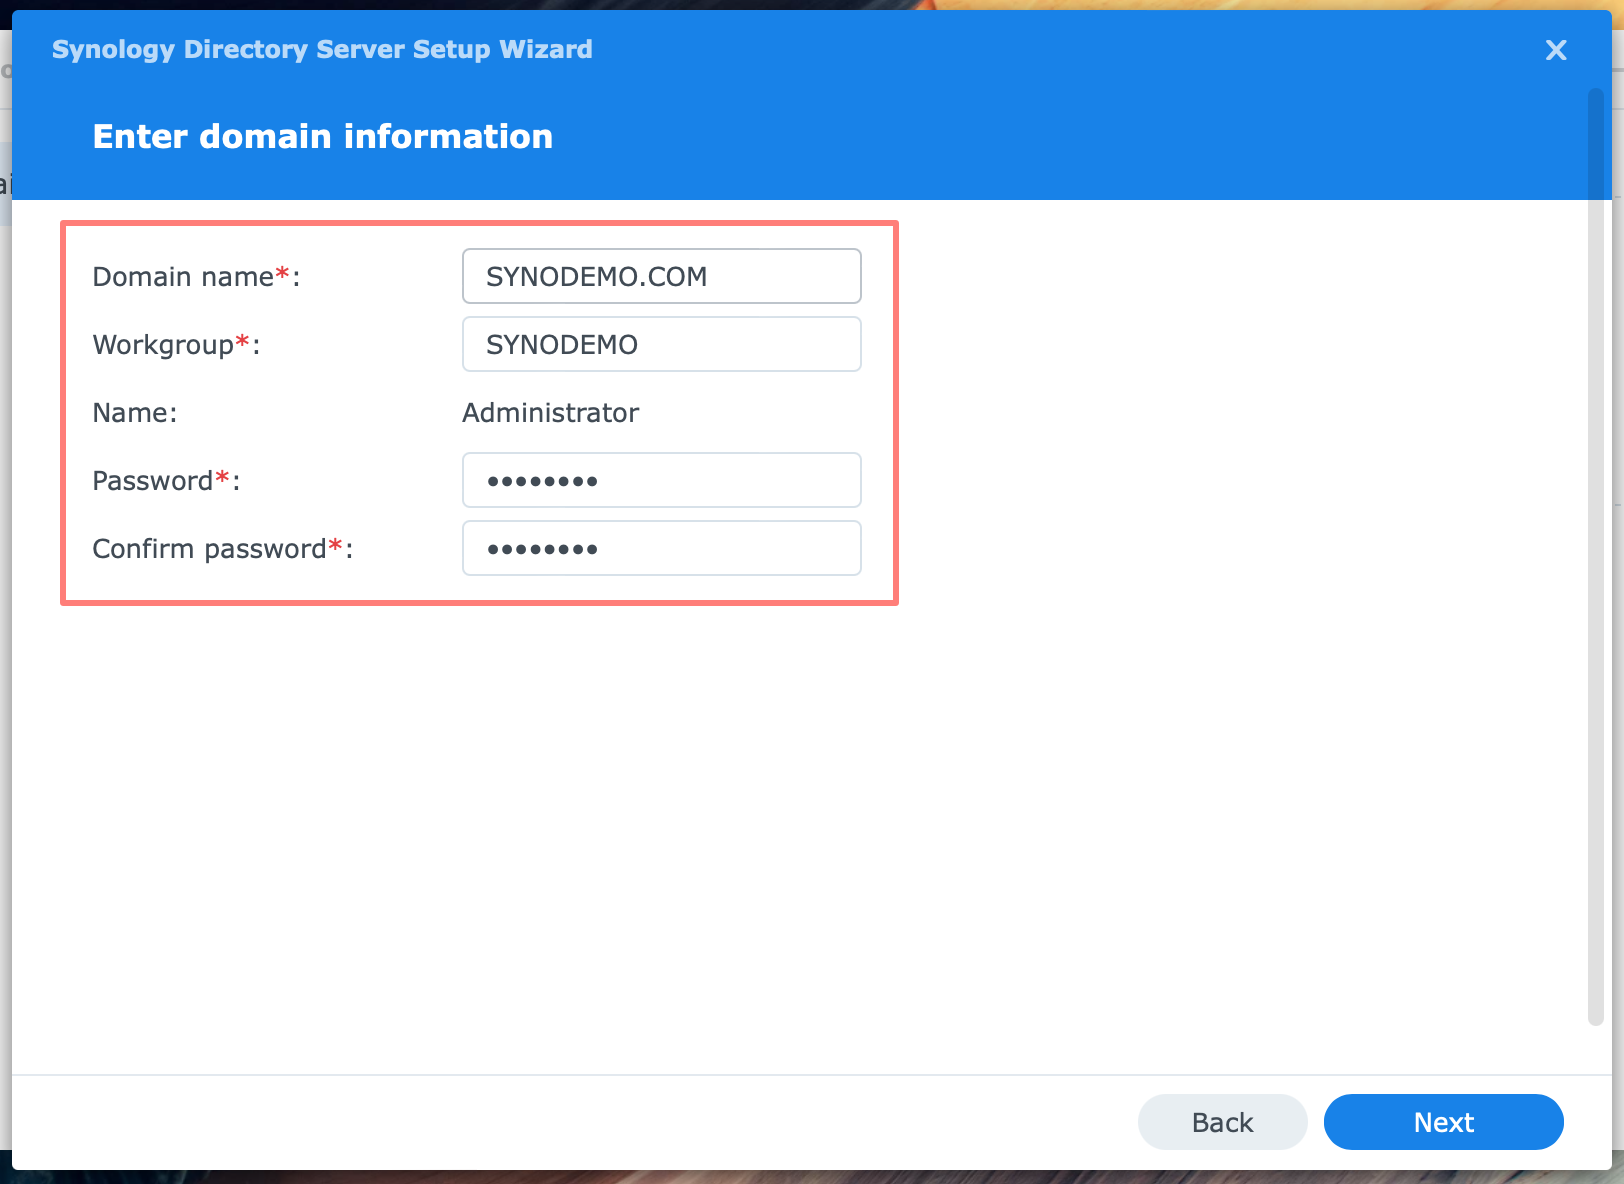
- Enter domain information
- Domain name
- Workgroup
- Name: Administrator
- Password
- Confirm password
In this screen, you provide the domain name and administrator password. The Workgroup name is automatically distilled from the domain name, but you can change it if necessary. Both the domain and workgroup names are listed in capital letters.
Create a unique and strong password for the Administrator and store it safely. When you are done, click Next to continue.
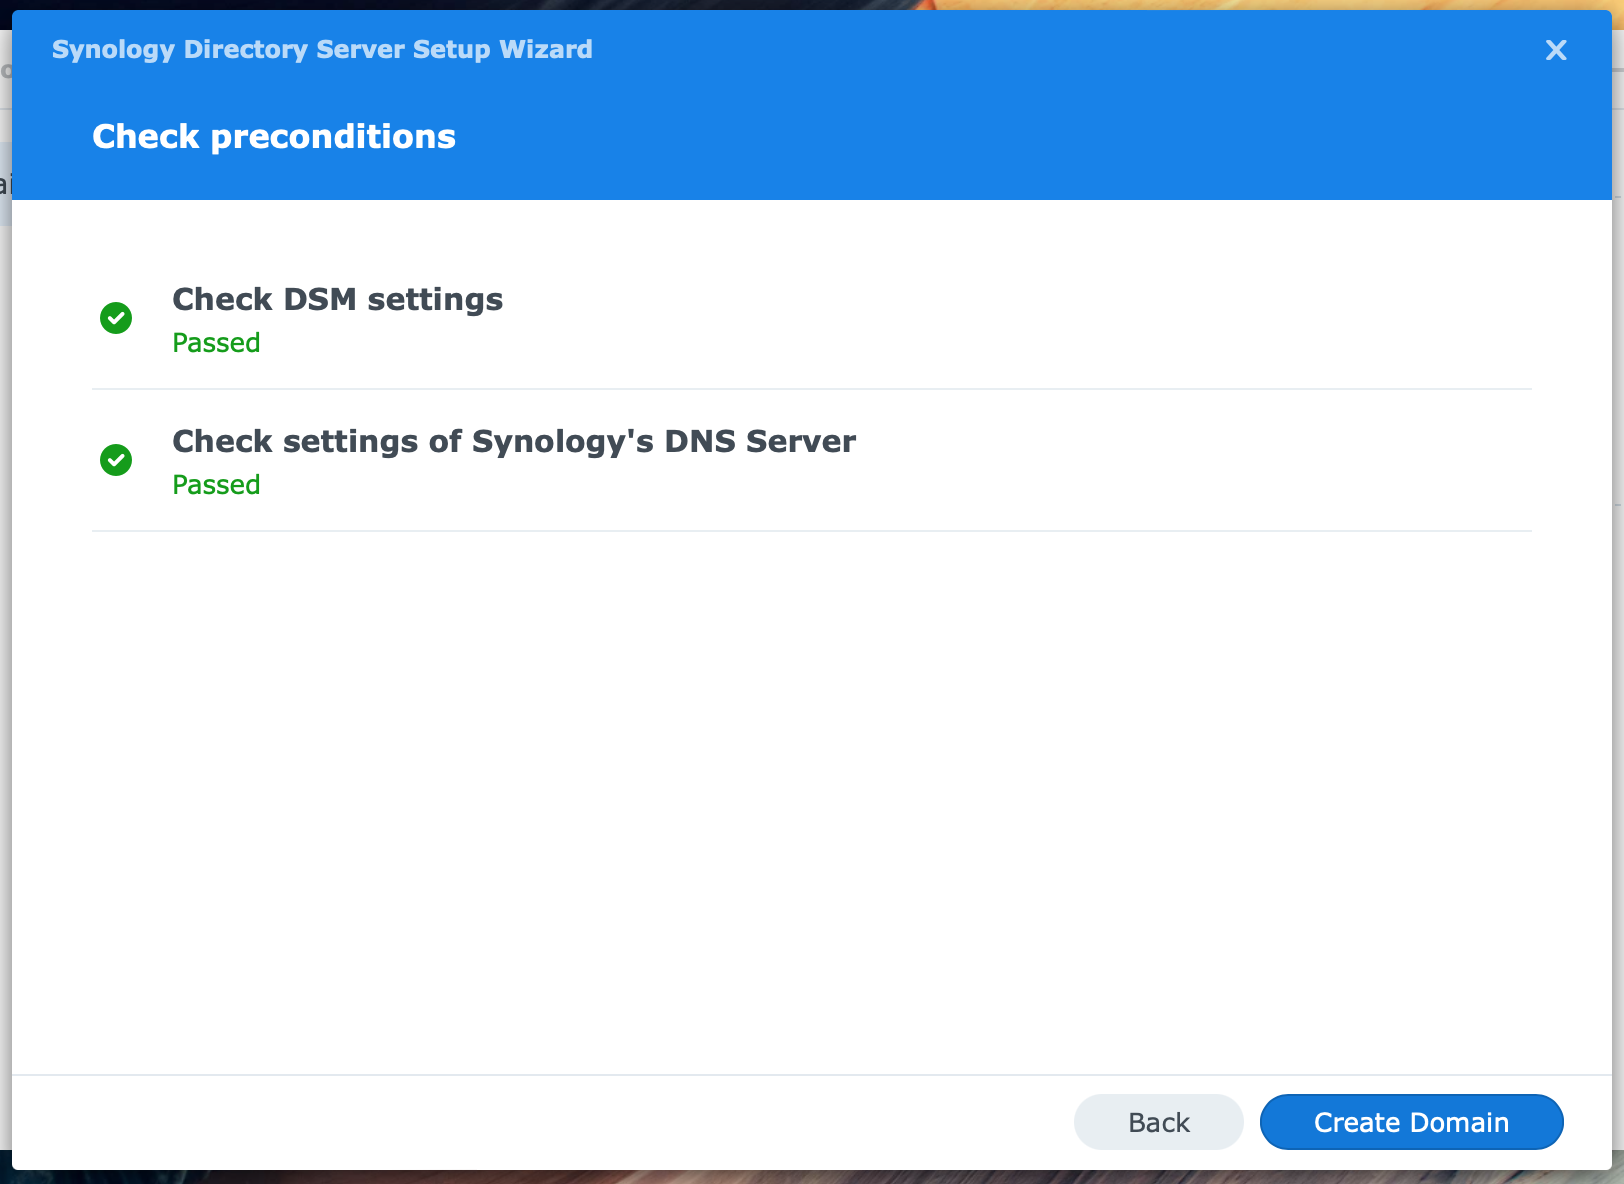
- Check preconditions
- Check DSM settings
- Check settings of Synology’s DNS Server
Before giving you the green light, the wizard checks a few settings, including the fixed IP address. When both checks are green, click the Create Domain button to create the domain in DNS and the directory server.
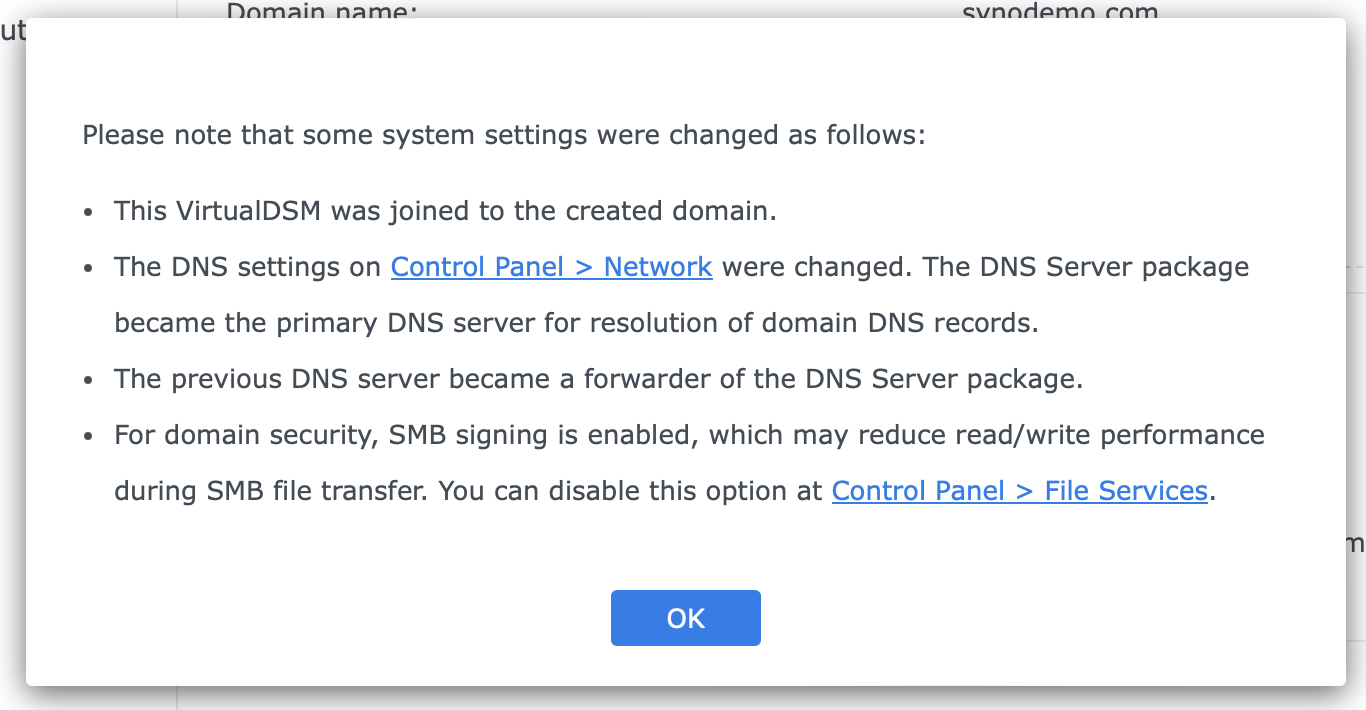
After creating the domain, the wizard displays a pop-up message indicating that the NAS has joined the domain and updated the DNS Server settings. Click OK. The wizard ends.
Congrats, you created your first domain (pat on the back).
Review Your Domain
After the wizard ends, you return to the Synology Directory Server application. I suggest you briefly explore the domain and other changes that took place.
The Synology Directory Server application has four screens:
- Domain
- Users & Computers
- Domain Policy
- Log
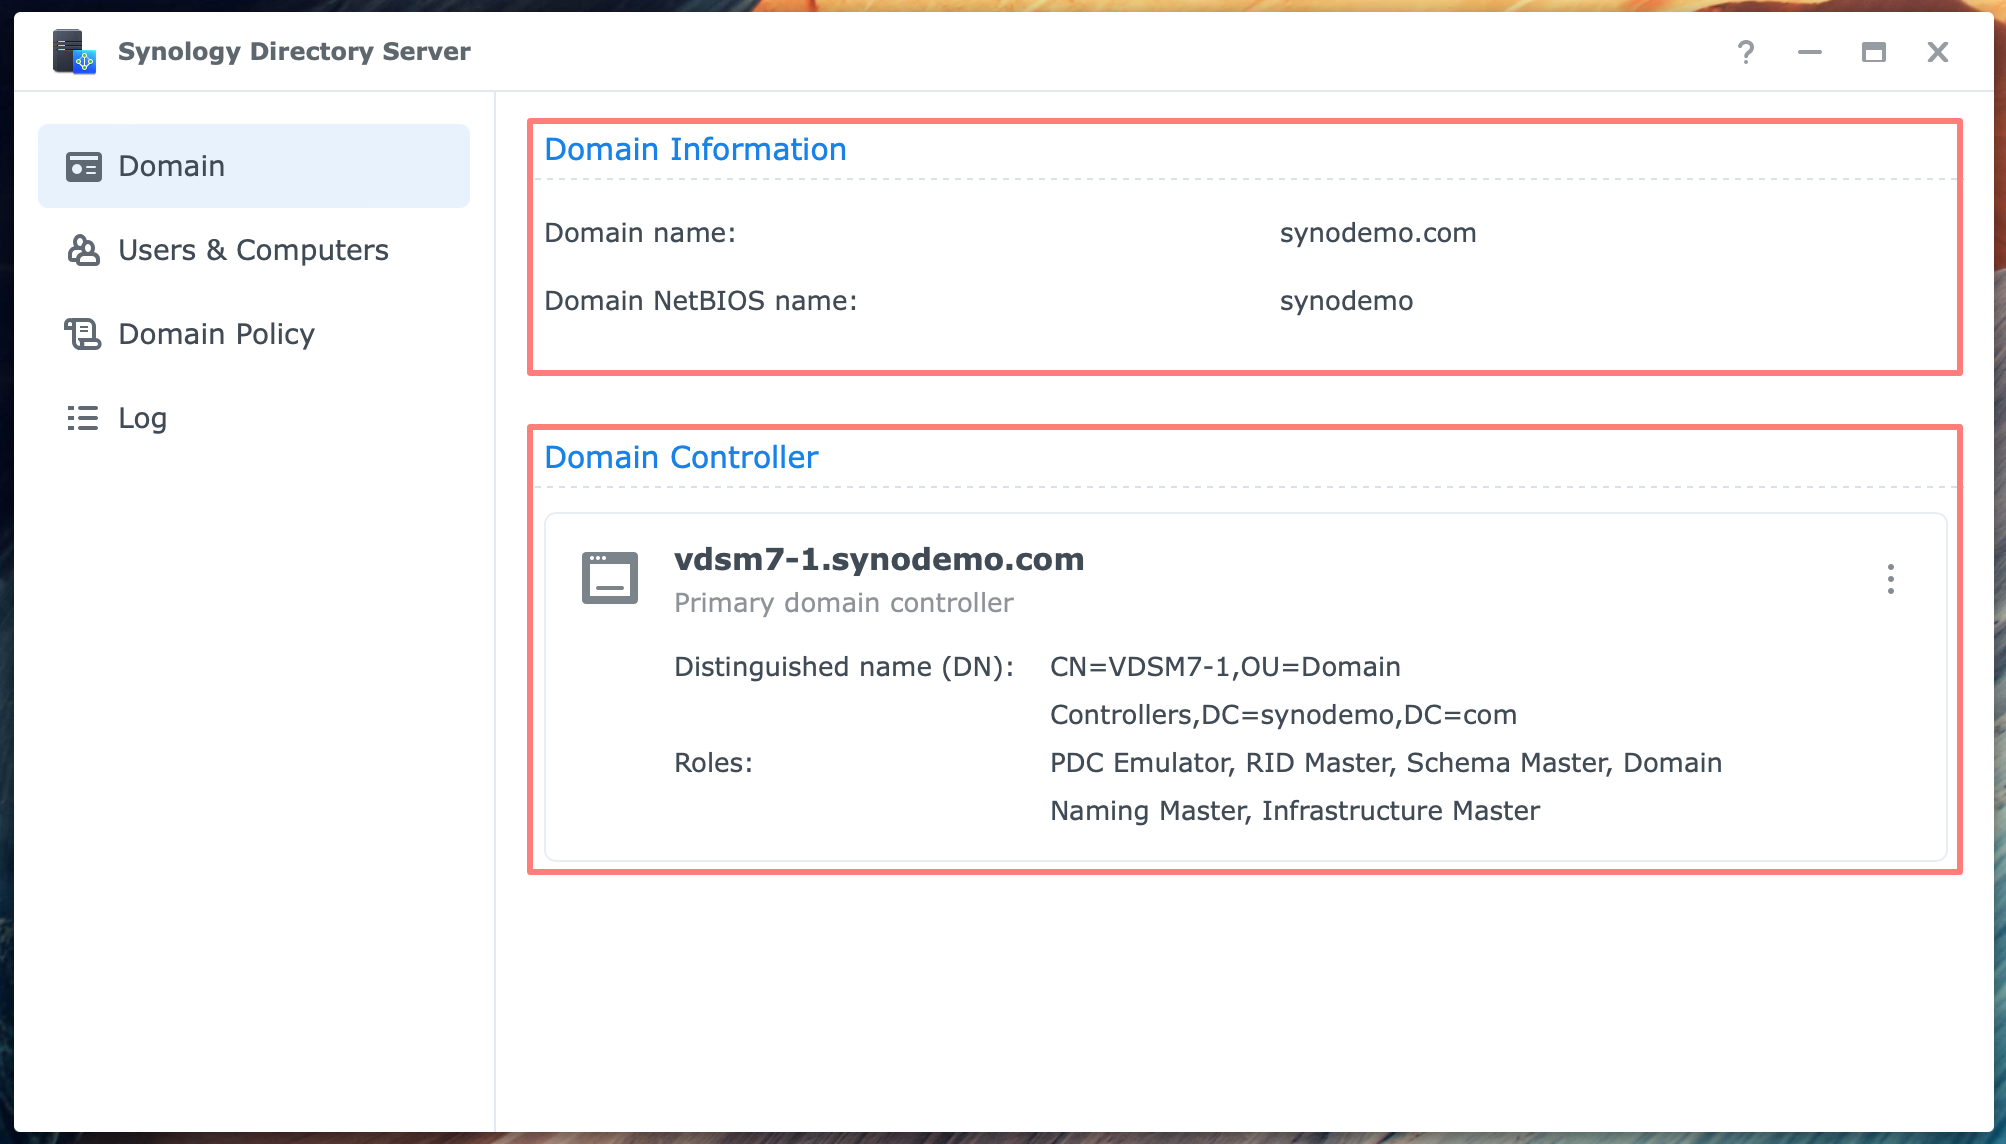
The Domain screen displays information about the domain and the domain controller. Notice the title Primary domain controller under the server name. Each domain controller has a distinguished name and particular roles. Since this is currently the only domain controller, it has all the roles.
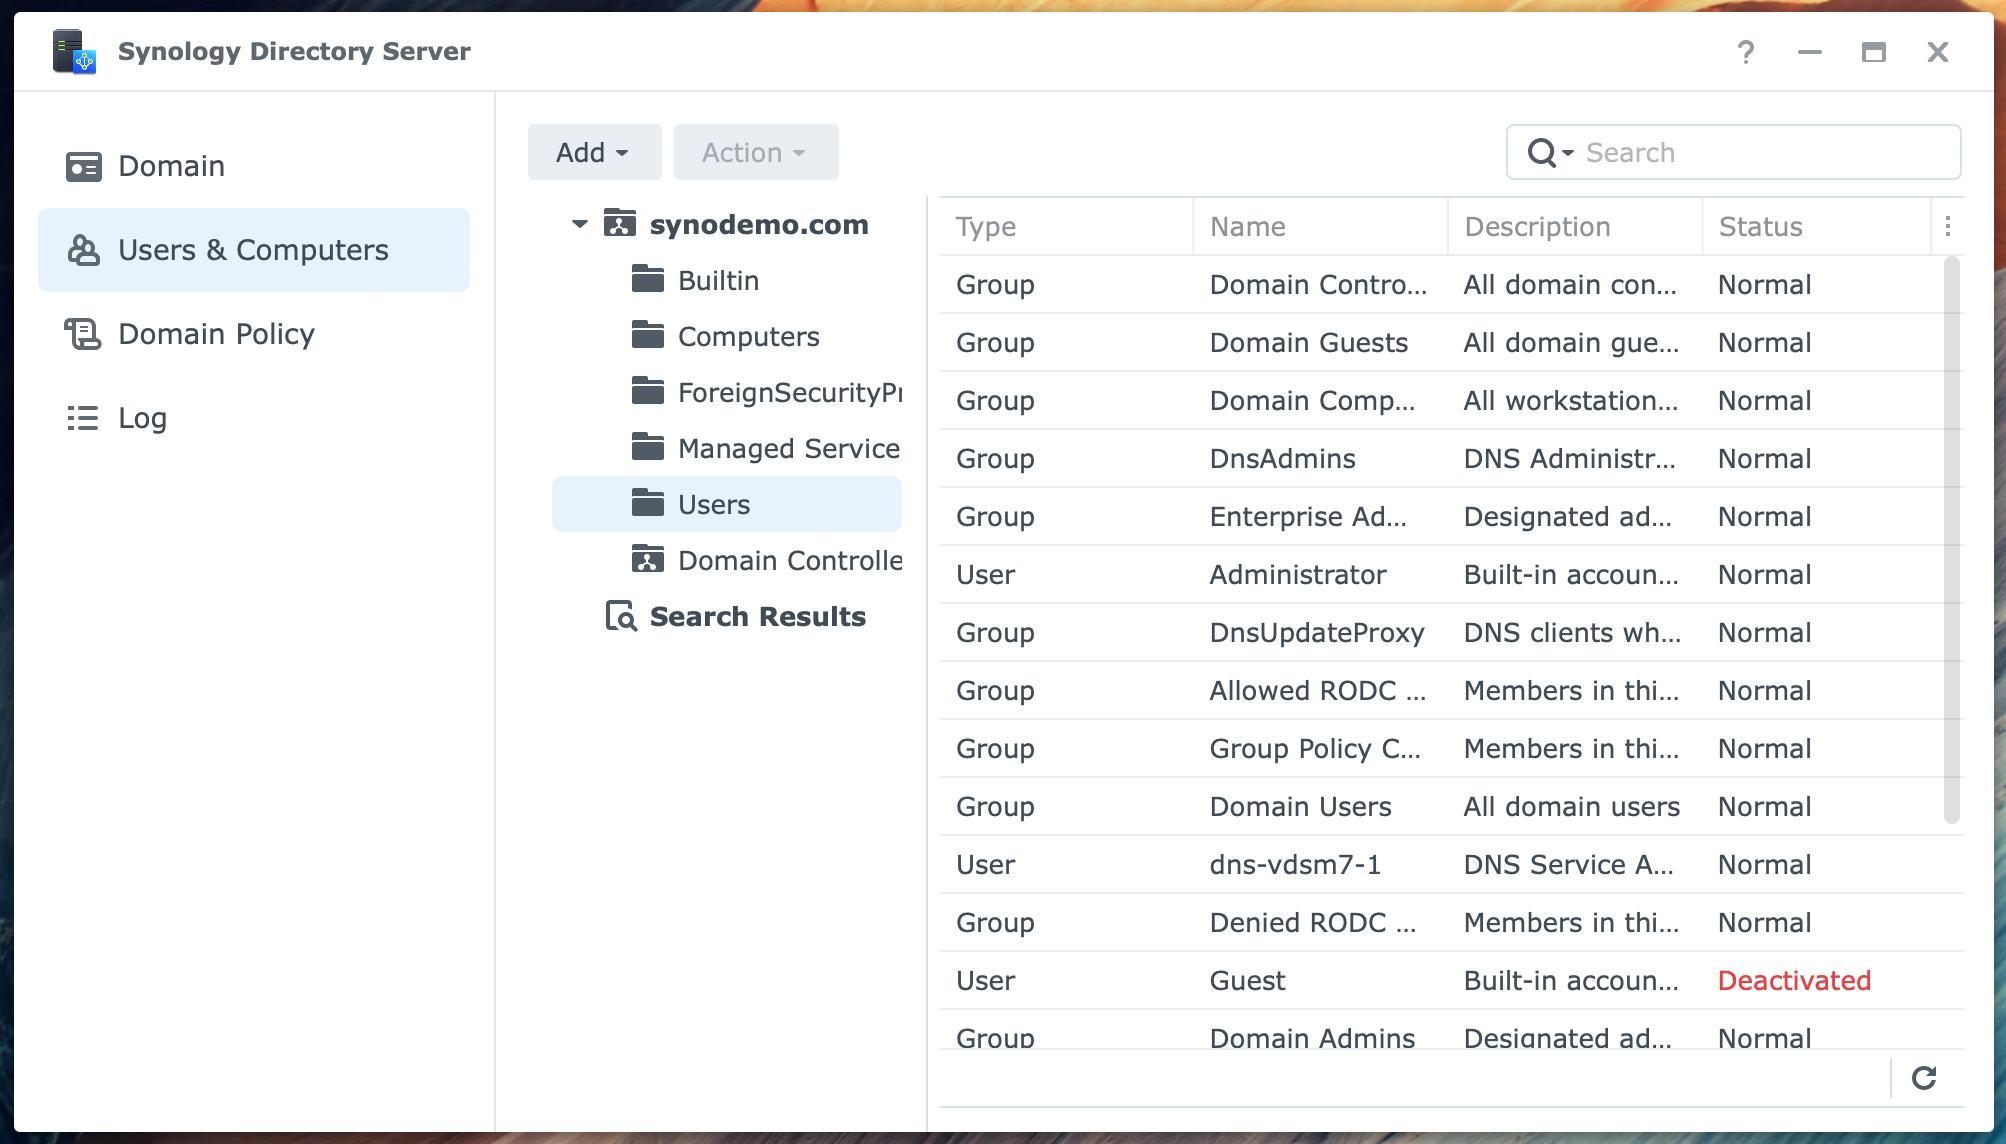
At the Users & Computers screen, you will find the domain’s users and groups. You can also create new users and groups. Computers that joined the domain and all domain controllers are listed here.
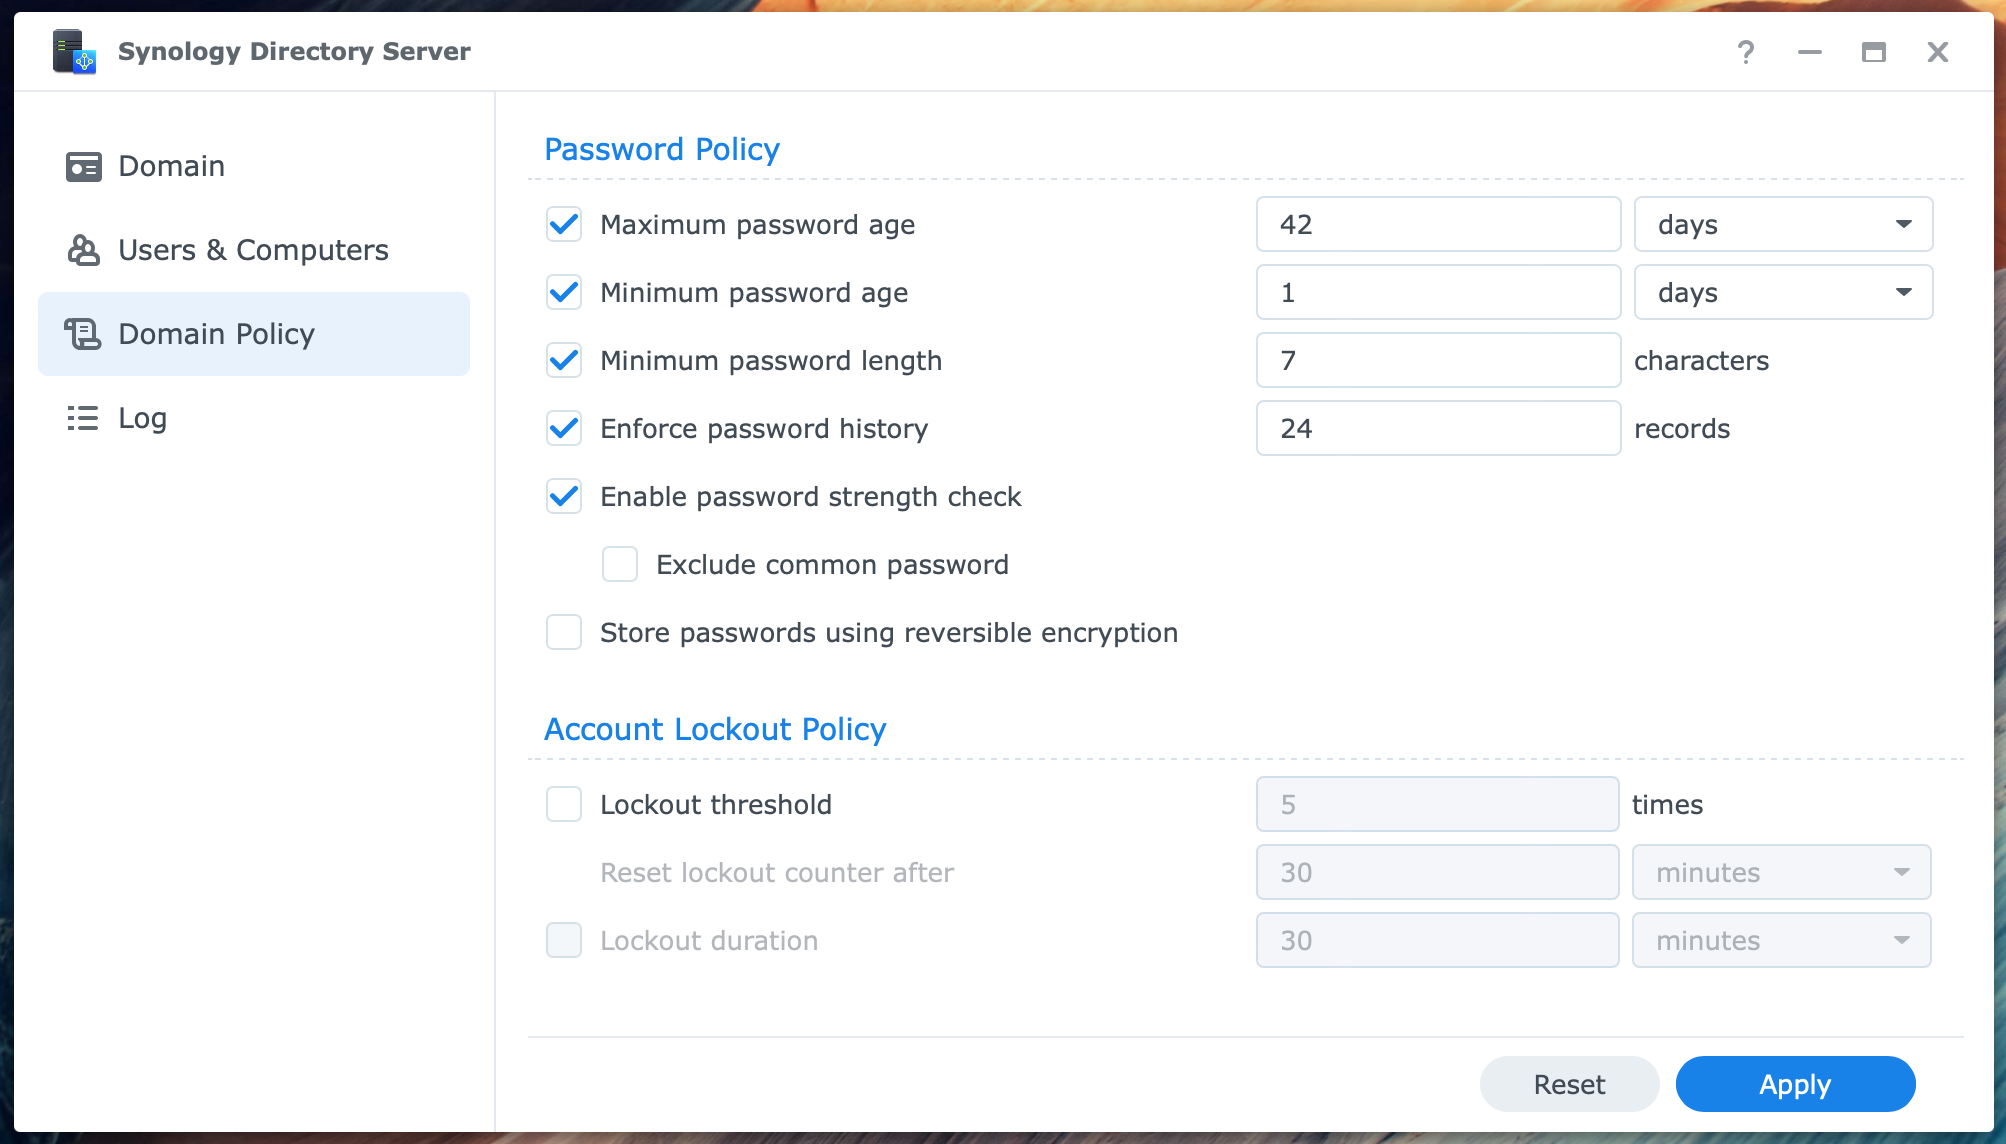
The domain’s password and lockout policies are on the Domain Policy page. You can change these policies according to your preferences.

The Log page is empty and has an Enable button. You can enable audit logging, but it is not enabled by default because it may affect system performance. I suggest enabling it to monitor the new installation. You can disable logging later via the Settings button that appears after enabling.
DNS
When creating a domain with Synology Directory Server, the DNS Server is automatically populated with zones and resource records. Open the DNS Server from the DSM desktop main menu.
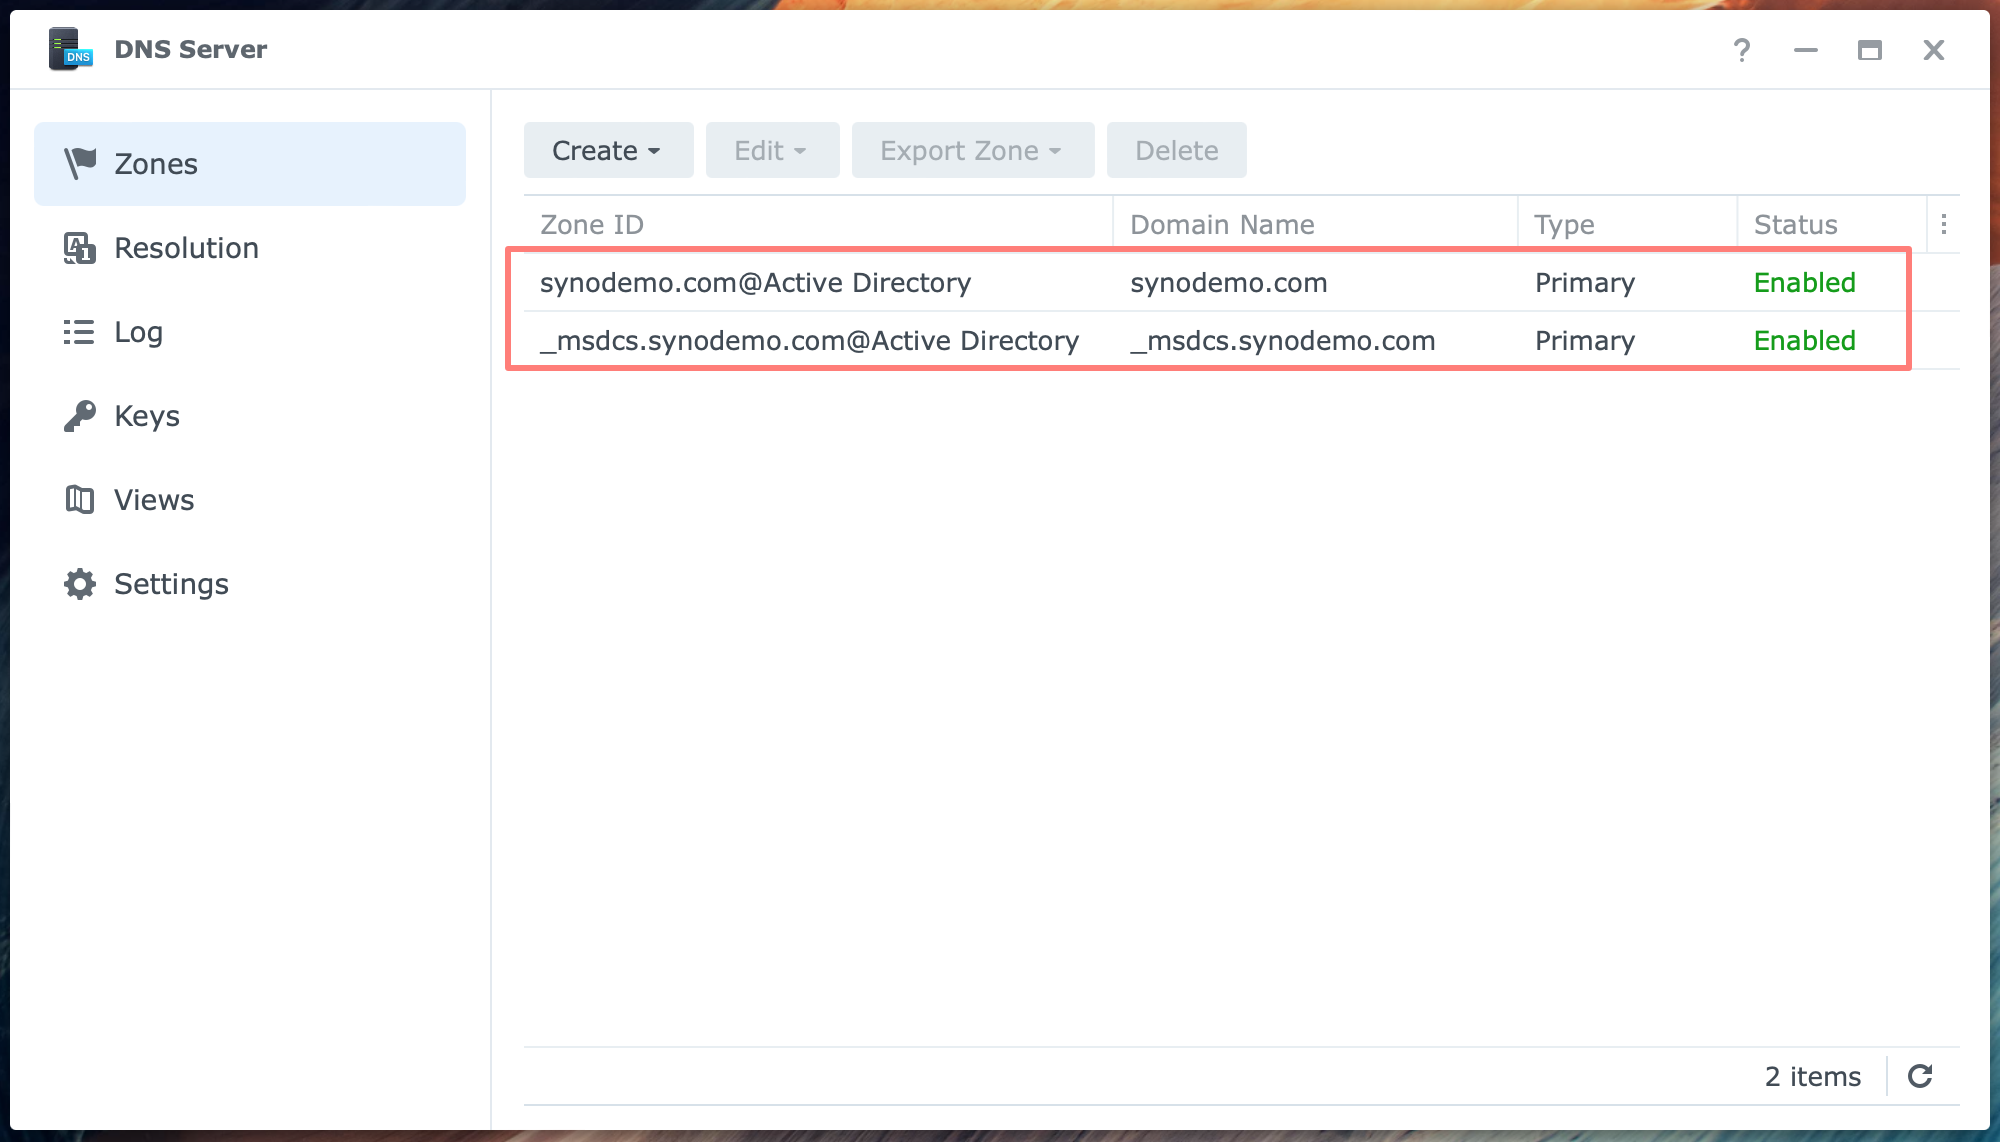
Notice that two zones were created for the domain. For the synodemo.com domain that I use in this post, the zone IDs are:
- synodemo.com@Active Directory
- _msdcs.synodemo.com@Active Directory
Double-click on each zone ID to view the records in that zone. You do not need to add or alter records.
Certificate
In Control Panel > Security > Certificate, you will find a new certificate with a year of validity. It has the server’s name in FQDN format. The description under the name states Synology Directory Server autogen certificate.
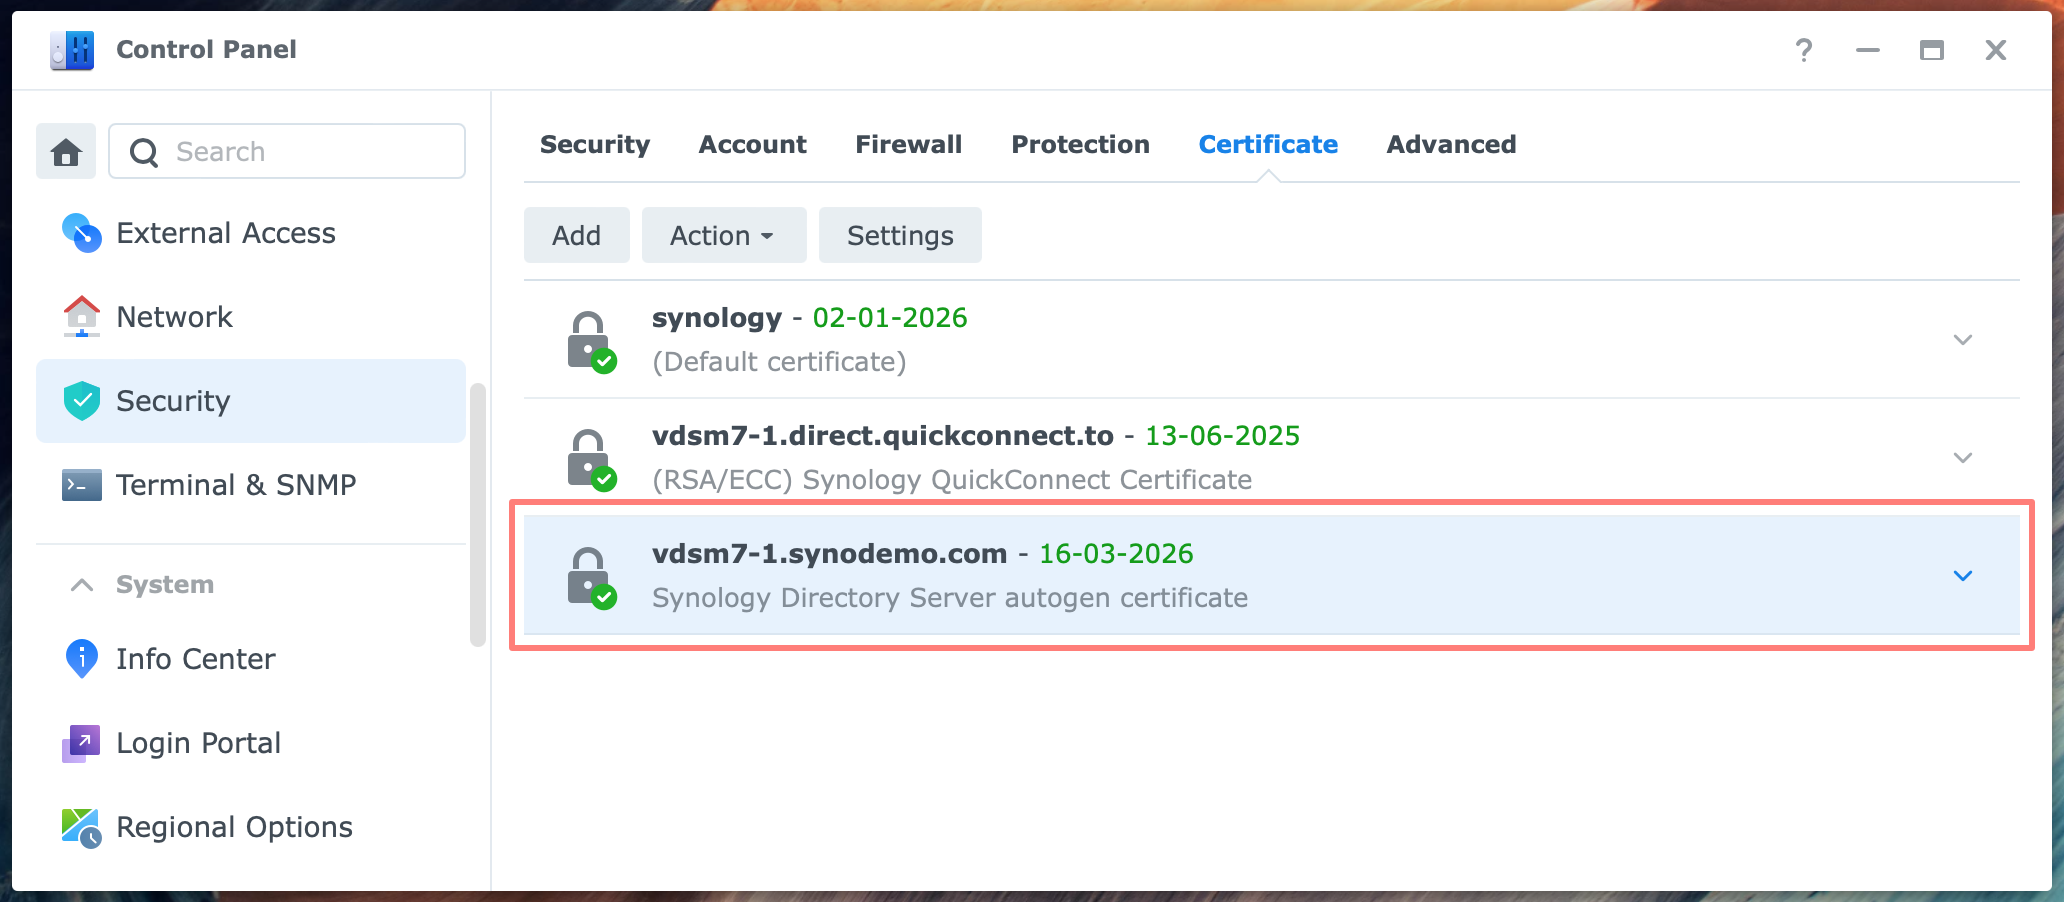
When you click the Settings button, you will see that this certificate has been assigned to the Synology Directory Server.
Domain/LDAP
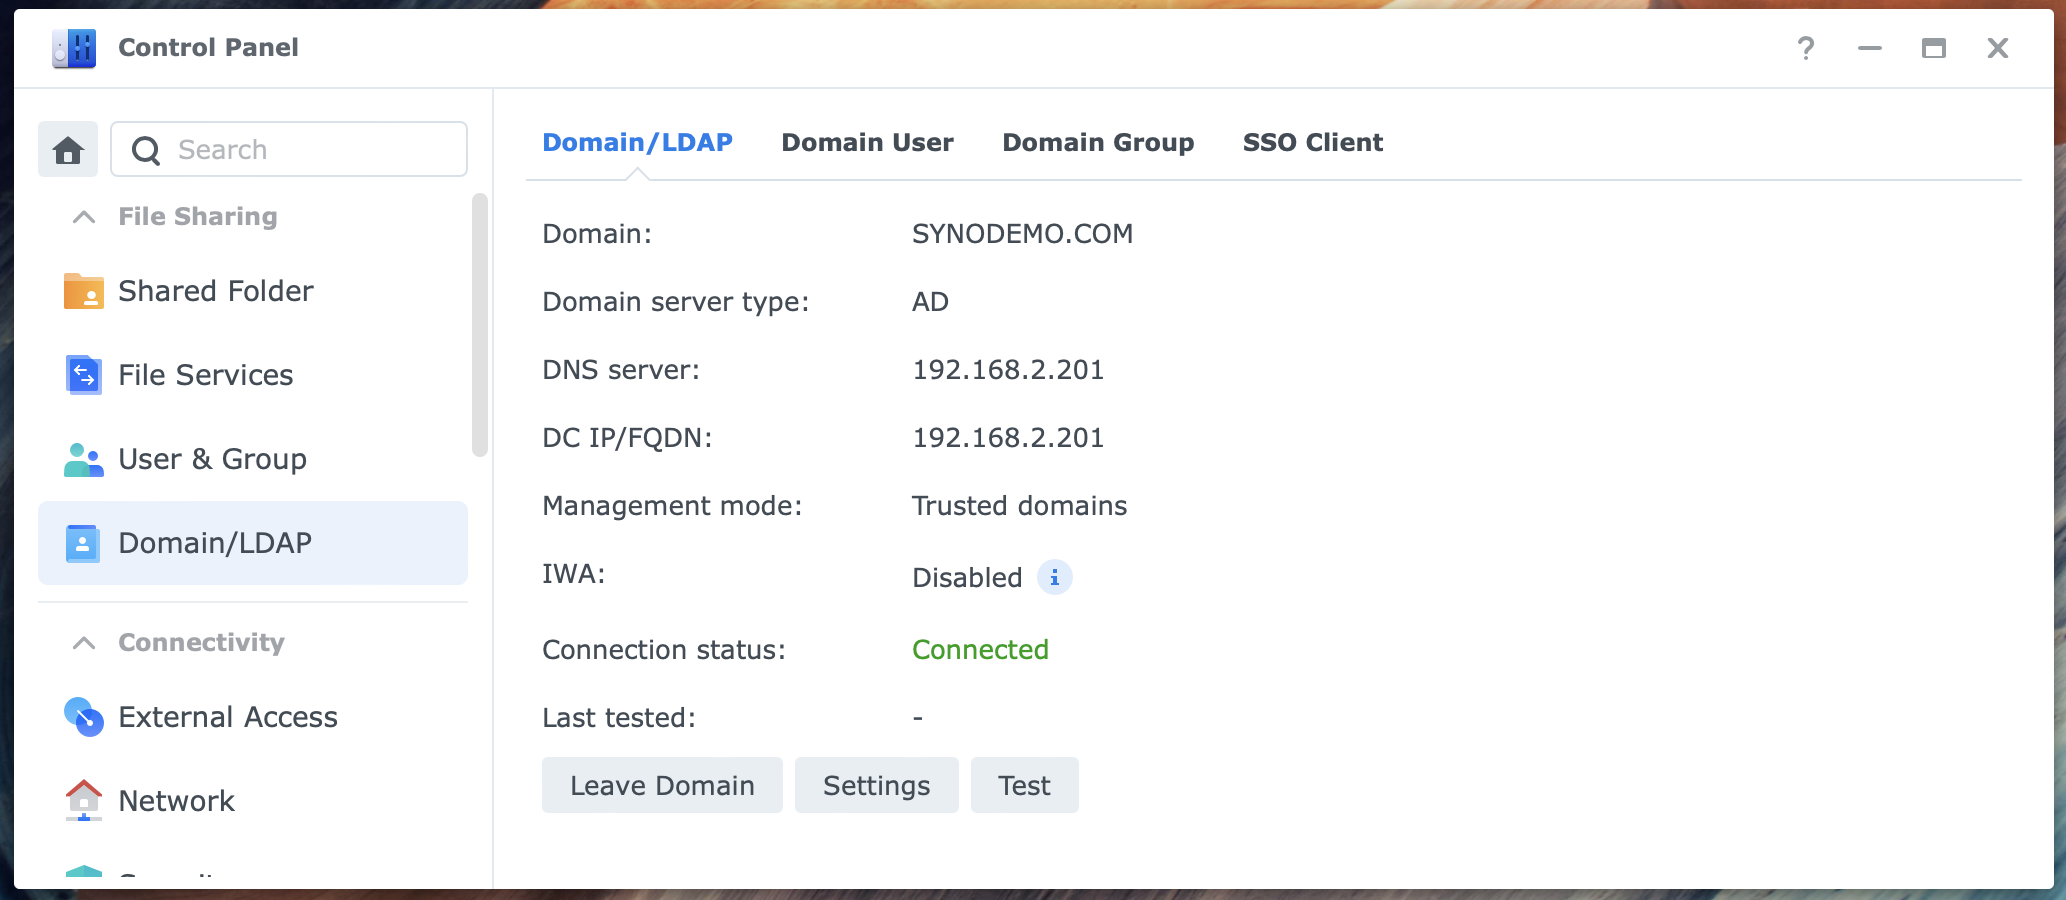
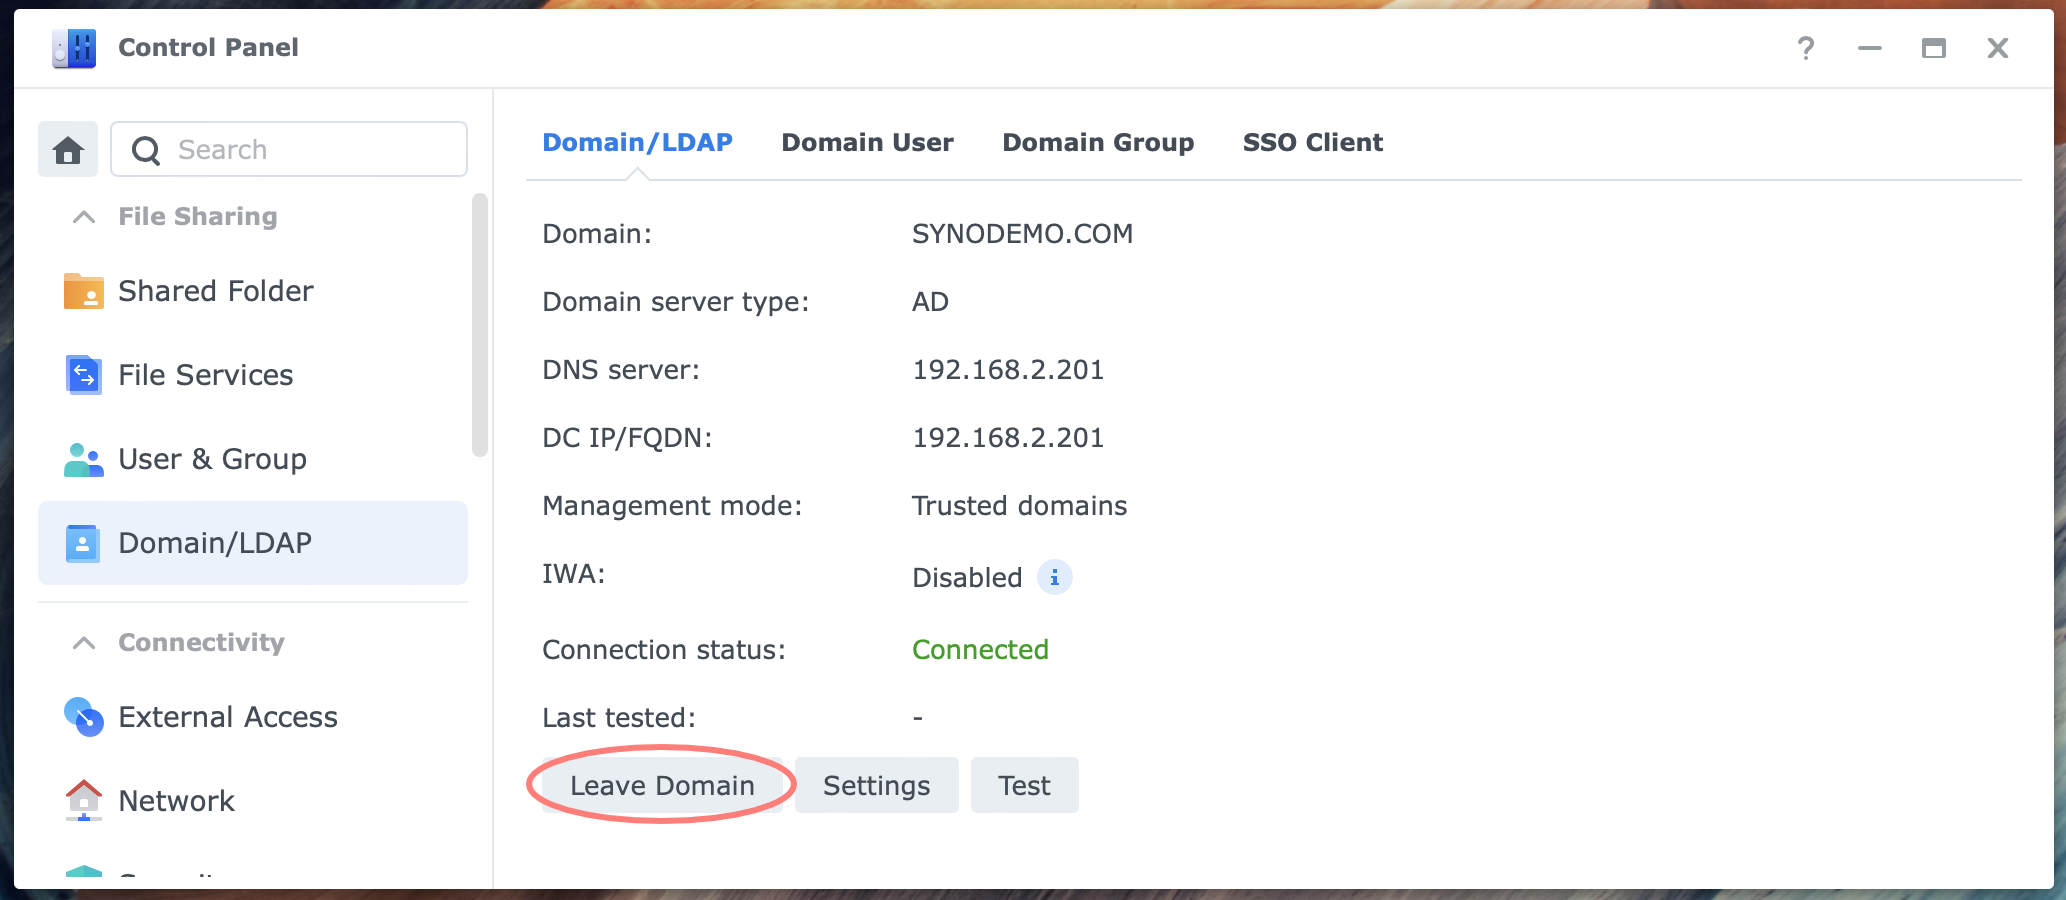
The domain information is displayed in Control Panel > Domain/LDAP > Domain/LDAP tab, which includes additional tabs for Domain User and Domain Group.
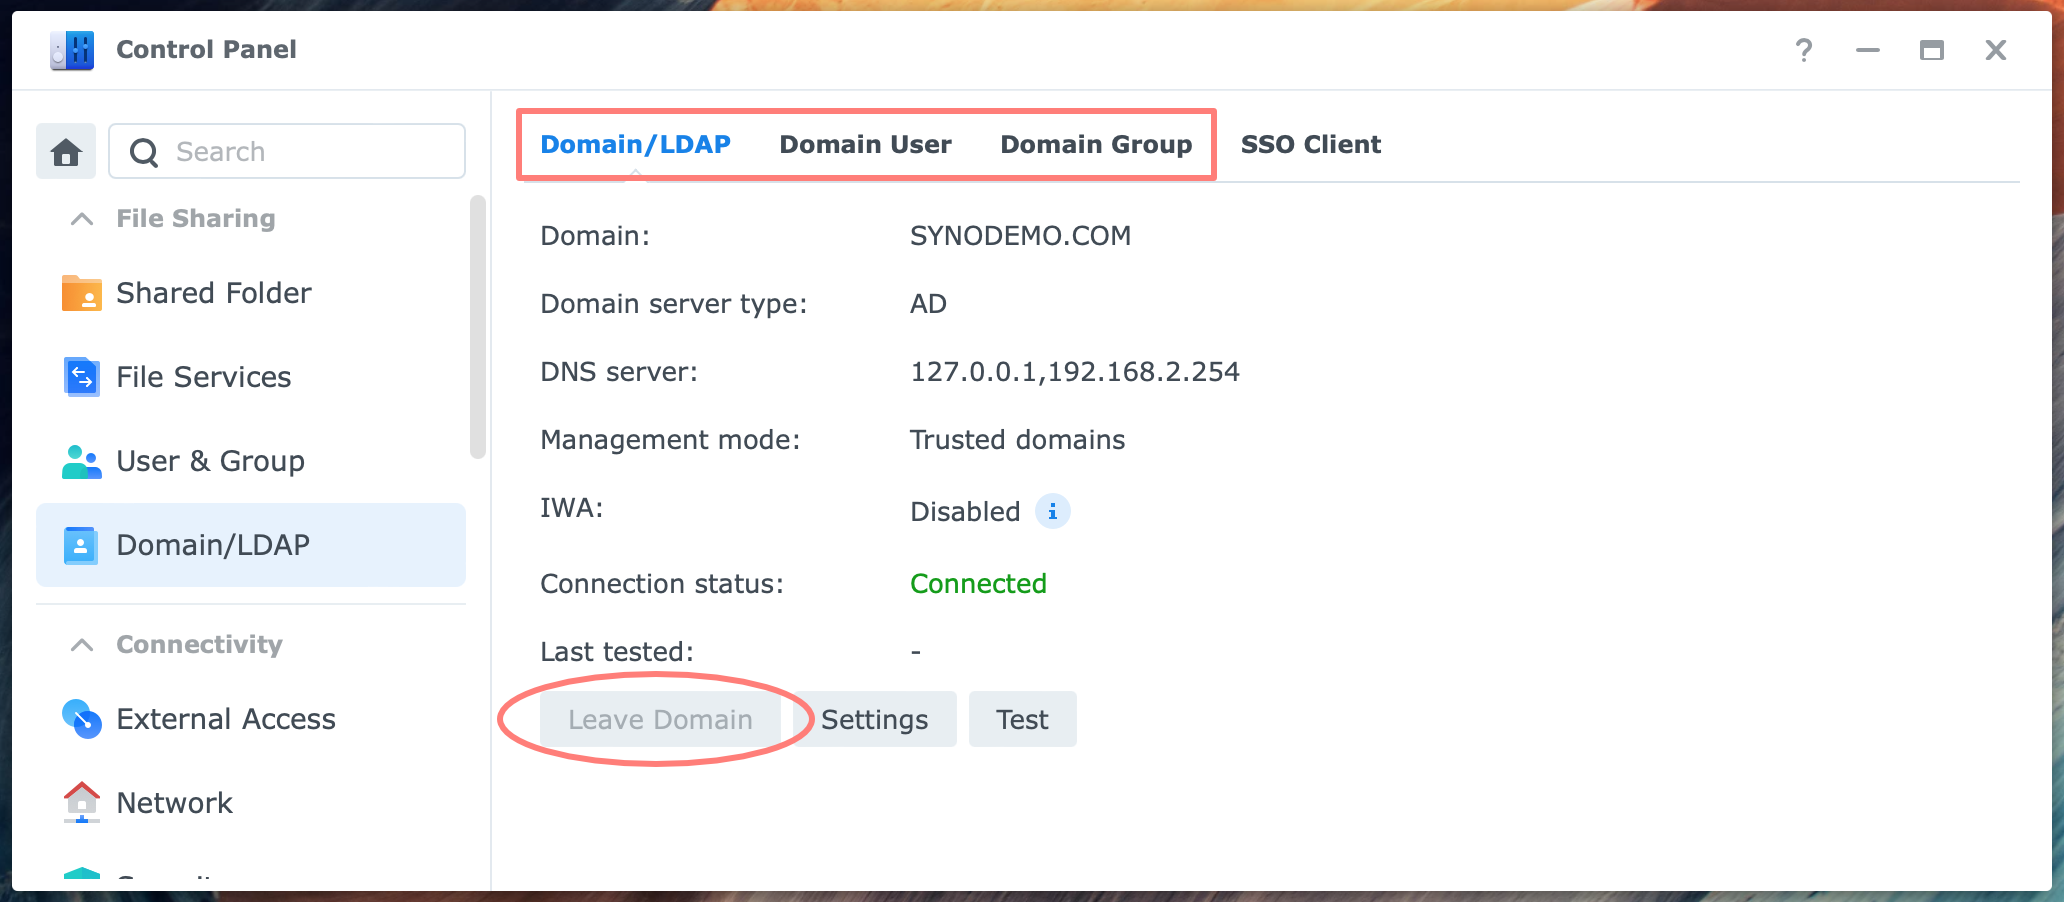
The Domain/LDAP tab displays vital information about the domain, including the domain server type (AD or Active Directory) and connection status. In case of doubt, a Test button allows you to test the client environment. The Settings button allows you to adjust settings, such as the machine’s DNS servers.
You can not leave the domain because the server is a domain controller. Only a Synology NAS that is a member server can leave the domain here. However, you can leave the domain using the Synology Directory Server tool.
Generally, you do not need to change any settings.
Logging in as a domain user
To wrap up the review of your newly created domain, log off from the DSM desktop. On the login screen, enter your domain credentials to log on again.
If you have not created any domain user accounts, use the domain administrator to log in.
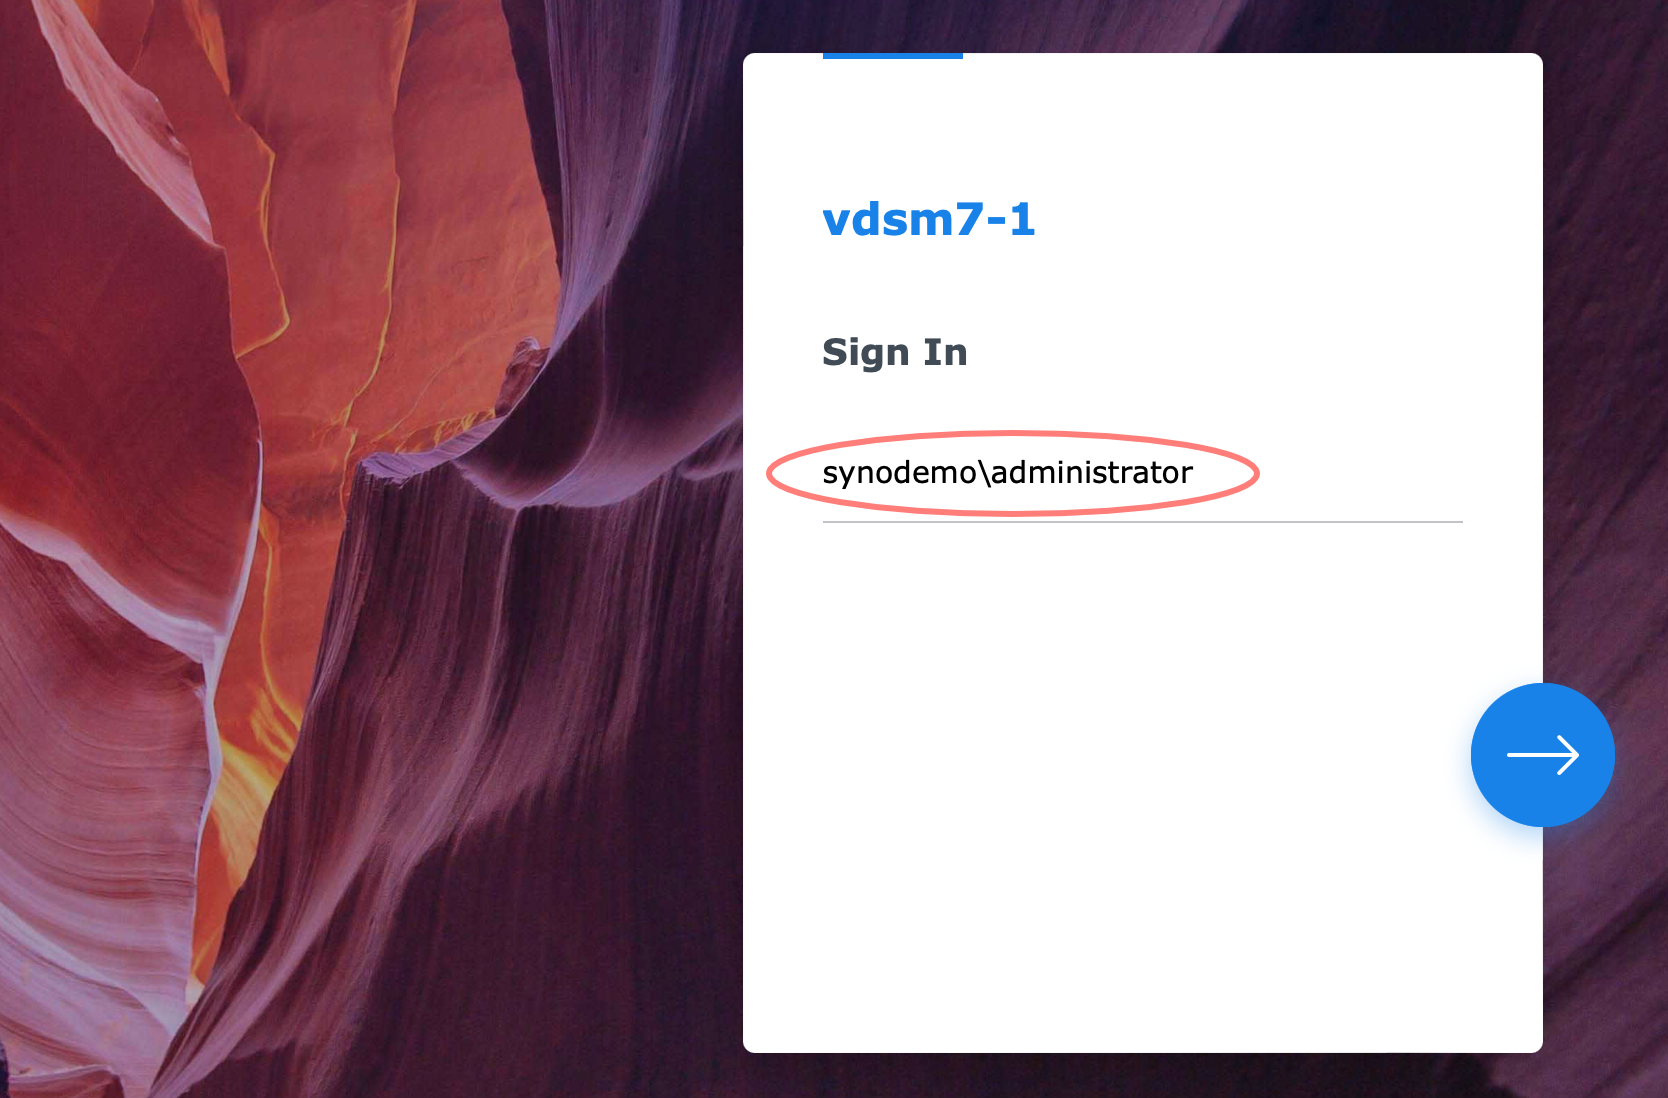
The syntax is:
- domain\account, like in synodemo\administrator
Please note that you enter the domain name in NetBIOS format without the extension. As a Domain Admins or Enterprise Admins group member, you are automatically an administrator of the NAS and all computers that joined the domain.
From here, you can perform several actions.
- join computers,
- create users and groups,
- assign permissions
I discuss each topic in detail below.
Join Computers
Joining a computer is the first step in using your domain. Users can only log in with their domain user account on a computer that is joined to the domain.
I discuss how to join a Synology NAS, a Windows computer, and a Mac computer.
Join a Synology NAS
You join a Synology NAS to the domain to allow domain users to log in or connect and access resources using their domain account. Only a joined NAS can assign permissions to domain users.
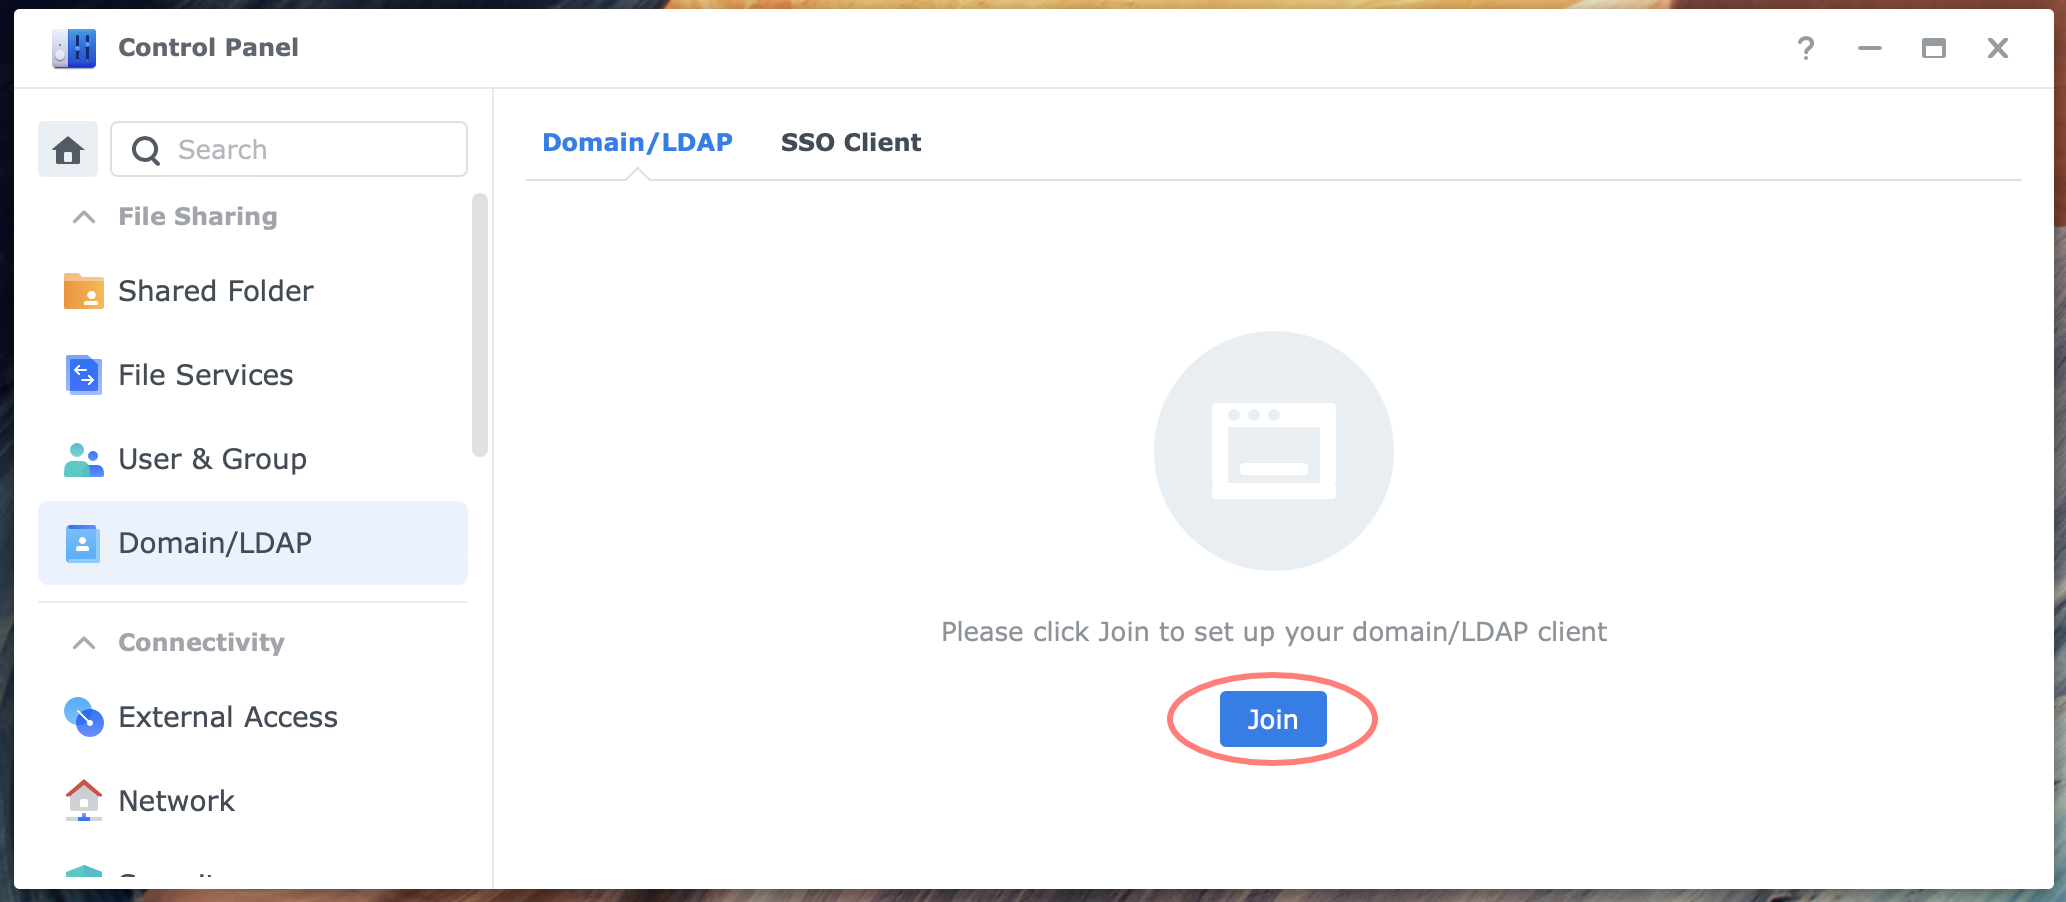
To join a Synology NAS to the domain, log in as the NAS’s administrator and open Control Panel > Domain/LDAP > Domain/LDAP tab. Click on the Join button. The Domain/LDAP Joining Wizard starts.
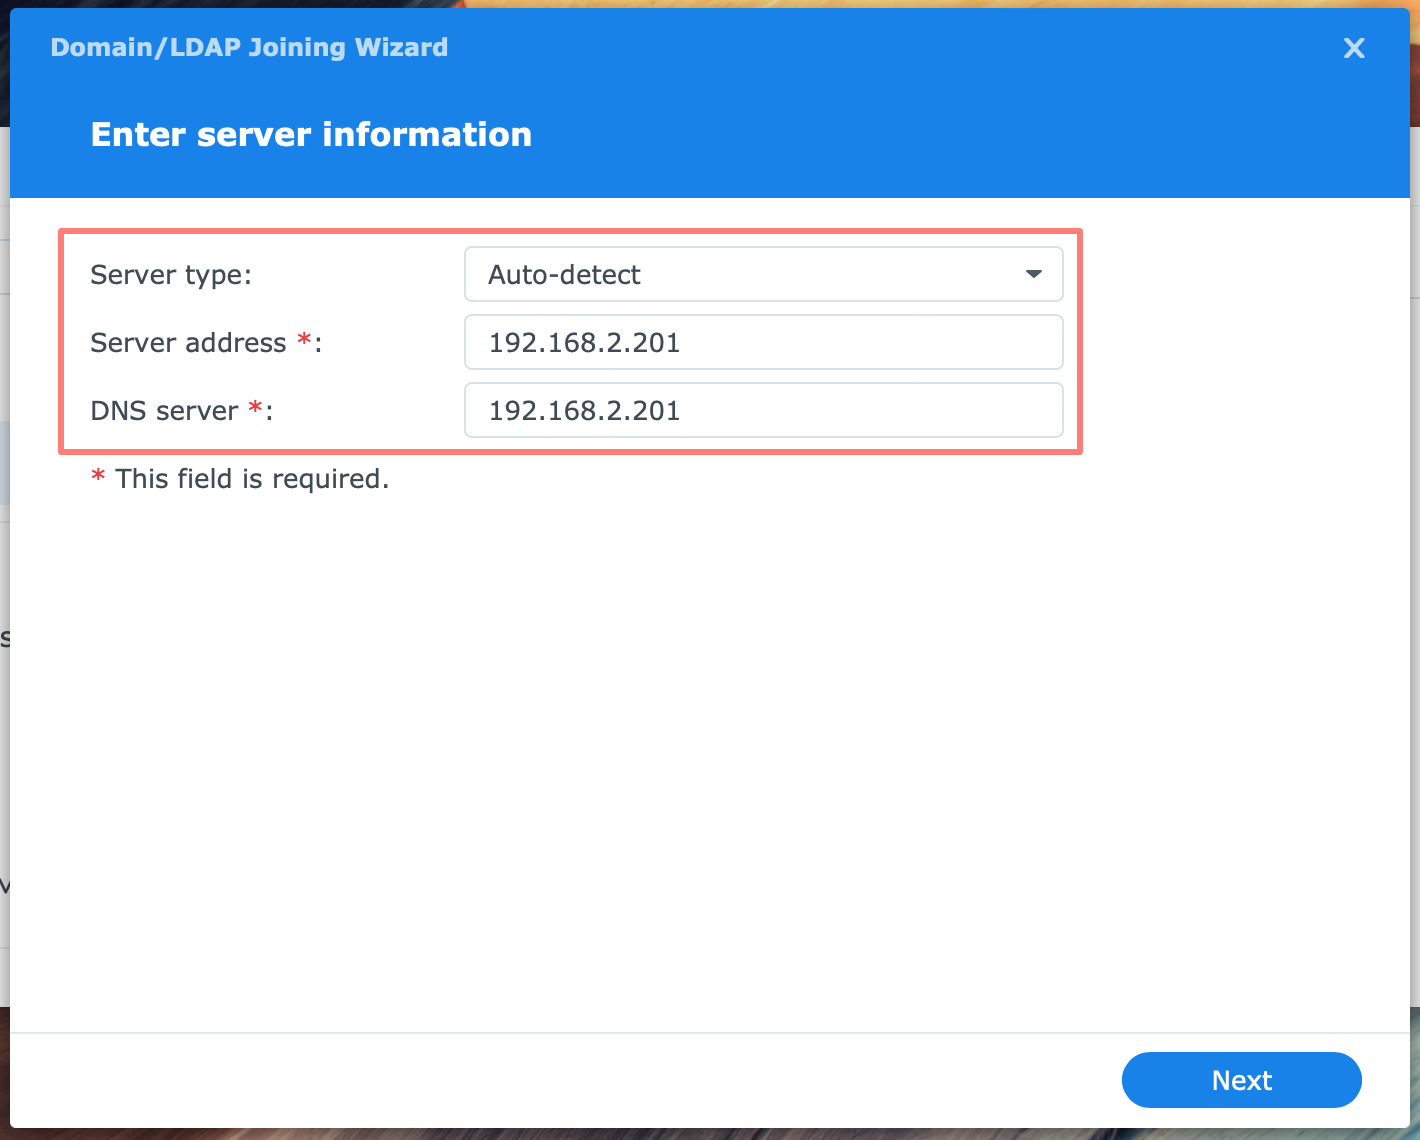
- Enter server information
- Server type: Auto-detect/Domain/LDAP
- Server address
- DNS server
The primary purpose of this screen is to determine whether you will join an Active Directory domain or an LDAP directory service. The information you enter is used for detection. On the next screen, you will enter the final information to complete the join.
You can leave the Server type selection to Auto-detect and provide the IP address of a domain controller. For the DNS server, enter the IP address of a domain controller that also functions as a DNS server. Long story short, enter the same IP address twice.
Click Next, and the wizard tries to connect and determine the directory type. If all goes well, the following screen opens:
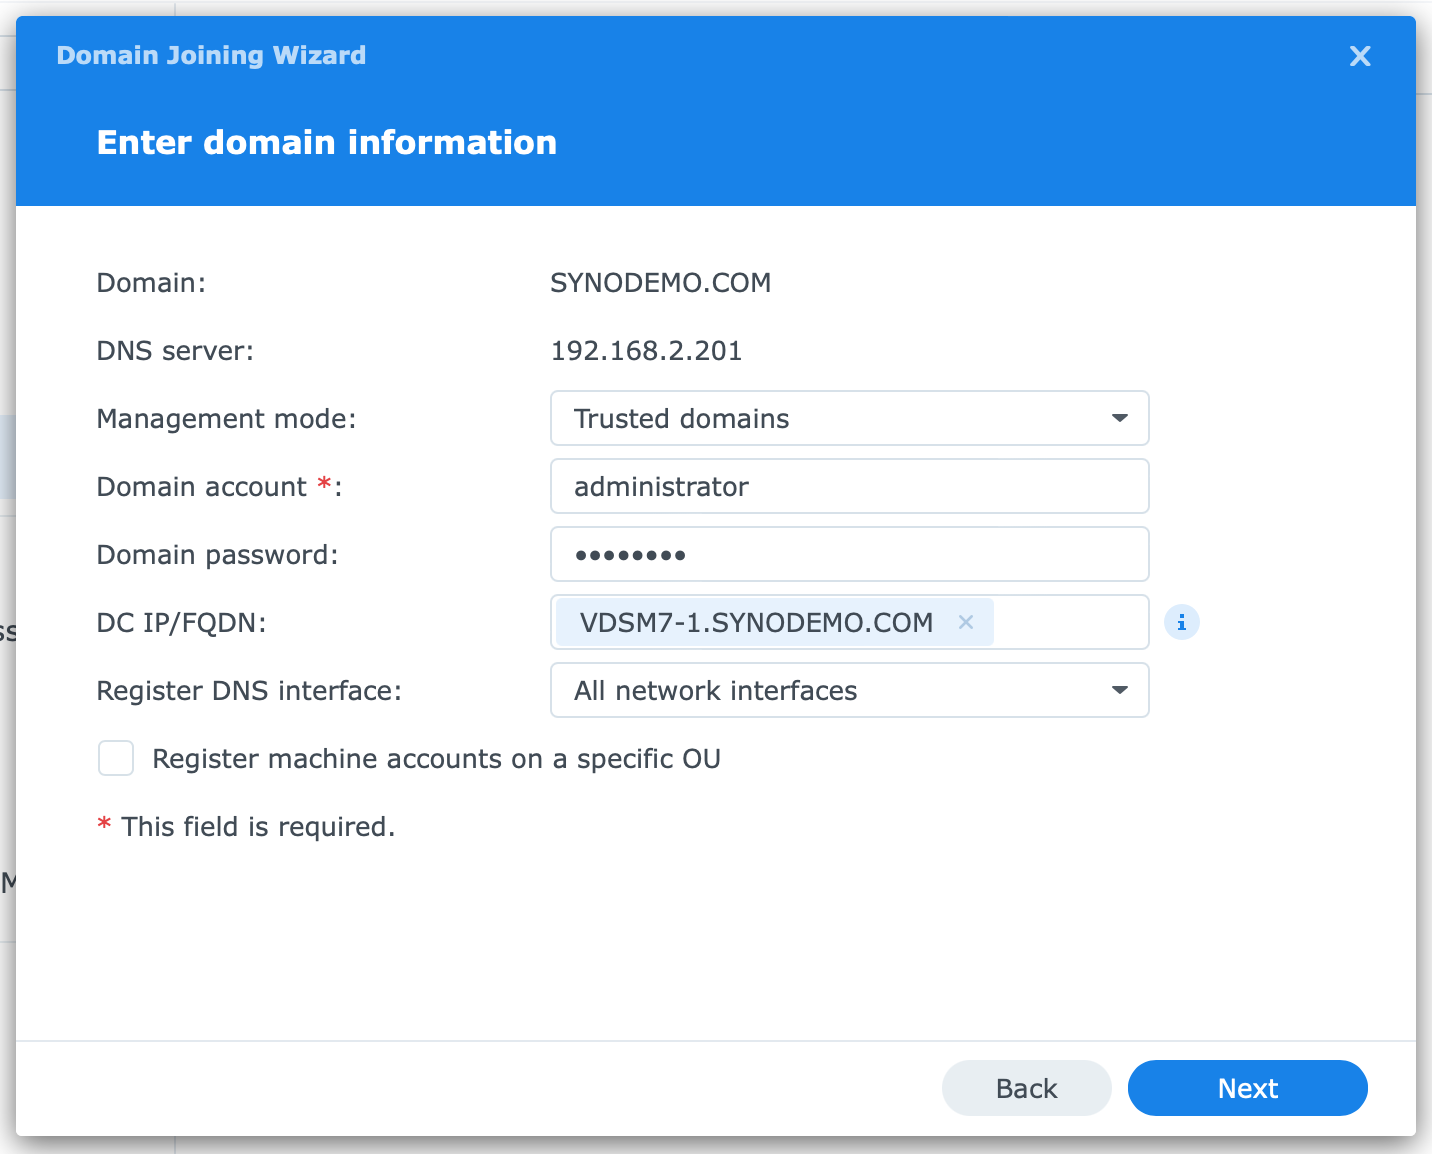
- Enter domain information
- Domain
- DNS server
- Management mode
- Domain account
- Domain password
- DC IP/FQDN
- Register DNS interface
- Register machine account on a specific OU
The domain and DNS server are filled in. Leave the Management mode as is.
Provide a domain account and password for the account with domain administrator privileges. The account administrator is filled in.
In the field DC IP/FQDN, you enter the IP address or Fully Qualified Domain Name (FQDN) of at least one domain controller (DC).
The DNS interface is registered in DNS by default. Select a specific interface if multiple LAN interfaces are active on the NAS that must be linked to different domains. In all other cases, leave the default to register all interfaces.
Registering the machine account on a specific OU for the Organizational Unit lets you select the OU in the following optional screen. I suggest leaving this unchecked, and the machine account will be registered in the default Computers OU.
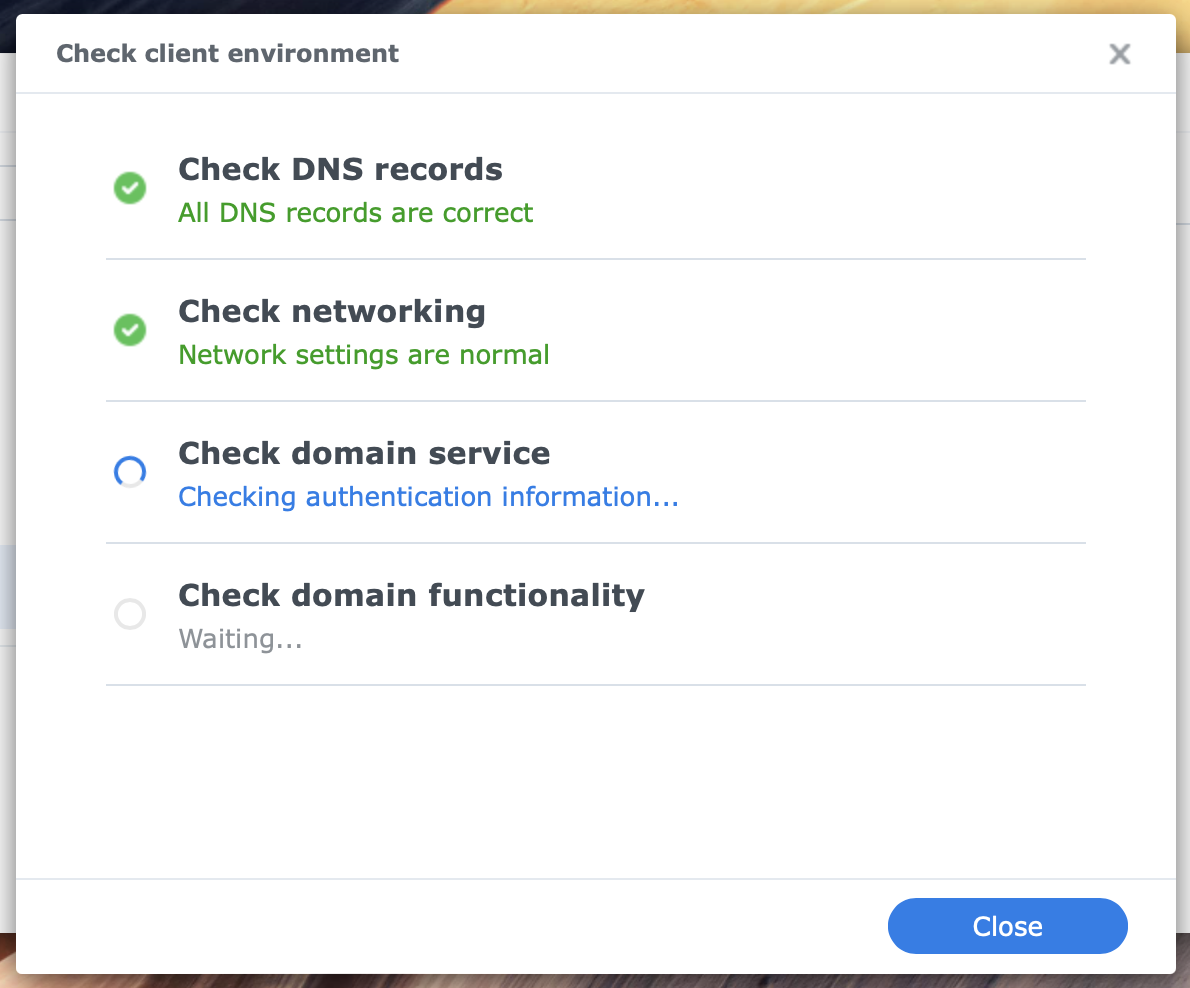
When you click Next, several checks are done, and the NAS joins the domain.
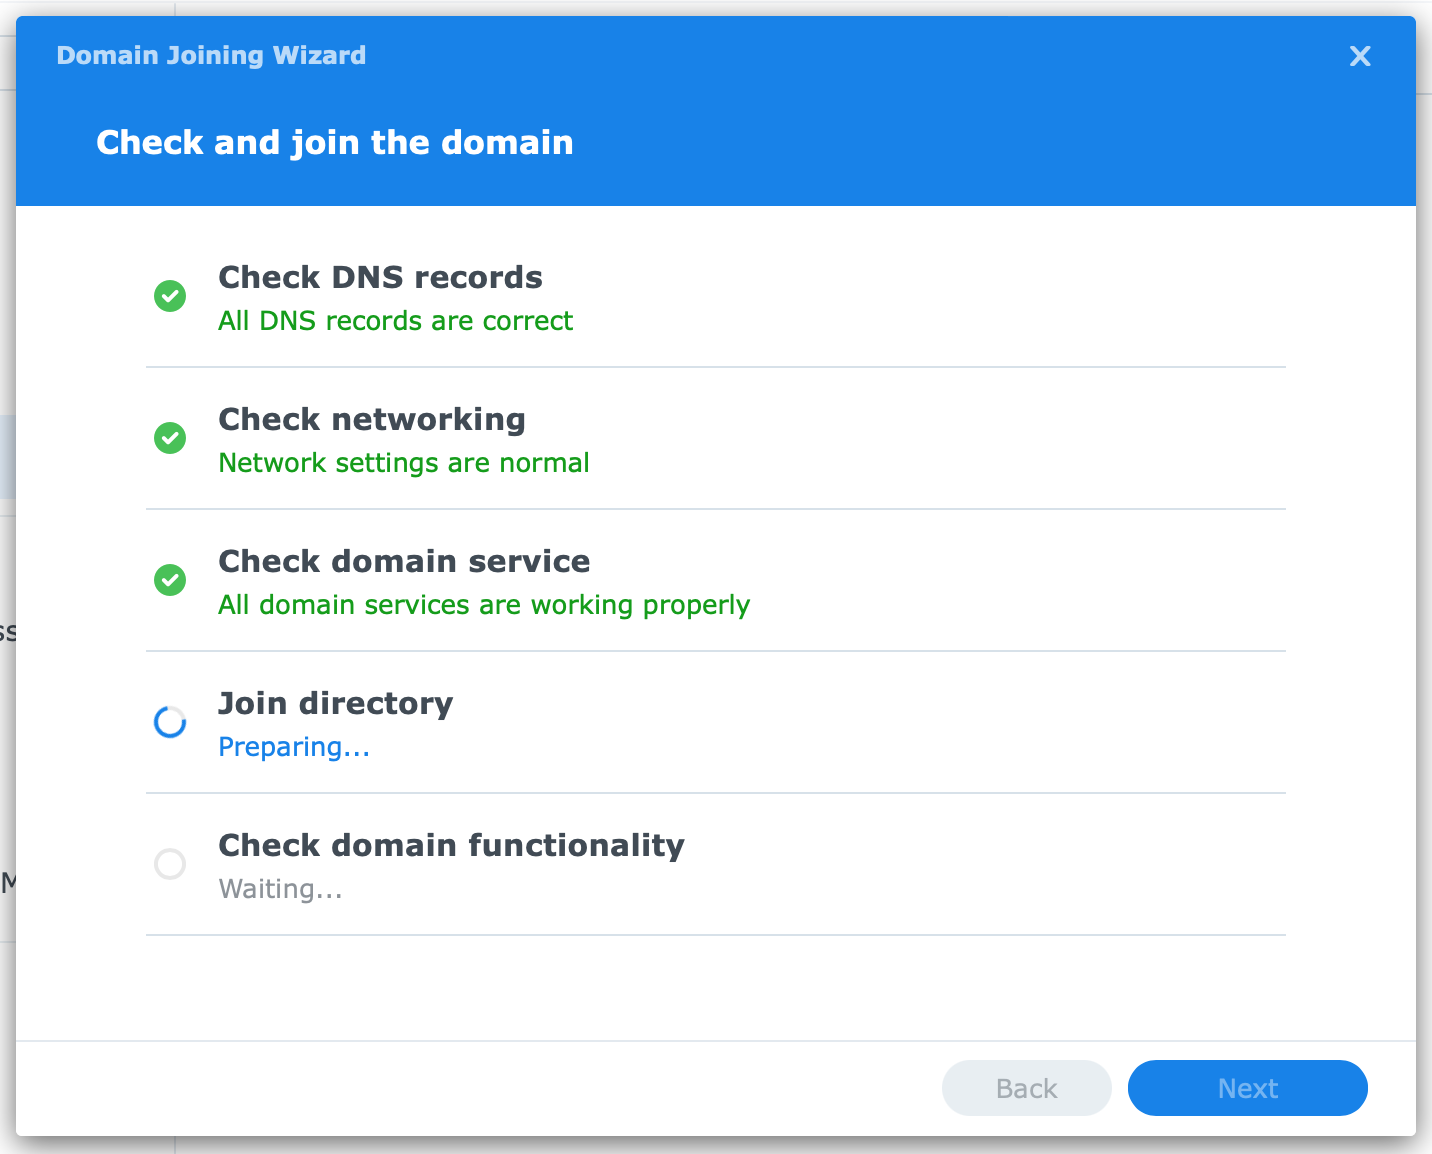
- Check and join the domain
- Check DNS records
- Check networking
- Check domain service
- Join directory
- Check domain functionality
If all return a green message, click Next. If any issue is detected, follow up with the advice given.
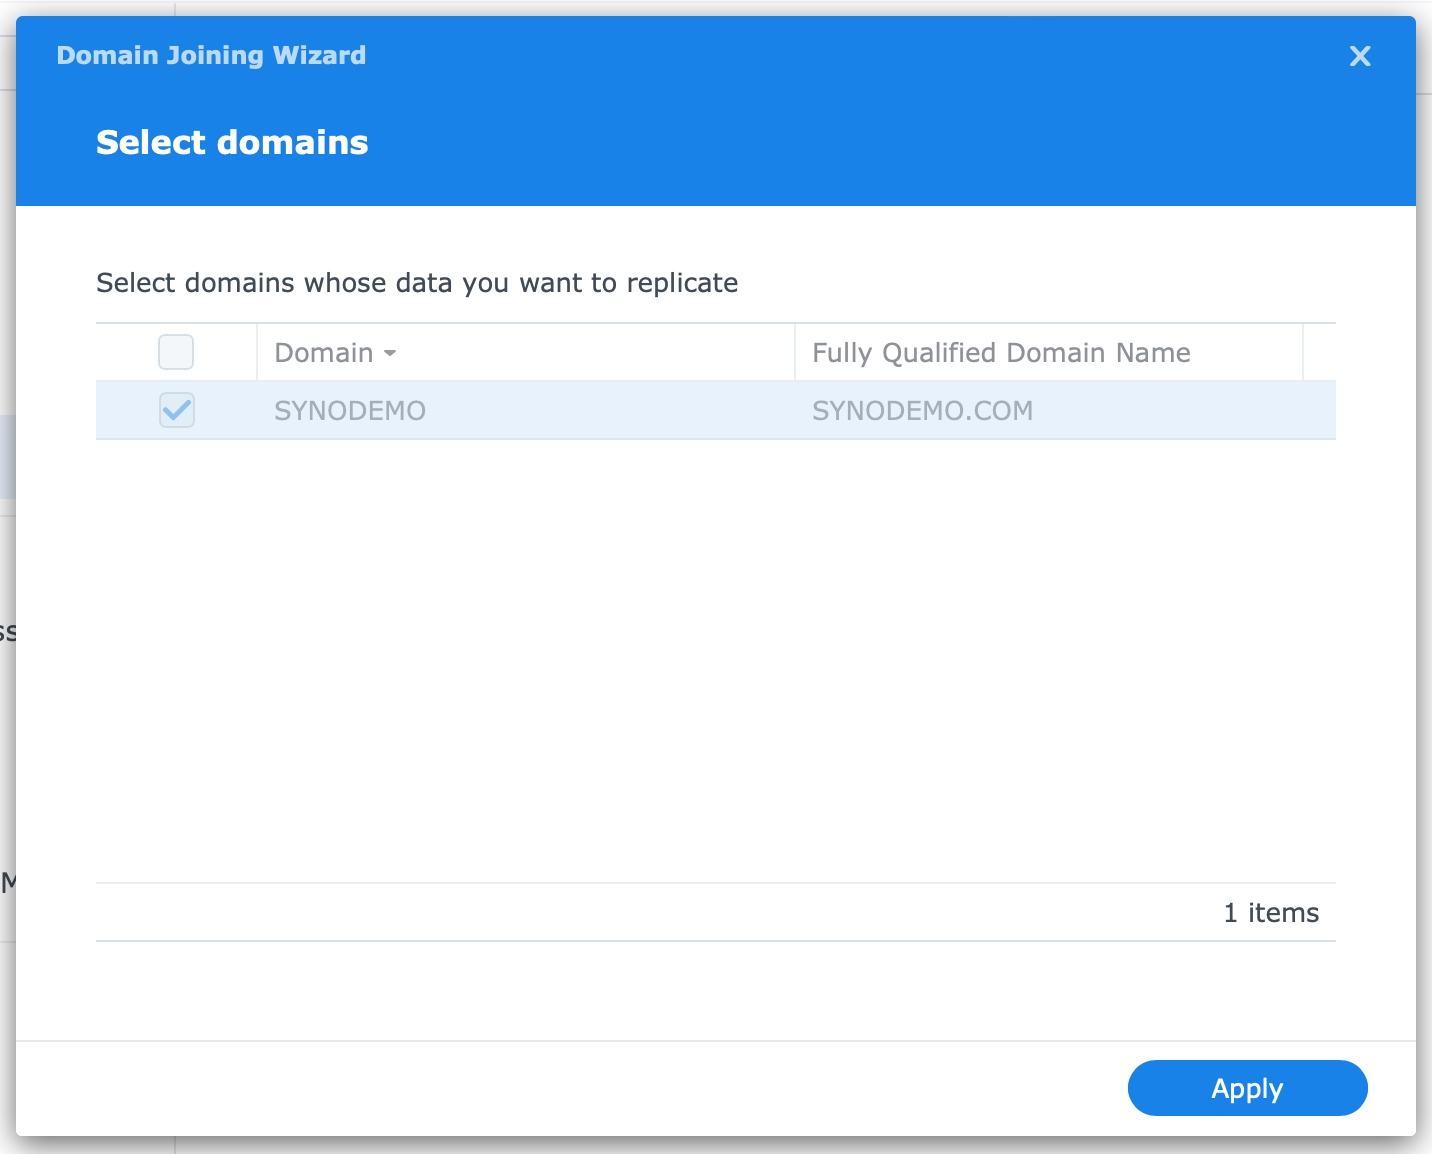
- Select domains
This screen does not have any options to select, but unless multiple domains are listed, which is likely because the DNS server has zones for various domains, you can skip this screen and continue. Click Apply.
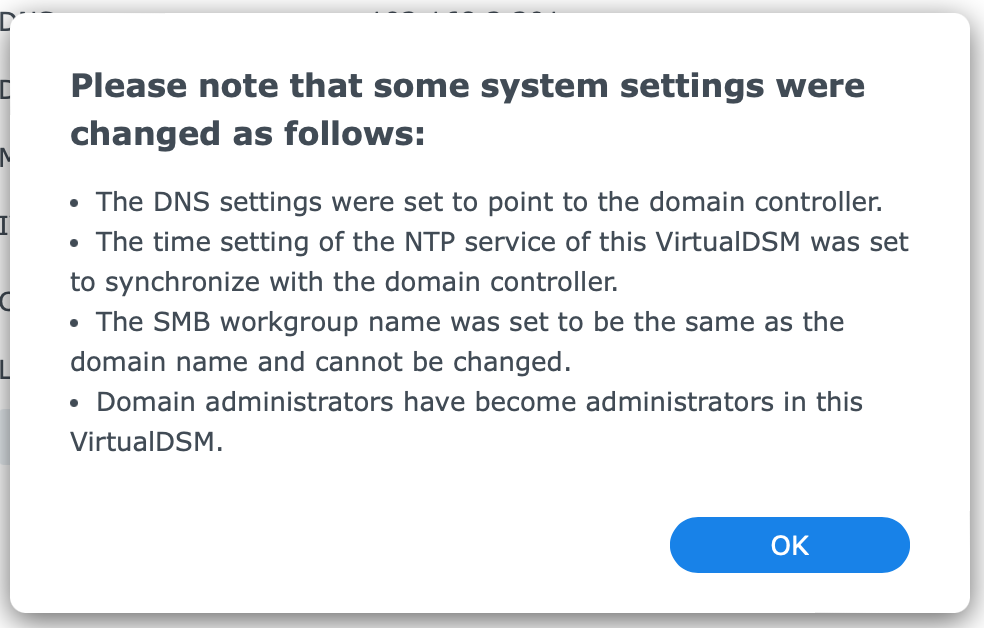
A pop-up screen indicates that the system settings, DNS, NTP, and SMB workgroup names have been updated. Also, domain administrators have become administrators of the NAS. Click OK. The wizard closes, and you return to the Domain/LDAP screen. Review the join’s status.
The Leave Domain button allows you to leave the domain. I will discuss leaving the domain later in this post. The Settings button allows you to, for example, add more domain controllers to replicate when they become available. I discuss the domain settings later in this post.
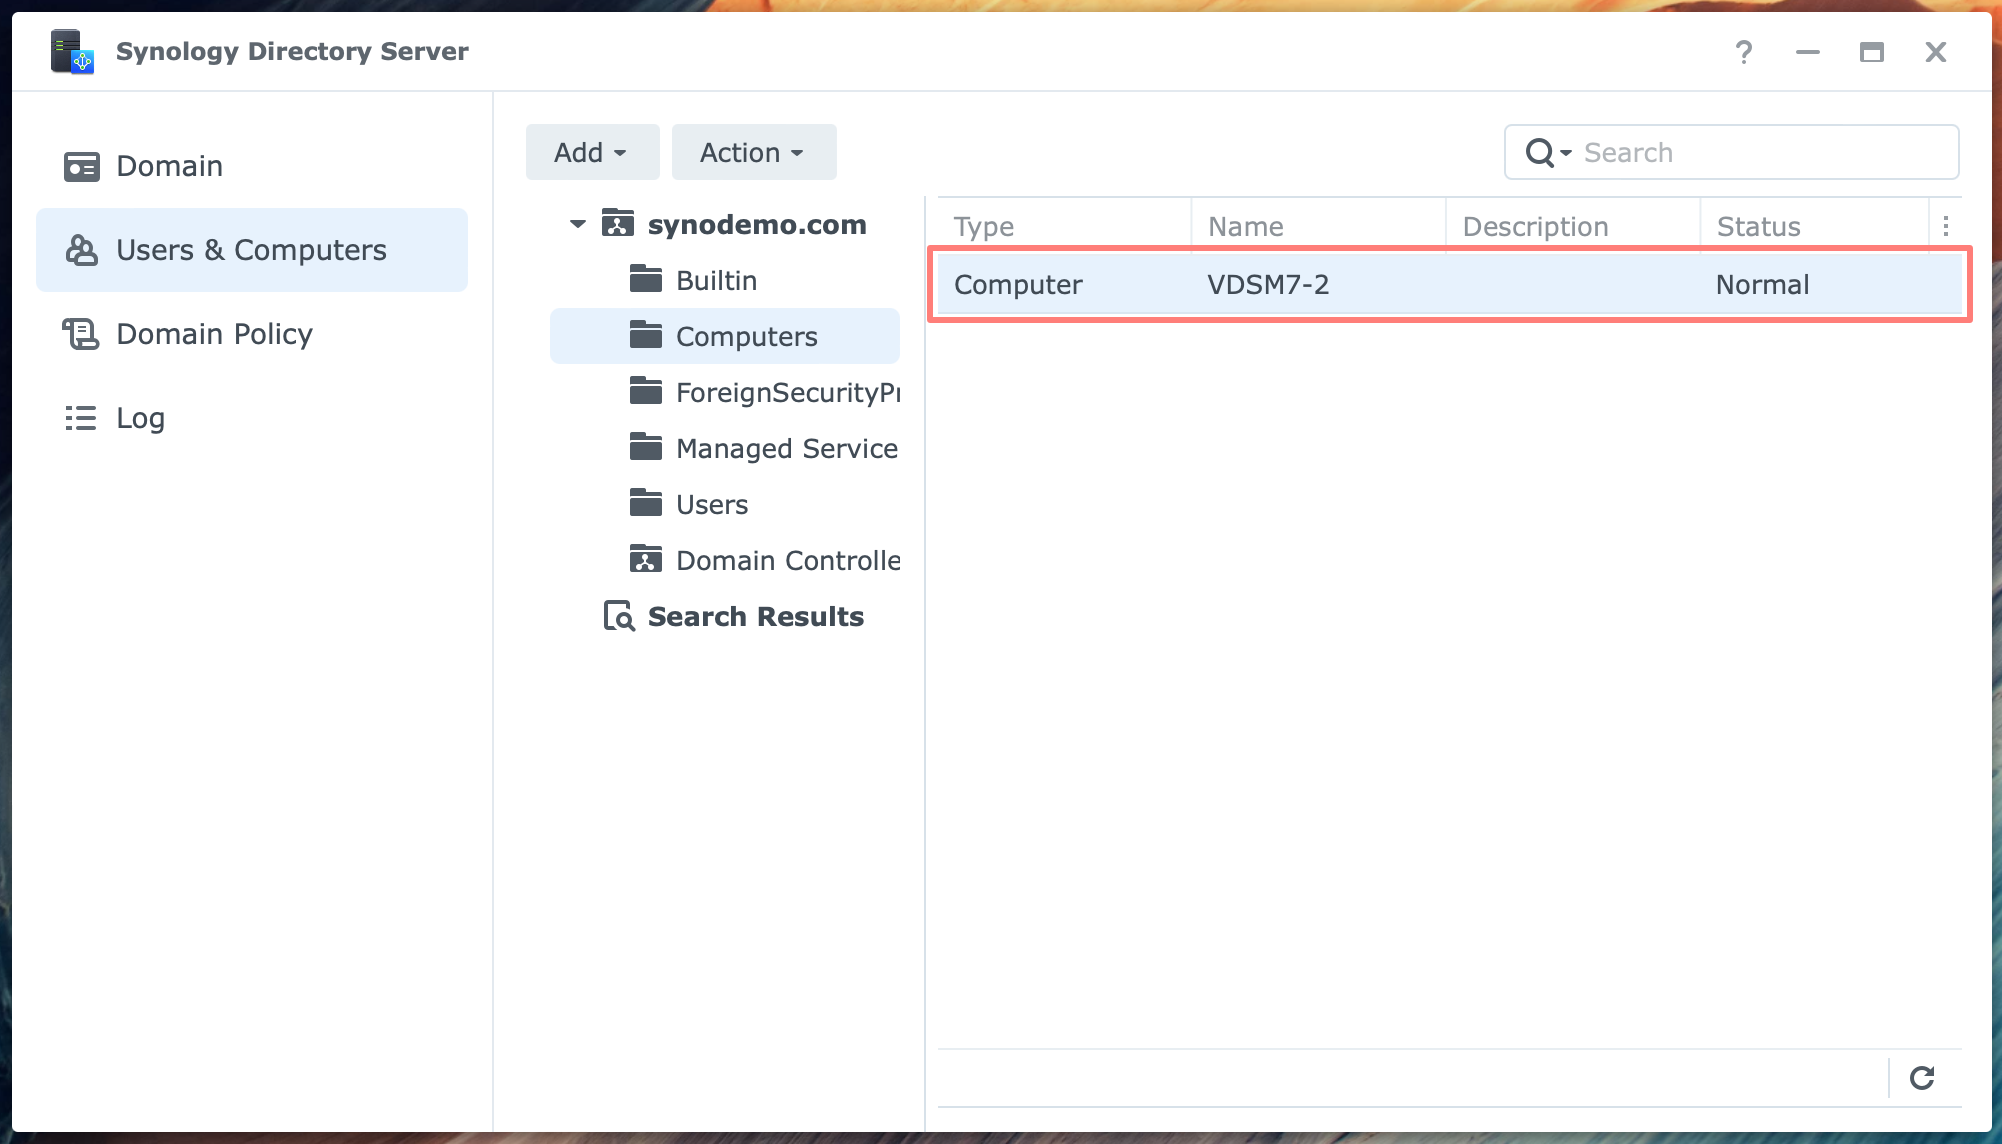
You can check the computer account in Synology Directory Server > Users & Computers > Computers OU on the domain controller.
Join a Windows computer
In this example, I add a Windows Server 2022 as a member server to the domain on my Synology NAS.
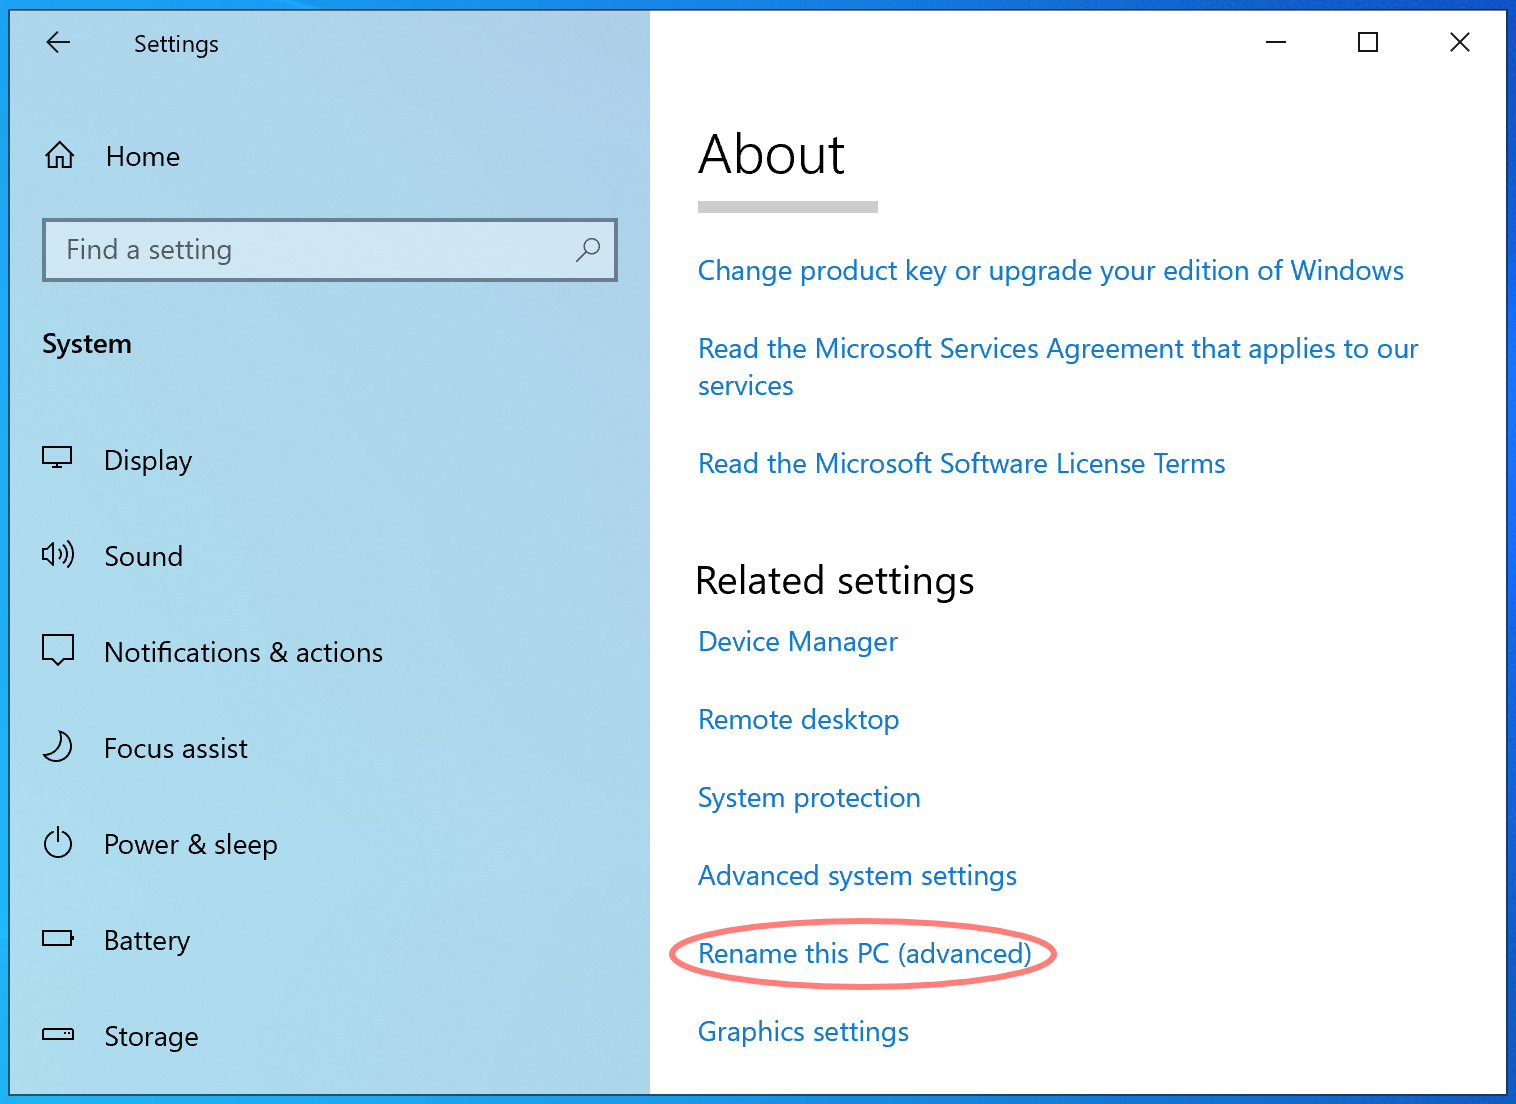
Log in as an administrator to the Windows Server. Open Settings > System > About. In the screen on the right, scroll to the bottom and click Rename this PC (Advanced). The System Properties dialog opens.

In System Properties > Computer Name tab > Change. The Computer Name/Domain Changes dialog opens.
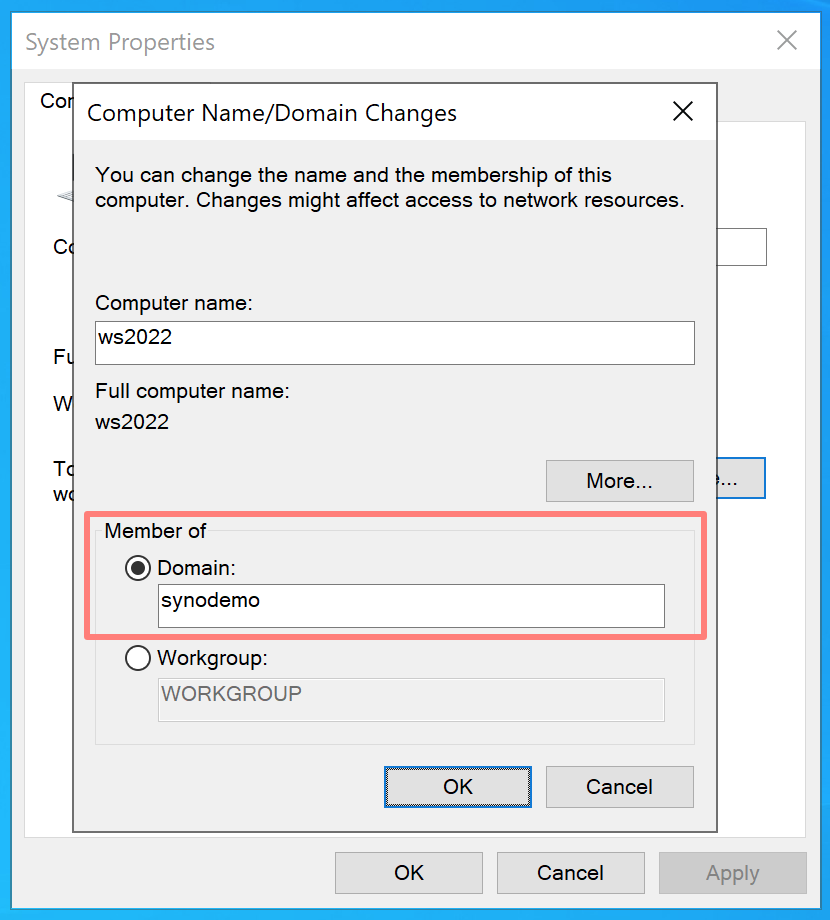
Under Member of, select Domain. Fill in the domain in NetBIOS format, like synodemo, and click OK. A dialog requests the domain admin’s name and password. Enter the information and click OK. After successfully joining, you will receive a welcome message. Click OK again.

Finally, you are instructed to restart the computer to apply the changes. Click OK. Restart now or later.
Joining can fail for different reasons. One is the DNS server that the joining computer uses. It must look for the DNS server on a domain controller.
The process with Windows 10 and 11 Pro is similar to the abovementioned steps. Note that you can not join Windows Home editions to a domain.
Joining a Mac computer
Performed on macOS Sonoma 14.7.
Before joining, check the DNS settings in the Mac’s network configuration. The computer network configuration must use the domain’s DNS Server in the DNS network settings to find the domain to join.
Two tools on the Mac are involved in the process: the Directory Utility and System Settings. With the Directory Utility, you configure domain access. In System Settings, you enable login to the Mac with a network account.
The Directory Utility application is somewhat difficult to locate. Therefore, start most descriptions by opening the System Settings tool, where you can access the Directory Utility. Apple has a good guide for Directory Utility. Select your macOS version at the top-left corner of the page for an adequate description.
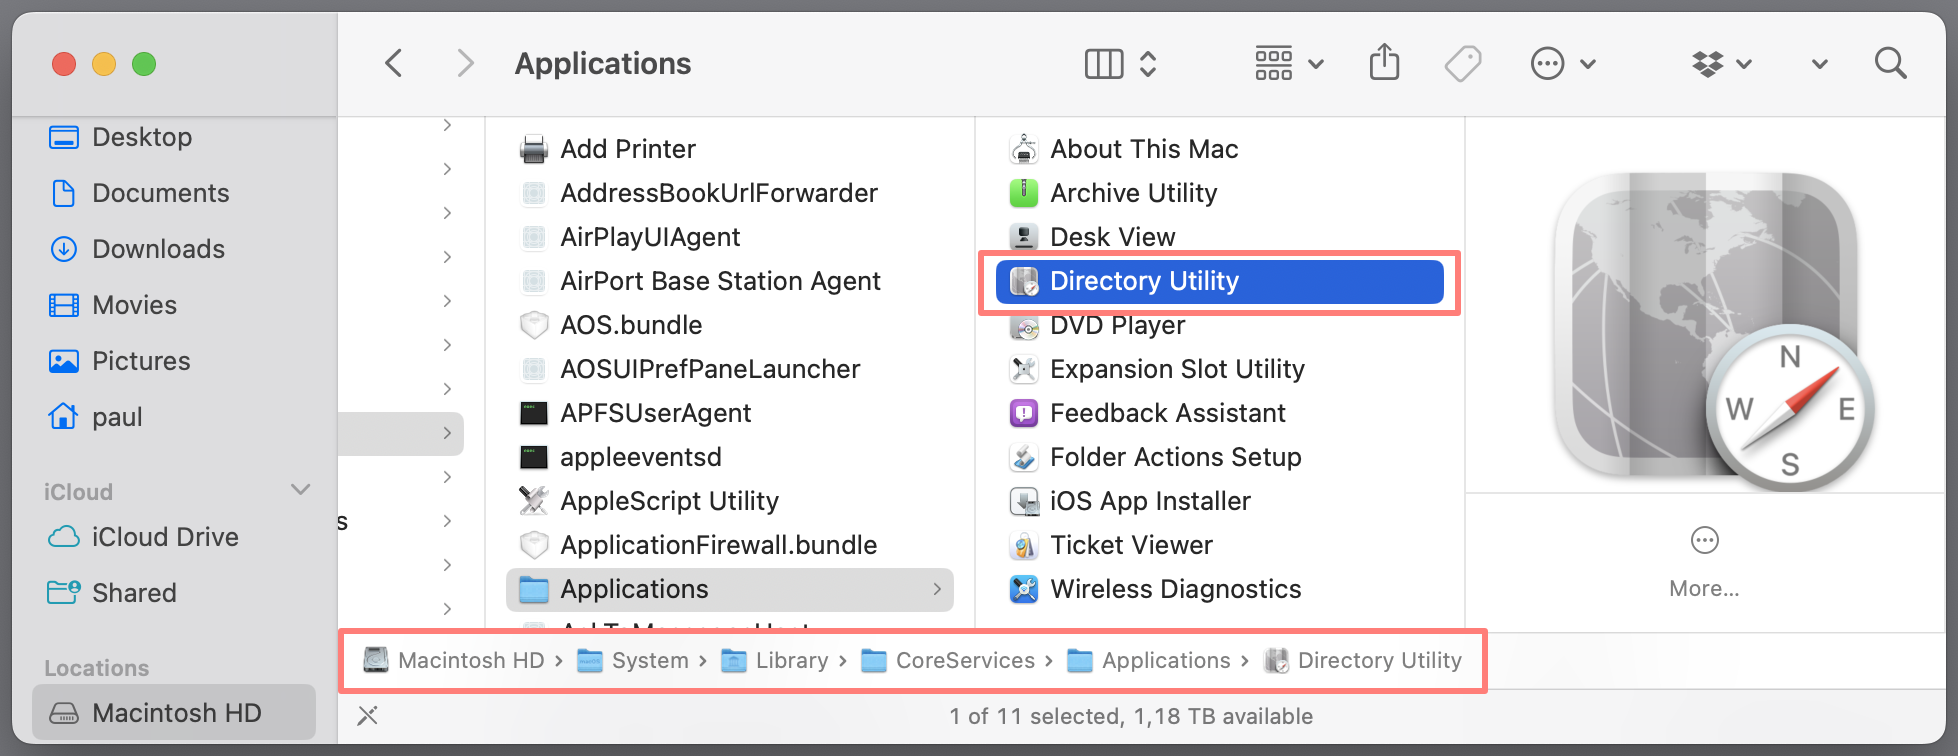
Fortunately, with Spotlight, you start Directory Utility, and its location is no secret at all: HD > System > Library > CoreServices > Applications >Directory Utility.

To modify the configuration, select the Services tab and unlock the padlock in the bottom-left corner of the screen. Then select Active Directory and click on the Edit settings pencil button. You might need to authenticate several times to modify the configuration.
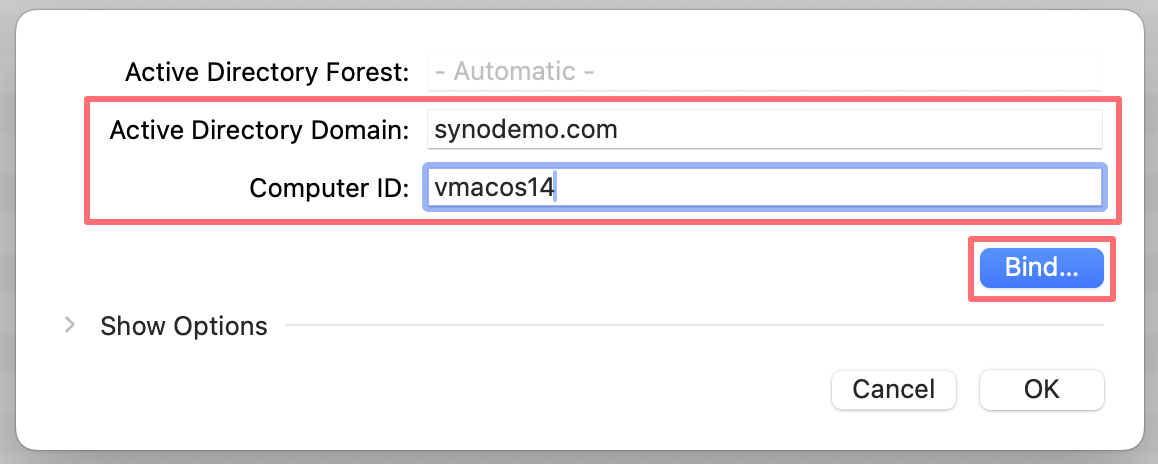
You enter the Active Directory domain and computer ID in an open dialog. The directory recognizes the computer by this ID. Prevent dashes in the computer name.
Note the hidden options under Show Options. I left them at their default setting. The Apple guide mentioned above provides more information on these options.
Click Bind.
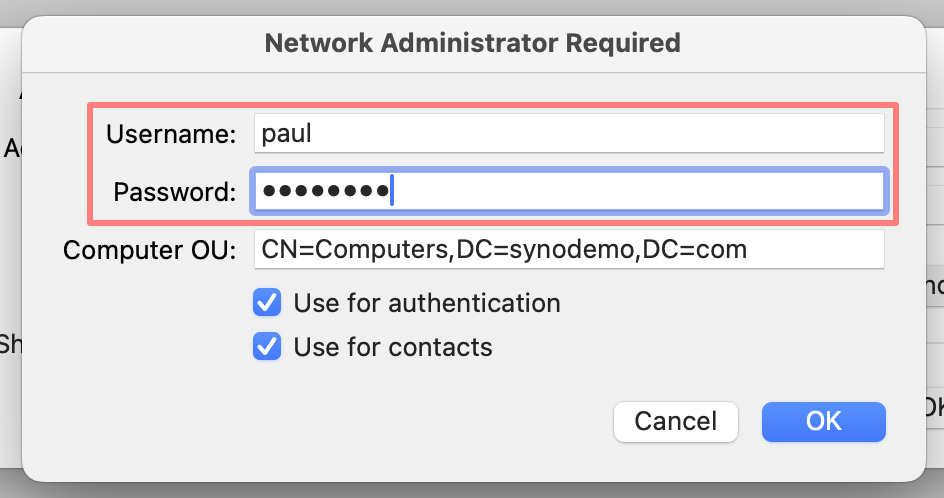
A new dialog opens asking for the username and password of a domain account with sufficient permissions to join the computer to the domain. This account must be a member of Account Operators, Domain Admins, or Enterprise Admins.
You can change the Computer OU (Organizational Unit) or CN (Container) in this dialog. The default OU is Computers, but if you created another OU for your computers or Macs, please change it here.
Click OK. The Directory Utility says Getting directory settings. When successful, you return to the previous screen, where an Unbind button replaces the Bind button. Click OK to return to the Directory Utility main screen. Close Directory Utility.
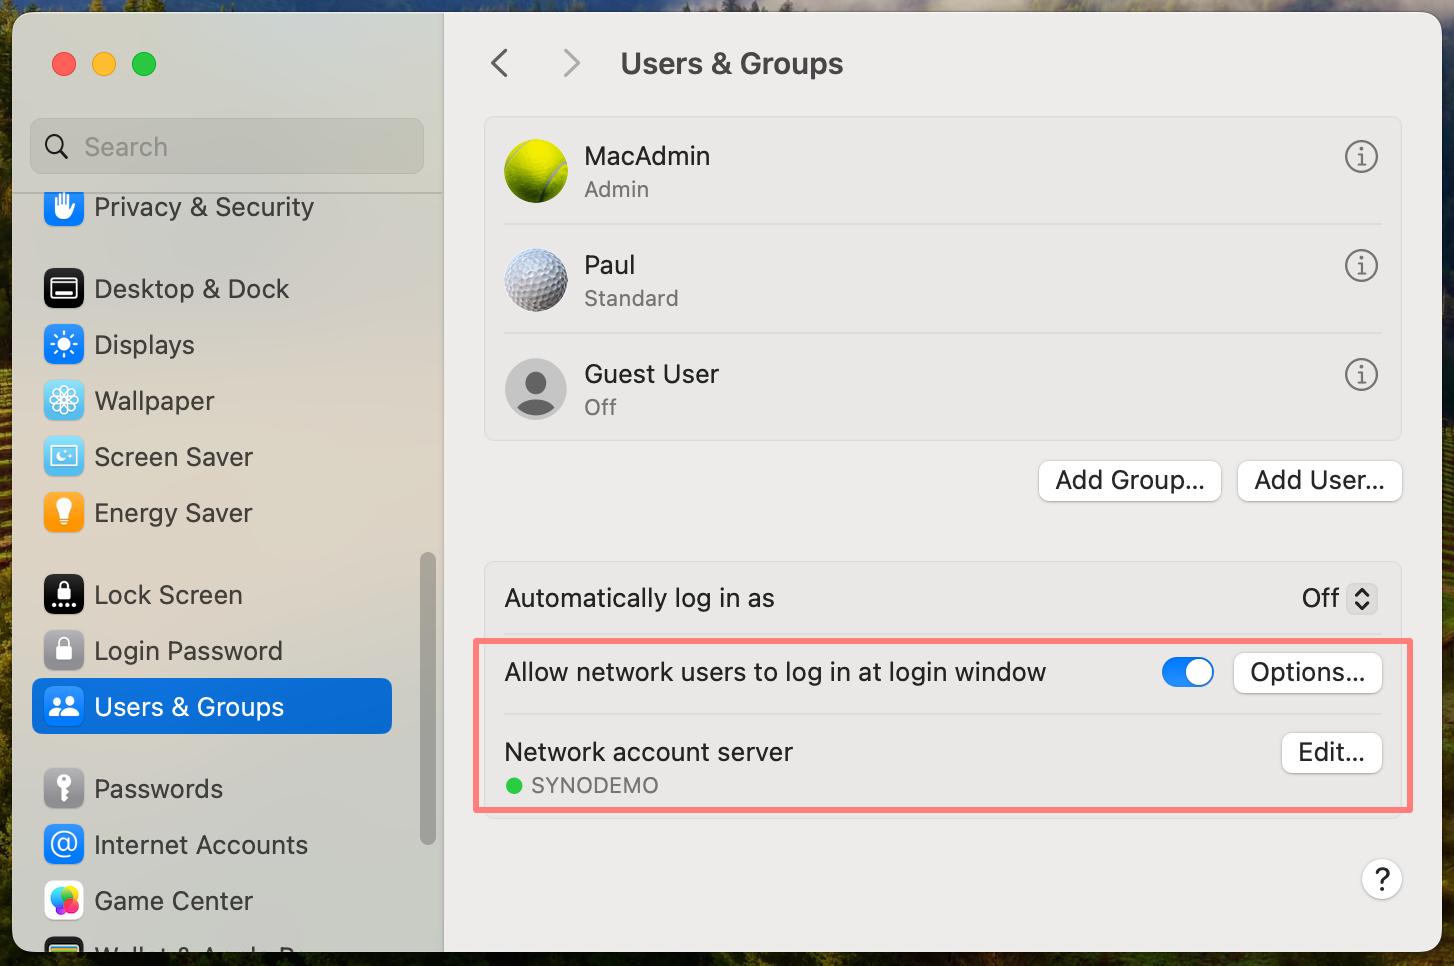
Open System Settings > Users & Groups. On the right, notice two new settings.
- Allow network users to log in at login window
- status: enabled
- options: choose between all network users or a selection
- Network account server listed: SYNODEMO.COM.
Log off and log in as a domain user.
Create Users And Groups
Log in to the DSM desktop as a domain controller NAS administrator. Then, go to Synology Directory Server > Users & Computers.
Create a user
Under the domain name, select the Users container unless you want the new user in a different container.
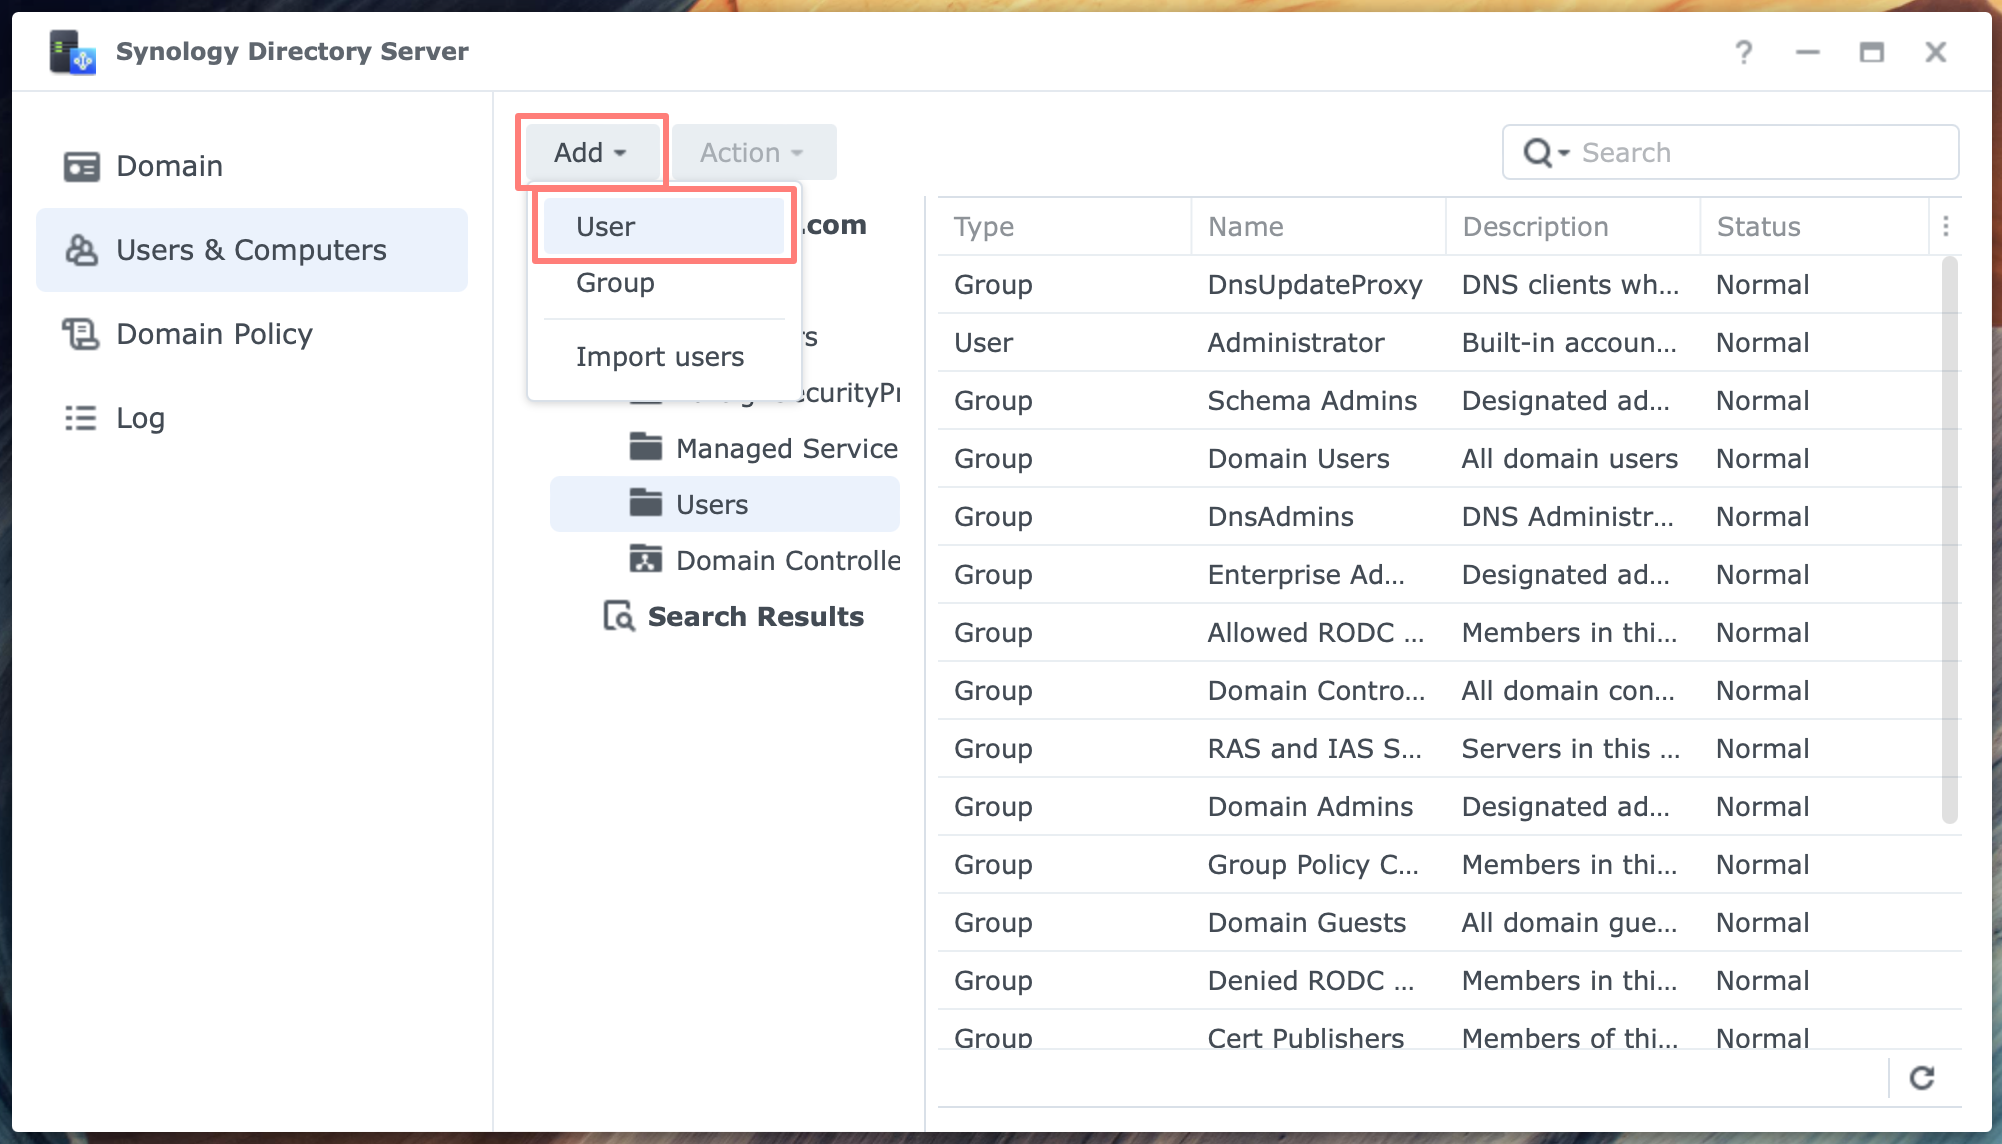
Click on the Add button > User. The User Creation Wizard starts. On the first screen, enter at least a username and a password. Click Next. Select the groups for the user to join.
Notice there are multiple screens with groups. The user is always a member of the Domain Users group. Click Next. Confirm the settings and click Done.
Create a group
Click on the Add button > Group. The Group Creation Wizard starts. In the first screen, enter at least a group name. Please select a group scope and group type, or leave them as the default. Click Next. Confirm the settings and click Done.

By default, the group scope is Global, and the group type is Security. This will work in most cases. For more information about group scope and type, please refer to the Administrator’s Guide for Synology Directory Server.
Assign permissions
With a Synology NAS, you can assign permissions to shared folders, folders, and applications. When a NAS joins a domain, you can assign permissions to domain users to these resources.
Shared folder permissions
You manage shared folder permissions by going to Control Panel > Shared Folder > selecting the shared folder > Edit > Permissions tab. In the drop-down list at the top left, choose Domain users or Domain groups.

The dialog displays the domain users or groups. Next, configure the permissions for local users and groups as needed.
Folder permissions
You manage folder permissions with File Station. Select a folder, then click Action > Properties > Permission tab > Create. The Permission Editor appears. Go to Domain > select a domain > User or Group. Check all necessary items.
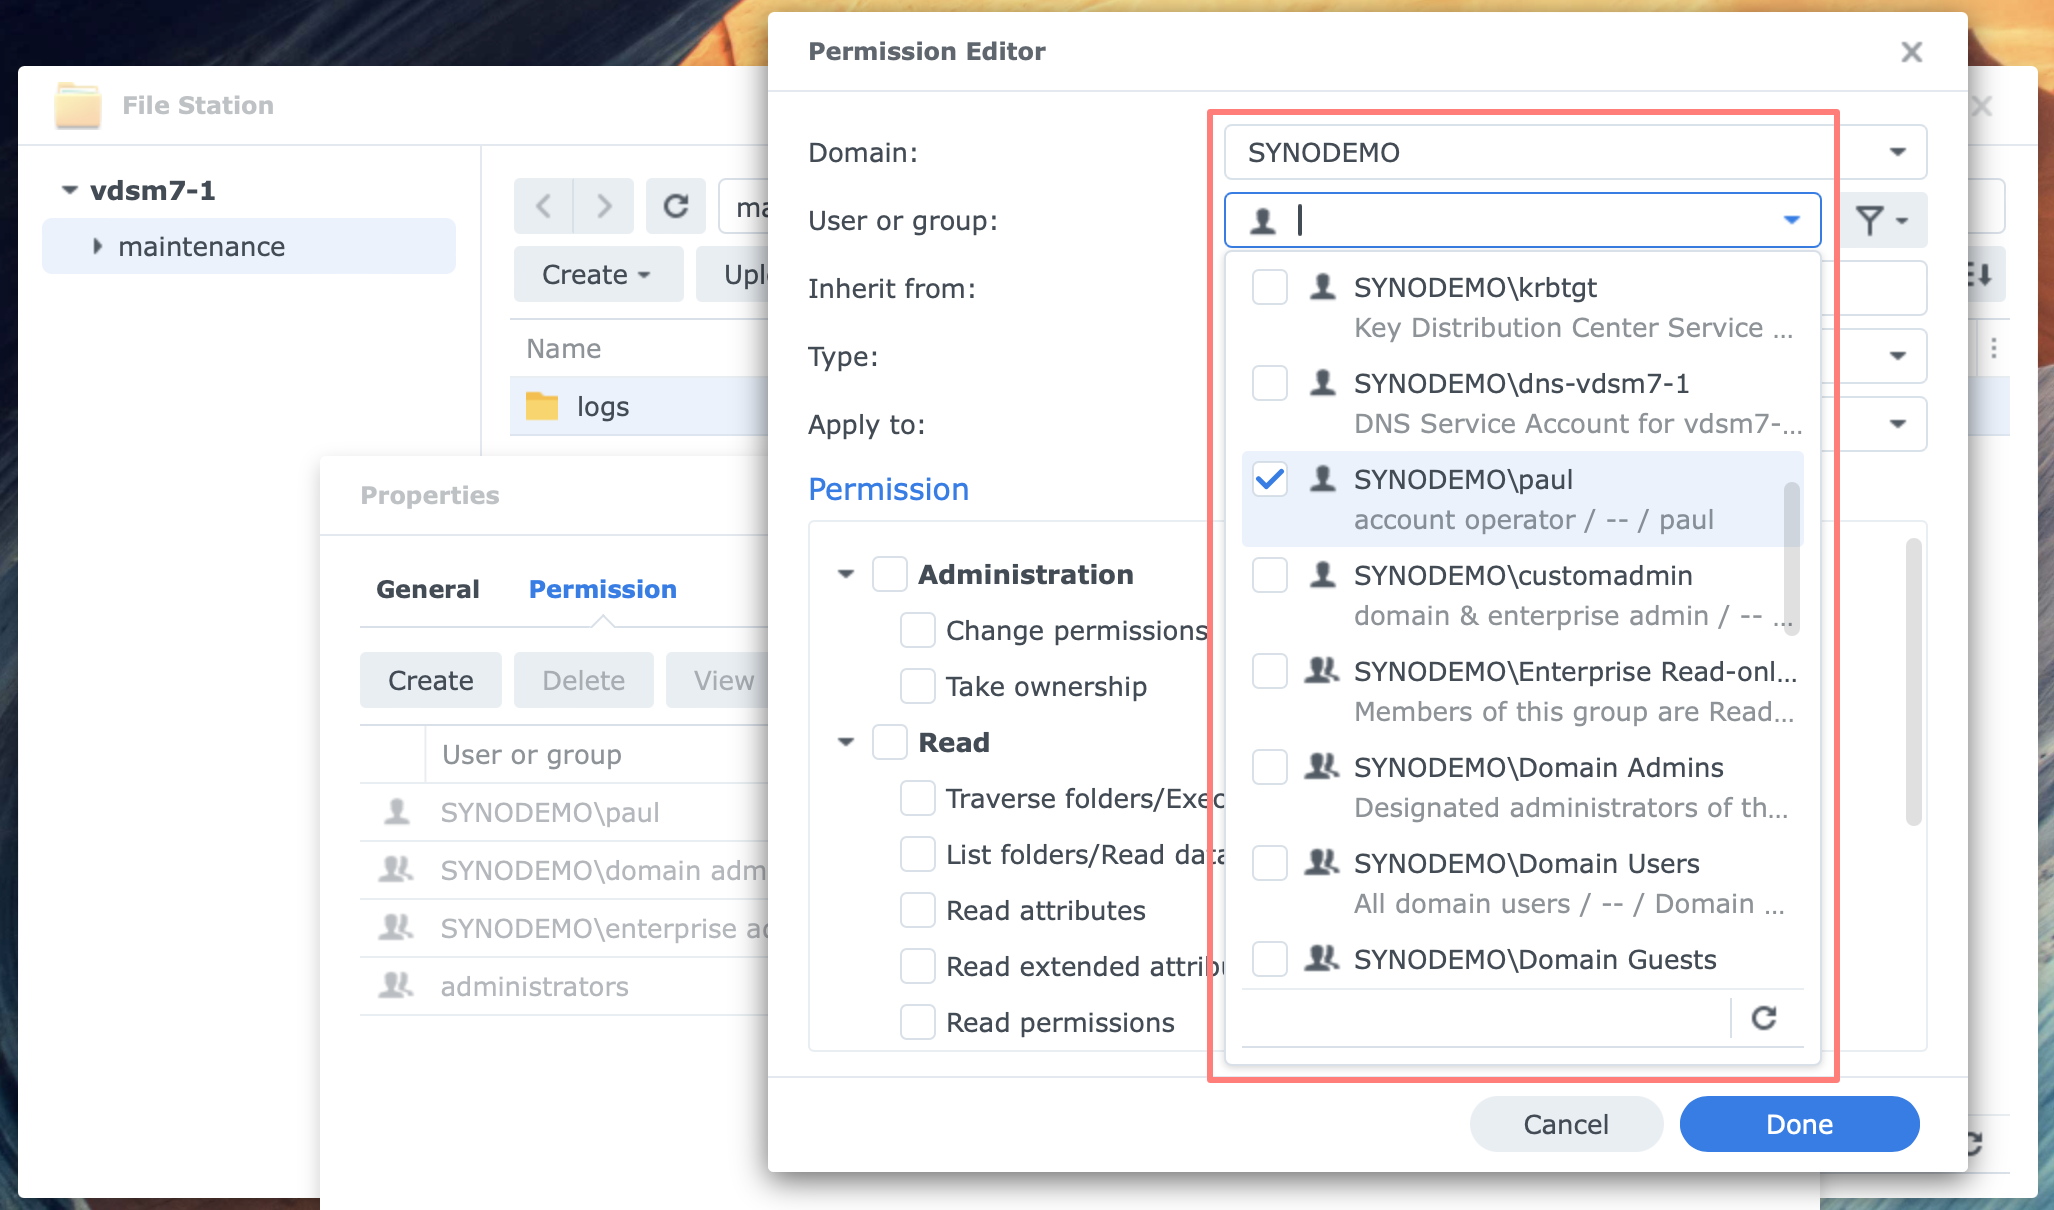
Configure permissions for the domain users and groups.
Application Privileges
You manage application permissions with Control Panel > Application Privileges. When permissions are granted to all users, they include all domain users.
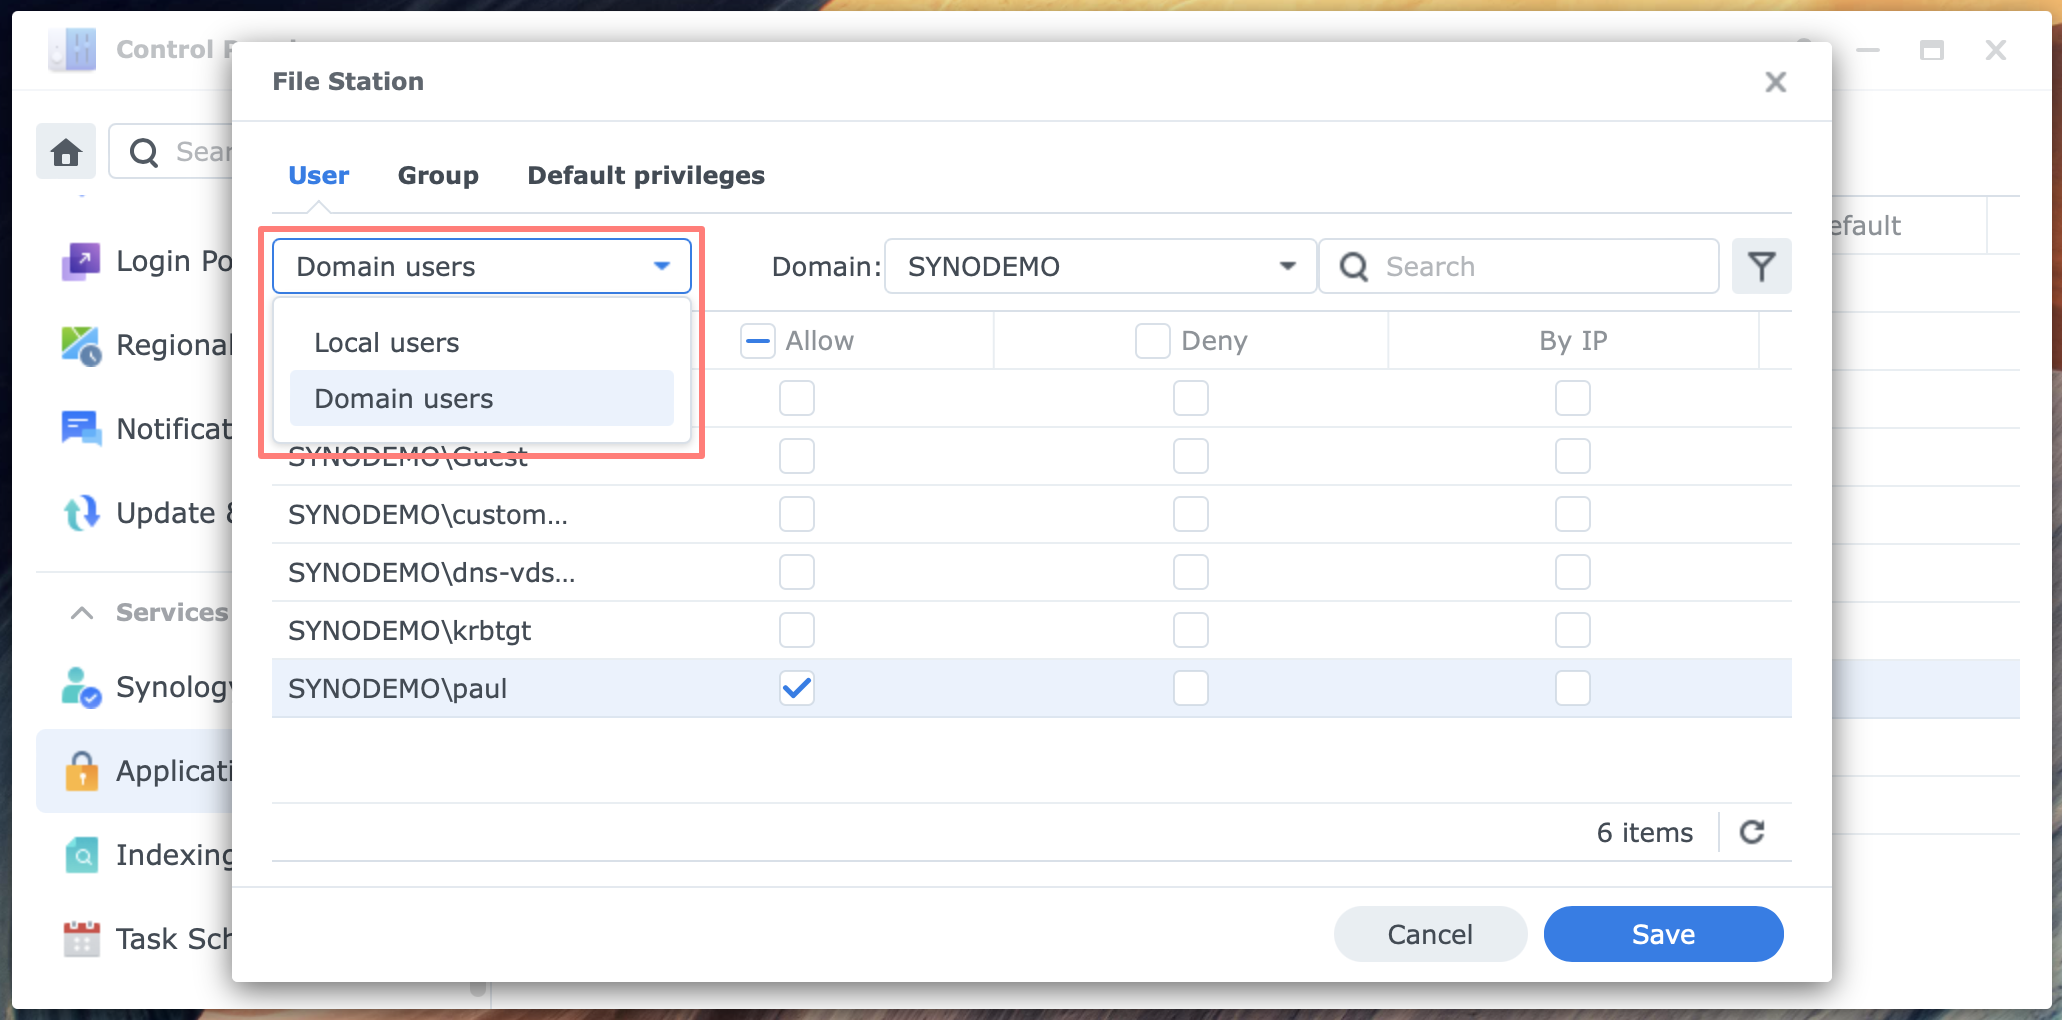
If not, select Application > Edit. On the User tab, select Domain Users; on the Groups tab, select Domain Groups. Then, configure permissions for the domain users and groups.
Add A Second Domain Controller
Because domain controllers play a vital role in a network, it is best practice to have at least two for each domain for resilience. With more domain controllers, you can balance the load or have one at a remote location that synchronizes with another domain controller. This prevents authentication traffic from going over a potentially slower WAN link.
You set up a second domain controller on the NAS to become the domain controller. The NAS must not have joined the domain beforehand. If that is the case, a pop-up message will appear, asking you to leave the domain when you install the Synology Directory Server package. Refer to this section for instructions on how to leave the domain.
It is best practice to run the same version of the Synology Directory Server tool on each domain controller and update it if necessary.
Installation
Install the Synology Directory Server on the NAS. This step is identical to the installation for the first domain controller, as discussed above. Remember the prerequisite of a static IP address. This step automatically installs the DNS Server package.
Configuration
After the installation, you open the Synology Directory Server application on the NAS. The setup wizard opens. On the first screen, choose one of the two options.
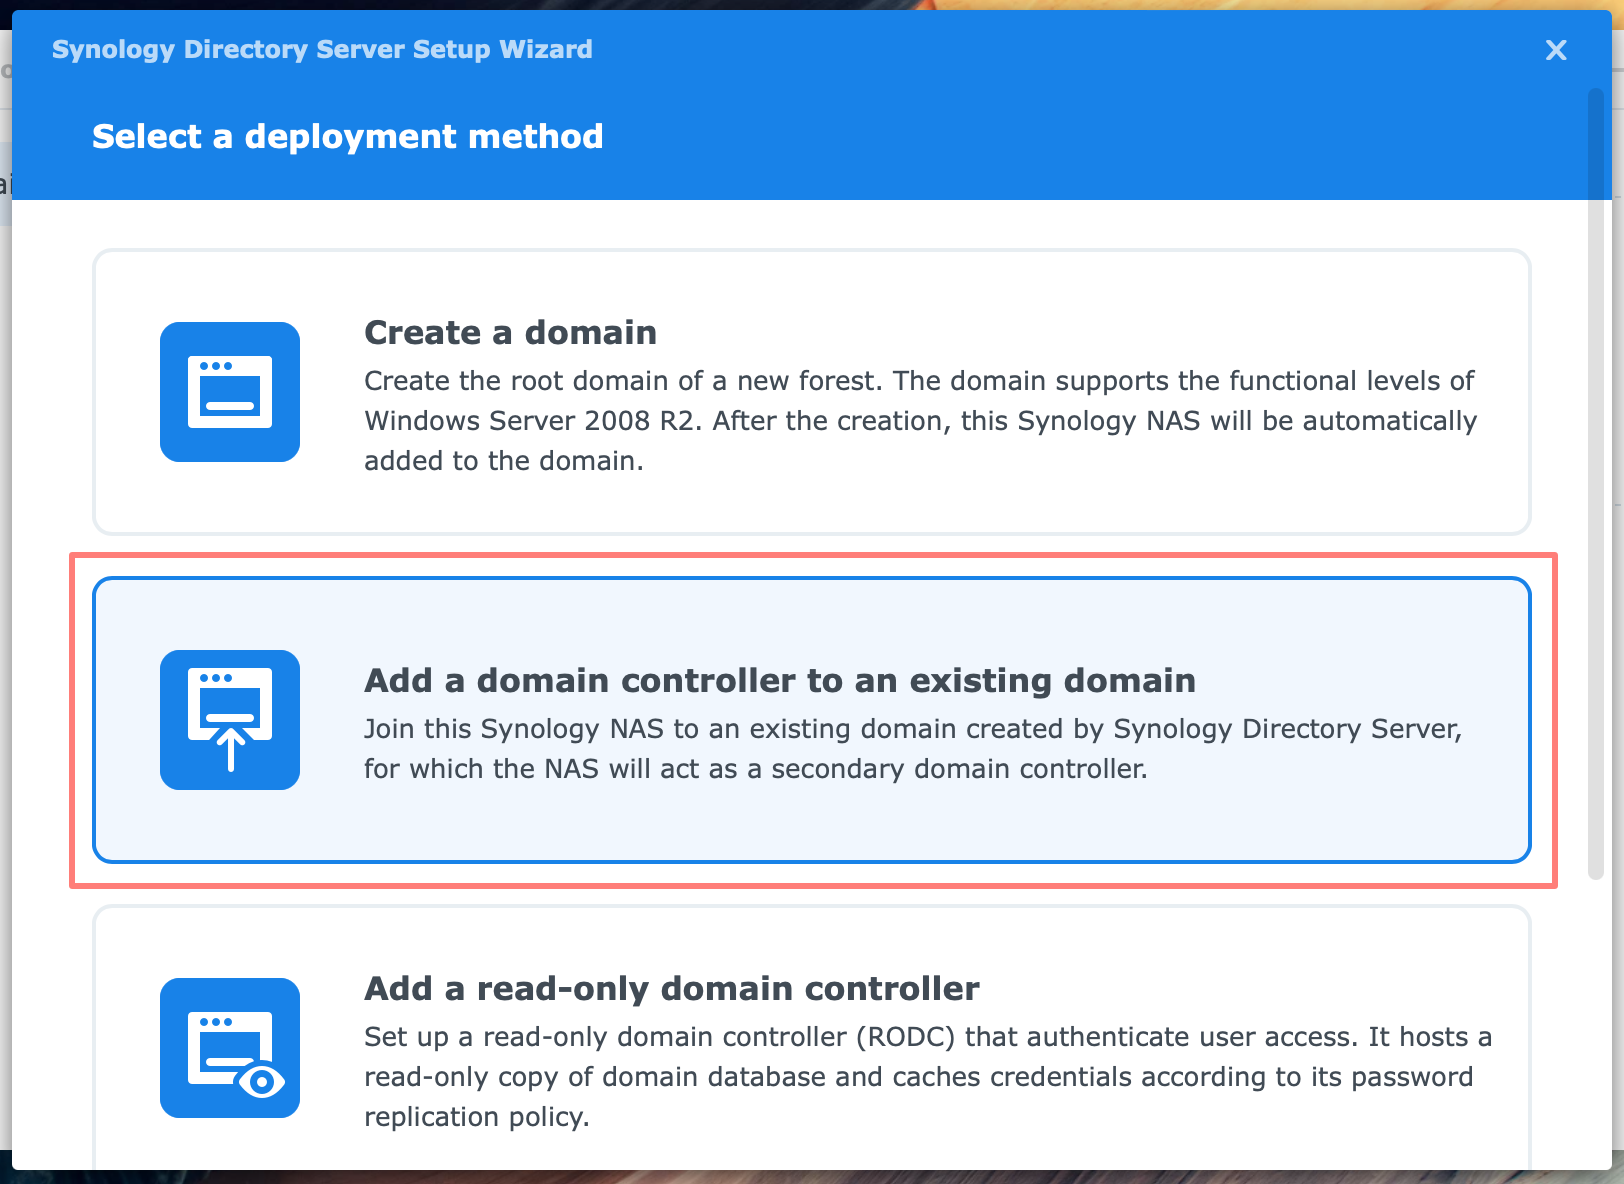
- Select a deployment method
- Add a domain controller to an existing domain
- Specify the target domain
- Add a read-only domain controller
- Specify the target domain
- Add a domain controller to an existing domain
Generally, the first option is the most effective. Read-only domain controllers are for specific scenarios, such as remote locations where physical access cannot be secured.
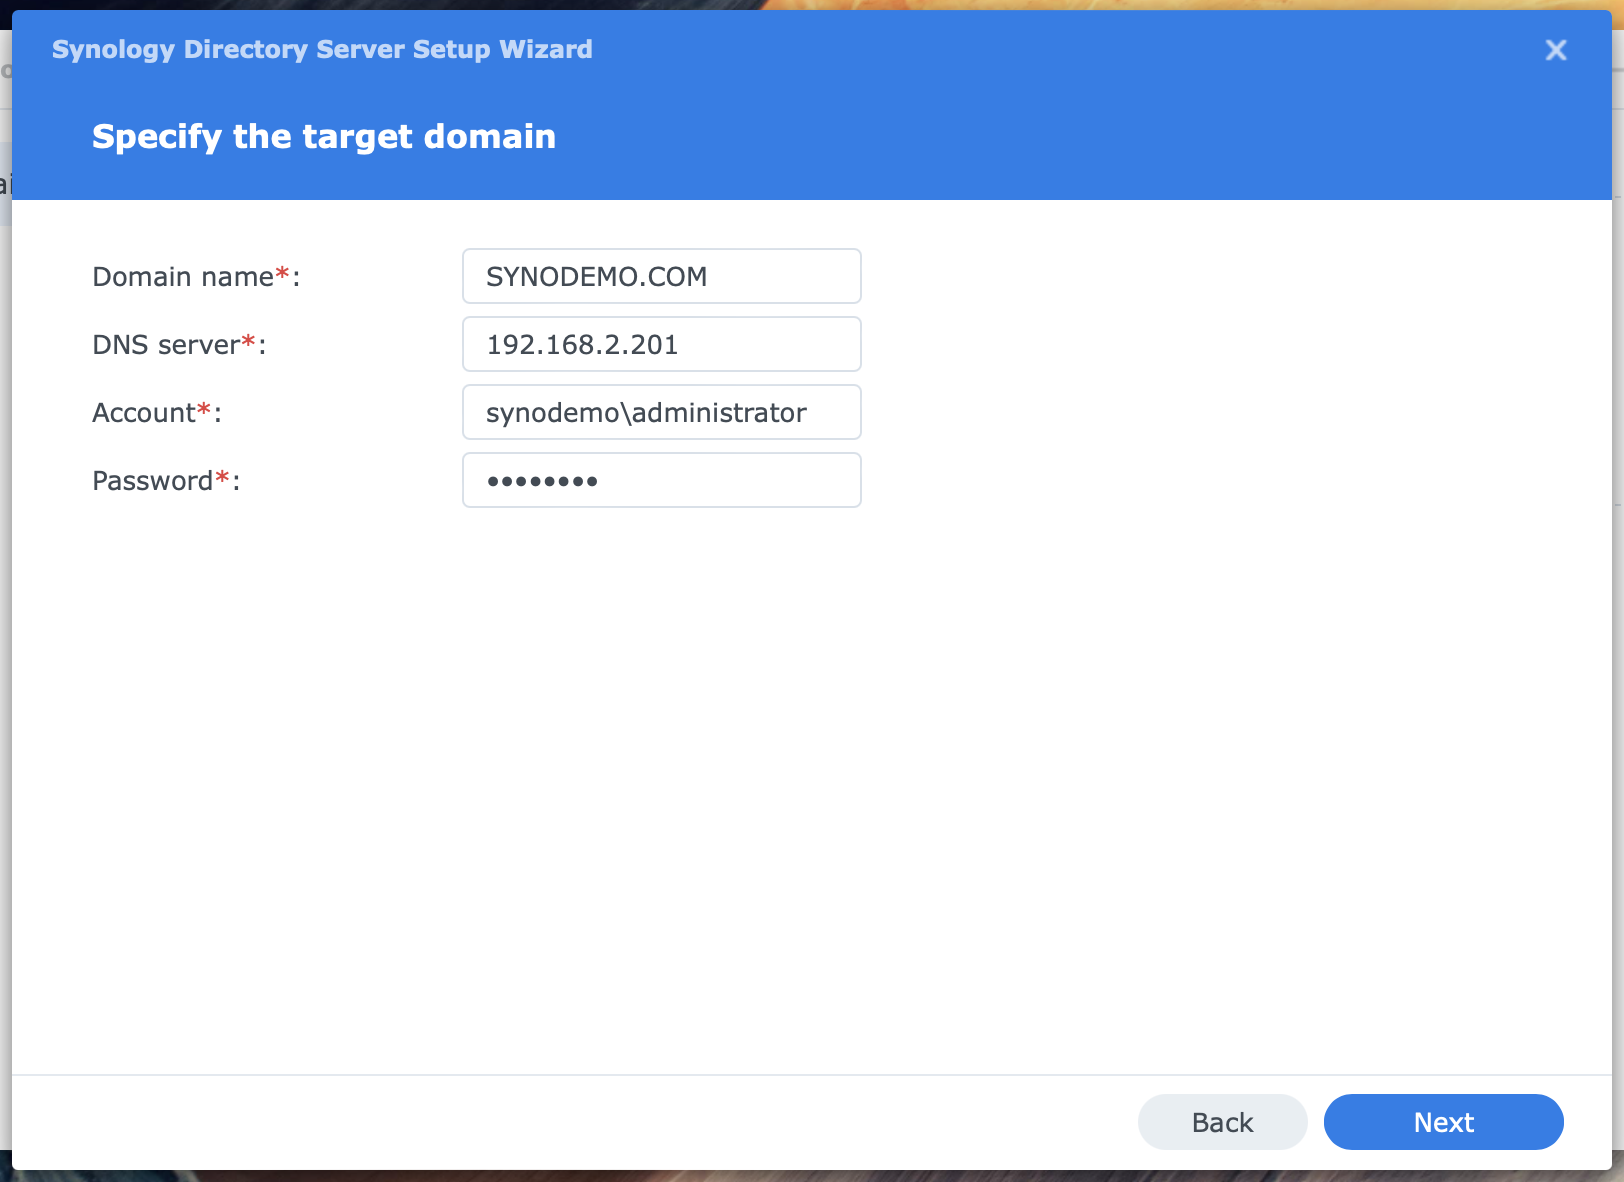
- Specify the target domain
- Domain name
- DNS server
- Account
- Password
Please enter the domain name, like synodemo.com, in my example. For the DNS server, enter the IP address of a domain controller that also functions as a DNS server. You can use the IP address of the first domain controller.
The domain account and password must belong to the Domain Admins group. You can use the default administrator. Use the workgroup or NetBIOS domain name as a prefix, like in synodemo\administrator. Click Next. The wizard performs several checks.
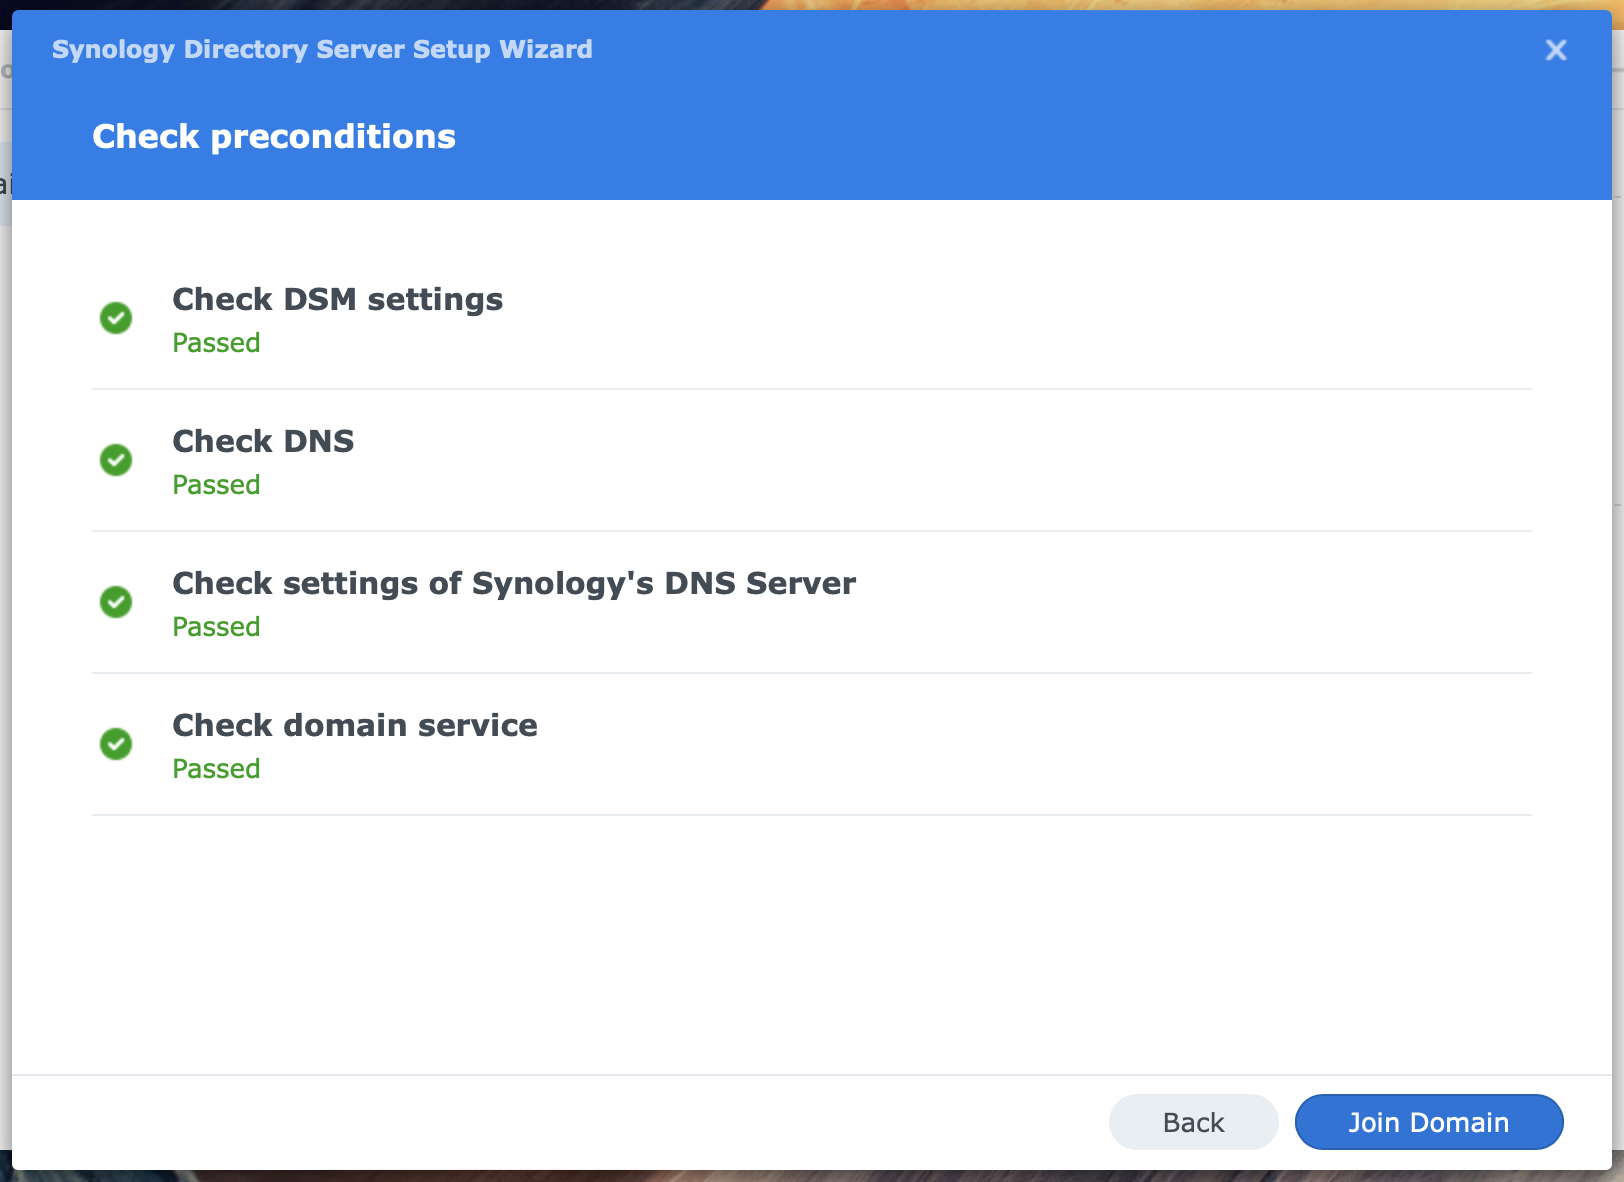
- Check preconditions
- Check DSM settings
- Check DNS
- Check the settings of Synology’s DNS server
- Check domain service
When all checks are passed and the status is green, click the Join Domain button. If any issue arises, follow up on the advice given.
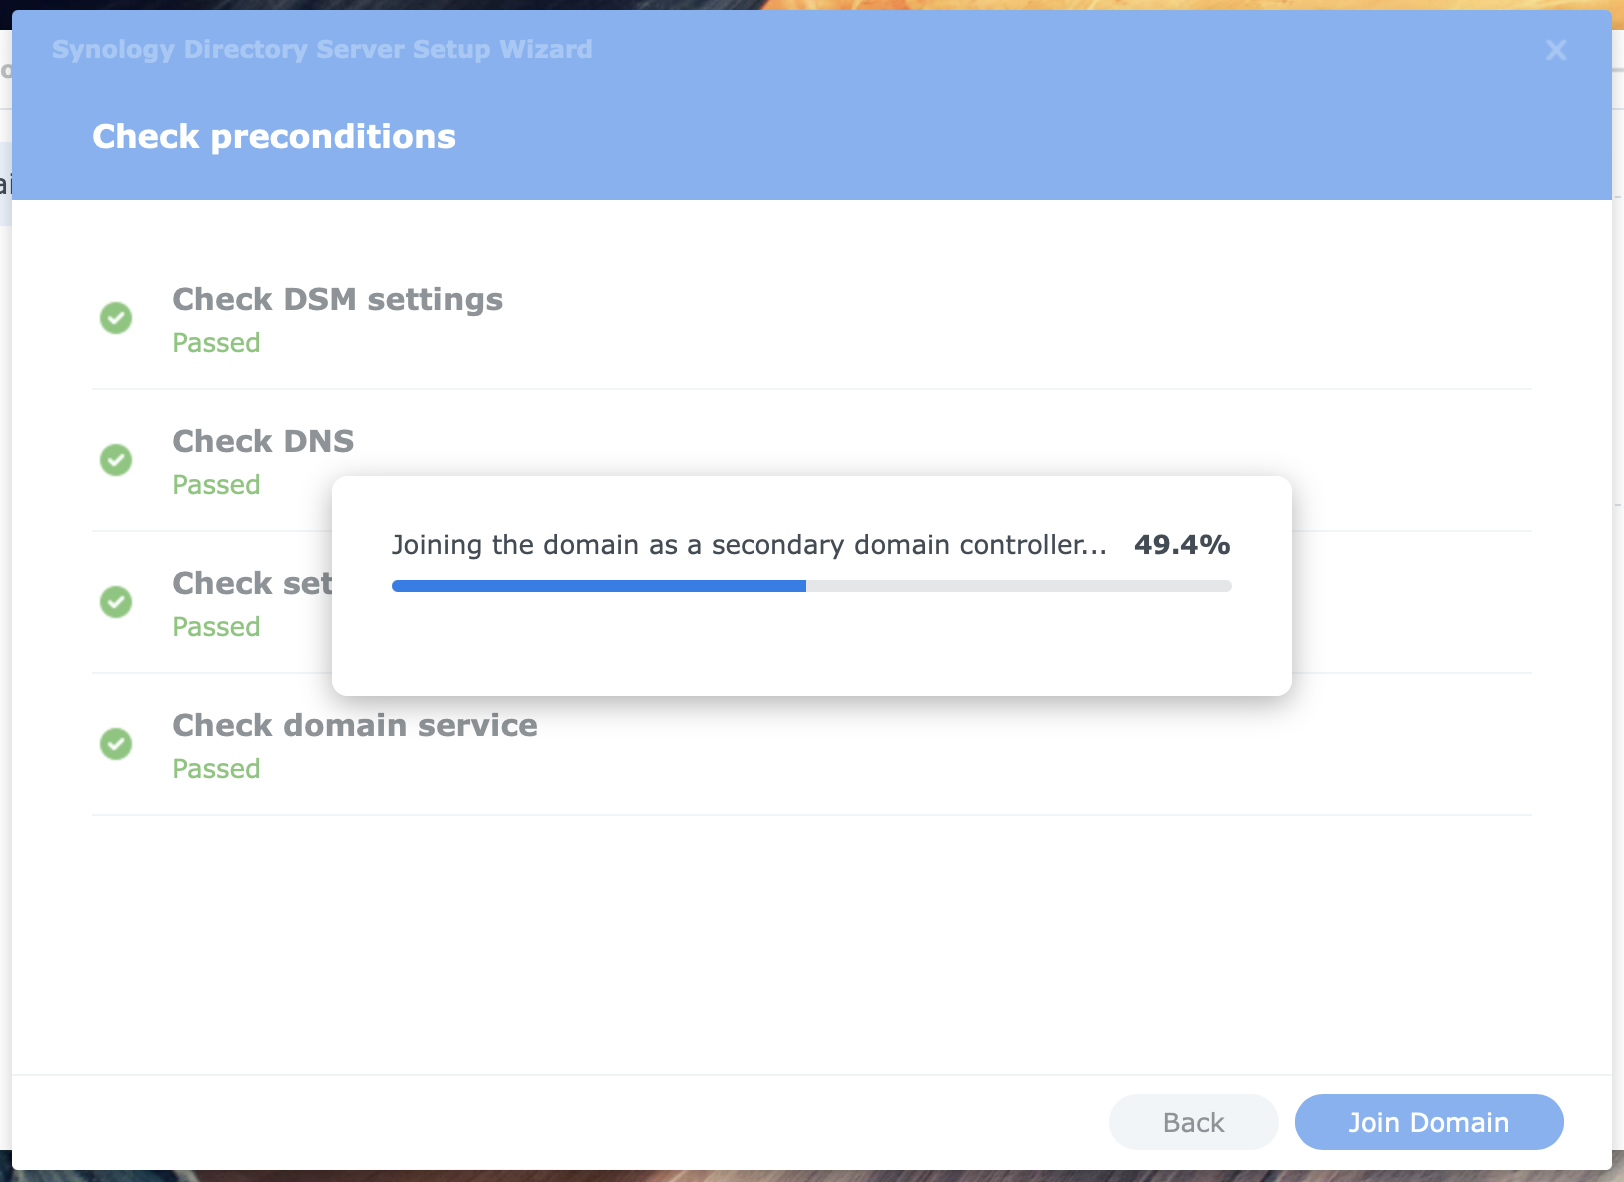
Wait for the joining to finish, which can take a minute. After the joining process finishes successfully, you will receive a message about the joining and the updated DNS and SMB settings. Click OK to close the message.
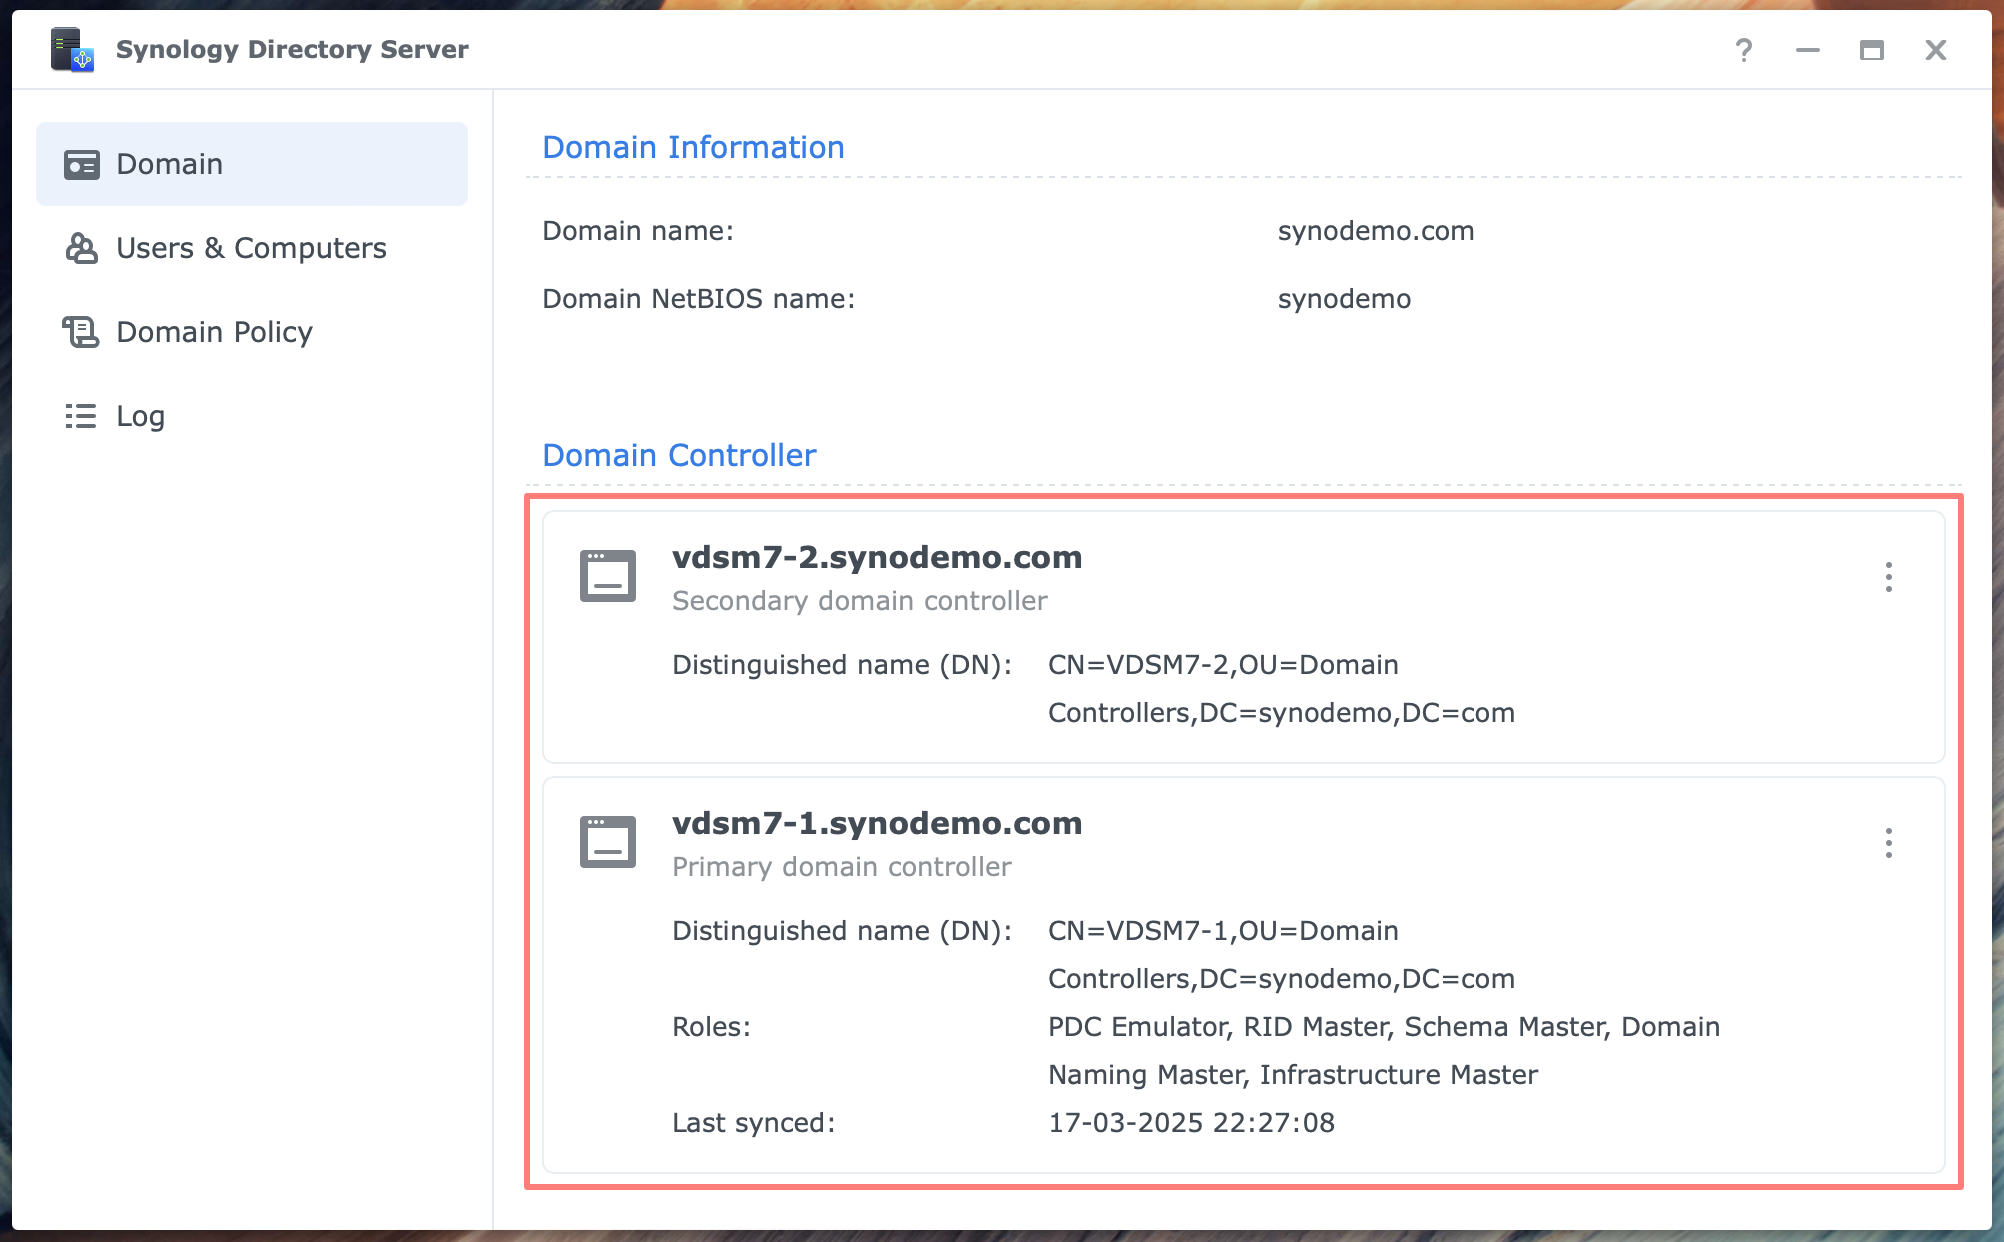
In the Synology Directory Server application on each domain controller, both servers are now listed as Domain Controller on the Domain page and in the Domain Controllers OU on the Users & Computers page. On the Domain page, the first domain controller is listed as primary and the other as a secondary domain controller.
Other changes on the system, such as the firewall (if enabled) and the certificate for the directory service, are similar to those on the primary domain controller.
During the configuration of the secondary domain controller, the domain’s DNS zone was updated with new resource records for the new domain controller.
Please remember to open ports for the Windows file server and NTP Service if you have a firewall running.
User Home
You can enable the User Home service for domain users on any NAS that joined the domain, including domain controllers. Since a domain user can log on to any server in the domain, you decide which server will host the home folders for the domain users.
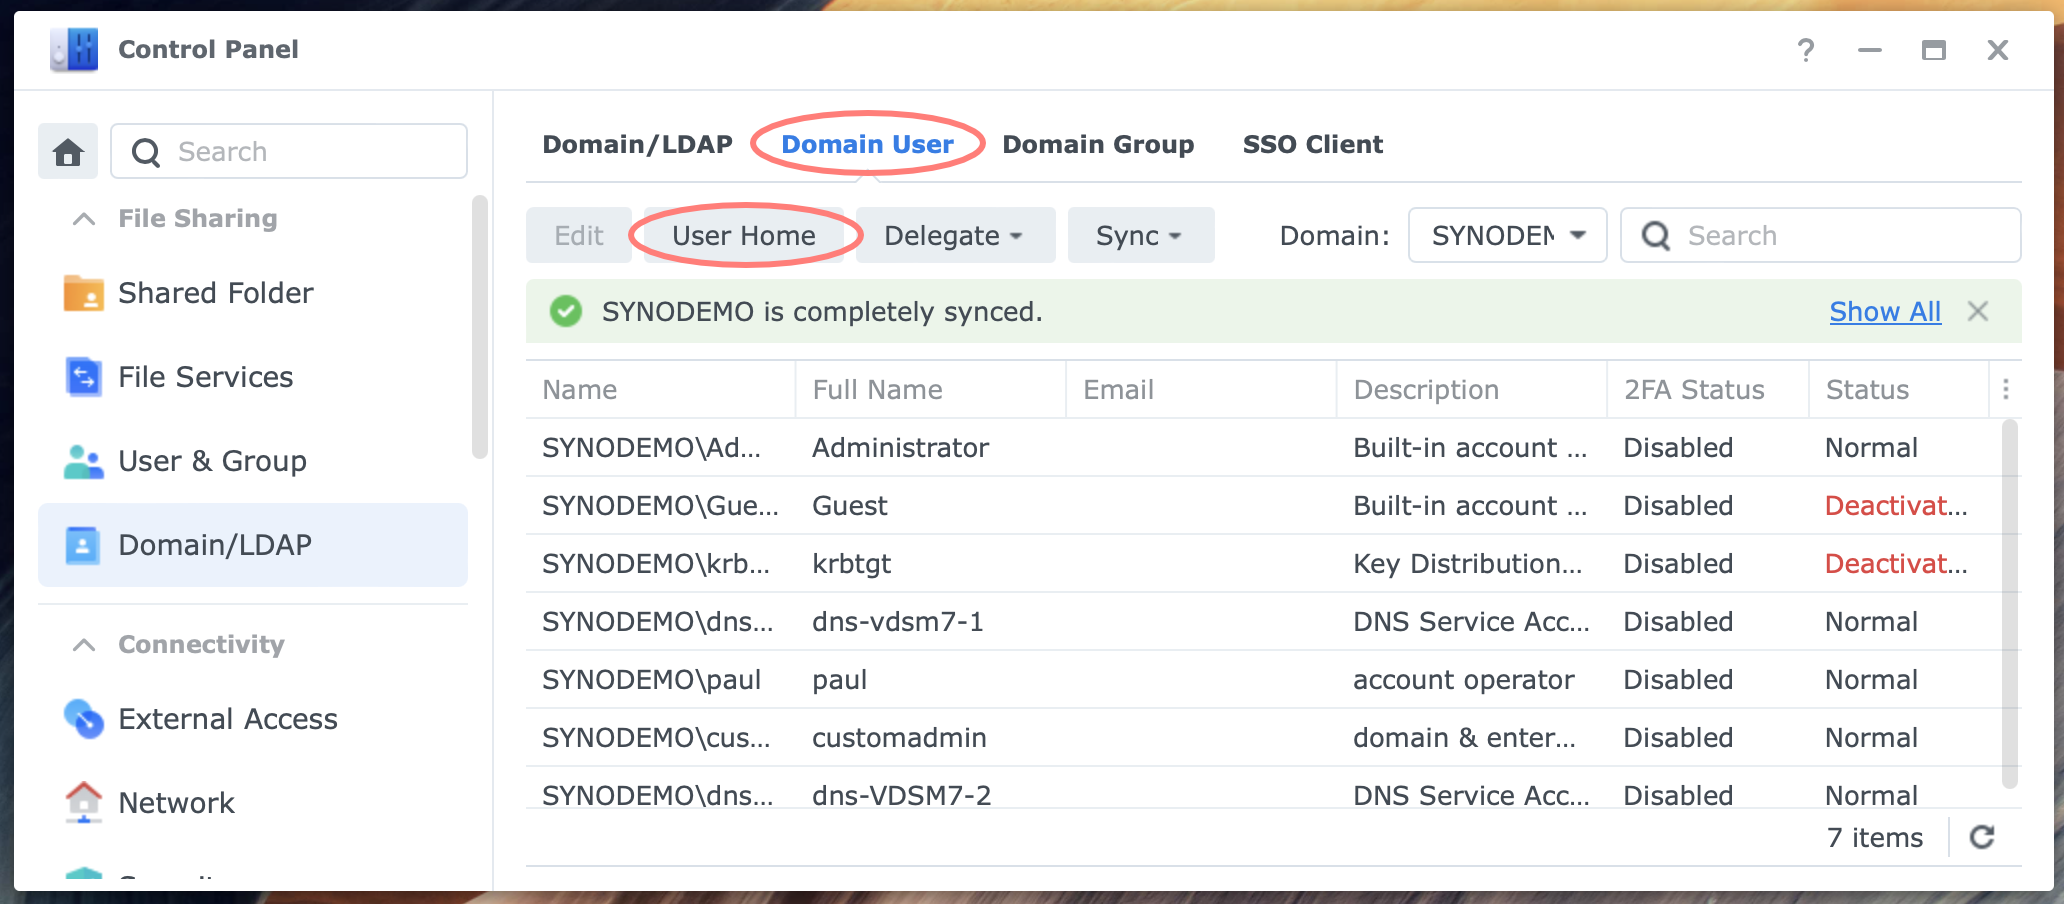
Log in to the selected NAS and go to Control Panel > Domain/LDAP > Domain User tab > User Home button. When you click on the button, the User Home dialog opens.
This dialog is identical to the Control Panel > User & Group > Advanced tab. However, domain users are included when you enable the User Home service from the Domain/LDAP applet in Control Panel.
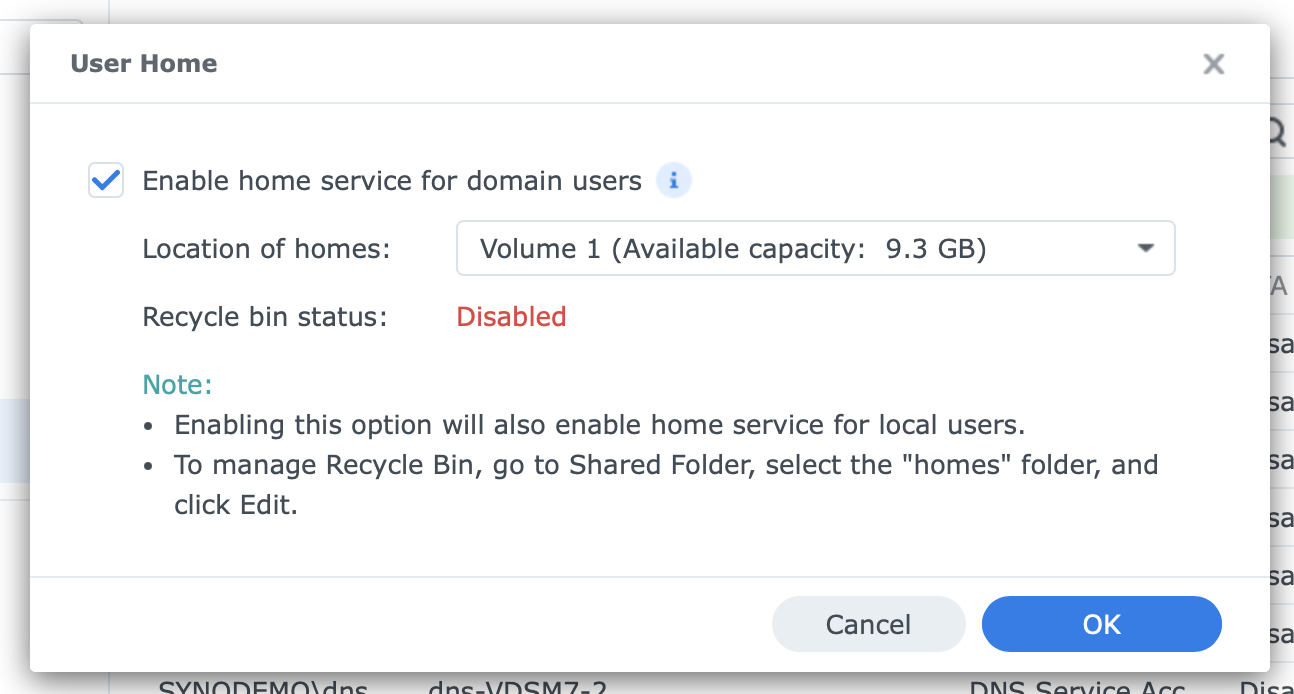
Enable the home service, select a volume if necessary, and click OK.
Two optional features must be configured. One hides the /homes shared folder, and the other enables the Recycle Bin. For details, please refer to Using Home Folders On Synology NAS.
Home folder names
Enabling the User Home service on a NAS automatically creates a home folder inside the /homes shared folder for every local user. For domain users, the NAS creates the user’s folder when the user first logs in to the DSM desktop or makes an SMB connection from the computer.
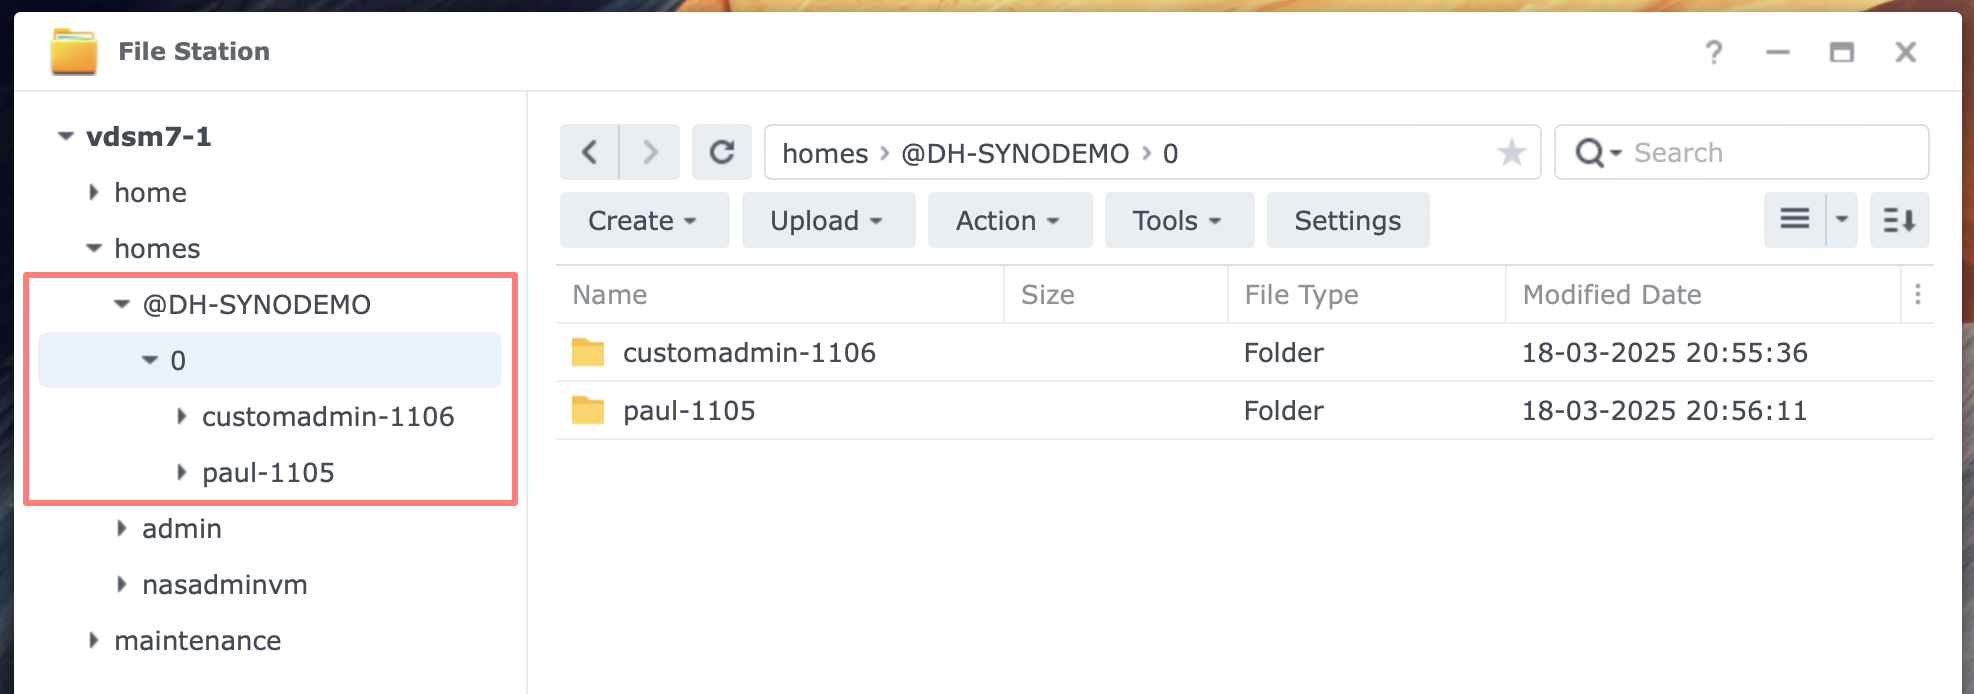
The naming syntax in the /homes shared folder differs from that of the local users. The syntax is:
- /homes/@DH-DOMAIN/0/userNAME-ID
For example, for paul in domain SYNODEMO (NetBIOS or workgroup name), with ID 1105, the path to the home folder is:
- /homes/@DH-SYNODEMO/0/paul-1105
Please note that the path is invisible to the logged-on user, as it is for local users when they log in. Only administrators see this path in the /homes shared folder.
Windows uses an identifier for each user. The default administrator has an ID of 500, and any custom-made user or group has an ID starting with 1100.
Domain Settings
You can configure several settings on every NAS that joins the domain, including domain controllers. What are these settings, and how would you configure them?
As mentioned, these settings are domain-related but server-specific. You can configure these settings as needed on each server. It makes sense to keep them consistent, but that is not mandatory.

To open the domain-related settings, go to Control Panel > Domain/LDAP > Domain/LDAP tab > Settings button. Click on the button to open the Settings dialog. Here, you find three tabs:
- General
- Management mode
- Advanced
General tab
At the General tab, you will find the following items:
- DNS Server
You might see multiple IP addresses on a domain controller. If you add more domain controllers, you could also add their IP addresses here. Generally, I do not expect any action to be taken here for domain controllers.
On a member server, such as a Synology NAS that has joined the domain, you see a single DNS server used during the join. You can add additional authoritative DNS server addresses for the domain. In layman’s terms, add their IP address here if you add a second or subsequent domain controller to the domain.
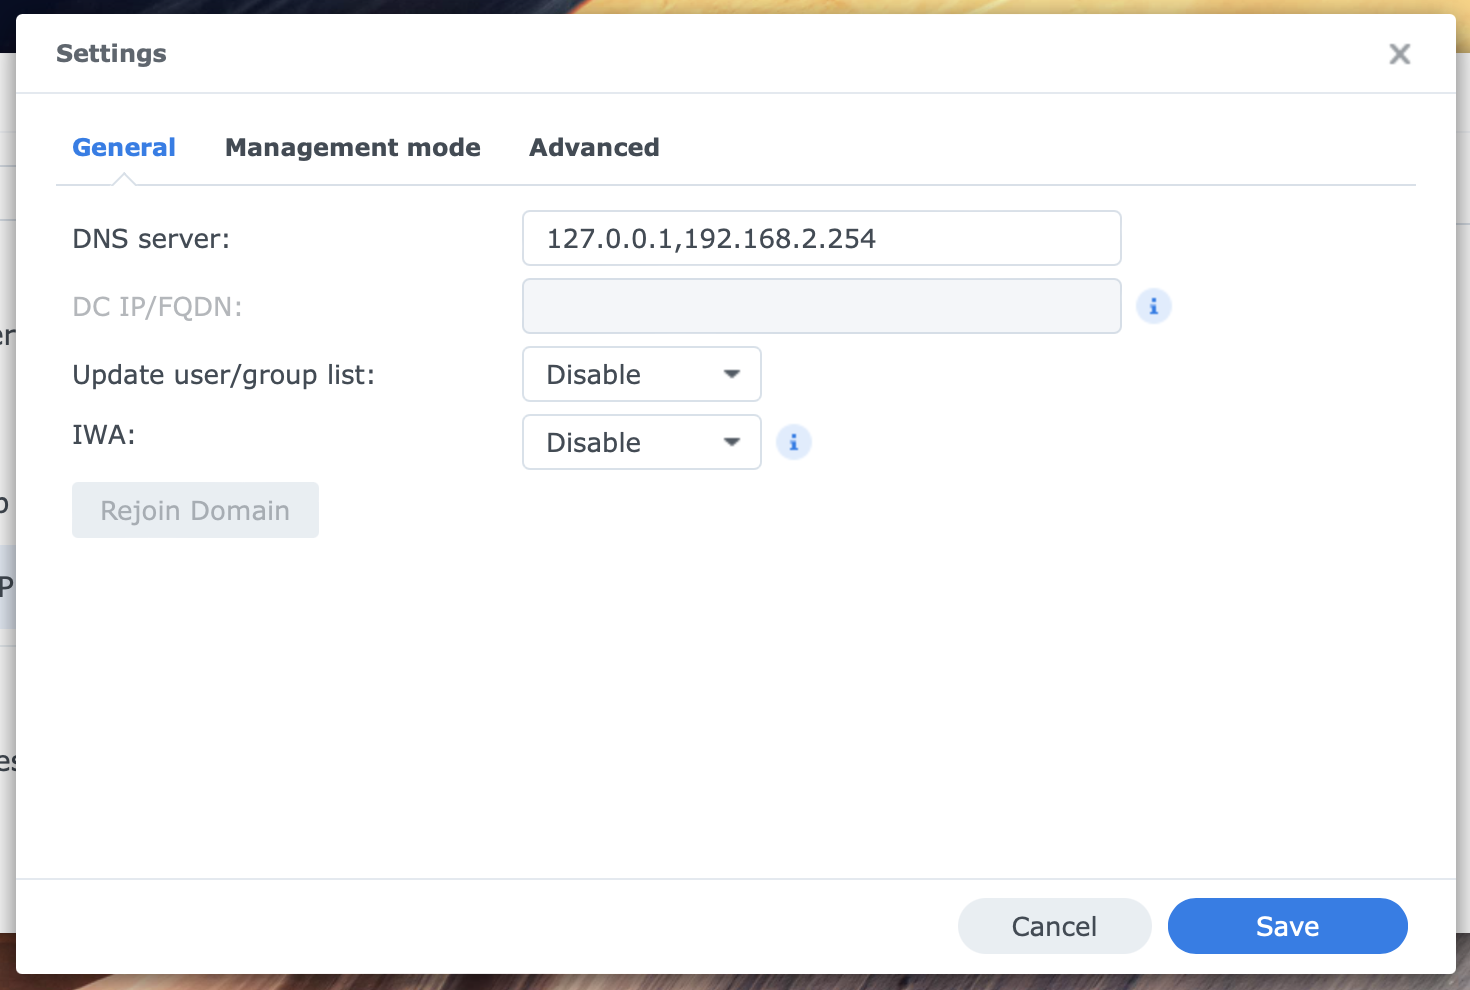
- DC IP/FQDN
What I wrote about the DNS server applies to the domain controller’s IP address or Fully Qualified Domain Name (FQDN). The field is blank on a domain controller. On a member server, the value is the one you entered during the join process. If there are more domain controllers to authenticate, you can add them here.
- Update user/group list
You need an up-to-date list of items in the domain to assign permissions to server resources to users and groups.
You can set how often the Synology NAS automatically updates the domain user and group lists. Automatic updates will affect system hibernation. You can manually update the list from the Domain User or Domain Group tab and click Sync Domain Data.
This setting is disabled by default. If you assign permissions, you can disable it and manually update the list, but I prefer to update it regularly.
- IWA or Integrated Windows Authentication
With IWA, a user can automatically sign in to DSM with an existing domain account on a Windows computer.
You need to enable IWA on the NAS and Windows computers. A Synology knowledge base article on IWA automatically signs in DSM provides more details.
Management mode tab
The management mode refers to the selection between:
- Trusted domains
- Single domain with OUs
You see a list of domains, the domain the NAS joined, and optionally trusted domains. The two options mentioned above are related to whether you would like to sync and update the user/group list of the domain you belong to or the trusted domains.
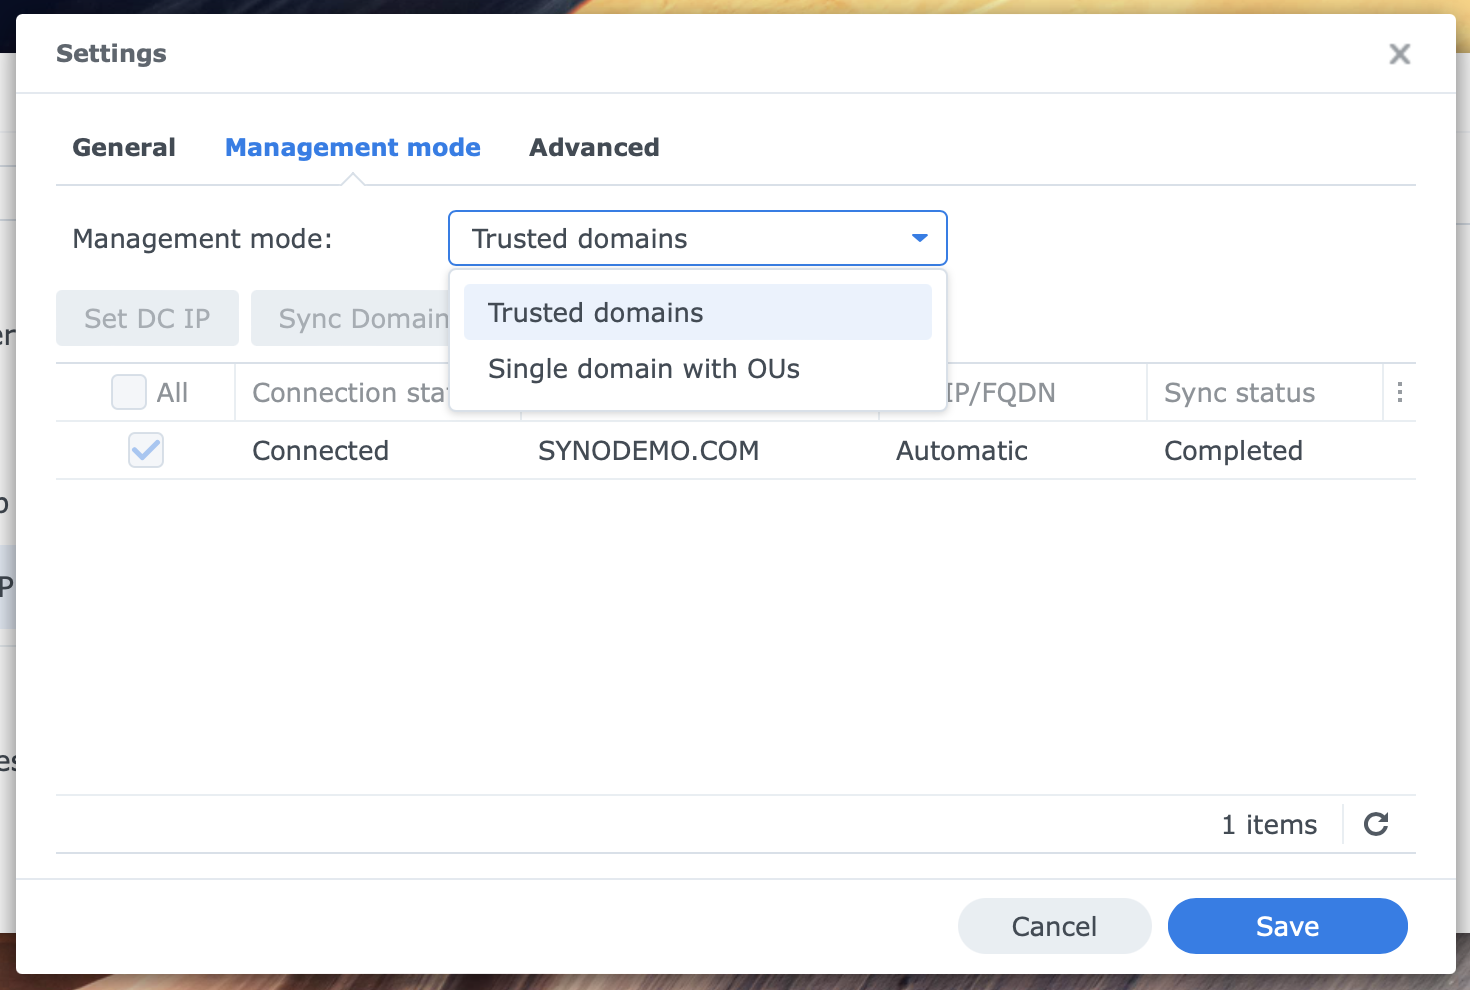
This setting is irrelevant as long as no trusted domains exist and only the domain to which the NAS is joined is listed.
From this tab, you can manually sync the data from the selected domain and, in some instances, set the IP address of the domain controller.
Advanced tab
Some items on this tab are greyed out on domain controllers but are editable on member servers.
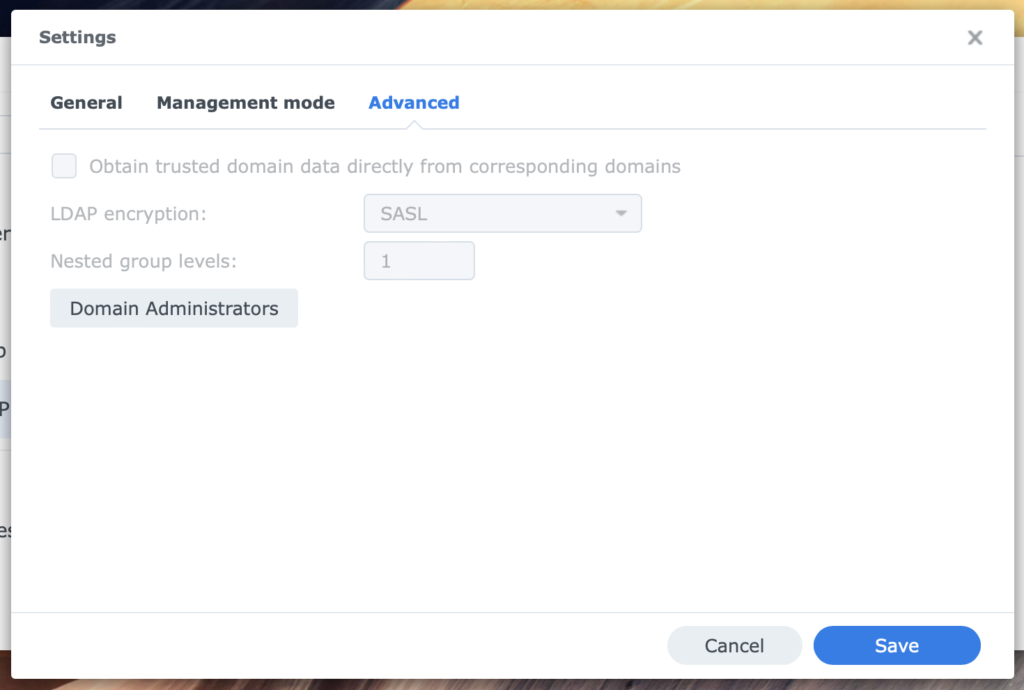
- Obtain trusted domain data…
By allowing the NAS to request data directly from trusted domains, you can avoid the need to modify users’ or groups’ permissions. If there are no trusted domains, this setting is irrelevant.
- LDAP encryption
The member server connects to the domain using LDAP. It can use either SASL or SSL/TLS for encryption. SASL is the default; I don’t see any reason to change this.
- Nested group levels
In contrast to a NAS’s local groups, you can nest groups from a domain. Here, you determine how many levels of groups can be nested on a specific NAS member server.
- Domain Administrators button
When you click the button and open the dialog, you might see the listed Enterprise Admins and Domain Admins groups. You can add or delete other groups.
Members of these groups have administrative access to the NAS. If you do not want this or a specific user or group to be able to administer a NAS, change the setting accordingly.
Leaving The Domain
We discussed joining the server to the domain. Now, we look at how to reverse this step.
A NAS as a member server can leave the domain to become a standalone server. You can demote a NAS as a domain controller to a standalone server. When you demote the last domain controller, you delete the domain directory and DNS entries.
To remove a NAS as a member server from the domain, follow these steps as a member of the Administrators group. I prefer a local administrator account, as the domain admin account will become invalid during leave.
You log in as a member of the administrators group on the joined NAS. Go to Control Panel > Domain/LDAP > Domain/LDAP tab, and click the Leave Domain button.
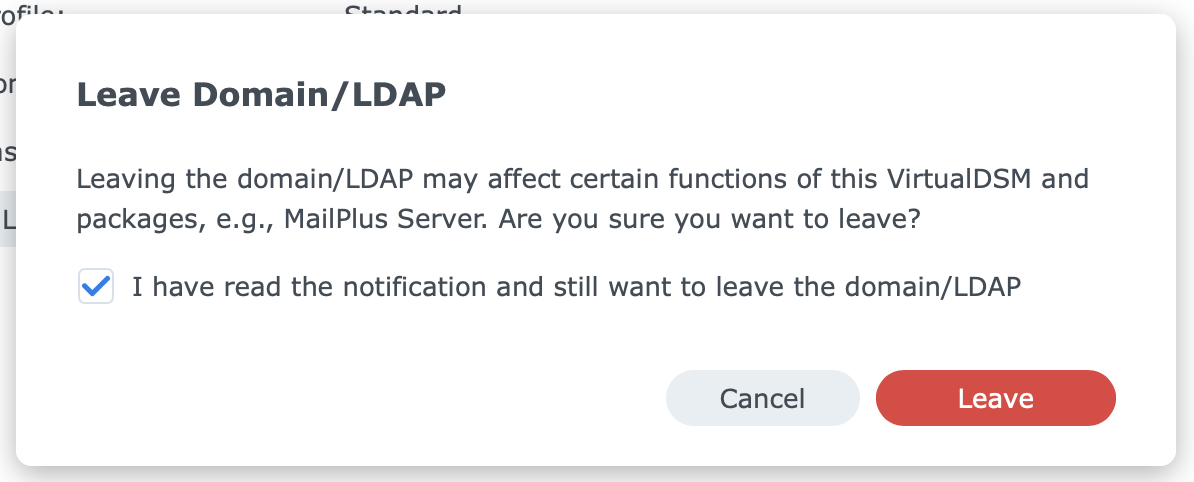
A Leave Domain/LDAP message alerts you to the impact on specific functions. Confirm and click Leave. In the Enter Password dialog, enter the account password you used to log in.
You may want to verify the DNS, NTP Service, and SMB advanced settings, as they were modified when you joined the NAS to the domain.
Demoting A Domain Controller
We discussed promoting a NAS to a domain controller and adding a second domain controller. Now, we look at how to reverse these steps. In this example, I demonstrate how to demote a domain controller. The domain has two domain controllers, a primary and a secondary. I plan to demote both and clear the domain.
After demotion, you can uninstall the packages for DNS Server and Synology Directory Server from the NAS unless you plan to use them again later.
Constraints
A domain controller can have FSMO roles. Typically, the first domain controller in the domain has these five roles. Before demoting a domain controller, you must transfer the FSMO roles to another controller. In the next paragraph, I discuss the FSMO roles and how to transfer or seize them.
If the domain controller to demote is unavailable, log in to another domain controller. This should only be performed for a defective domain controller.
Demotion process
To demote a domain controller, log in as a domain or local administrator on the domain controller you plan to demote and open the Synology Directory Server tool. I prefer a local administrator because the domain administrator is invalid on the NAS after the demotion and is logged off immediately.
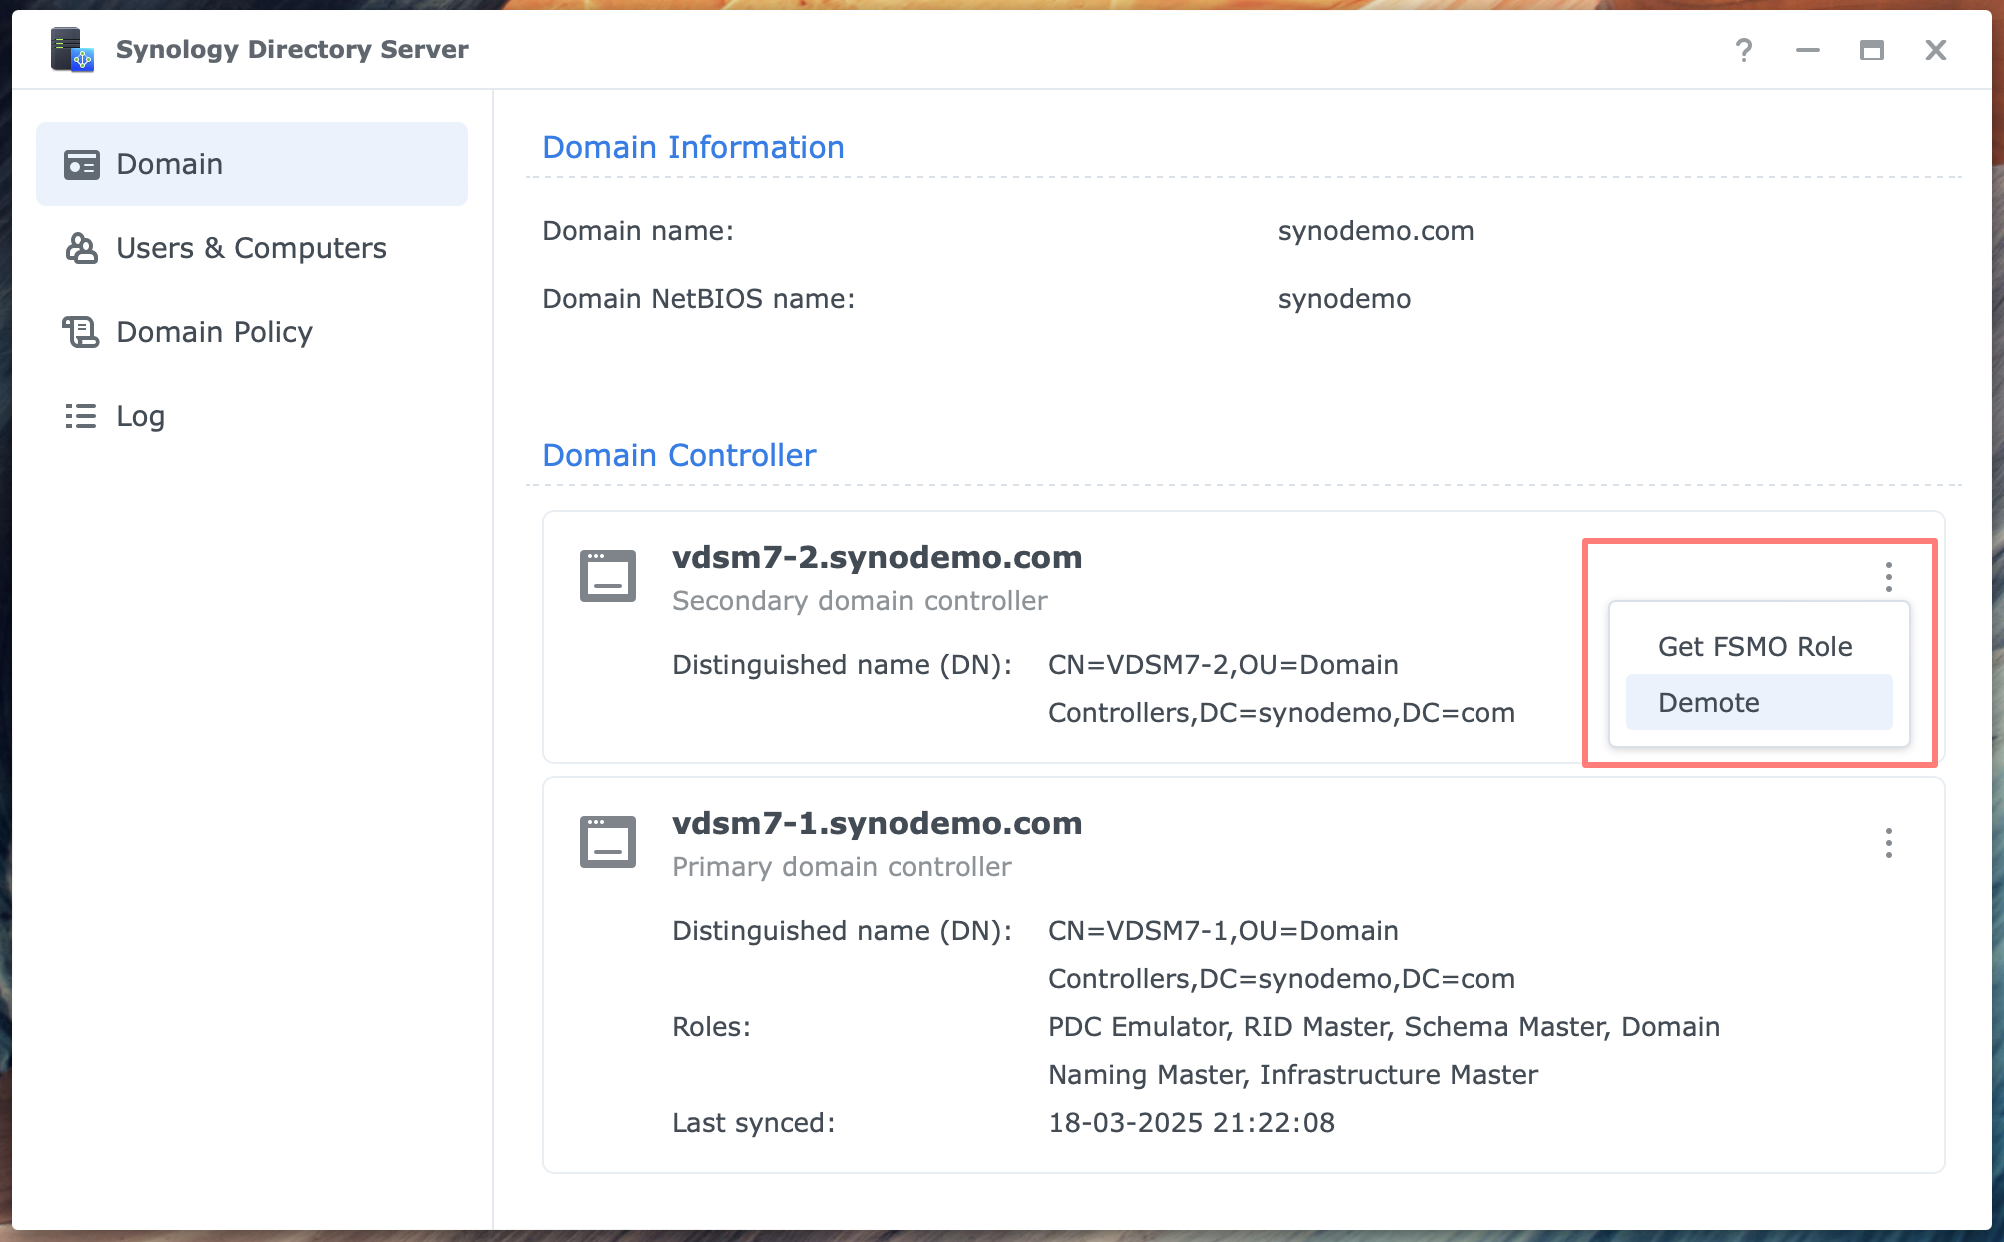
Look up the domain controller you want to demote in Synology Directory Server > Domain page > Domain Controller. Click on the three dots to the right of that domain controller and choose Demote.
Enter the domain administrator credentials in a dialog. Click Submit. Demotion starts. When it finishes, the Synology Directory Server tool closes.
You may want to verify the DNS server and SMB advanced settings, as they were modified when you joined the NAS to the domain.
Demoting the last domain controller
The process for demoting the last domain controller is identical to that for other domain controllers, but you get an additional warning. You effectively remove the domain while demoting the domain controller.
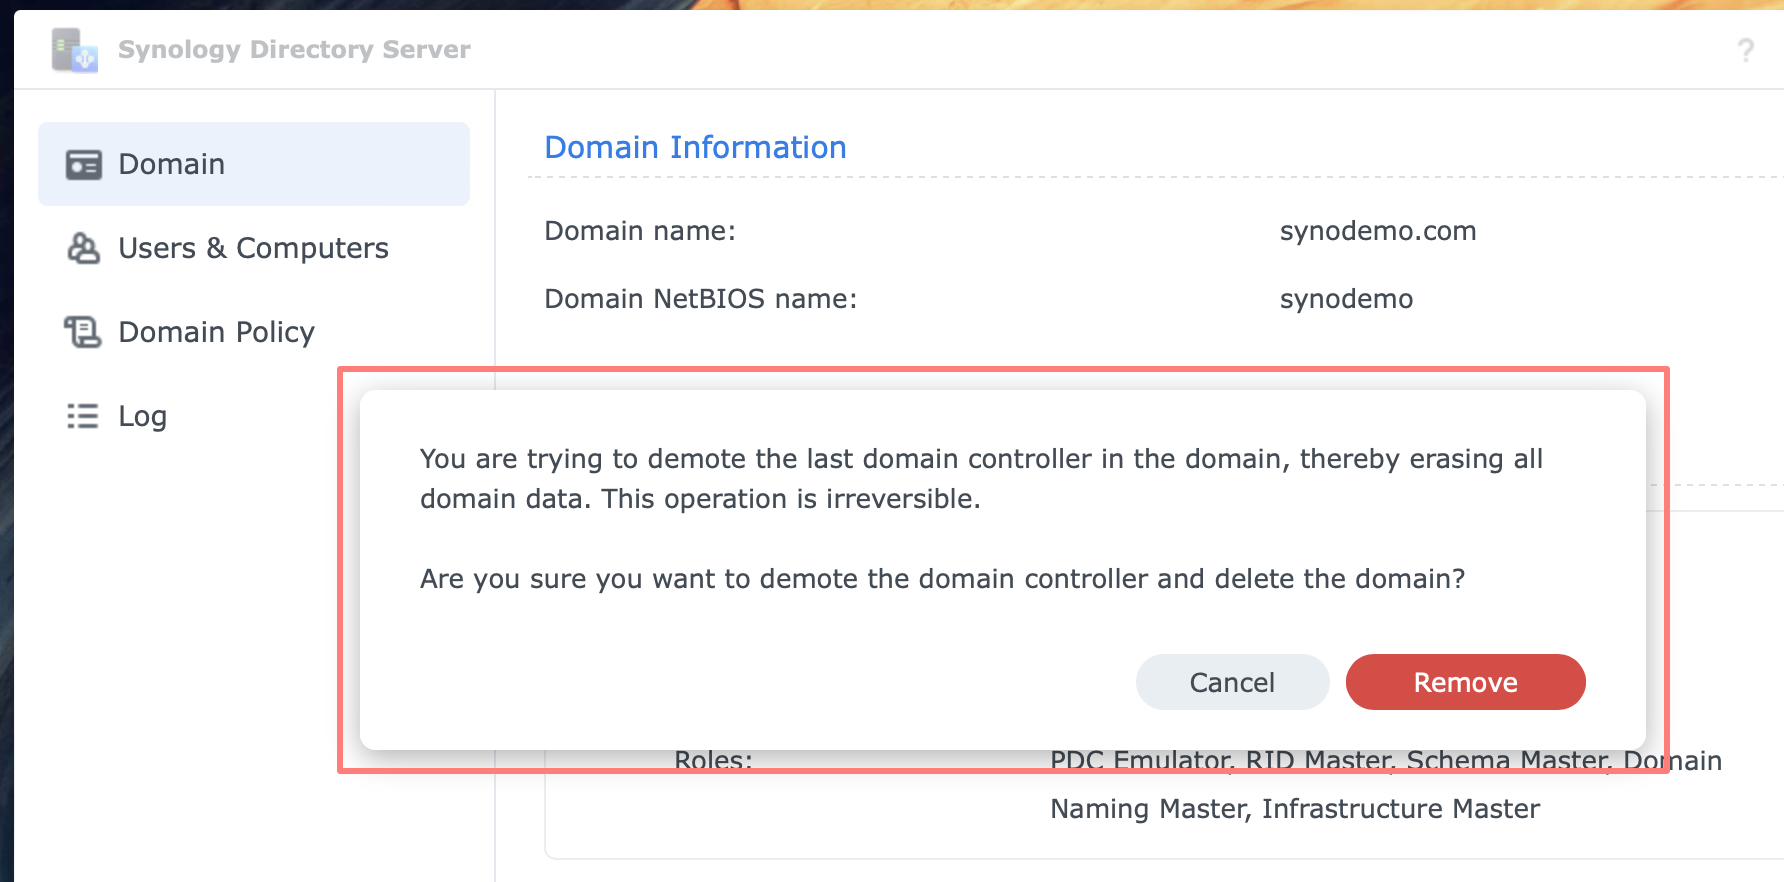
Click Remove in the dialog, enter the password for the logged-in user, and click Submit. When it finishes, the Synology Directory Server tool closes.
You might want to check the DNS, NTP, and SMB advanced settings, as they were changed when you joined the NAS to the domain.
Transferring FSMO Roles
You can have multiple domain controllers in your network that are equal in their function, but one or some domain controllers have a unique task defined by a role. There are five unique roles in any domain called FSMO roles. FSMO stands for Flexible Single Master Operation.
To transfer an FSMO role, log in as a domain or local administrator on one of the domain controllers and open the Synology Directory Server tool.
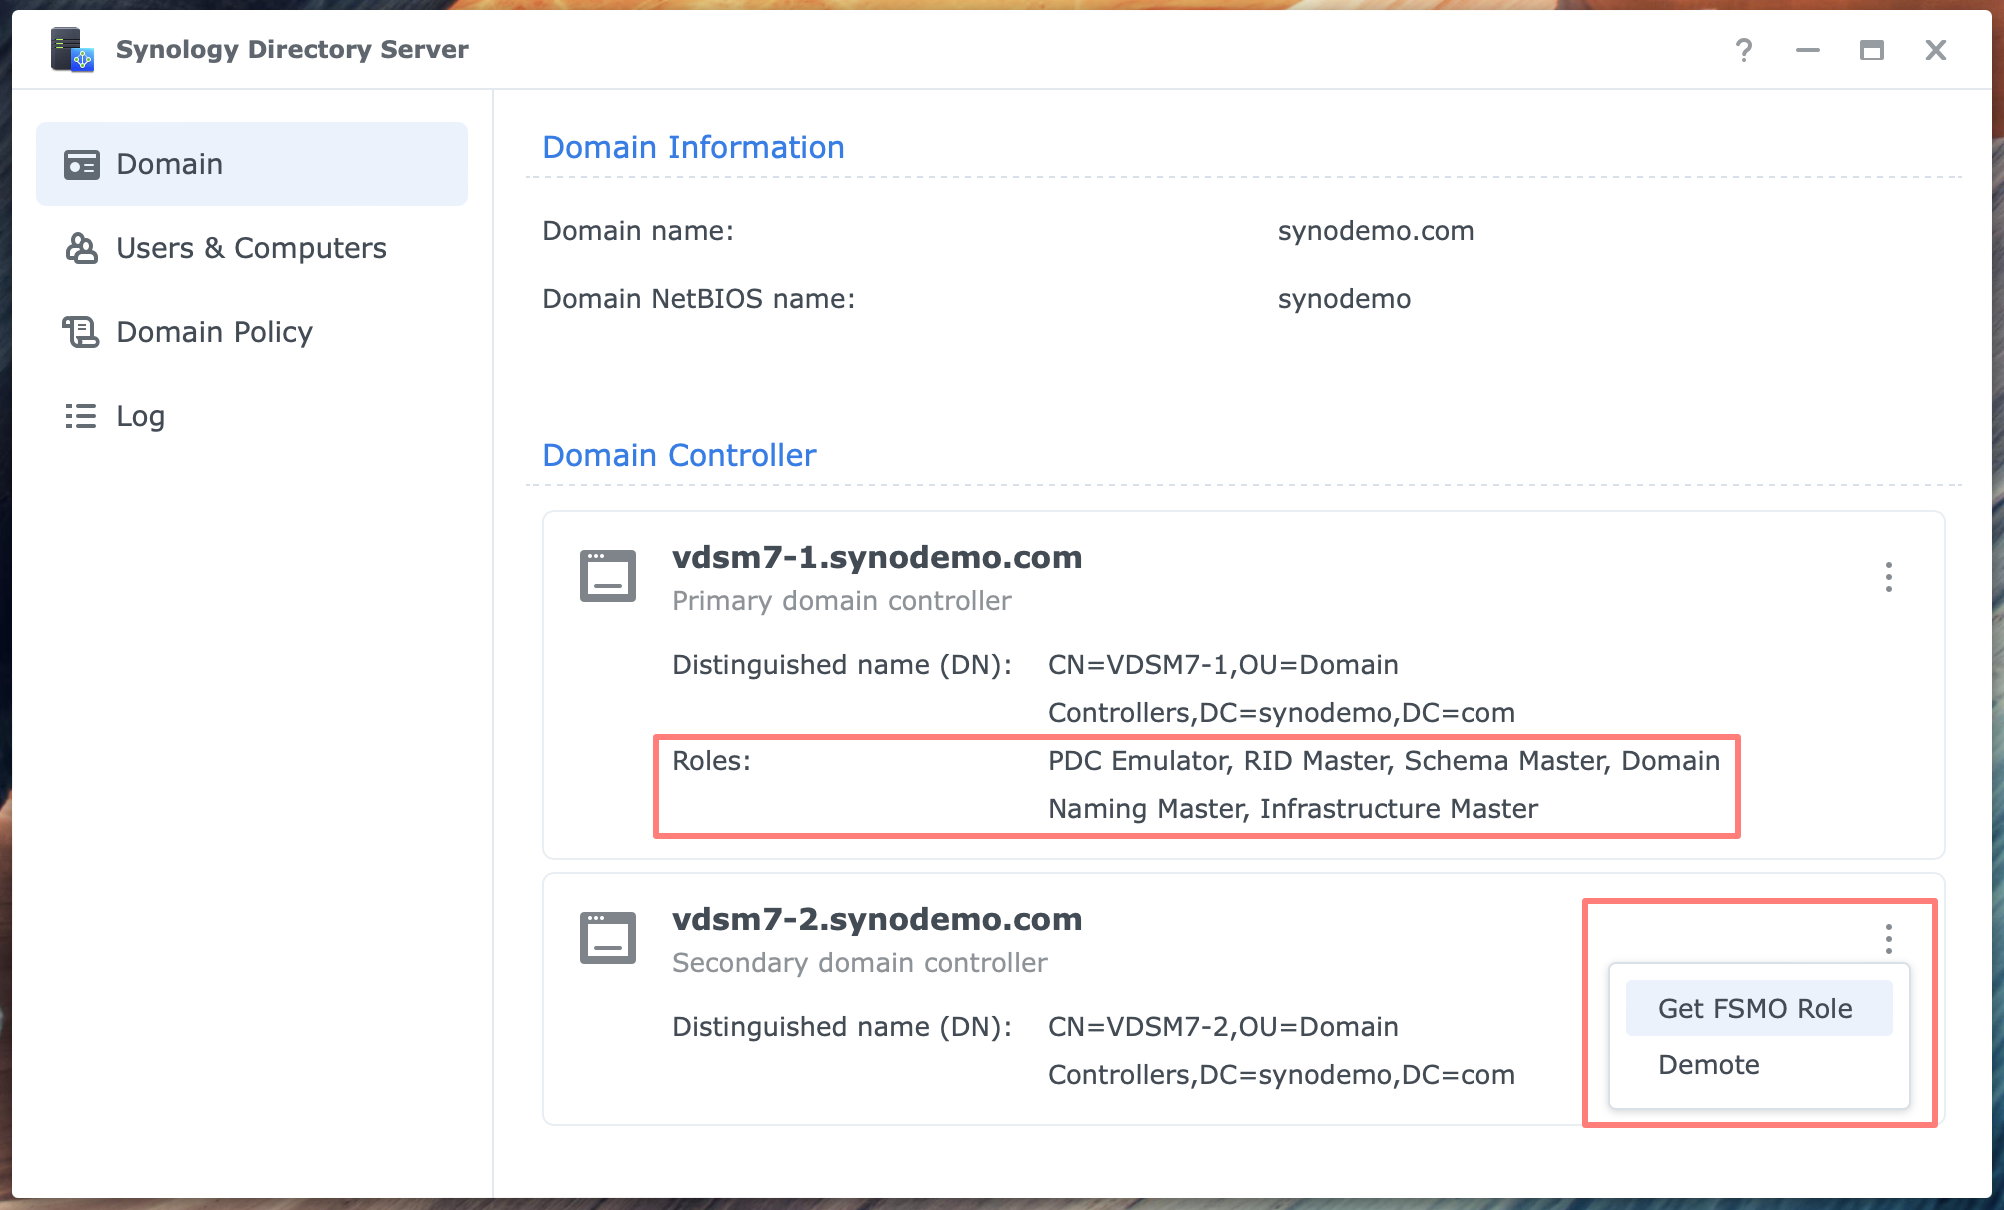
On the Domain page, under Domain Controller, look up the domain controller that will receive the FSMO role. Click on the three dots to the right of that domain controller and choose Get FSMO Role.
In the Get FSMO Roles dialog, enter the following information:
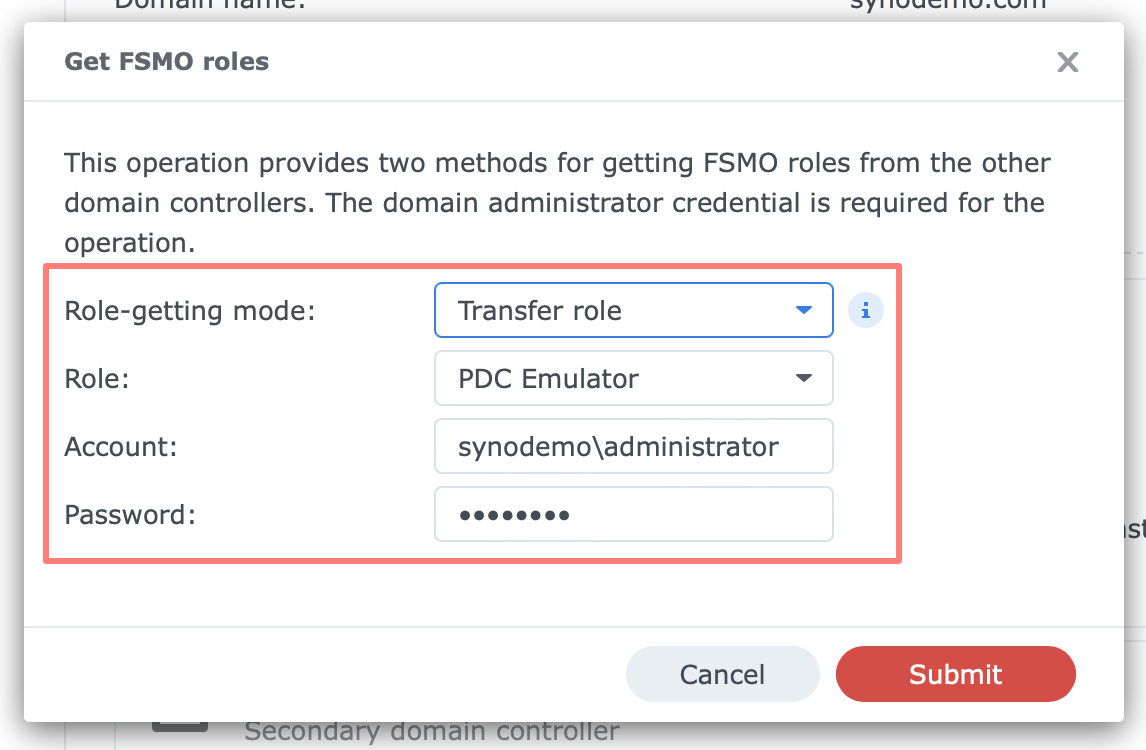
- Role-getting mode
- Transfer role: regular operation
- Seize role: when the original owner of the role is permanently offline
- Role
- select the role to transfer; you transfer one role at a time
- Account/Password
- enter the credentials of a domain administrator
When you transfer the PDC Emulator role, the domain controller that receives the role becomes the primary domain controller.
Logging And Testing
A Synology NAS joined to a domain provides testing. When the NAS is a domain controller, you can enable logging.
Logging
Go to Synology Directory Server > Log. On this page, you can enable and disable audit logging. Enabling it may affect database performance.
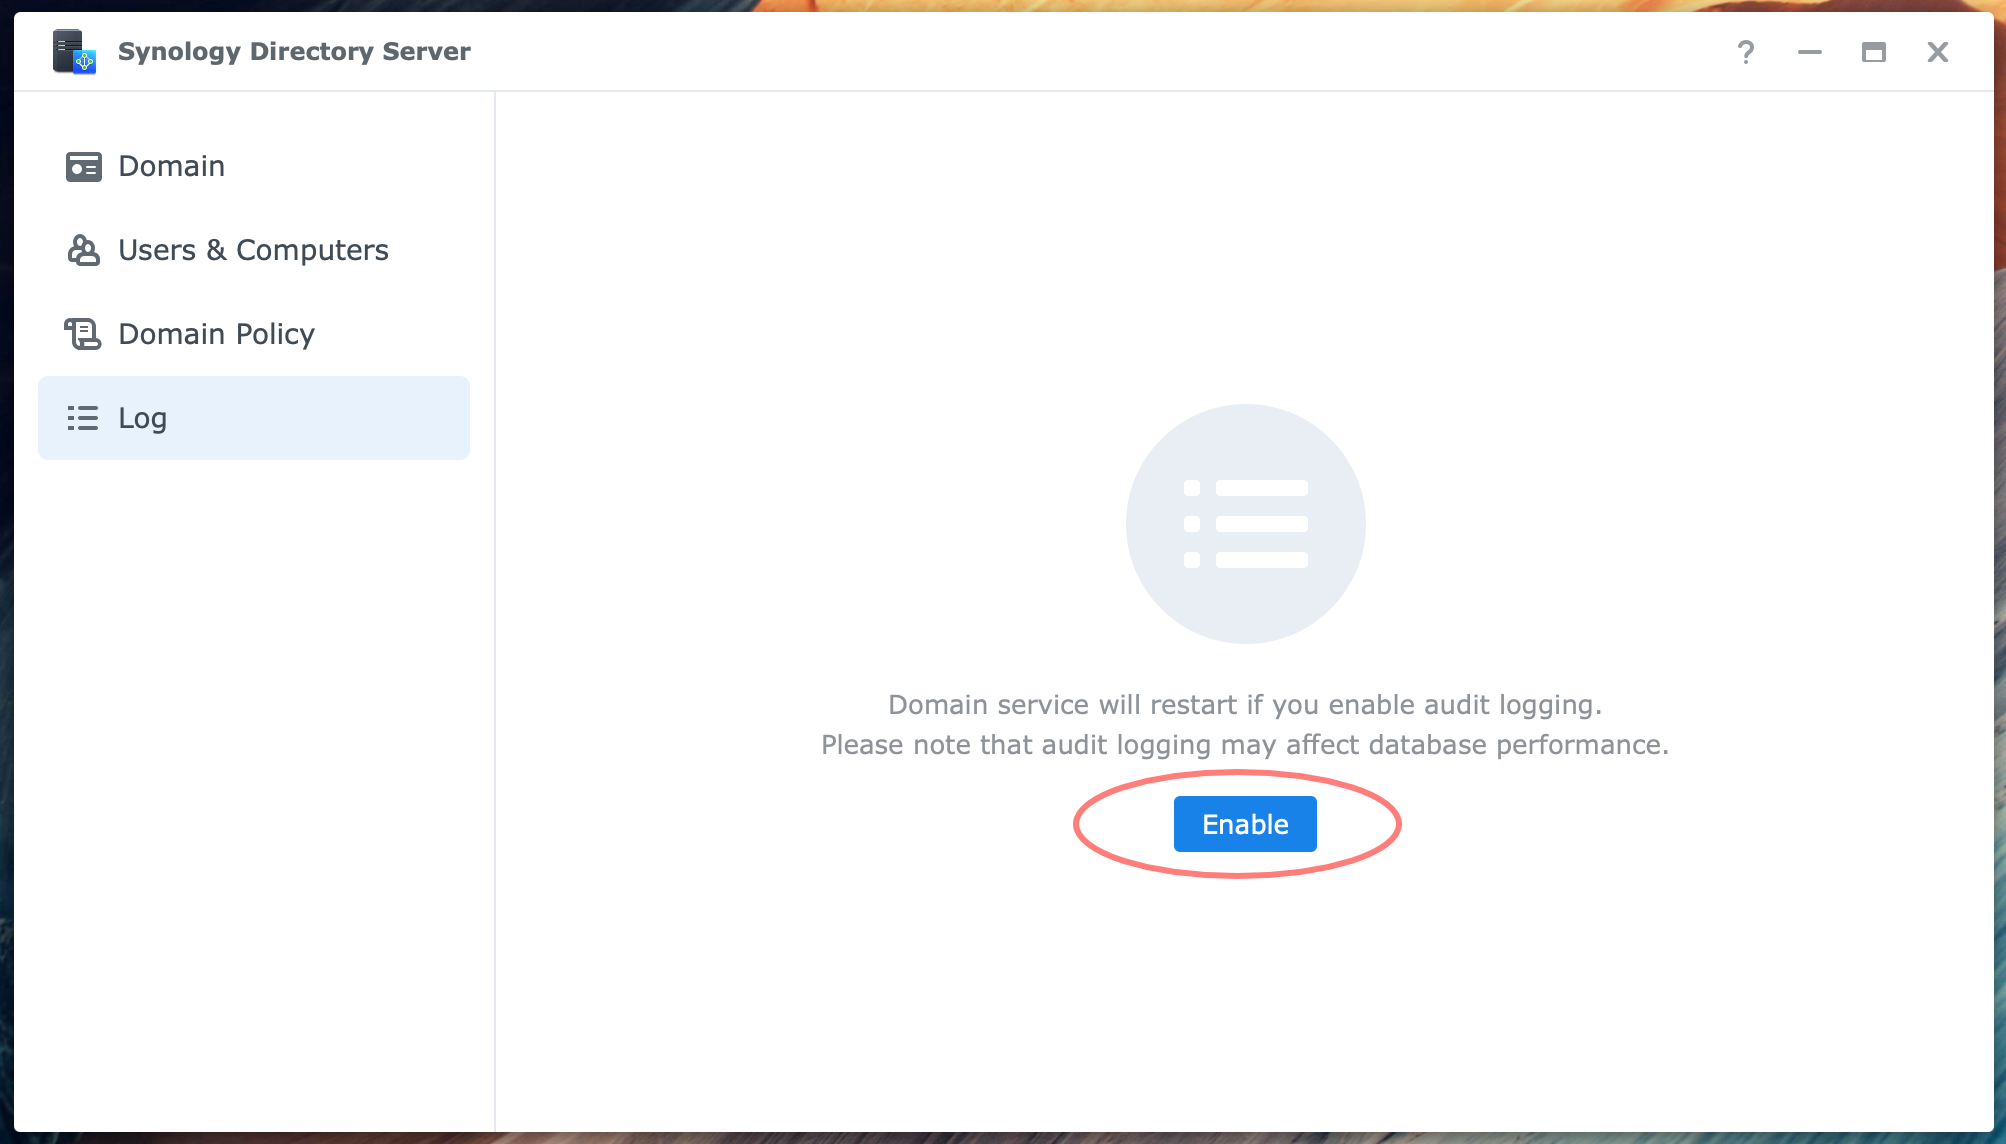
As a general rule, you can disable logging if everything runs smoothly and enable it for troubleshooting purposes.
Testing
If you have any doubts about the domain or the domain controllers’ workings, you can do a check similar to creating a domain or joining the domain. Testing is available for Synology NASs that are member servers of the domain or for domain controllers.
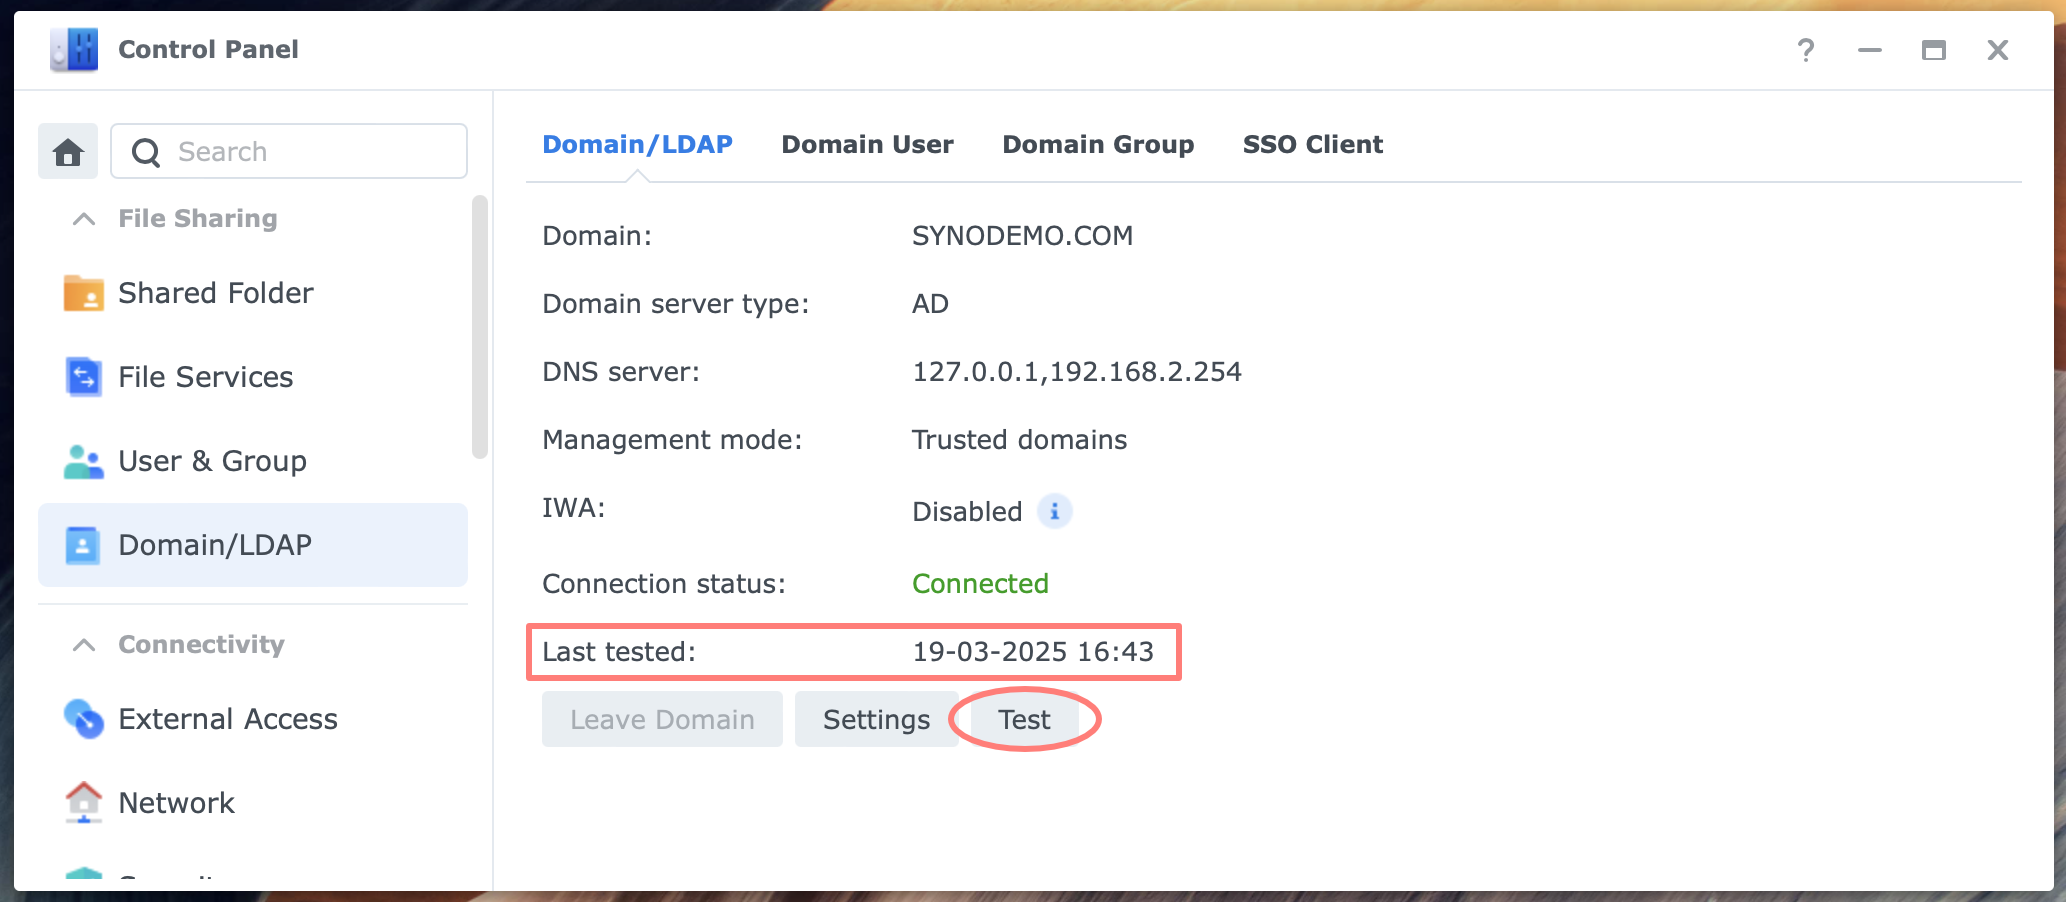
When logged in as an administrator, go to Control Panel > Domain/LDAP > Domain/LDAP tab > Test button. This page displays the last time the test was performed.
The test checks several items in four categories and reports the results.
Thanks for reading
This post is donation-ware, and I made it to help you. Please consider leaving a comment or buying me a coffee if you found it helpful. I will be eternally grateful.
Paul Steunebrink / Storage Alchemist
Paul, I want to thank you very much for writing this tutorial. It was a great help to me in managing and setting up my domain and also to transfer my domain controller from an old NAS to a new one. Your tutorial is much better than anything I have seen from Synology themselves.
Thank you for your comment, Hans, glad to hear it helped you achieving your goals.
Best regards, Paul Steunebrink / Storage Alchemist