With LDAP, you create a single namespace for all users and computers on your network. Users can access services and resources on the network with a single user account. Likewise, system administrators need a single account to access all servers, making system management more straightforward.
Setting Up LDAP Server On Synology NAS
LDAP, or Lightweight Directory Access Protocol, is a directory service that can be installed on a Synology NAS. It is aimed at systems running Unix, Linux, and macOS.
For a network with Windows servers and clients, I prefer Windows Active Directory or Synology Directory Server. For details on the latter, please refer to Setting Up Synology Directory Server.
The LDAP Server on Synology is based on an open-source version of OpenLDAP. You can download the OpenLDAP Admin Guide from their website.
The Synology LDAP Server package is in Package Center. Its version number relates to the OpenLDAP version. At the time of writing, Synology uses the 2.4.x release, which is slightly behind the current version 2.5 of OpenLDAP.
LDAP relies on the DNS service to define its namespace and find the directory. To set up a DNS Server on a Synology NAS, please refer to Setting Up DNS Server On Synology NAS.
Design Considerations
Synology makes installing and using an LDAP server on a NAS reasonably easy. But before you do so, you need to make some technical preparations. The main question, however, is how and where you like to use the LDAP service.
Prerequisites
Your shopping list for implementing an LDAP service includes a domain name and an authoritative DNS server for that domain. The Synology NAS that hosts the DNS and LDAP servers needs a fixed or static IP address on the LAN interface.
You can run the DNS server and LDAP Server on the same NAS or different NASs, or you can run the DNS server on another platform in your network.
An SSL certificate for the domain is optional. The LDAP server uses the certificate to encrypt replication between the Provider and Consumer and client to connect to the LDAP server.
Redundancy
Make sure you have a second (Consumer) LDAP server running. In larger environments, multiple Consumers are recommended. Be aware that a Consumer on your Synology NAS only replicates a Provider/Consumer on a Synology NAS. Provider and Consumer must be on the same version of the LDAP Server package.
The exact requirement for redundancy applies to the DNS server: one with a primary zone and one or more with a secondary zone.
Use cases
LDAP works well for authentication with a single account and multiple devices and services. Possible scenarios where you might want to implement an LDAP server are:
- You use a service that supports LDAP, like Google Workspace
- you have multiple NASs and prefer to access these with a single account for the convenience of both users and the administrators of the NAS compared to separate accounts for each NAS
- locally logging in to computers with the same account as the user logs in to each NAS or LDAP supporting services
- or any combination of the above
User Home
As a Synology NAS administrator, you are familiar with the User Home service. When you enable this service, it creates the /homes shared folder and provides a home folder for every local user of the NAS.
You can extend the User Home service to LDAP users when the NAS joins an LDAP directory. From a design perspective, I suggest deciding which server in the domain will provide the user’s home folders.
Applications
Most business or productivity applications on the NAS can work with LDAP users and groups.
My design
In this post, I use two DNS and two LDAP servers with a single domain. Two servers provide the resilience needed in a business environment. I also wanted to investigate the additional configurations that come with this setup.
You are free to use a single server for each service, two DNS servers, and a single LDAP server, or the other way around. Where applicable, replace the names with yours.
- primary DNS server and LDAP server (Provider)
- hostname: vdsm7-1
- IP: 192.168.2.201
- secondary DNS server and LDAP server (Consumer)
- hostname: vdsm7-2
- IP: 192.168.2.202
- domain name
- synodemo.com
The domain synodemo.com is a registered name that I use for demonstration purposes.
LDAP Concepts
The Internet offers countless resources about LDAP and its terminology. While you do not need to study them all, a few terms are essential for setting up an LDAP server and connecting an LDAP client.
Provider versus Consumer
The Provider is the primary LDAP server and holds a writable directory copy. There is only one Provider per namespace. The Consumer is a read-only copy of the Provider. There can be multiple Consumers.
Link the Consumer to the directory on the Provider with a user account member of the Directory Consumer group.
Base DN and Bind DN
Both Base DN or Distinguished Name and Bind DN provide authentication information.
- The Base DN is the base distinguished name of the LDAP. It is generated from the specified FQDN. For example, if the FQDN is “ldap.synology.com,” its Base DN will be “dc=ldap,dc=synology,dc=com”
- The Bind DN is the distinguished name of the user of the LDAP. For example, if the Base DN of the LDAP database is “dc=ldap,dc=synology,dc=com,” the root Bind DN will be “uid=root,cn=users,dc=ldap,dc=synology,dc=com”
User accounts
You can create users and groups in the directory with an LDAP server running in your network. When you join your NAS to the directory, you can assign access permissions and privileges to these LDAP users and groups to resources on the NAS.
Local users and groups continue to exist and can be used in addition to the LDAP users and groups if necessary.
LDAP and DNS
LDAP servers and clients both use DNS for name resolution. In other words, a DNS server with a zone that you use for LDAP is a prerequisite.
As a result:
- you need to create a host record (type A, AAAA, or both) in the DNS forward zone on the DNS server for each LDAP server in your local network
- the LDAP servers and the LDAP clients use DNS to resolve the hostname of the LDAP server
You can host the DNS server using Synology’s DNS Server package on the NAS or a different platform. Unlike with the Synology Directory Server, you can install the DNS Server package on the same NAS as the LDAP server, but that is not a requirement. A second DNS server is recommended for redundancy.
Before you install and configure an LDAP server and join a computer or NAS to an LDAP domain, check the DNS setting in the network settings. The DNS server to which the LDAP server sends its queries must be authoritative for the domain or one that forwards its request to that DNS server.
When you have a home or small business setup, you typically use the internet modem as your primary DNS server or a DNS server that the ISP offers on the Internet.
When installing the DNS server, a prerequisite for setting up LDAP is to ensure that all servers and clients on the network point to the new DNS server on the local network and that the DNS server enables forwarders to the Internet.
The result will be that LDAP authentication will successfully access resources on the Internet.
Throughout this post, I use synodemo.com as my domain name. This is a registered domain that I use for demonstration purposes. Replace it with your domain name.
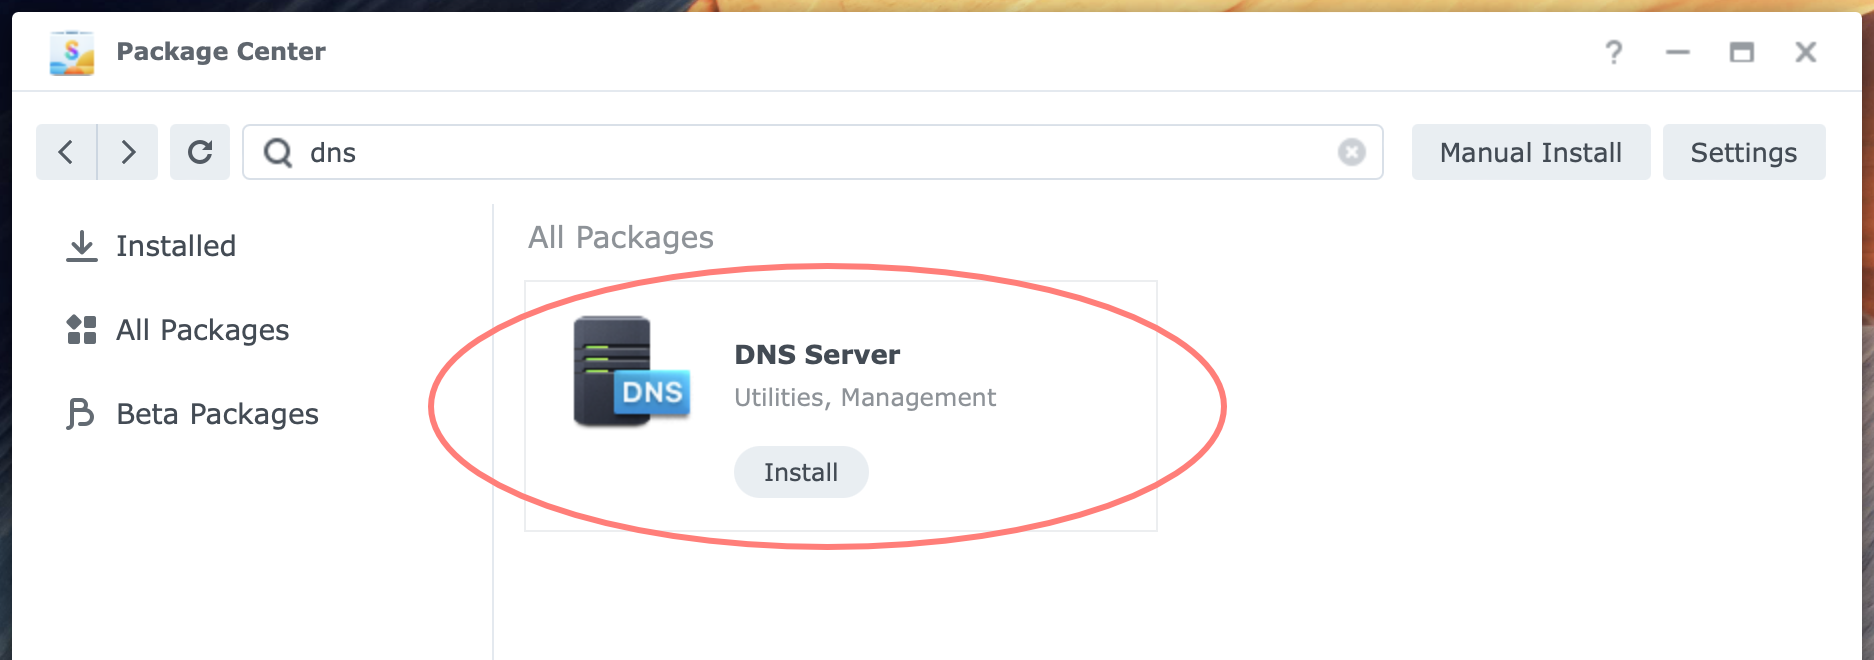
To use a Synology NAS as a DNS server, please refer to Setting Up DNS Server On Synology NAS. The tutorial about DNS Server was written with LDAP Server on the NAS in mind.
Installing LDAP Server
You are ready to go if you meet the requirements of a NAS with a fixed IP address on the LAN interface and have set up DNS in your local network with a domain name you plan to use for LDAP.
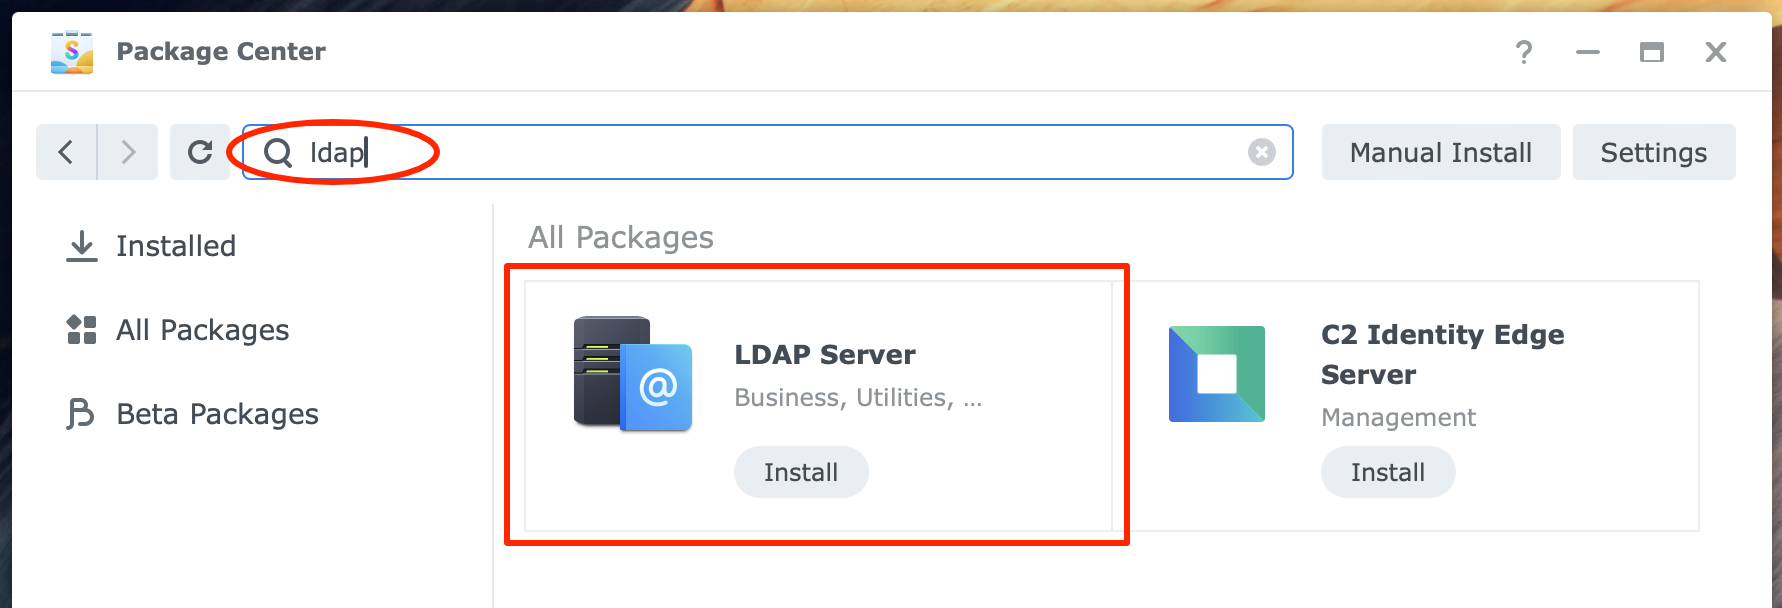
Log in to DSM with an administrator account and open Package Center. In Package Center, select All Package in the left column.
I prefer the search function to find the package I am after quickly. Type LDAP in the search bar and press Enter. The LDAP Server package appears. Click on the Install button.
If you have multiple volumes on your NAS, the installer might ask for the volume to install the package. Click Done in the Confirm settings screen, and keep the Run after installation checkbox enabled.
You can not install the LDAP Server on a NAS with Synology Directory Server running or vice versa.
Firewall warning
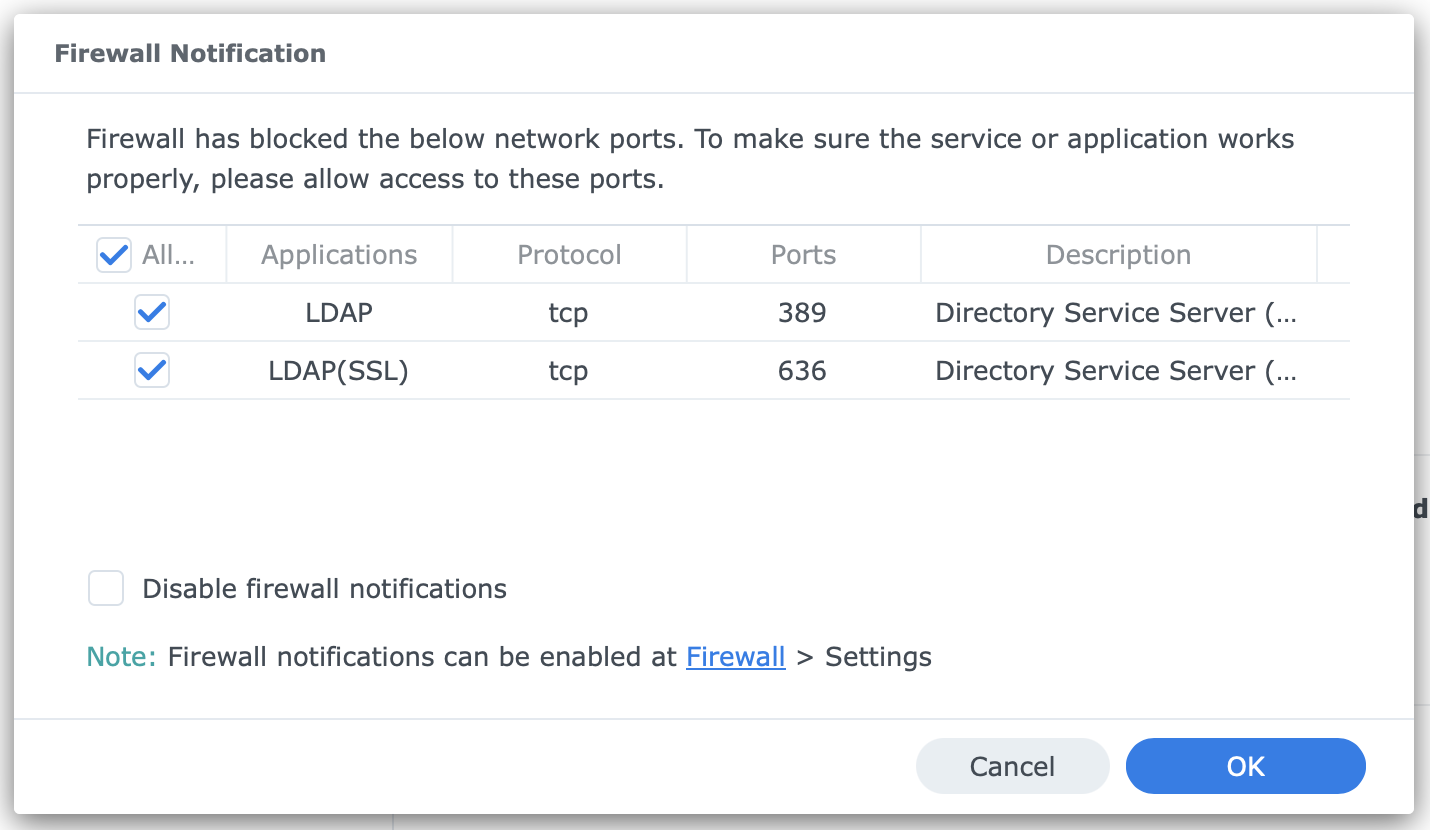
If the firewall is enabled on your Synology NAS, you will receive a warning to add ports 389 (LDAP) and 636 (LDAP SSL) to the firewall rules.
Configuring certificate
The NAS default certificate is automatically linked to the LDAP Server service. You can review and change it in Control Panel > Security > Certificate > Settings button, or choose a different certificate.
Configuring backup
It is highly recommended that you configure a backup for the LDAP Server. You have two backup options with the LDAP Server on your Synology NAS.
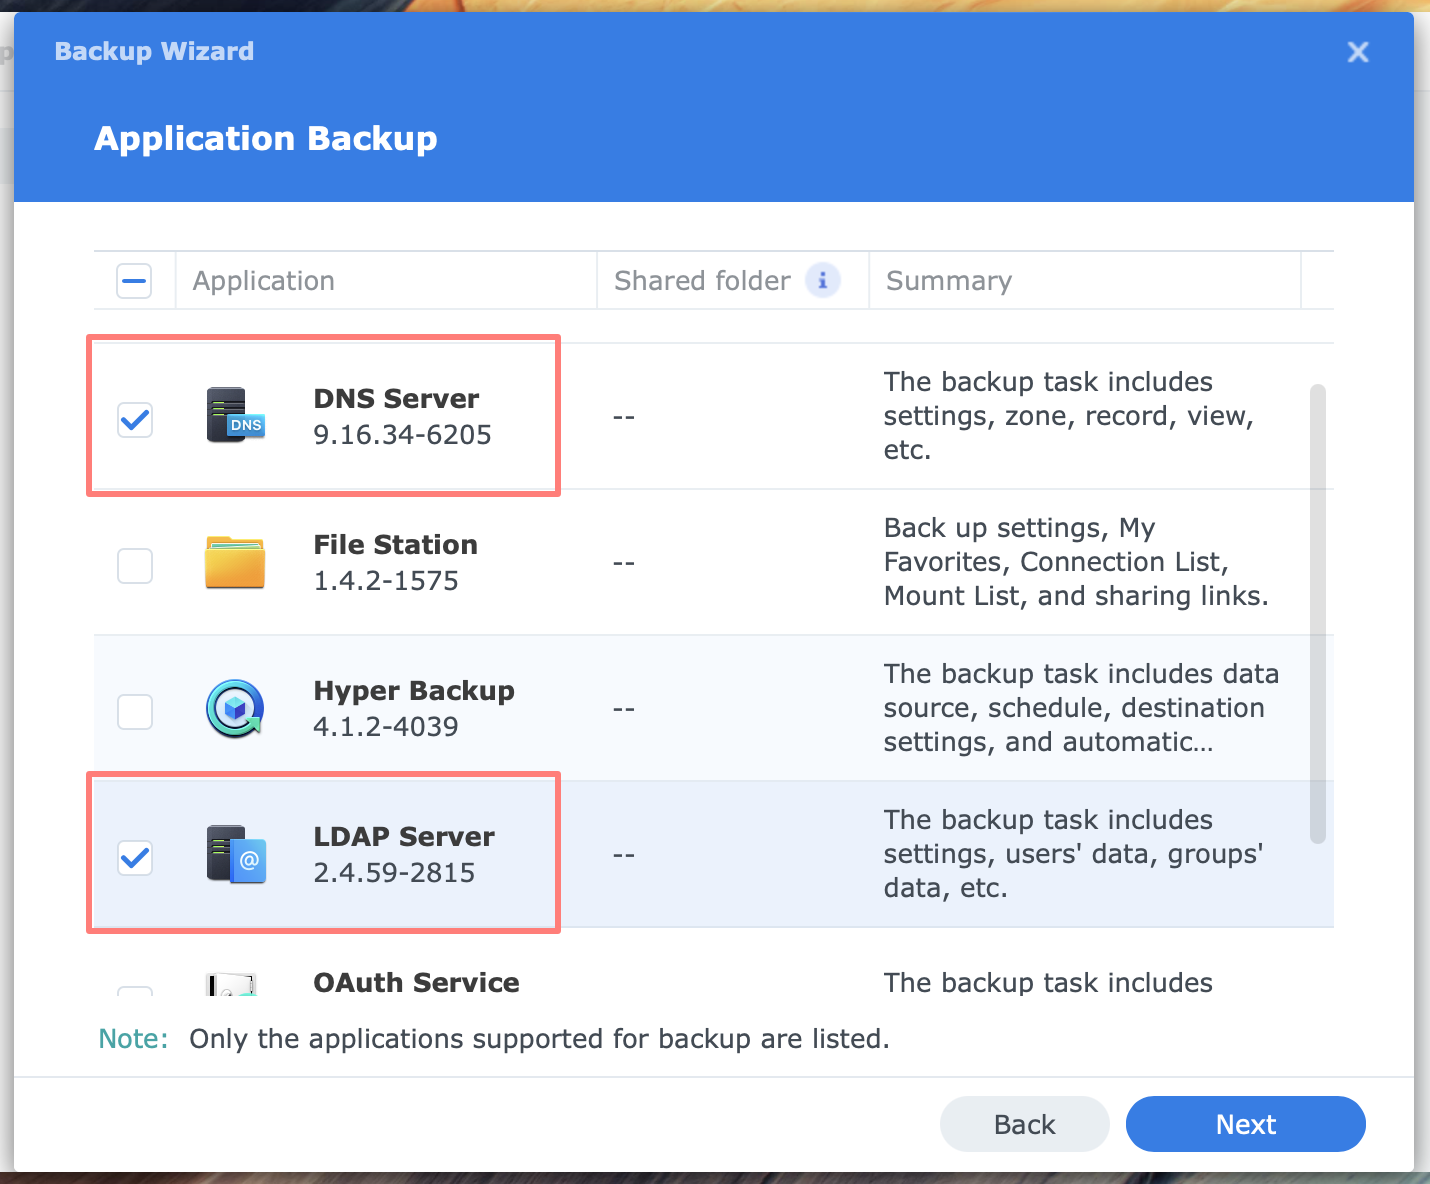
You can add the LDAP and DNS servers to a Hyper Backup task. Create or edit a File and Package backup task and enable LDAP Server from the Application Backup page of the Backup Wizard or the Application page of an existing task.
Alternatively, you can back up the LDAP Server to a local folder on the NAS. In the next section, I discuss configuring this option in the section on exploring the LDAP Server’s application.
Both options work equally well. The Hyper Backup option might be good if you already have Hyper Backup running. If not, choose the backup option from within the LDAP Server.
Control Panel
Like other network services, such as the DHCP Server, DNS Server, and Synology Directory Server, the Login Portal and Application Privileges in Control Panel do not require configuration.
Configuring LDAP Server
Whether you plan to set up single or multiple LDAP servers that replicate within the same namespace, you start with the Provider server, the first one in the namespace.
Settings page
When opening the LDAP Server application, you will see the Settings page. Here, you fill in your LDAP configuration.
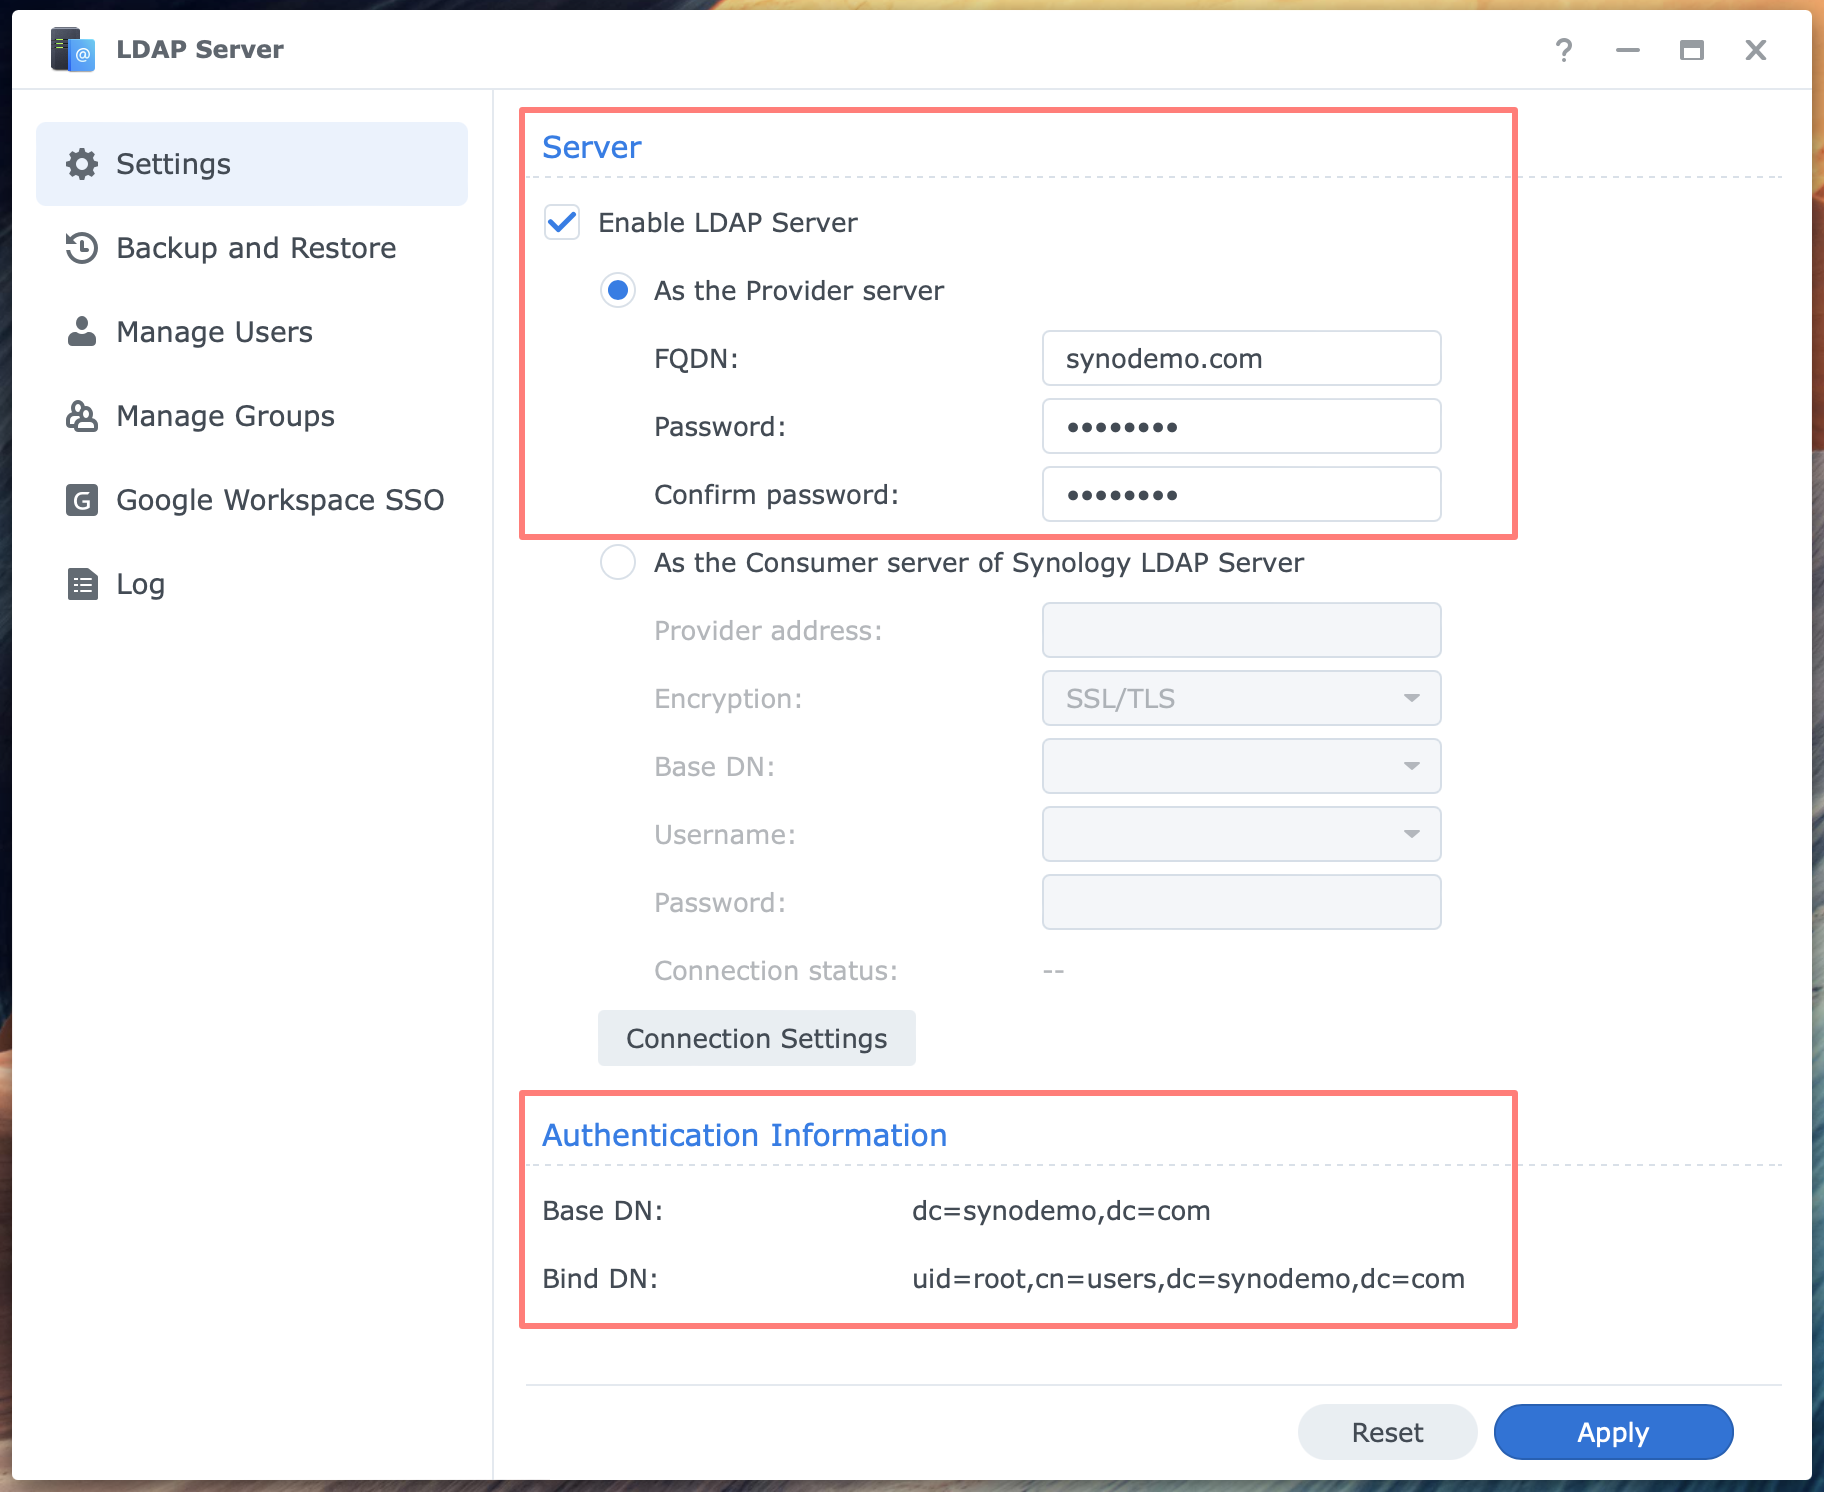
Enable LDAP Server
- choose As the Provider server
- FQDN: the domain name is the namespace that LDAP uses: synodemo.com in my example
- password (2x): this is the password of the LDAP root account
After you click Apply, two DNs appear at the bottom of the screen:
- Base DN: dc=synodemo,dc=com
- Bind DN: uid=root,cn=users,dc=synodemo,dc=com
Create a strong and unique password and store it in a safe location, preferably a password manager.
Connection Settings
The connection settings are namespace-specific. If you install another LDAP Server, a Consumer, for example, will inherit the connection settings.
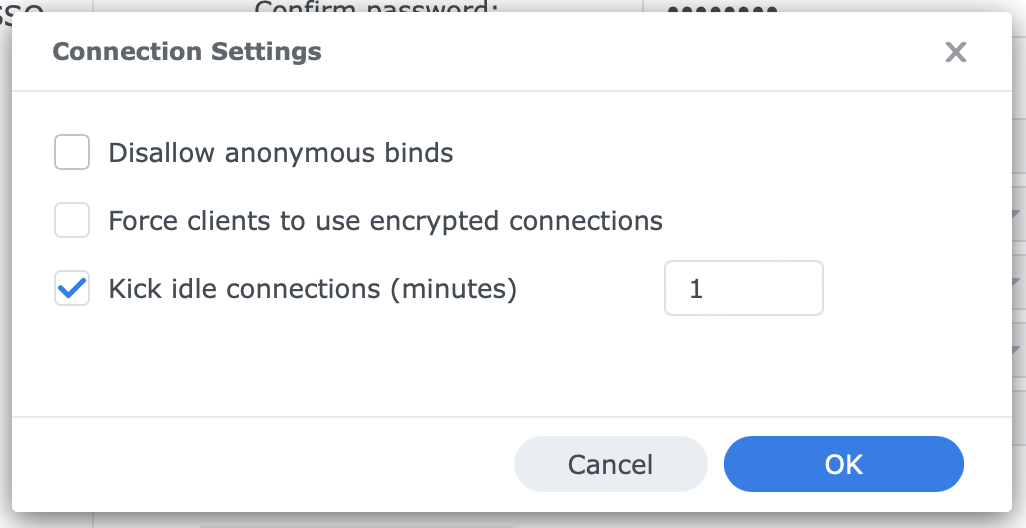
Open the Connection Settings dialog with the button. There are three items in this dialog:
- Disallow anonymous binds
- Force clients to use encrypted connections
- Kick idle connections (minutes)
Note that Mac clients use anonymous binds, so you should not enable Disallow anonymous binds if you have Mac clients.
LDAP clients connect to the LDAP server. This connection can be encrypted or not. You can force clients to use an encrypted connection with the second option. Recommended.
The LDAP server can disconnect a connection after a specified time, defined in minutes. The range is between 1 and 43200 minutes (or 1 minute to 30 days), and the default is 1 minute.
Setting Up A Secondary LDAP Server
You have finished installing the Provider server. Now, you can install the Consumer, creating a read-only version of the Provider database. Note that the Consumer that runs the Synology LDAP Server package can only connect to a Provider that runs a Synology package.
Preparations
Like each LDAP server, give the NAS a fixed IP address. Next, prepare DNS. DNS preparations are twofold.
You create an A-resource record in the zone on the DNS server for the server on which you install the Consumer LDAP server. In other words, the server exists in DNS. This will help clients in finding the LDAP server.
Second, configure the DNS Server in the NAS’s network settings. The NAS and the LDAP server must be able to resolve hosts in the zone for the domain you use for LDAP.
Next, create a consumer account in the Provider’s LDAP server. You will need that account to configure the LDAP Server as a Consumer server, as explained below.
Last, install the LDAP Server package from Package Center on the NAS that becomes the Consumer.
Configure LDAP Server
When starting the LDAP Server for the first time, it opens the Settings page. Follow the steps below.
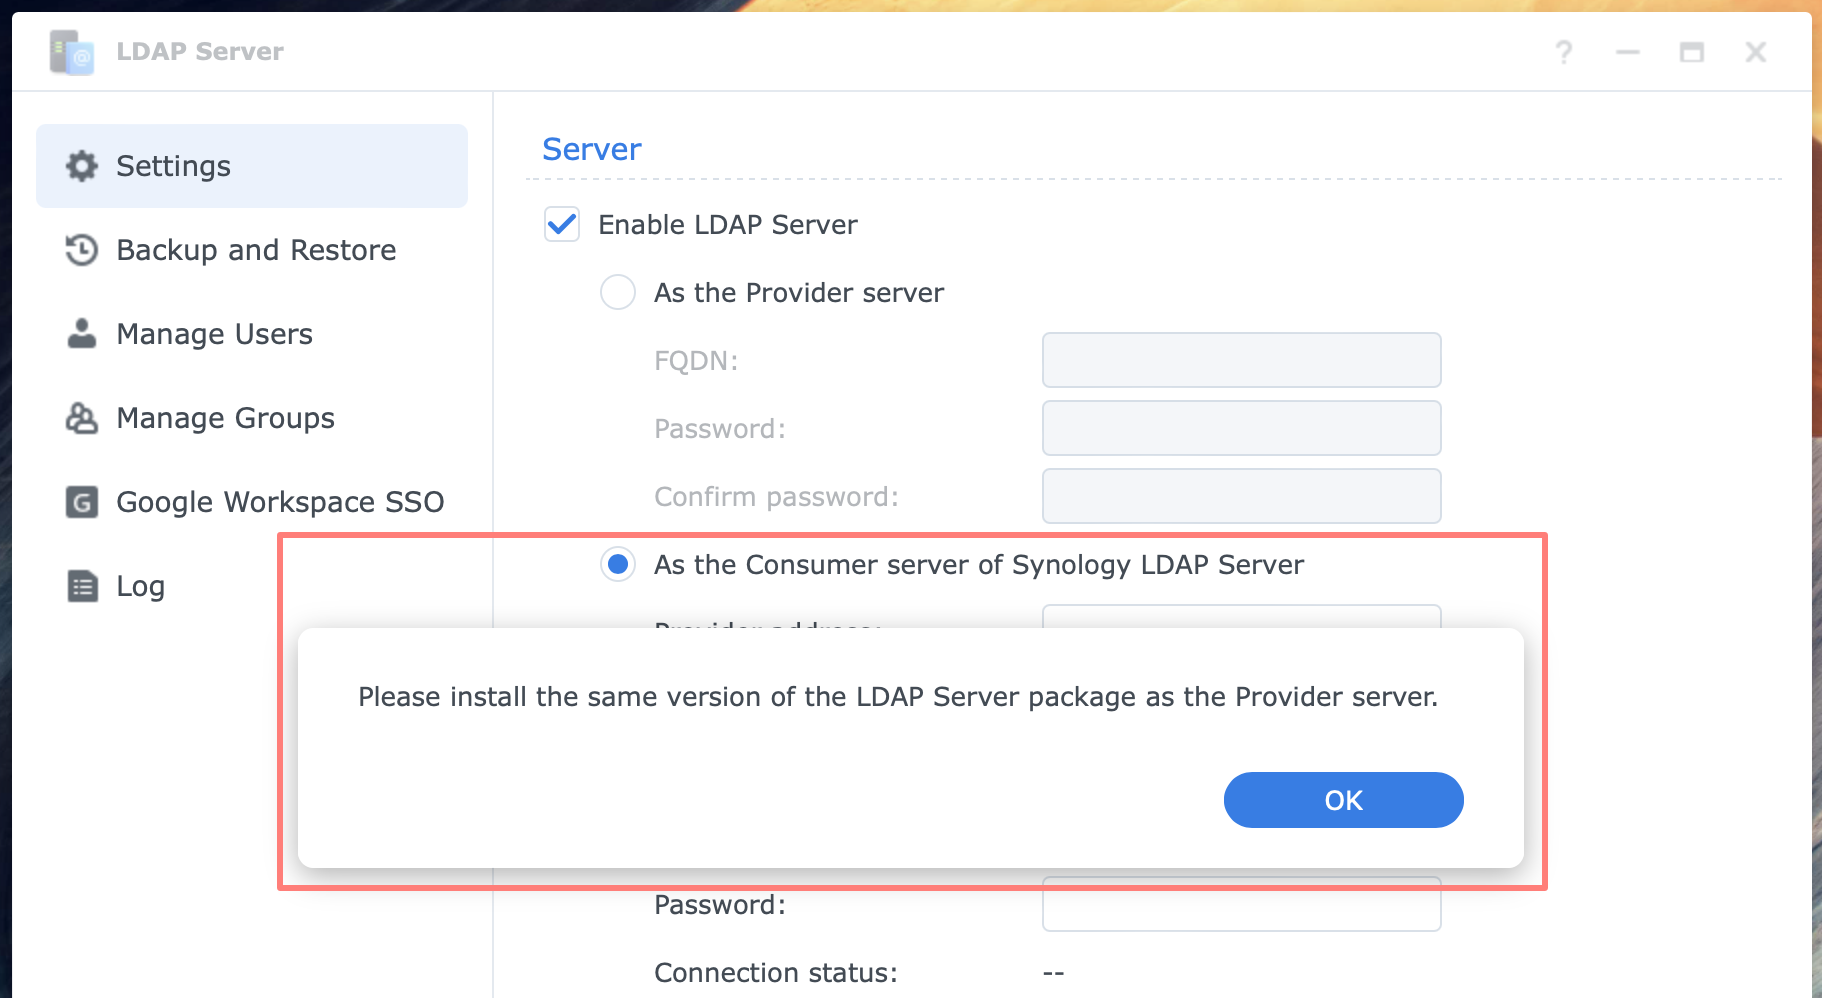
- Enable LDAP Server
- choose As the Consumer server of Synology LDAP Server; notice the message that alerts you to use the same version of the package as the Provider server; click OK

Enter the following information:
- Provider address
- a domain name or IP address; if a domain name, the Consumer server must be able to resolve that name to an IP address; in my example, ‘vdsm7-1.synodemo.com’
- Encryption
- SSL/TLS (default)
- Base DN
- copy this from the Provider
- Username
- for this purpose, the account name you created on the Provider must be a member of the Directory Consumers group, in my example, ‘consumer’
- Password
- that belongs to the username
- Connection status
- this will appear after you click the Apply button; the status Connected in green means a successful connection.
Notice the same Connection Settings button and dialog as from the Provider server. These settings are inherited from the Provider and are read-only.
Your Consumer is now set up and running.
Exploring The LDAP Server Application
We discussed the Settings page for configuring either the Provider or Consumer server. The LDAP Server application has more tricks on its sleeve. Let’s have a look.
Backup and Restore page
Open the Backup and Restore page and click the Configure button to configure the backup destination and schedule. The Configure dialog opens.

- Destination
- Select the shared folder from the drop-down list. I have a maintenance shared folder on all NASs I manage, which I use for this purpose.
- Maximum number of backup versions
- the default is 10 if you need more versions because you want to be able to go back further in the past, increase the value
- Enable scheduled backup
- I recommend backing up the LDAP server at least daily, as is the default; you can accept the default or change the frequency and time of day to your preferences.
- Click OK to save the backup configuration.
You can manually initiate a backup using the Back up now button. I suggest you begin a backup to test the configuration.
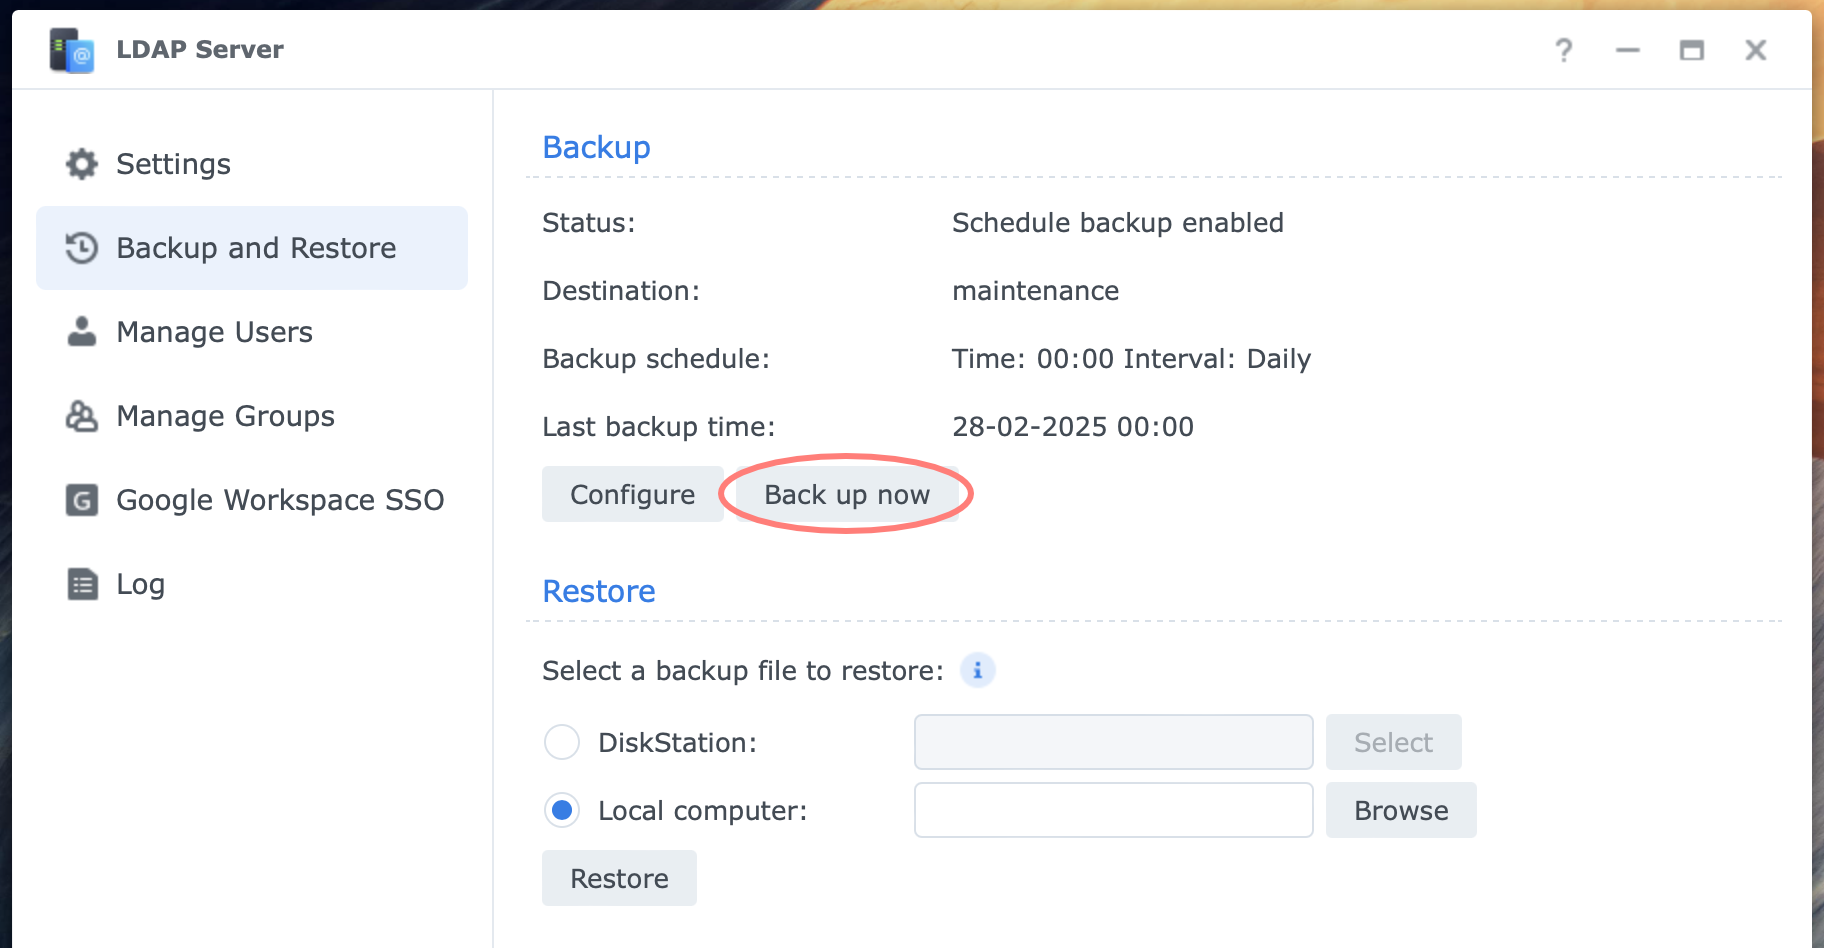
Notice the pop-up message about the service being unavailable for a moment.
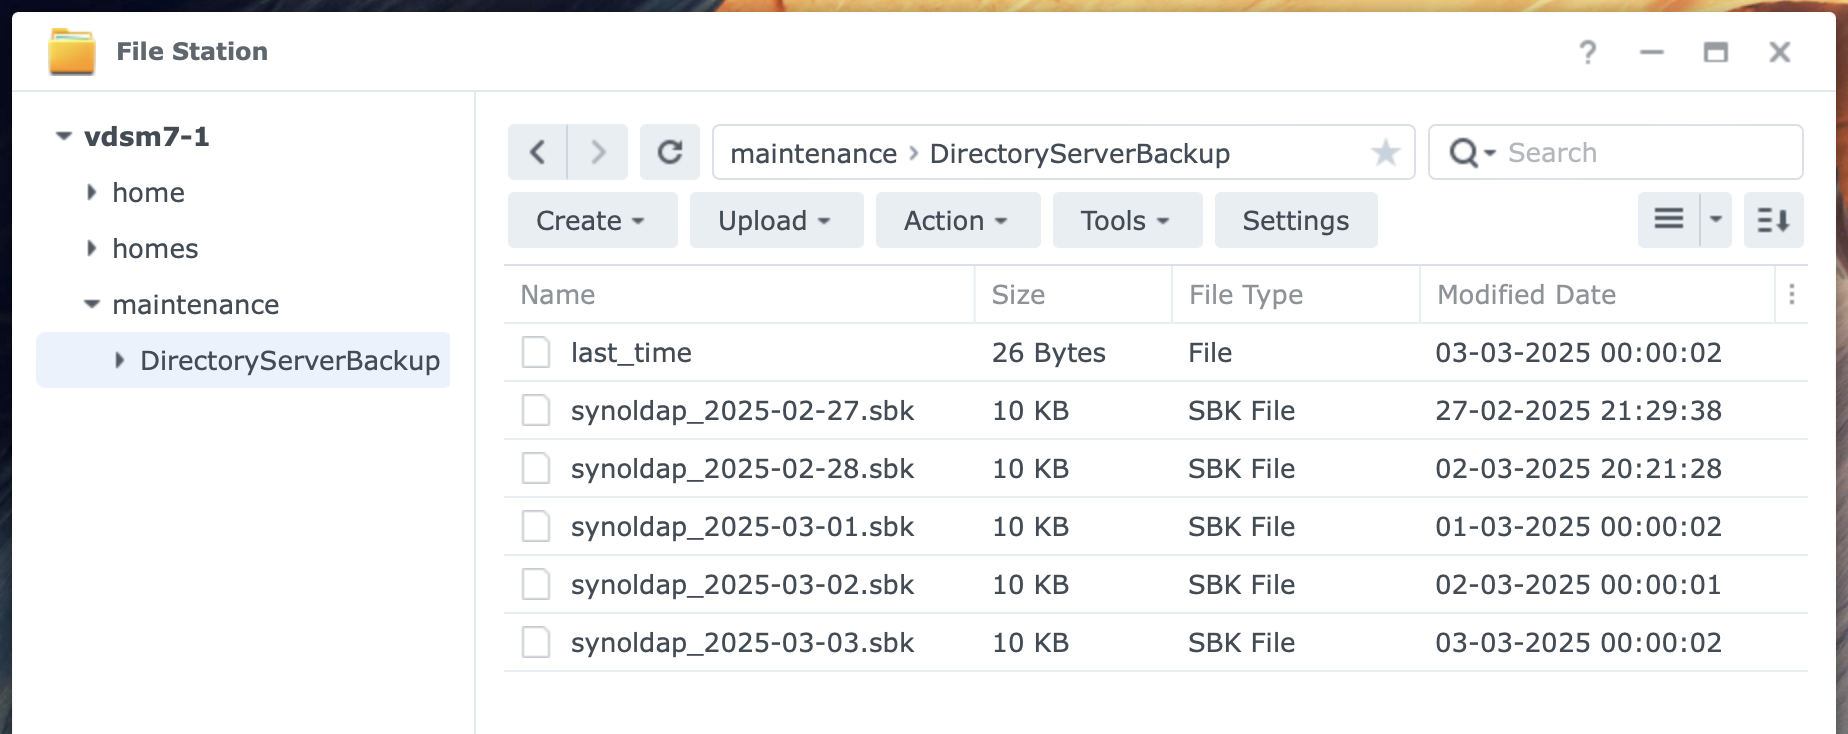
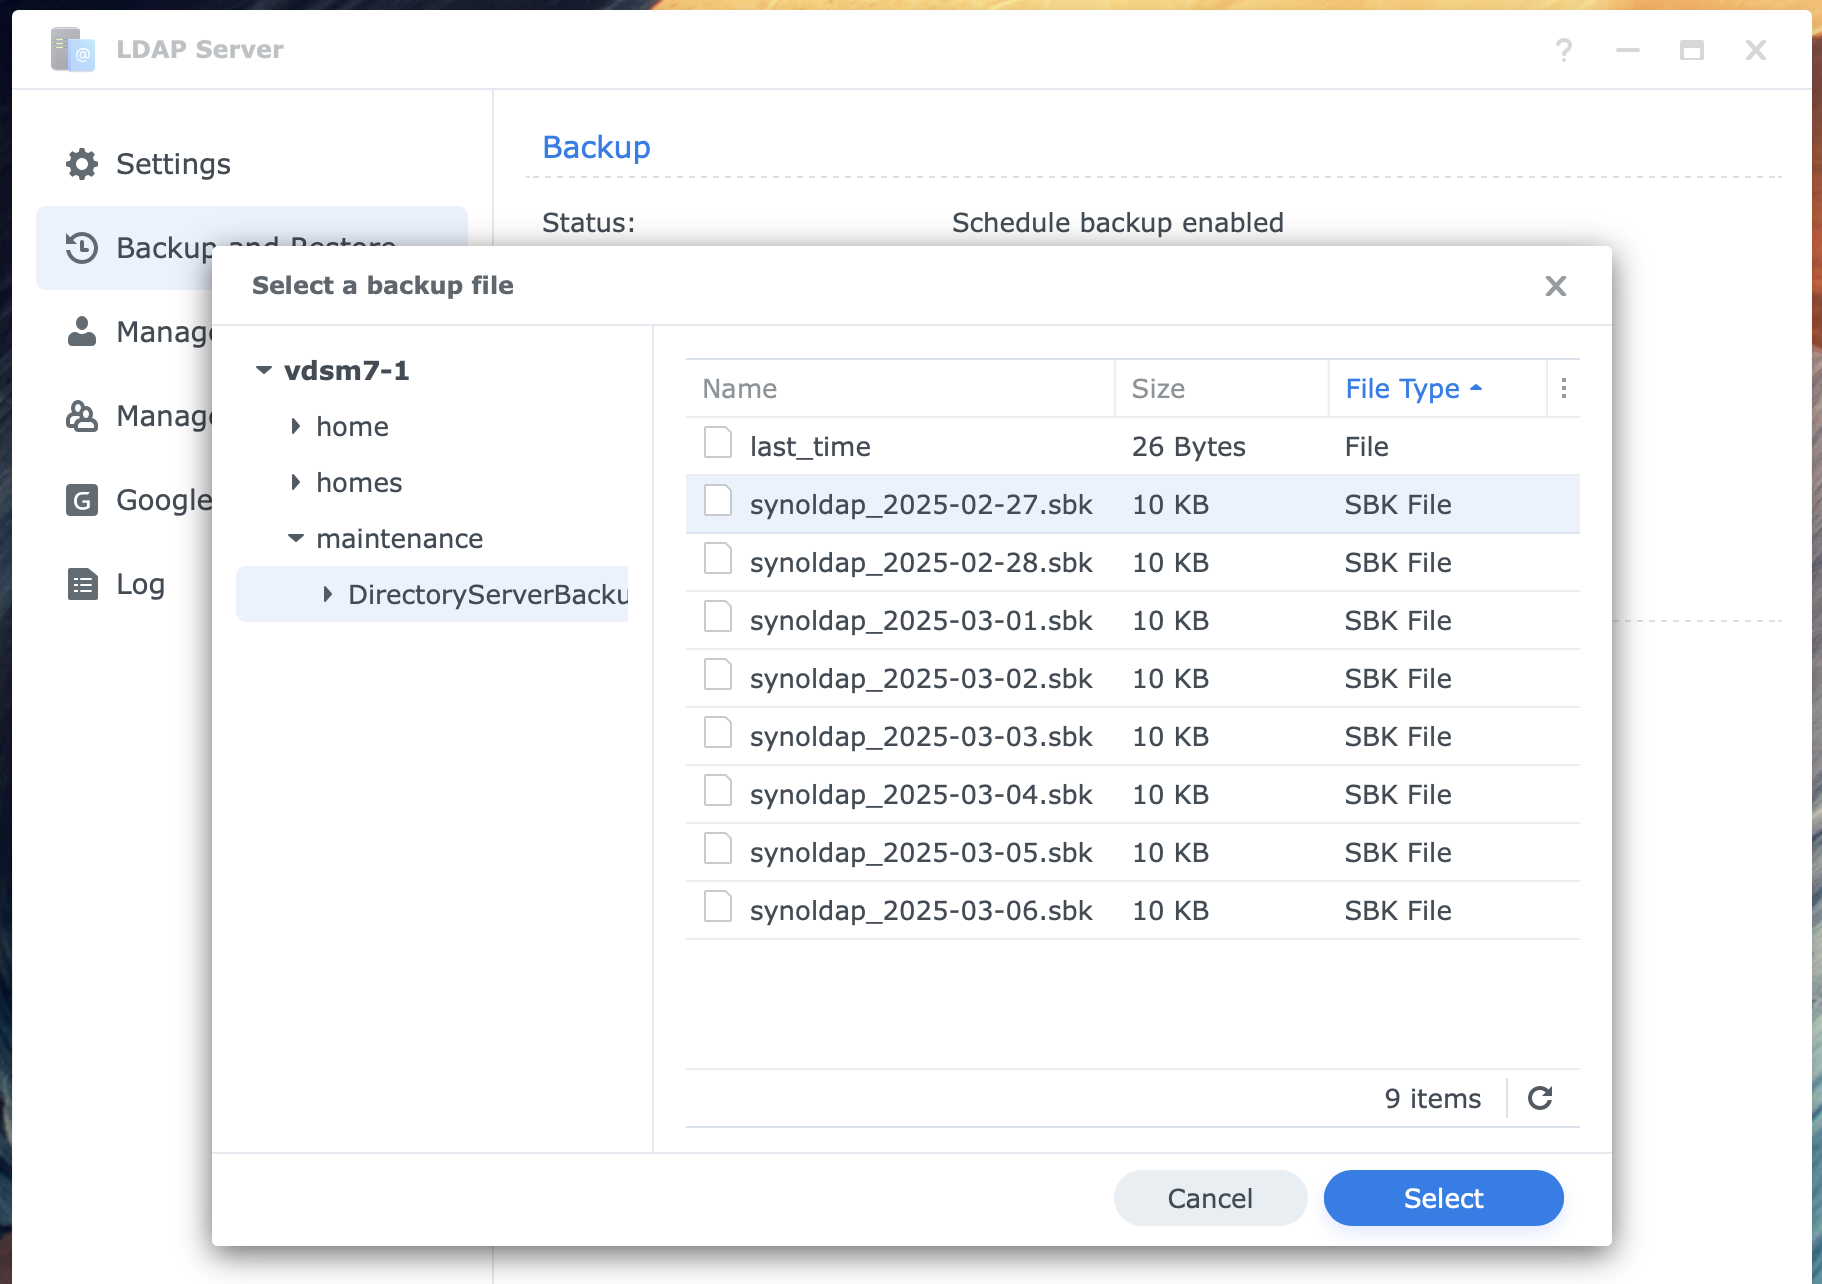
The backup creates a subfolder named DirectoryServerBackup in the chosen folder. Each backup is stored in a synoldap_[date].sbk file in that folder.
Restore a backup
A restore from the LDAP Server backup involves loading a file from the NAS (DiskStation) or local computer.
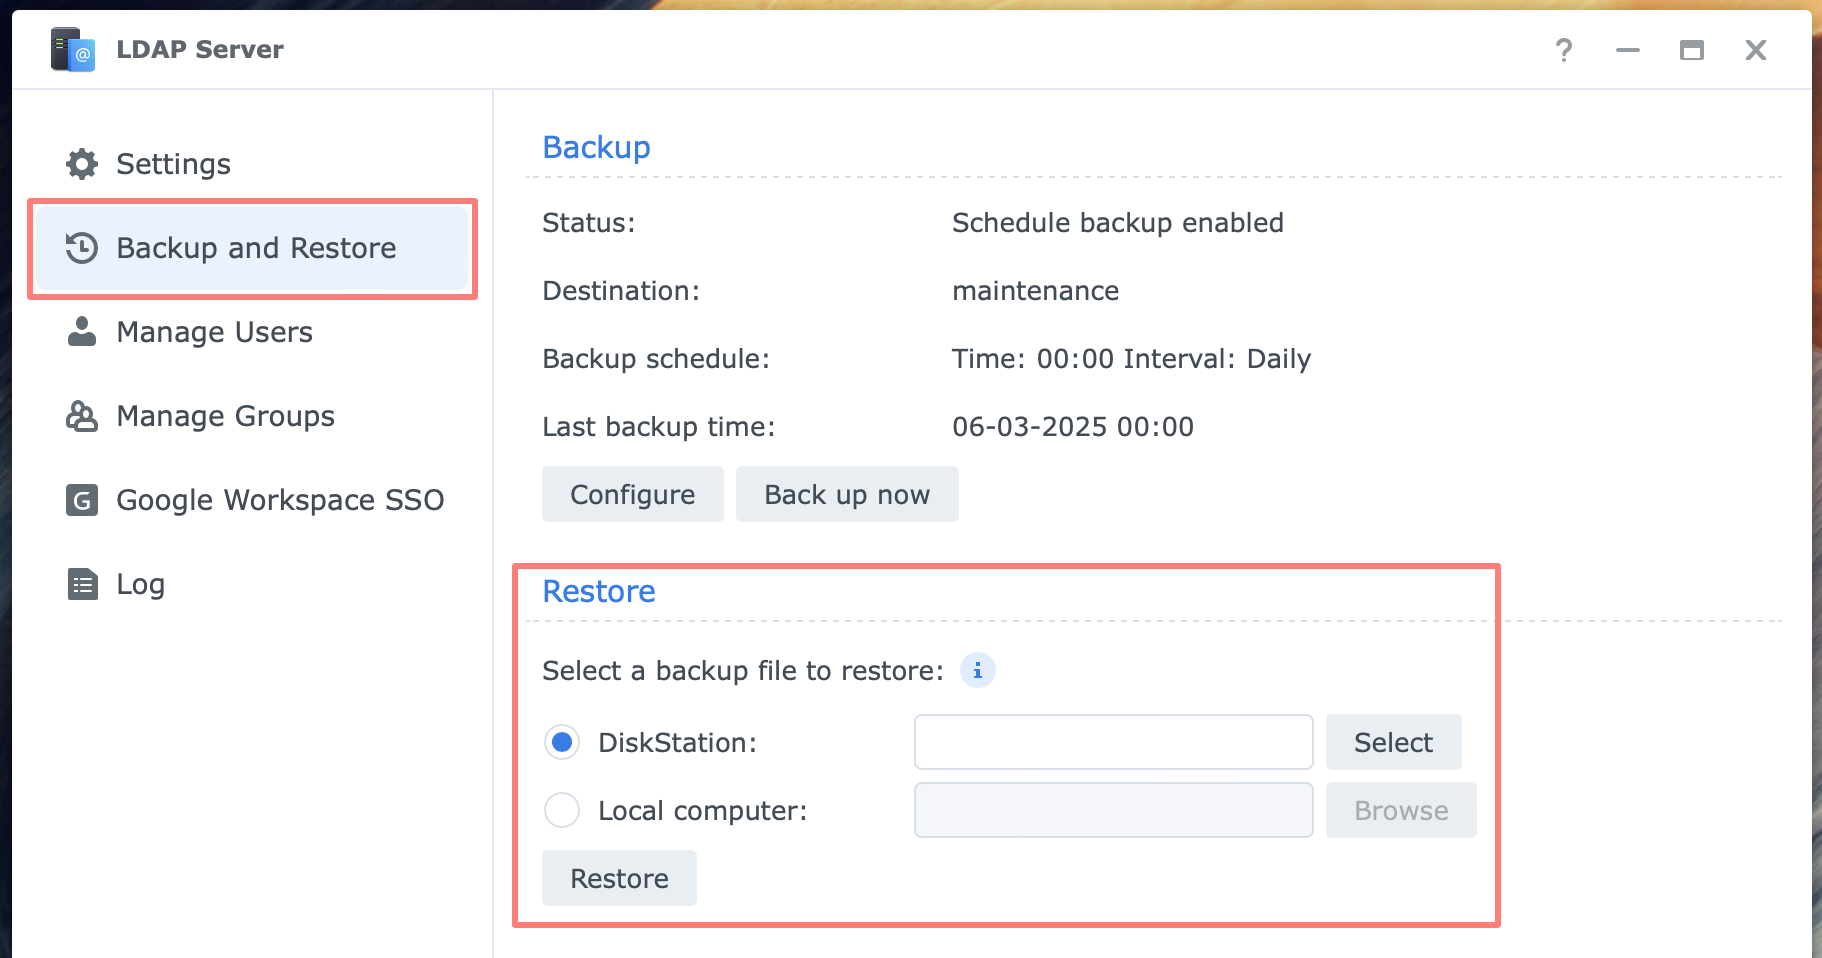
On the Backup and Restore page, go to the Restore section and select
- DiskStation
- Local computer
You browse and select a file and click on the Restore button.
A Restore dialog with a message/warning states that all information in the LDAP server will be replaced with the restored backup. Check “I understand…” and click OK to continue.
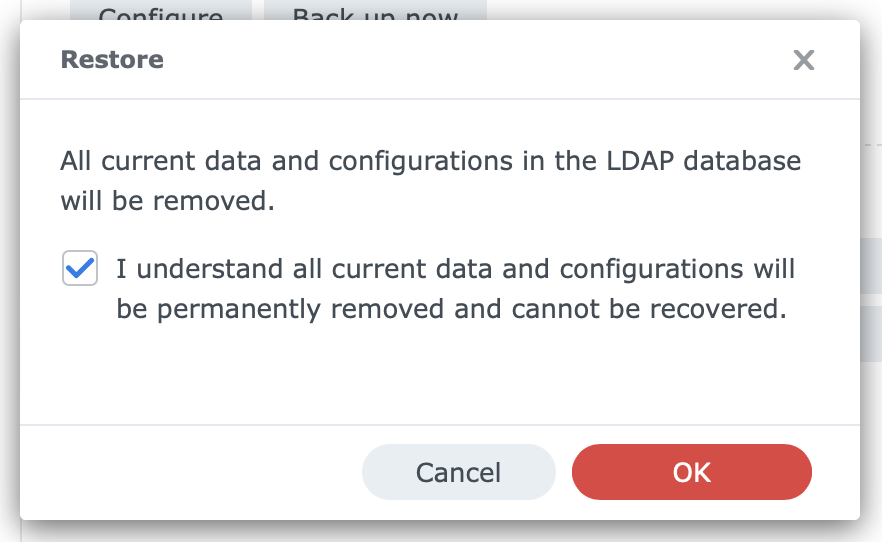
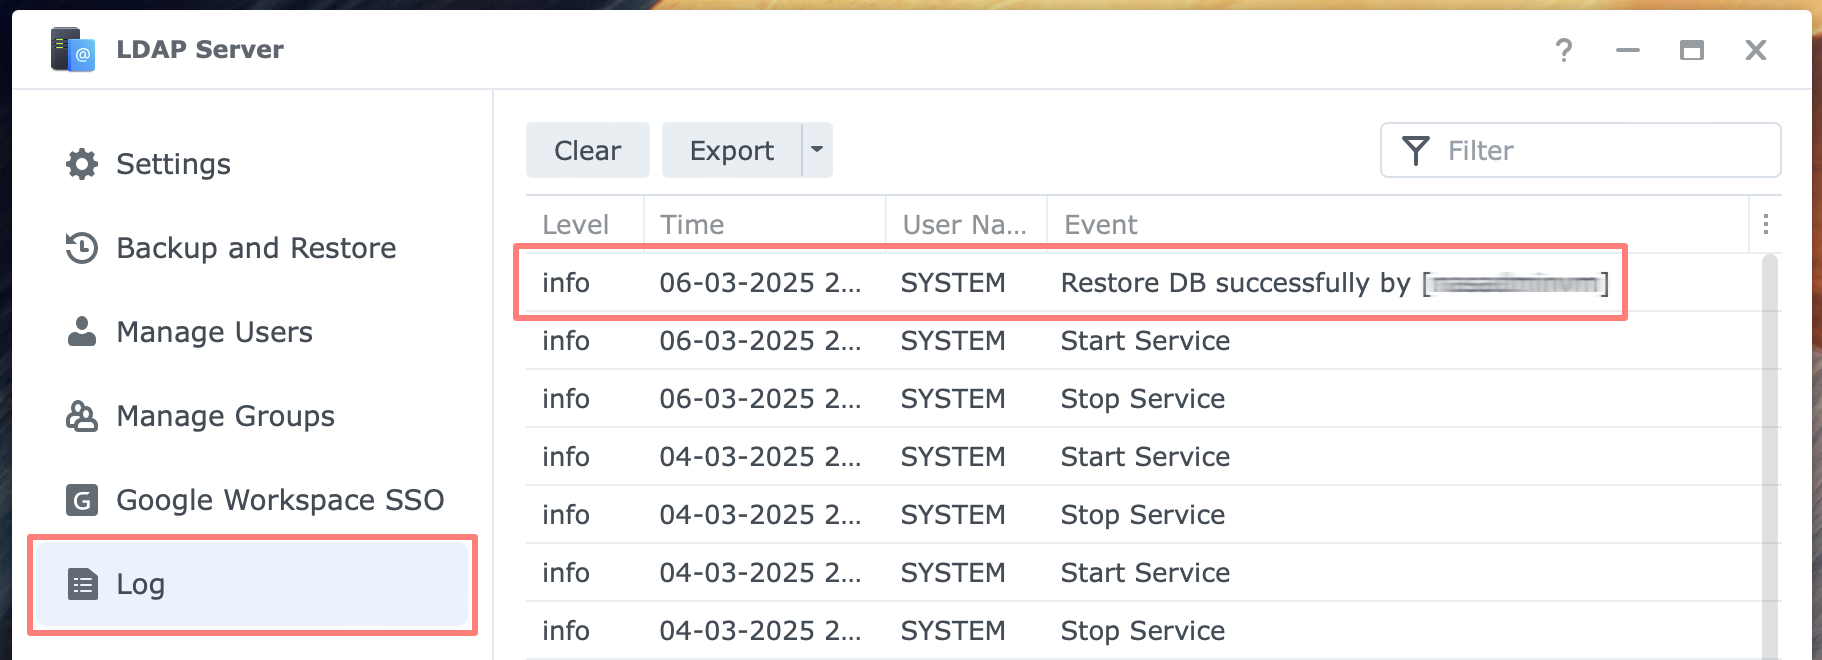
The restoration starts immediately. When finished, you will find an entry in the log on the Log page.
Manage Users
You are familiar with creating users and groups in Control Panel > User & Group, where you create local users and groups. You can continue to make those if necessary, but you do not benefit from the LDAP Server.
In the LDAP Server application, you create LDAP users and LDAP groups. We look into the users first from the Manage Users page.
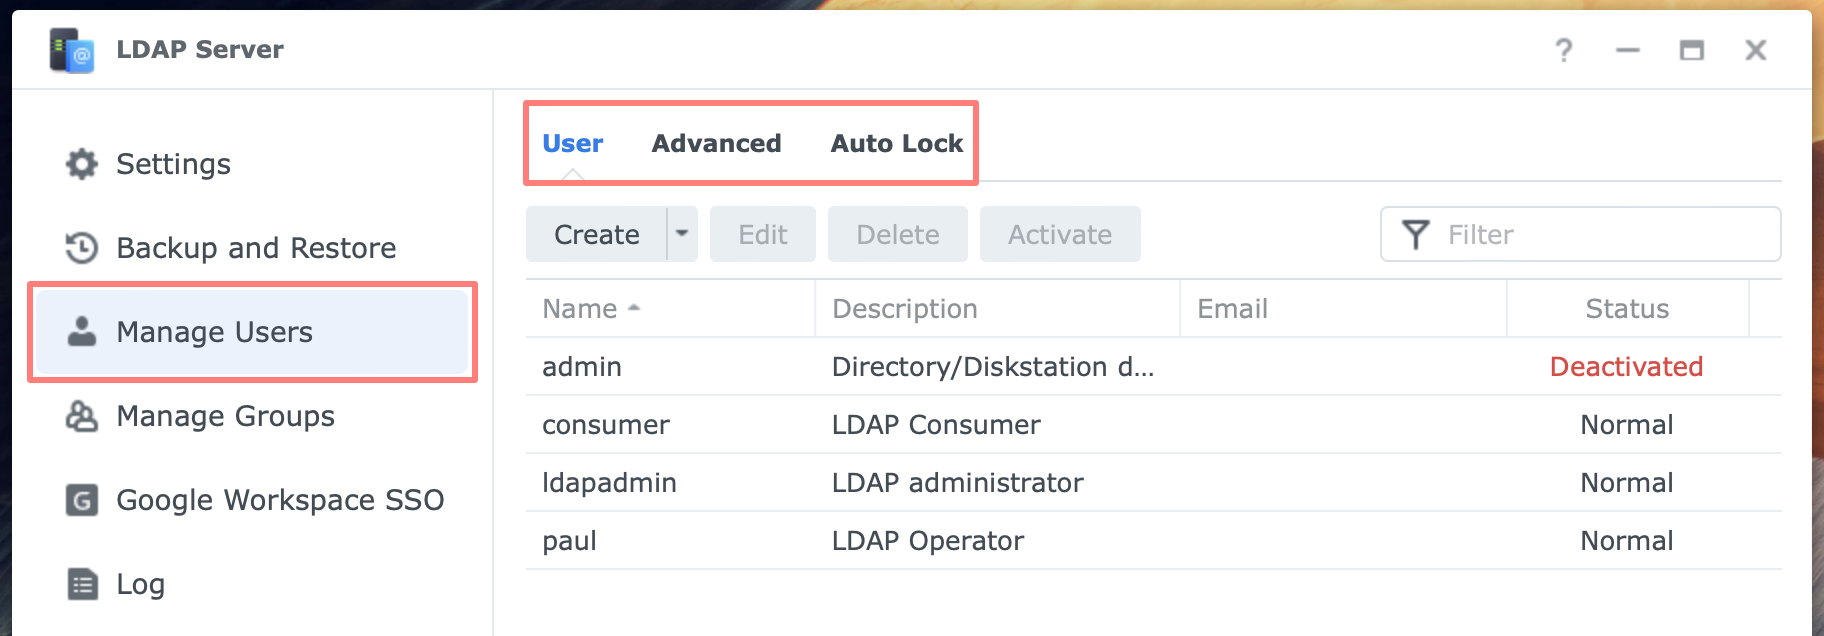
This page has three tabs
- User
- here, you manage the users in your LDAP directory
- Advanced
- rules for password strength and password expiration
- Auto Lock
- define auto-lock after failed login attempts to prevent brute-force attacks
Default admin
After configuring the LDAP Server, one default admin account has been deactivated.
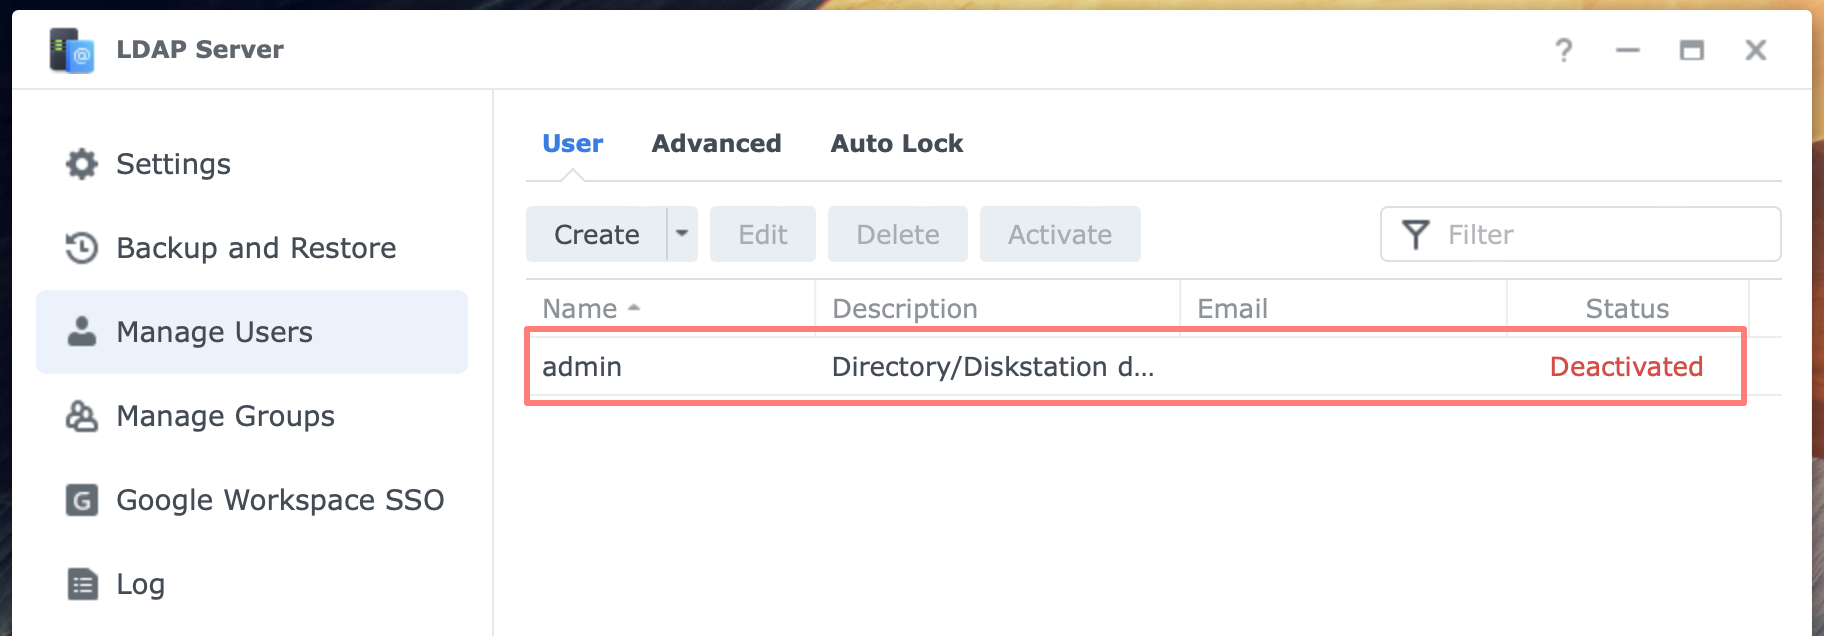
I encourage you to look into this account’s properties, particularly its group membership. There are two default admin groups: Directory Operators and administrators.
Custom admin
I suggest creating a custom admin as an LDAP user. With this account, you can manage LDAP.
Please note that any local administrator of a NAS is also an administrator of the LDAP Server on that NAS. The other way around is also true: when you log in to a NAS that joined LDAP with an LDAP administrator account, that account is also an administrator of the NAS.
I have not found a way to separate these roles, NAS and LDAP administrator.
Open LDAP Server > Manage Users > Create. This starts the User Creation Wizard.
- Enter user information
- Name & Password are mandatory fields; the rest is optional.
- Description: LDAP administrator
- Join groups
- every user is a member of the users group; add Directory Operators and administrators
- More attributes
- skip this page unless you find it necessary to enter information
- Confirm settings
- confirm and click Done to create the user
User accounts
Create accounts for each LDAP user. Regular accounts with no special duties within LDAP are only user group members. Instead of creating each user individually with the wizard, you can import a list of users with a .csv file.
Additionally, you may create groups to access specific resources like applications or shared folders on your NAS.
Client and Consumer
If you plan to set up a second LDAP server, called a Consumer, create a user for the Consumer server and make it a member of the Directory Consumers group. Do not add the account to other groups, which could cause a permission error.
Suggested account name: consumer.
Likewise, you can create an account to join computers in the LDAP directory. Make this account a member of the Directory Clients group.
Suggested account name: client.
You can add a Consumer server and a Client computer to the LDAP directory with an administrator account. However, it is best practice to use the principle of least privilege to perform tasks.
Manage Groups
On the Manage Groups page, you see five default groups. I distilled the following information about them from the DSM help application.
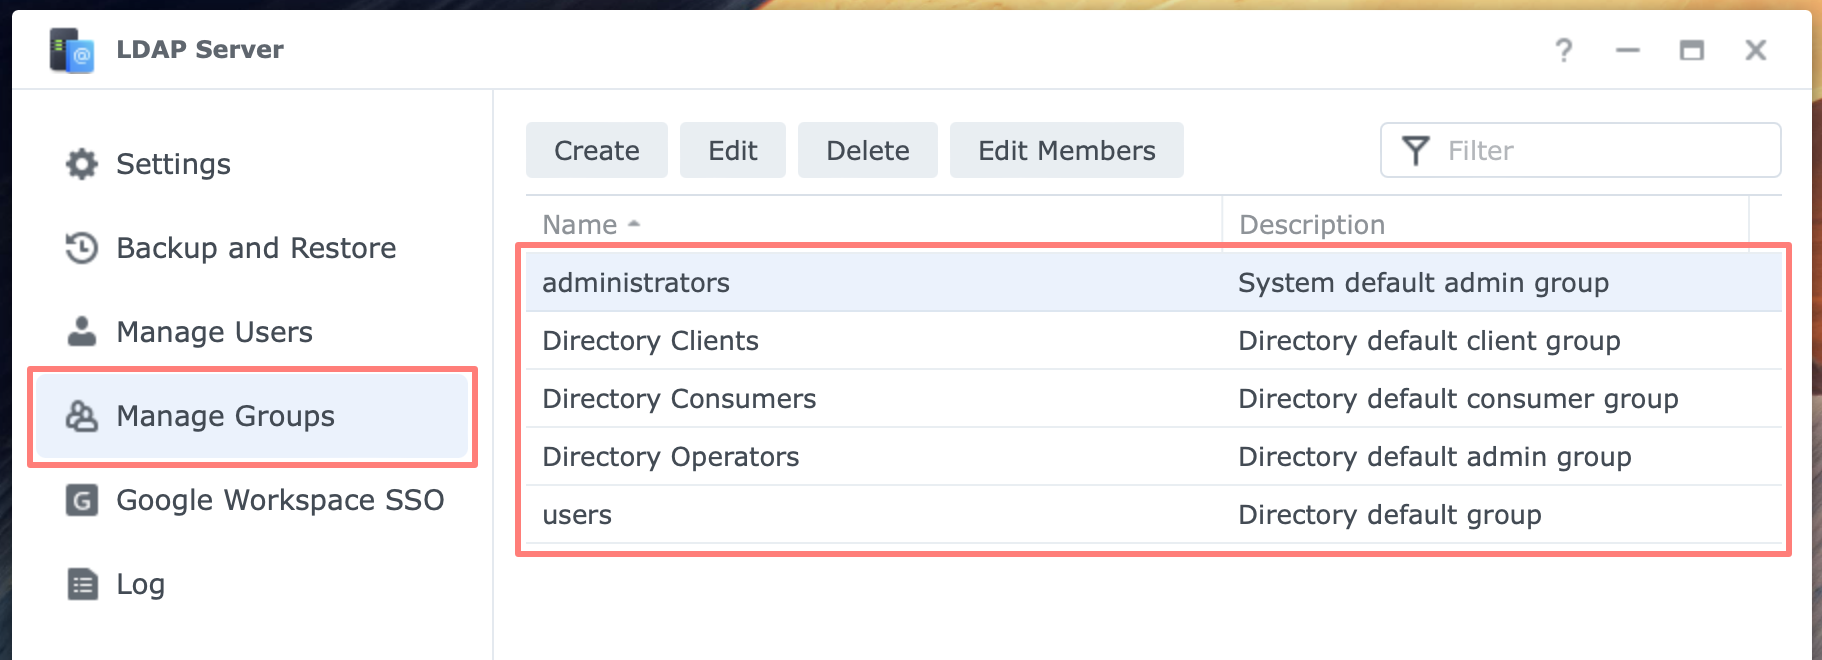
System default groups are as follows. Please note that you cannot create a group with names reserved for system use.
- users
- This is the default group for all users.
- administrators
- This is the administrators group.
- Directory Operators
- Users belonging to this group will have permission to manage the LDAP server.
- Directory Consumers
- Users belonging to this group will have read permissions for configurations and users/groups in the LDAP Server. A Consumer server must belong to this group to replicate data from the Provider server. Members of this group should only be used in the Consumer server’s Bind DN and should not belong to any other group. Otherwise, synchronization errors may occur due to incorrect permissions.
- Directory Clients
- Users in this group will have read permissions for users/groups in the LDAP Server. For security purposes, it is recommended that an LDAP client who wishes to join an LDAP server be given a user in this group.
On the Manage Groups page, you can:
- create new groups
- delete groups except for the default groups
- manage group membership, except for the users group
Permissions to resources like folders and applications are easier to manage with groups. To assign permissions to LDAP groups and users on a NAS or other server, join that server to the LDAP directory first.
Log
The log on the Log page contains events about starting and stopping the service, backing up and restoring the database, adding and deleting a user, and enabling the Provider server.
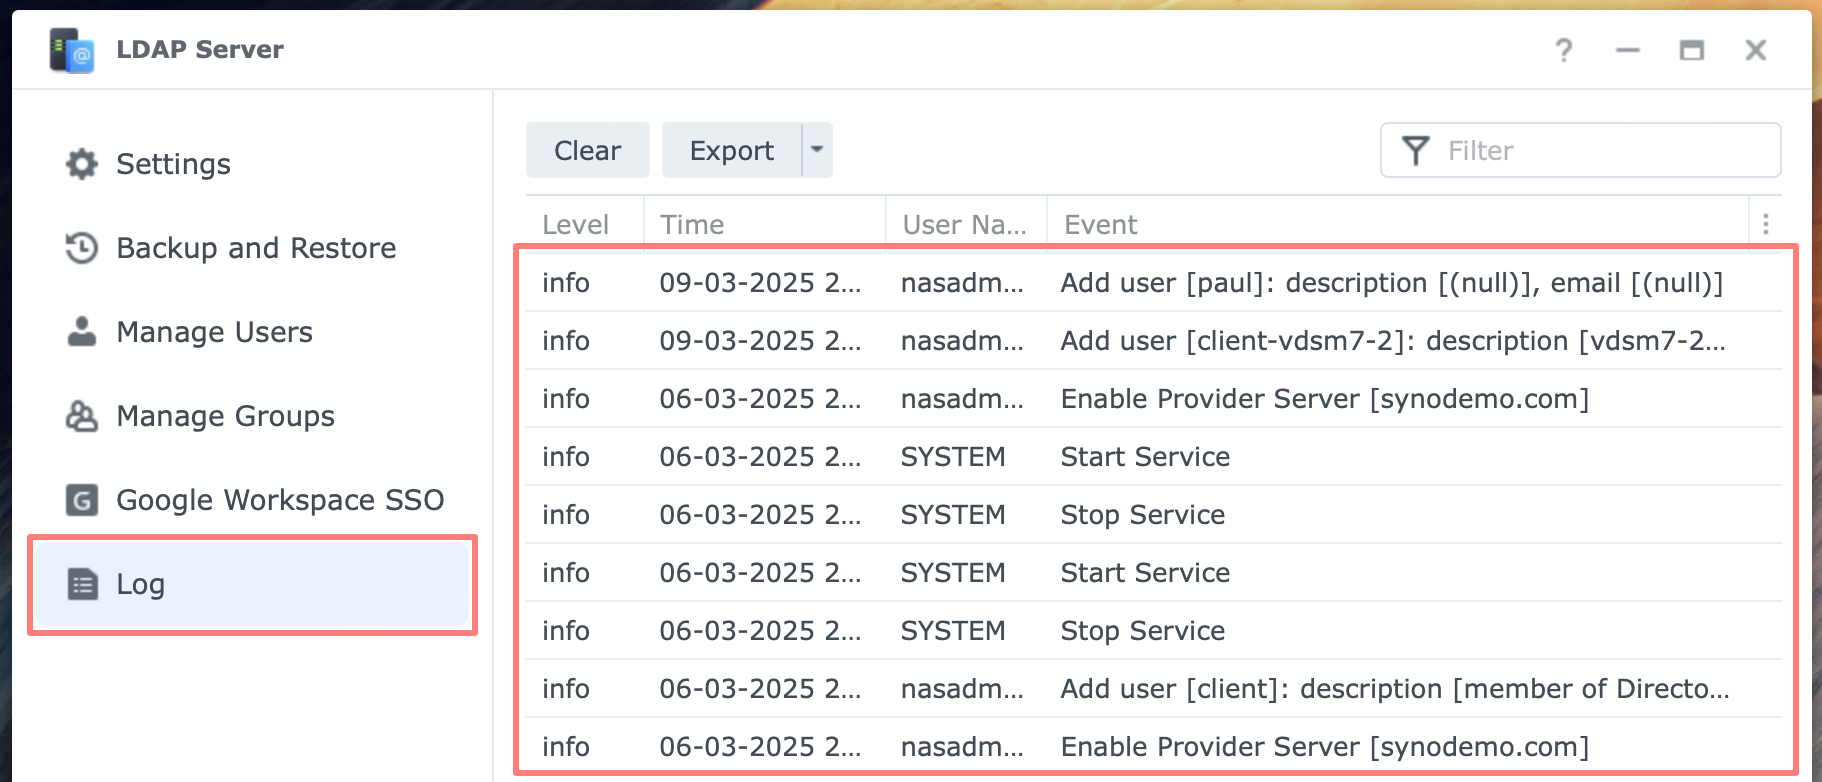
You can clear and export the log.
Joining Synology NAS To LDAP
After you install and configure the LDAP Server as a Provider or Consumer, it runs the service, but the NAS is not yet part of the directory service. Joining is a manual process. The procedure outlined below is for any Synology NAS joining LDAP, whether it runs the LDAP Server or not.
When you join a NAS to the LDAP service, you can log in to DSM with your LDAP account and assign files, folders, and application permissions to LDAP users and groups.
Domain/LDAP wizard
The Domain/LDAP page is located in the Control Panel. You can join the NAS to an Active Directory or an LDAP service from this page.
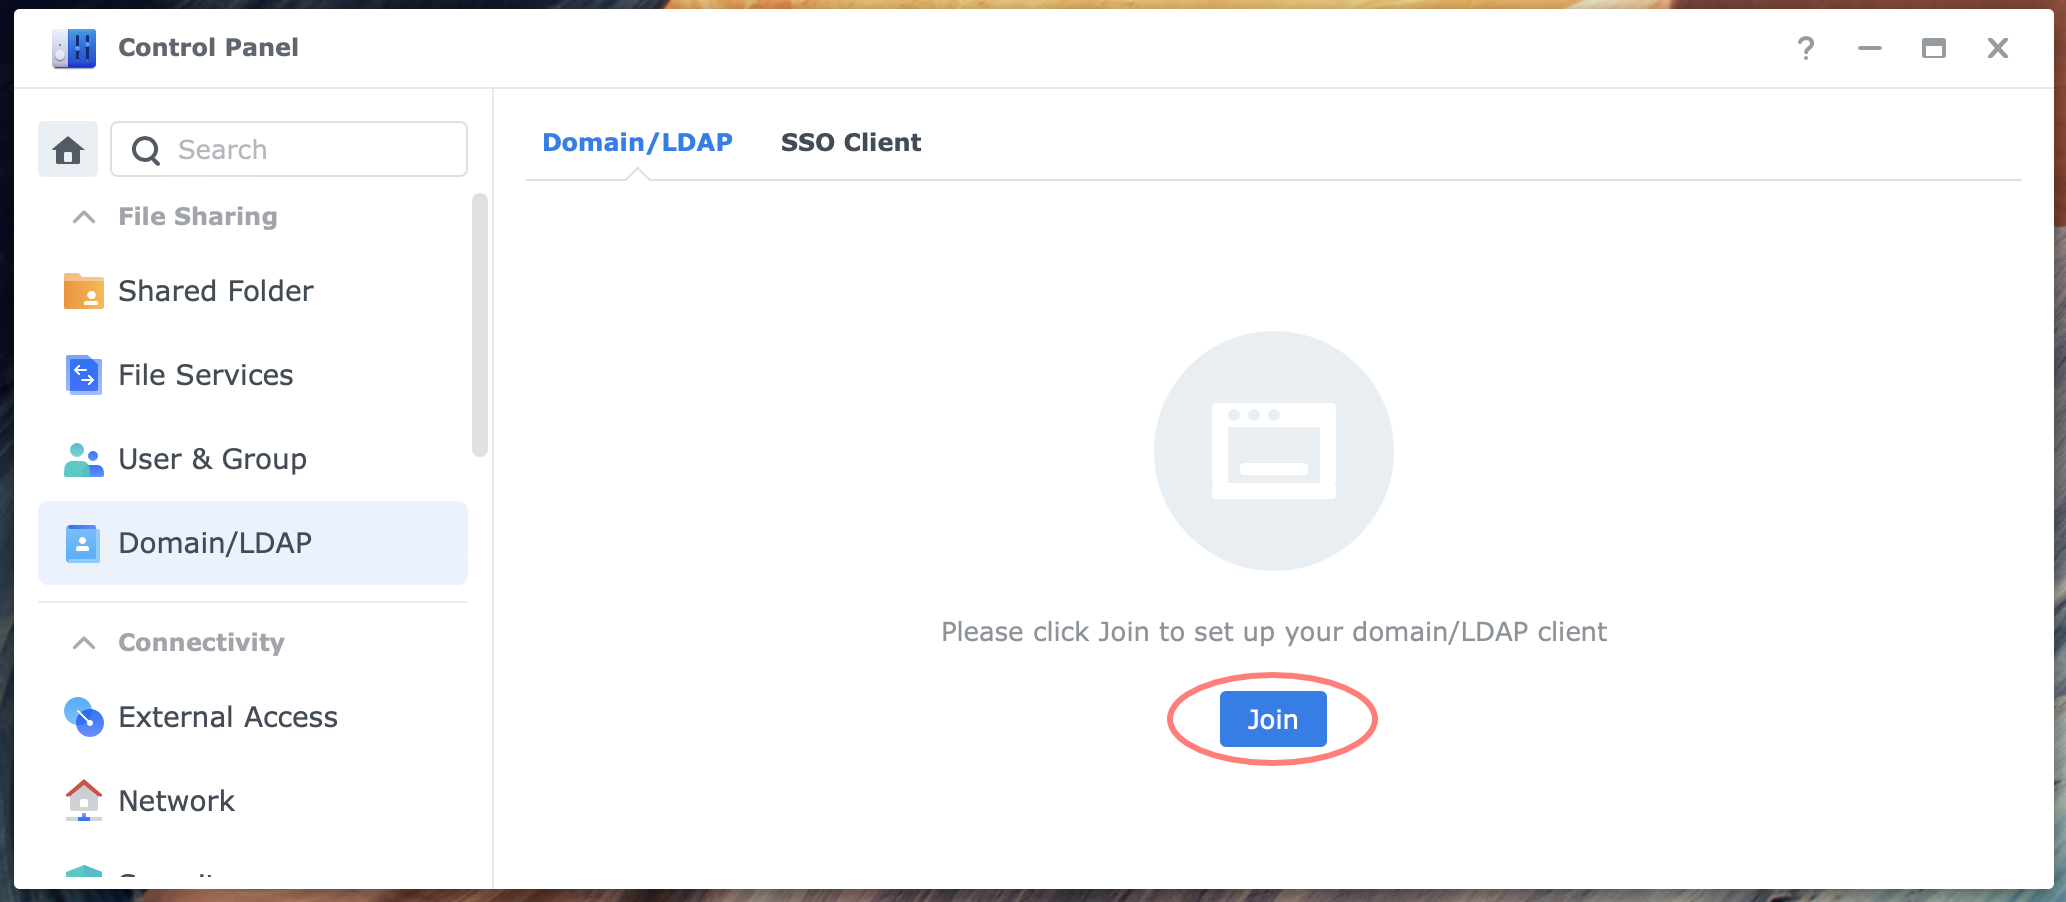
Go to Control Panel > Domain/LDAP > Domain/LDAP tab > Join button. The Domain/LDAP Joining Wizard opens.
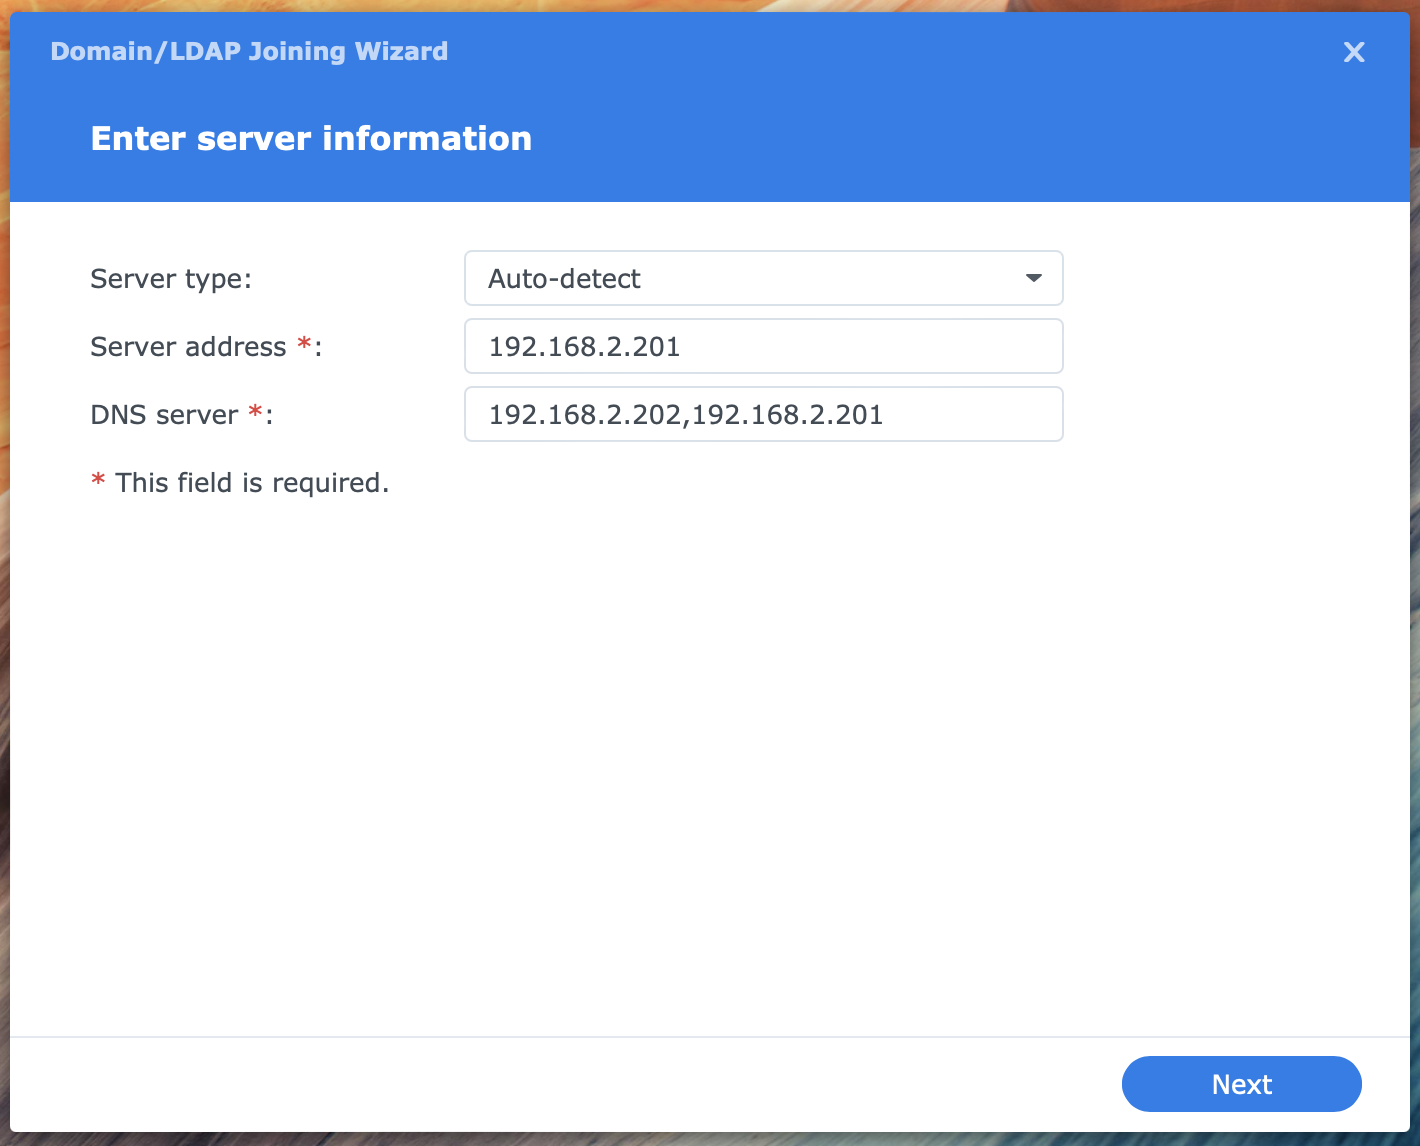
Enter server information
- Server type
- Auto-detect
- the Auto-detect setting automatically chooses between Domain or LDAP; if for some reason detection fails, choose LDAP
- Server address
- the IP address or FQDN from the Provider
- if you fill in the FQDN, the host must be able to resolve the name; see the following items
- DNS server
- this is already filled in from the network configuration; you can enter multiple addresses if you have a primary and secondary zone; it is used to resolve the FQDN in the previous field
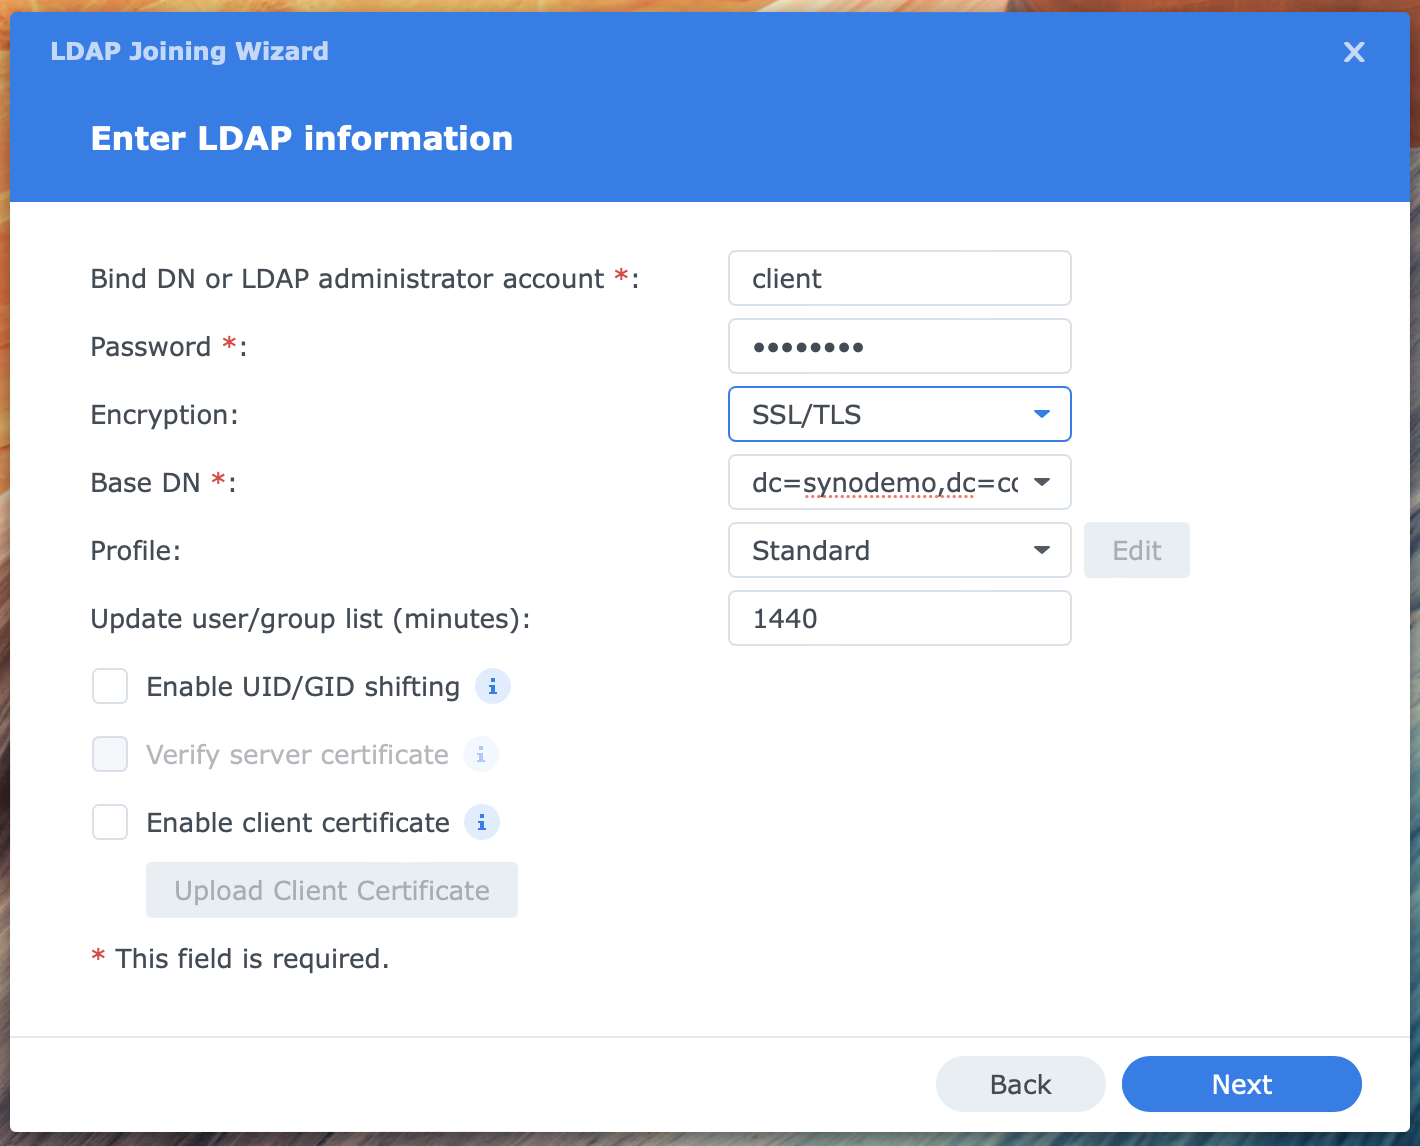
On the next screen, enter LDAP information. You provide authentication details and an LDAP profile.
- Bind DN or LDAP administrator account
- the Bind DN uses the root account of the directory; I prefer to use an account that is a member of the default Directory Clients group to add devices to the directory
- Password
- enter the password of the account
- Encryption
- SSL/TLS is my preference, but you may choose a different value
- Base DN
- copy from the LDAP Server app > Settings screen
- or use the drop-down list to select the Base DN
- in this post, I use dc=synodemo,dc=com
- Profile
- Standard
- this is the type of Synology’s LDAP Server
- Enable UID/GID shifting
- advised in larger setups
- Enable client certificate
- does not apply in this scenario
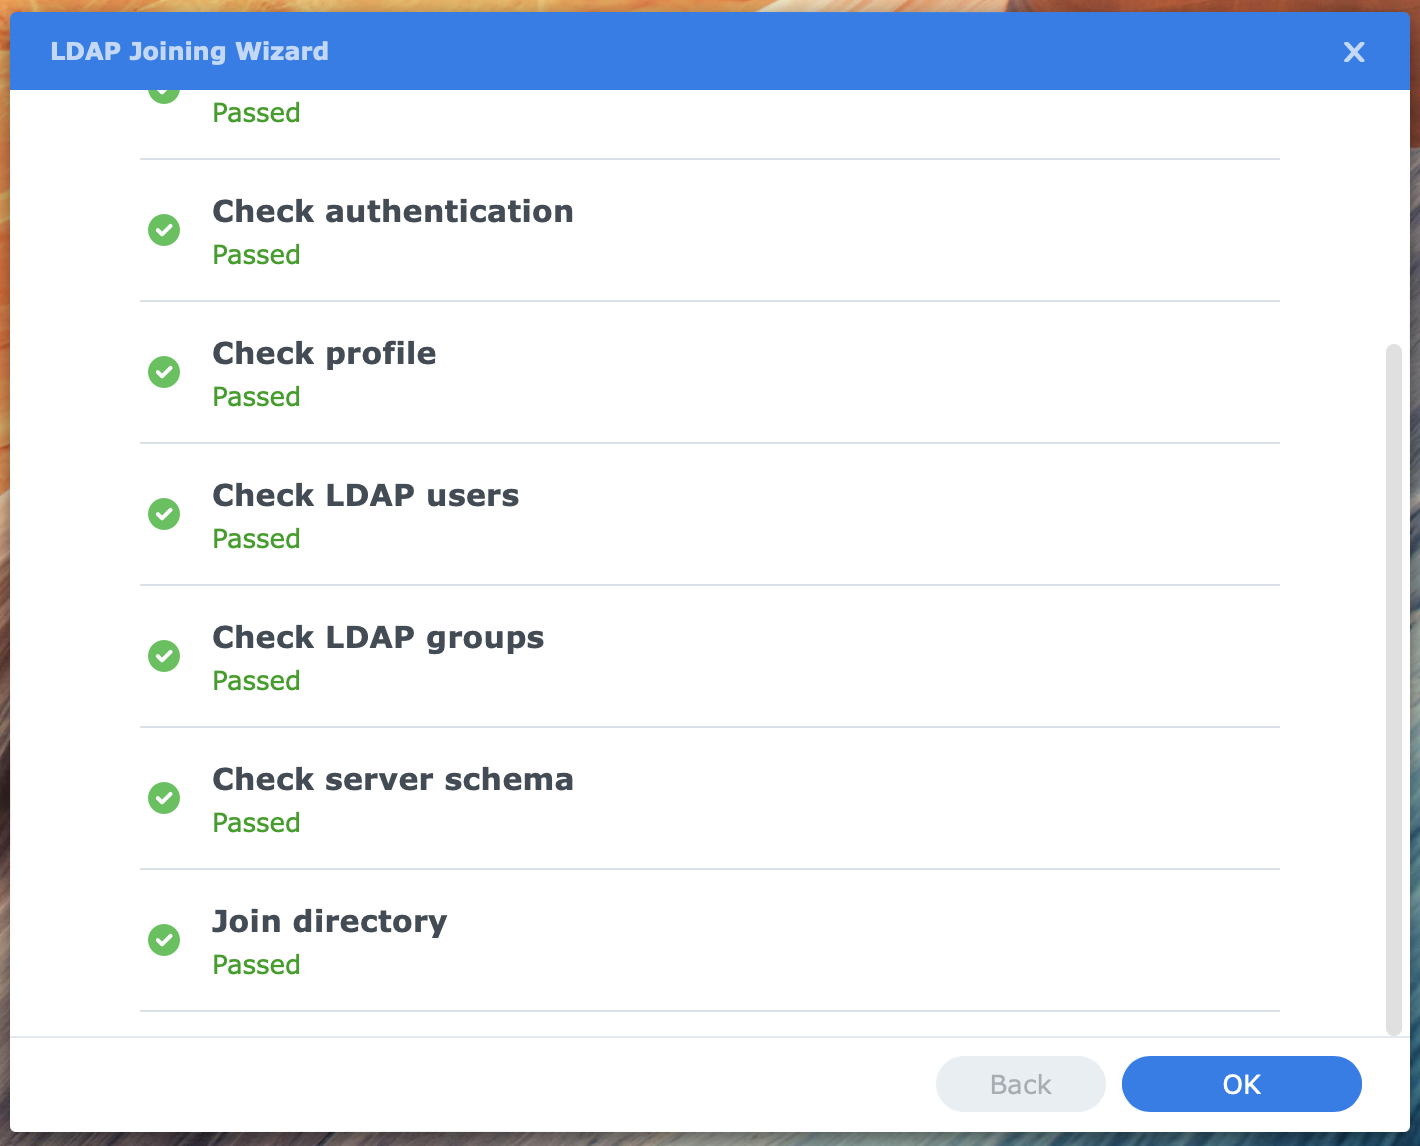
When you click Next, the wizard performs several checks. When the checks pass, the joining is successful. Click OK to close the wizard.
You return to Control Panel > Domain/LDAP > Domain/LDAP tab. Notice the LDAP User and LDAP Group tabs.
Domain/LDAP tab
After joining this tab, display basic information about the directory. If you doubt whether a Synology NAS joined a directory, go to this page.
You can test the connection, review and edit the settings you entered when joining, and leave LDAP. See the separate note about leaving LDAP in the next paragraph.
Leaving LDAP
You can leave the LDAP directory service like joining. Go to Control Panel > Domain/LDAP > Domain/LDAP tab.
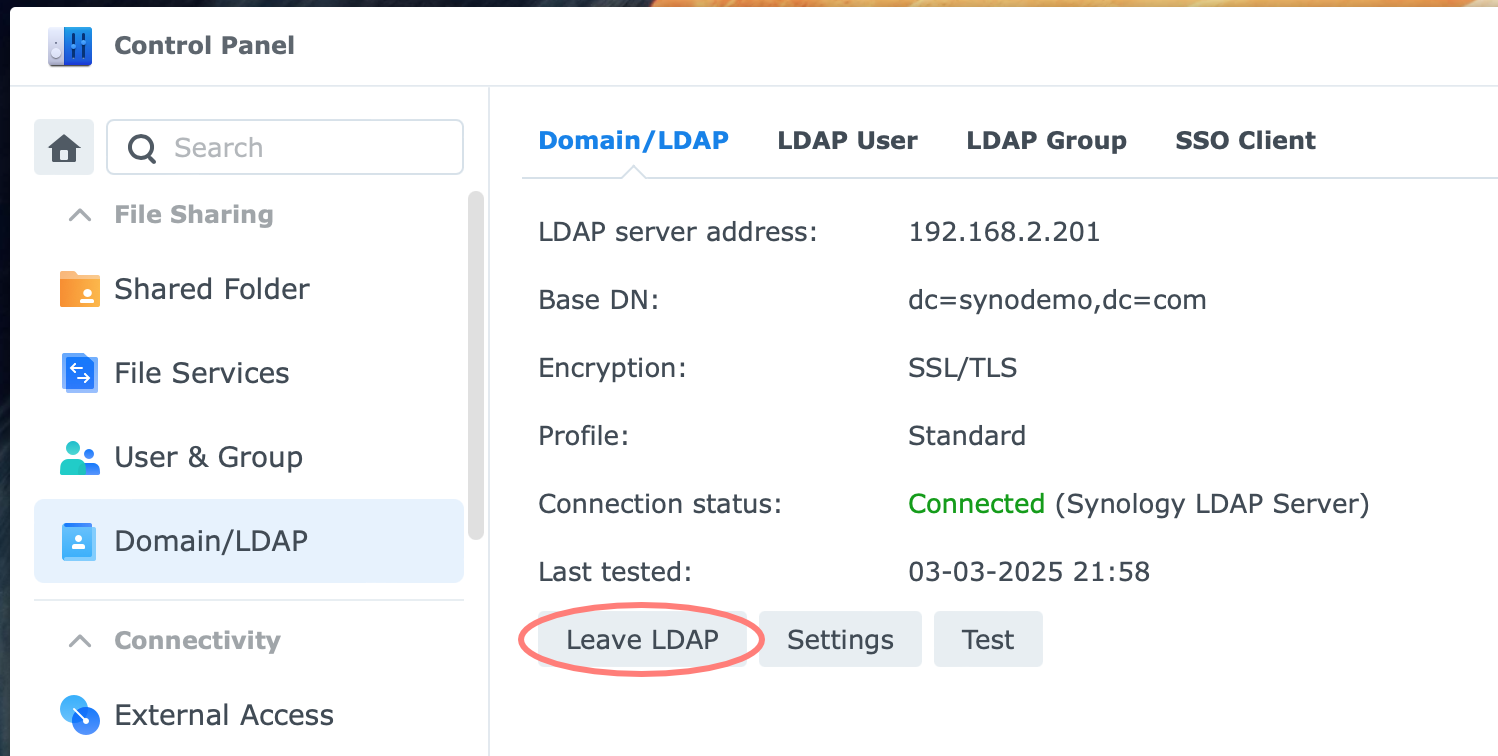
In the bottom-left corner, you will find the Leave LDAP button.
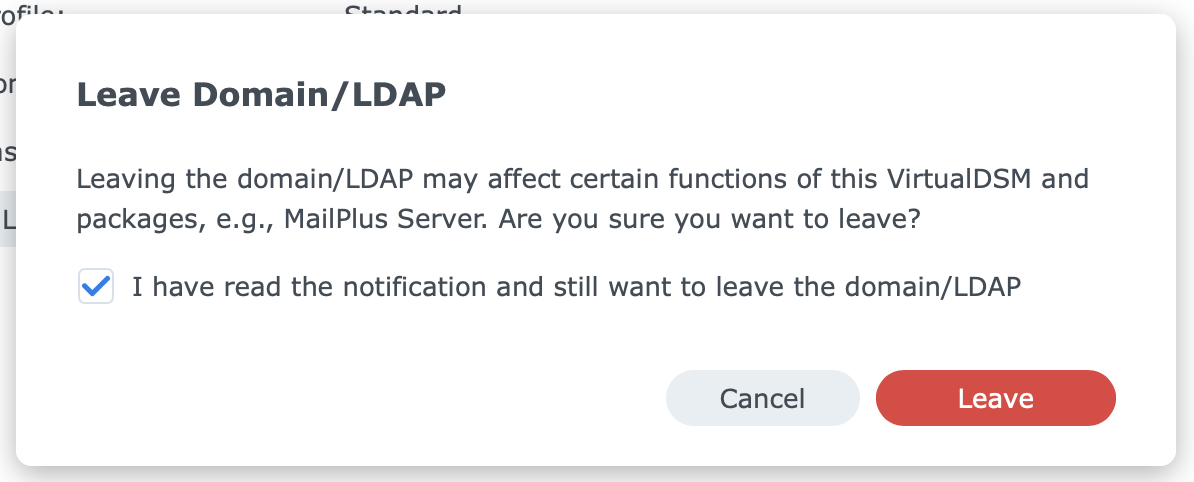
A Leave Domain/LDAP message will appear when you click this button. Confirm that you have read the message and click on the Leave button. Enter your password in the pop-up screen and click Submit.
LDAP User and Group tab
The LDAP User tab lists the user names in the directory with the syntax username@domain_name. Now that the NAS has joined the directory, you can log in to DSM using an LDAP username.
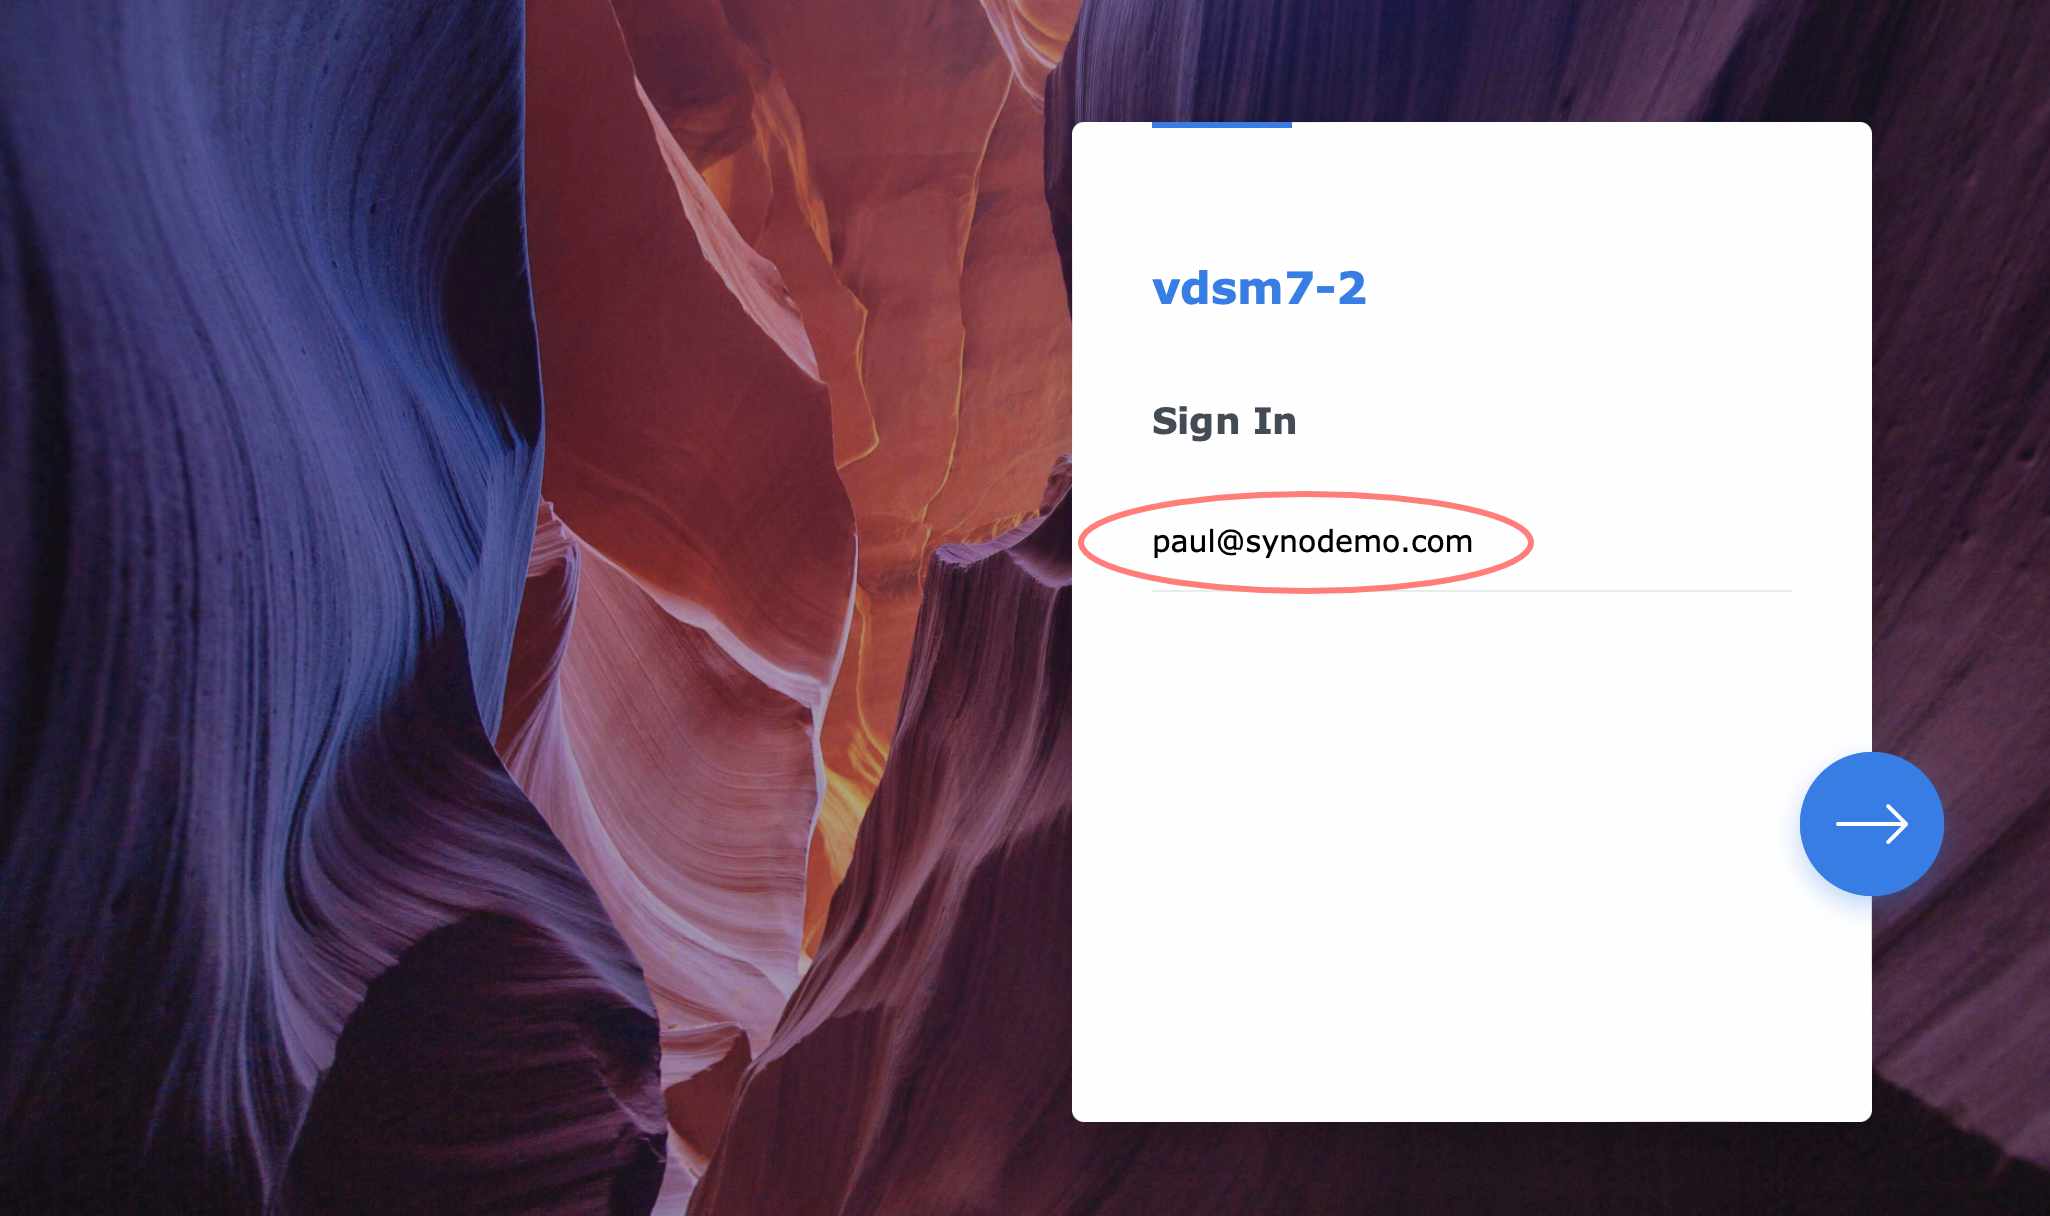
Omitting the domain name during log-in may work equally well if the user name is unique on the NAS; no local user account with the same name exists on the NAS.
Other signs of a joined NAS are permissions to LDAP users/groups in the Control Panel > Shared Folder and Application Privileges and permissions in the File Station.
The LDAP User and Group tabs have Delegate and Update LDAP Data buttons. The Delegate option works similarly to Control Panel > User & Group > User and Group tab.
Update LDAP Data
The Update LDAP Data button is essential to updating the data from the directory to the NAS. The NAS needs the user and group information from the directory to log in, access the user’s home folder, and assign permissions to folders and applications.
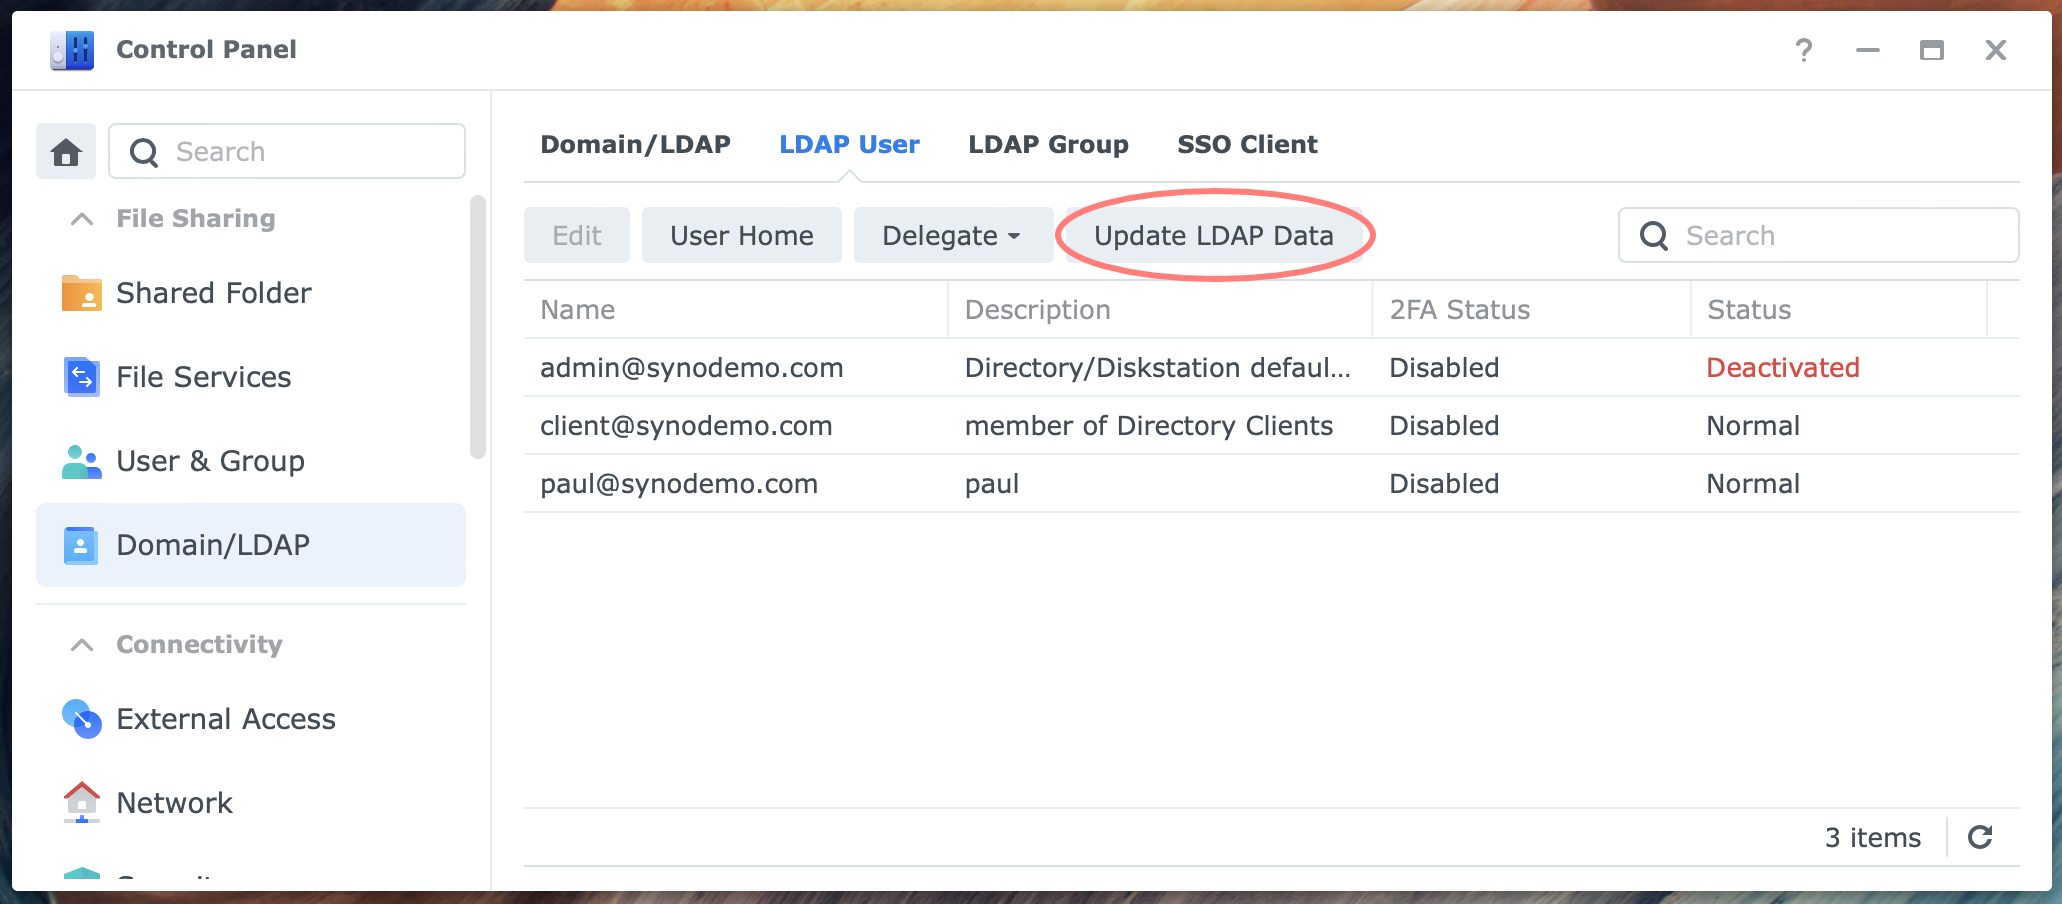
As a NAS administrator, you have to do that manually. You cannot configure this as an automated process unless you script the action and schedule a task.
The LDAP User tab has a User Home button.
User Home
The LDAP User tab has a User Home button. This button lets you enable the User Home service for LDAP users on the NAS. Since an LDAP user can log on to any server in the domain, you decide which server will host the home folders for the domain users.
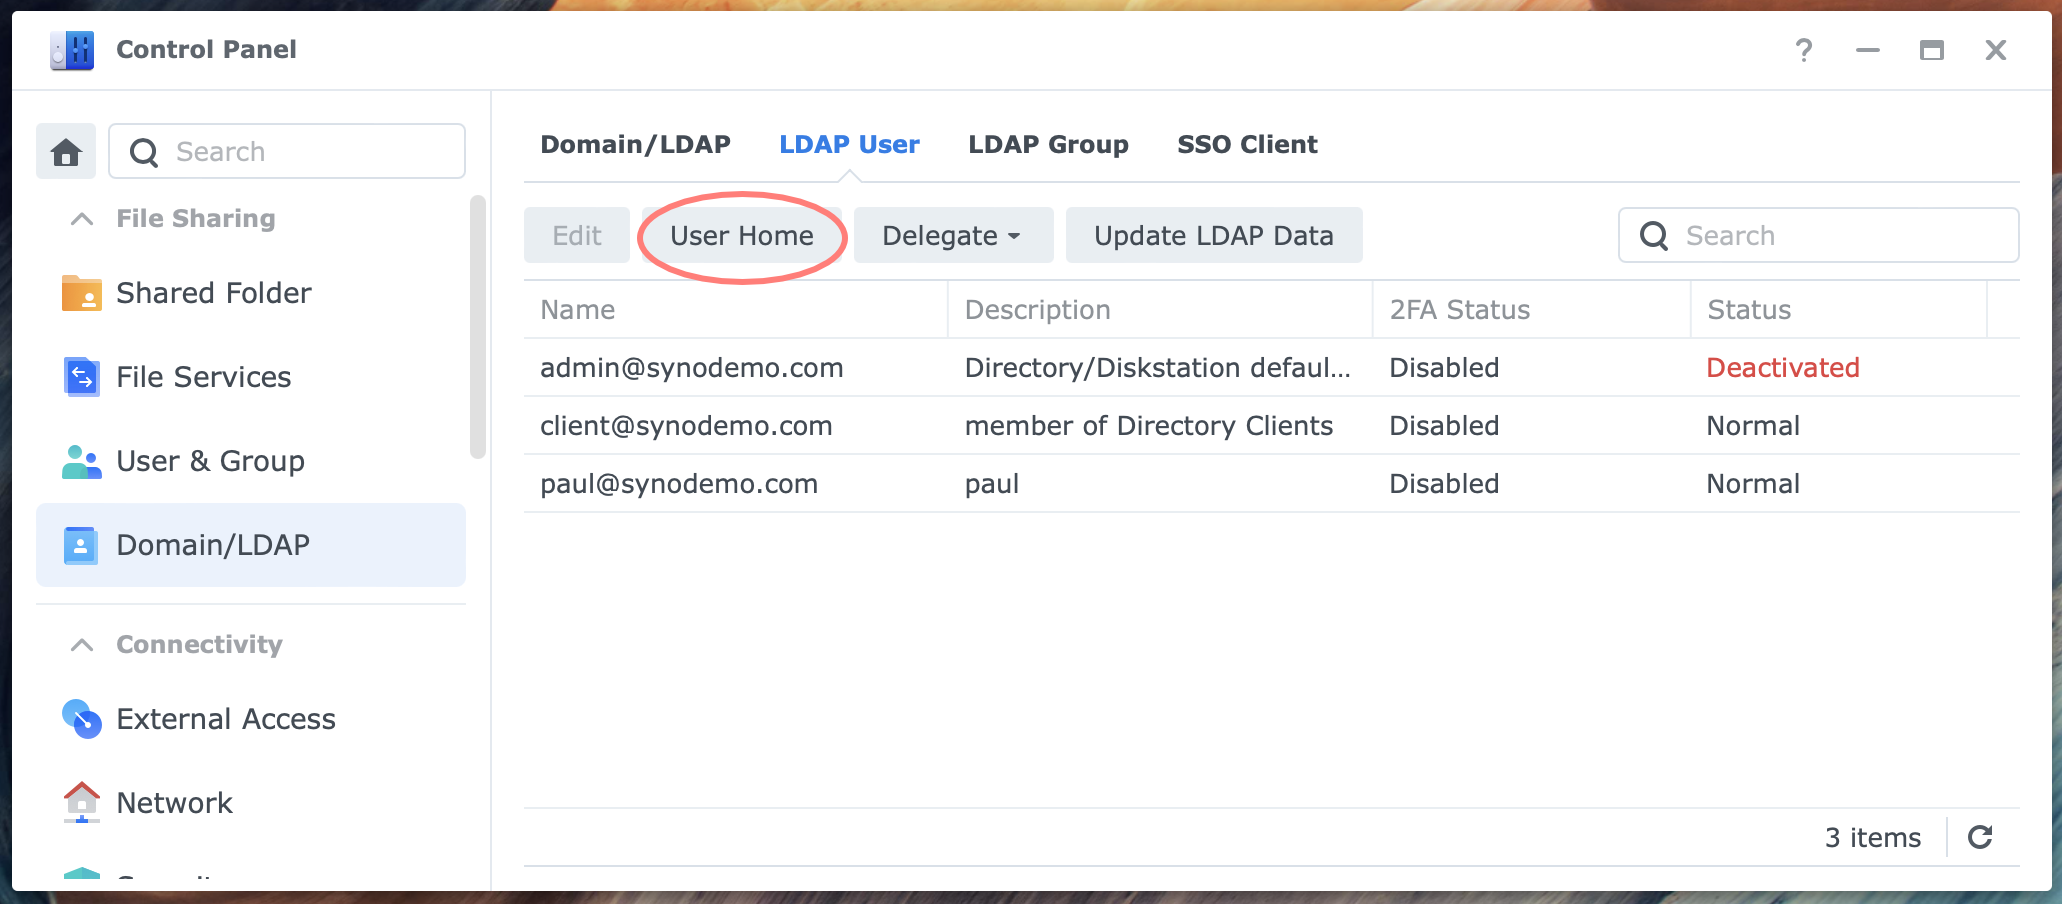
Log in to the selected NAS and go to Control Panel > Domain/LDAP > LDAP User tab > User Home button. When you click on the button, the User Home dialog opens.
This dialog is identical to the Control Panel > User & Group > Advanced tab. However, LDAP users are included when you enable the User Home service from the Domain/LDAP applet.
Enable the home service, select a volume if necessary, and click OK.
After enabling the User Home service, I suggest configuring two features: hide the /homes shared folder and enable the Recycle Bin if desired. For details, please refer to Using Home Folders On Synology NAS.
Home folder names
Enabling the User Home service on a NAS automatically creates a home folder inside the /homes shared folder for every local user.
For LDAP users, the NAS creates the user’s folder when the user first logs in to the DSM desktop or makes an SMB connection from the computer.
The naming syntax in the /homes shared folder differs from that of the local users. The syntax is:
- /homes/@LH-DOMAIN/61/userNAME-ID
For example, for account ldapadmin in domain SYNODEMO.COM, with ID 1000001, the path to the home folder is:
- /homes/@LH-SYNODEMO/61/ldapadmin-1000001
Please note that the path is invisible to the logged-on user, as it is for local users when they log in. Only administrators see this path in the /homes shared folder.
I am not sure about the ../61/.. subfolder. It could be any random number.
Managing Access Permissions
In Control Panel, you can assign shared folder and application permissions to LDAP users and groups. The procedure is identical for local users and groups. In this case, you open a drop-down box to see the LDAP users or groups.
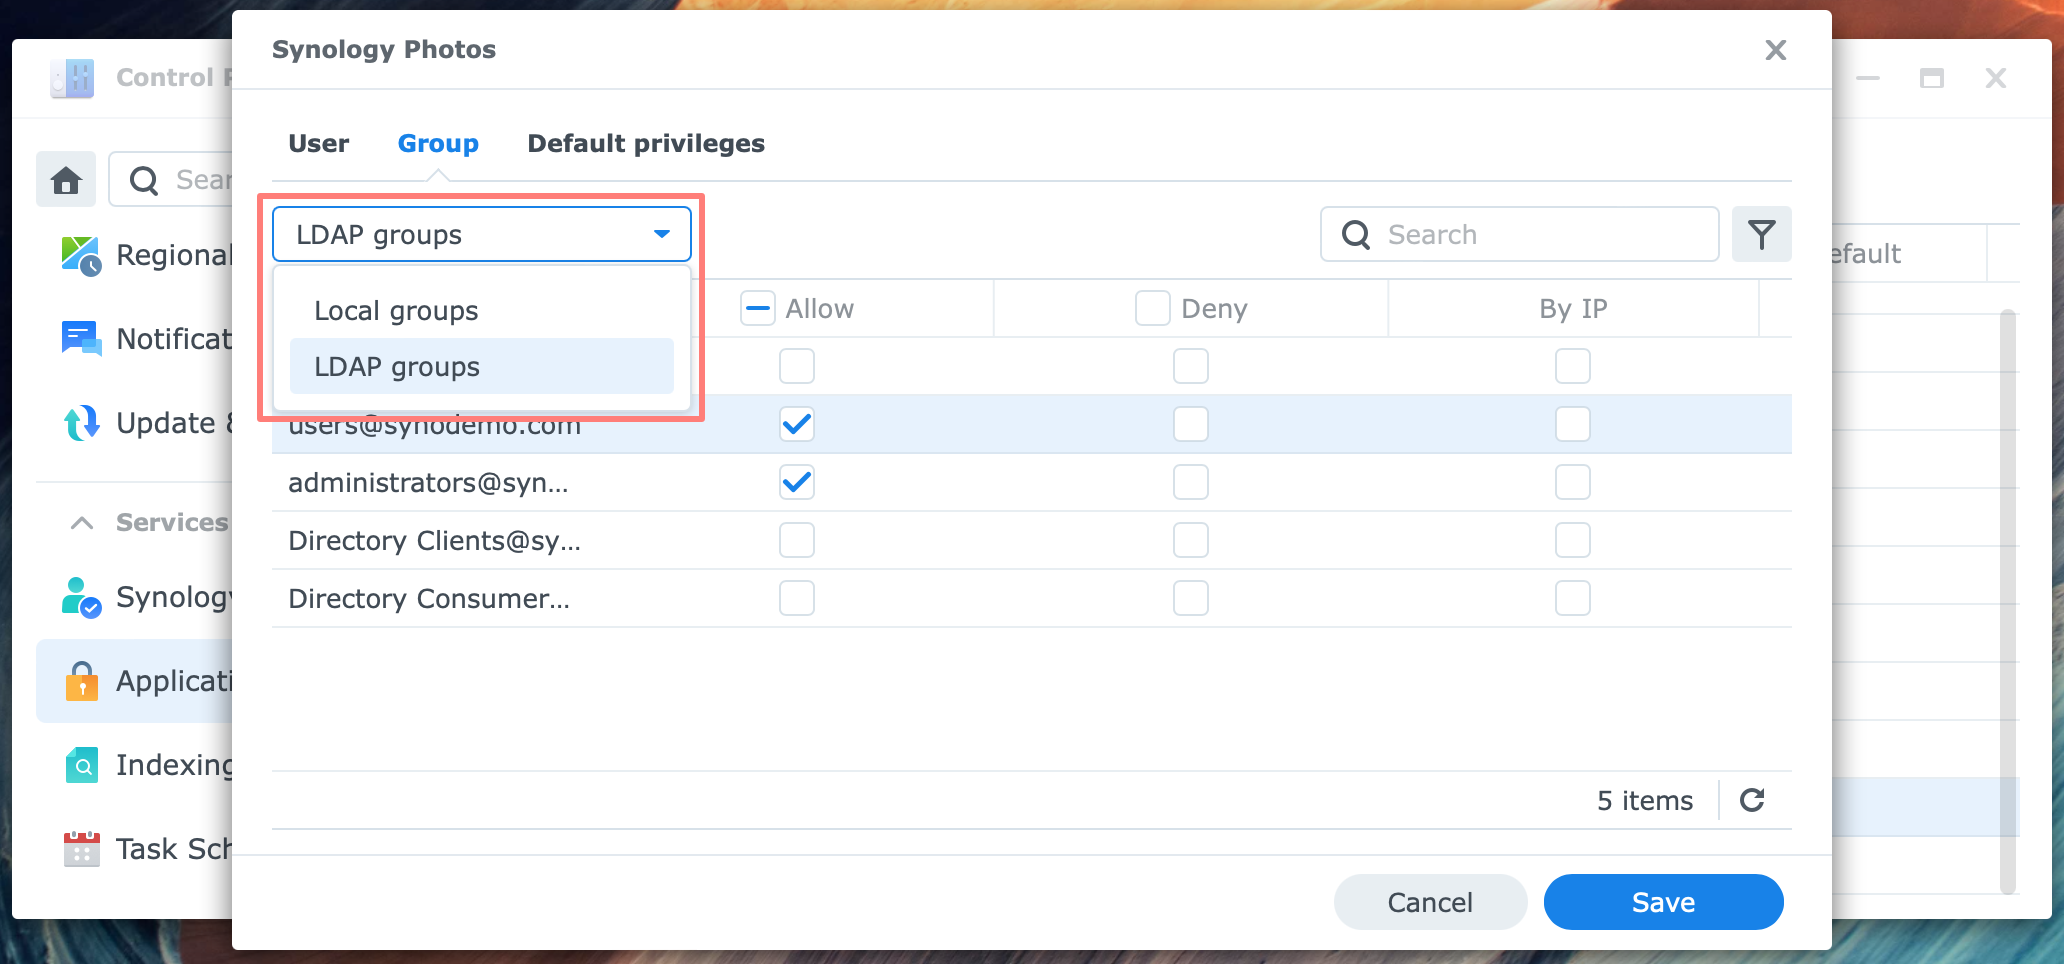
Except for Download Station, all applications for which you can configure application privileges support LDAP users and groups.
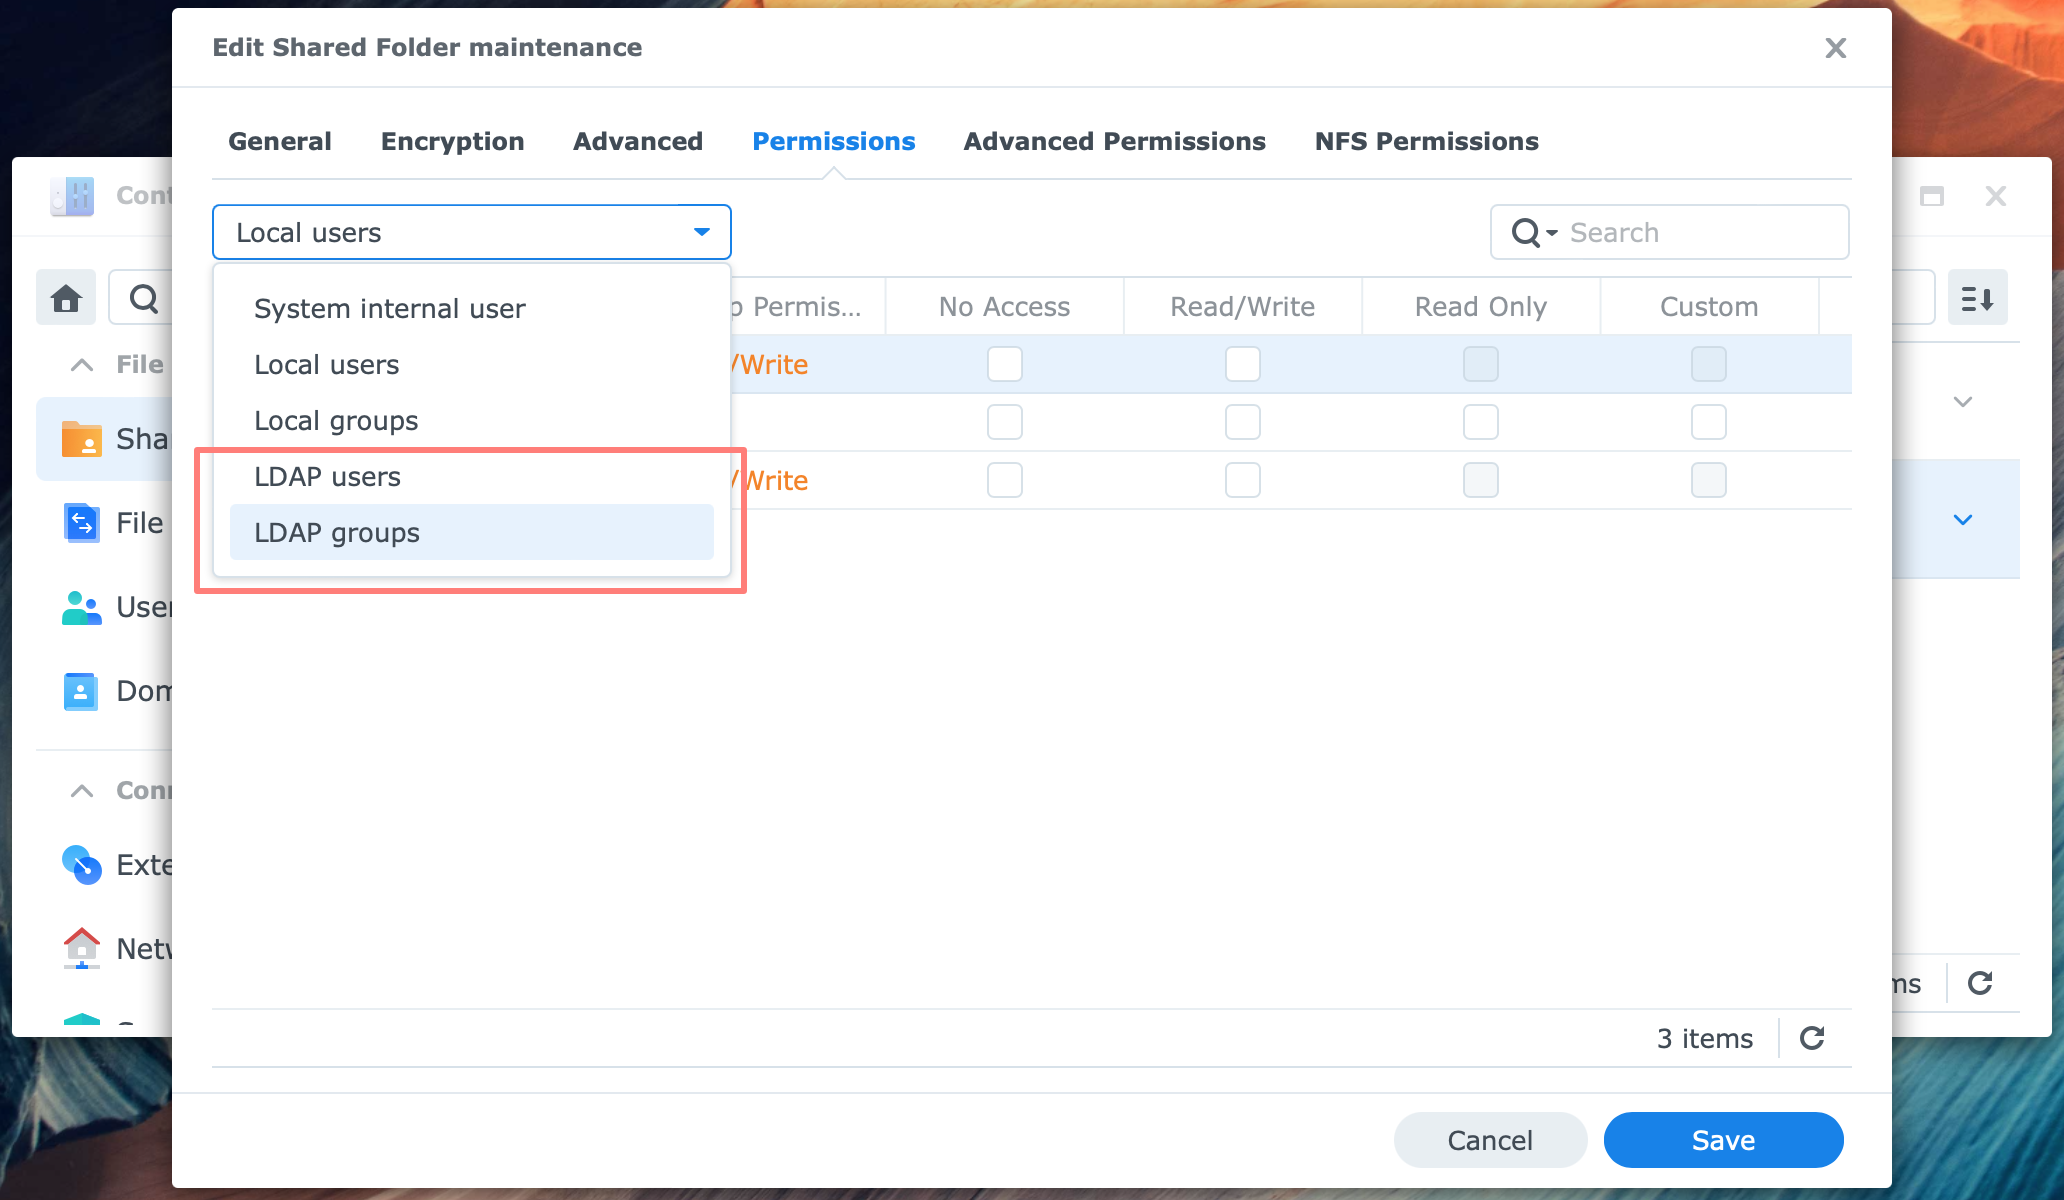
Open the Permissions tab for each shared folder. From the drop-down list in the top-left corner, select LDAP Users or Groups and assign the permissions.
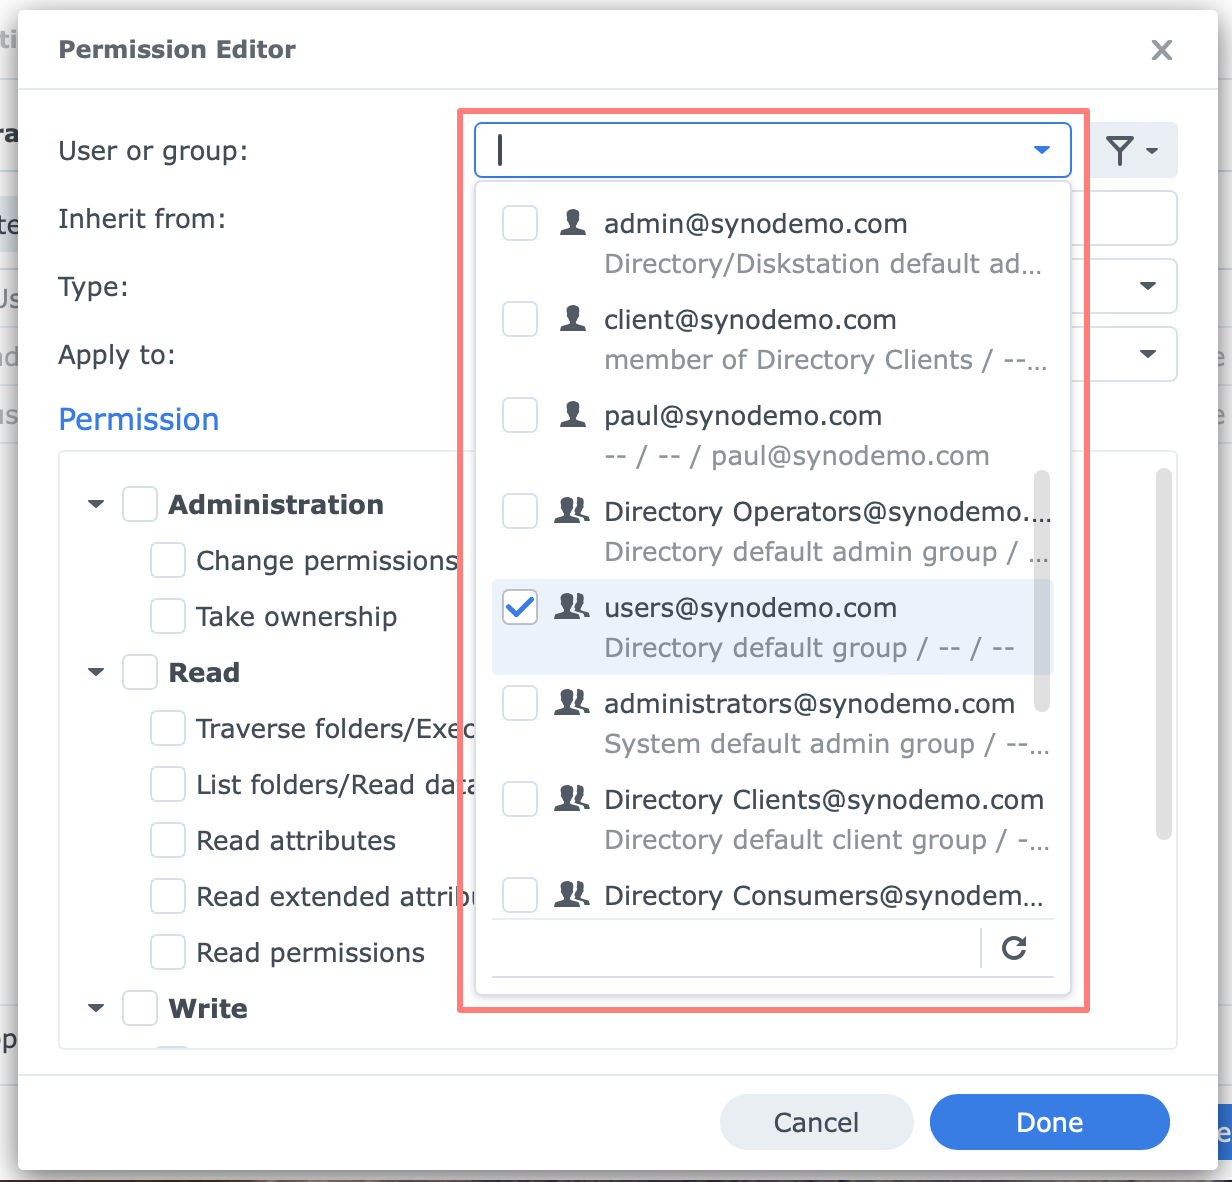
In File Station, you edit the folder permissions. On the Permission tab of a folder in File Station, you will find the LDAP users and groups among the local users and groups in the same list.
Joining Computers To LDAP
You might want to join your Apple Mac computers to LDAP. The advantage of joining a computer to LDAP is that you can log in with the same LDAP account you use on the NAS. Another benefit is that users can log in to different computers with the same LDAP account, assuming all computers have joined LDAP.
From what I read on the Internet, joining Windows computers to LDAP is unsuccessful. I suggest installing Synology Directory Server on a NAS if you have Windows computers and want to use a directory service. This directory service is a Samba-based implementation of Active Directory.
Joining an Apple Mac computer
An excellent knowledgebase article from Synology describes how to join a Mac client to a Synology LDAP directory service. Instead of copying the text and images, I suggest you look it up.
Thanks for reading
This post is donation-ware, and I made it to help you. Please consider leaving a comment or even buying me a coffee if it did. I will be eternally grateful.
Paul Steunebrink / Storage Alchemist