In this post, I cover different options for restoring Hyper Backup. I encourage you to review them before you need it. It is best practice to test your backup regularly. After all, a backup is only as good as its restoring ability.
Restoring Hyper Backup
There is much information about backing up your NAS but very little about how to restore that backup. That is unfortunate because losing data is stressful, but not knowing how to restore your backup is more than you can comfortably handle.
If you are not familiar with the different concepts behind Hyper Backup, I suggest you read Understanding Hyper Backup, a separate post.
Backup version type
When you make a Folders and Packages backup, you usually make backups with multiple versions, including rotation settings.
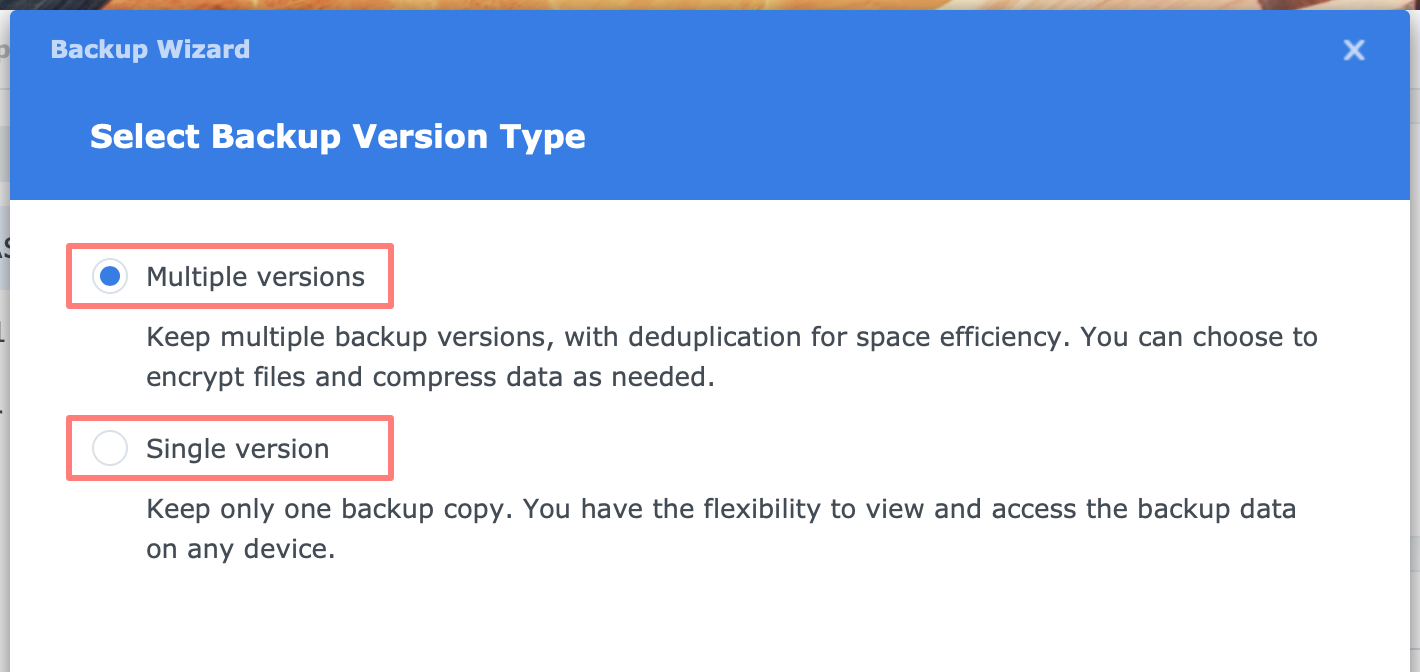
Depending on the chosen backup destination, there might be another backup version type, the single version backup without rotation. The chosen backup version type affects your restore options. For more details about different backup version types, please reference Understanding Hyper Backup.
The Entire System backup type, available on DSx18+ models and higher with DSM 7.2 or higher, lets you restore only the whole NAS, including all configurations. There is no option to restore selectively.
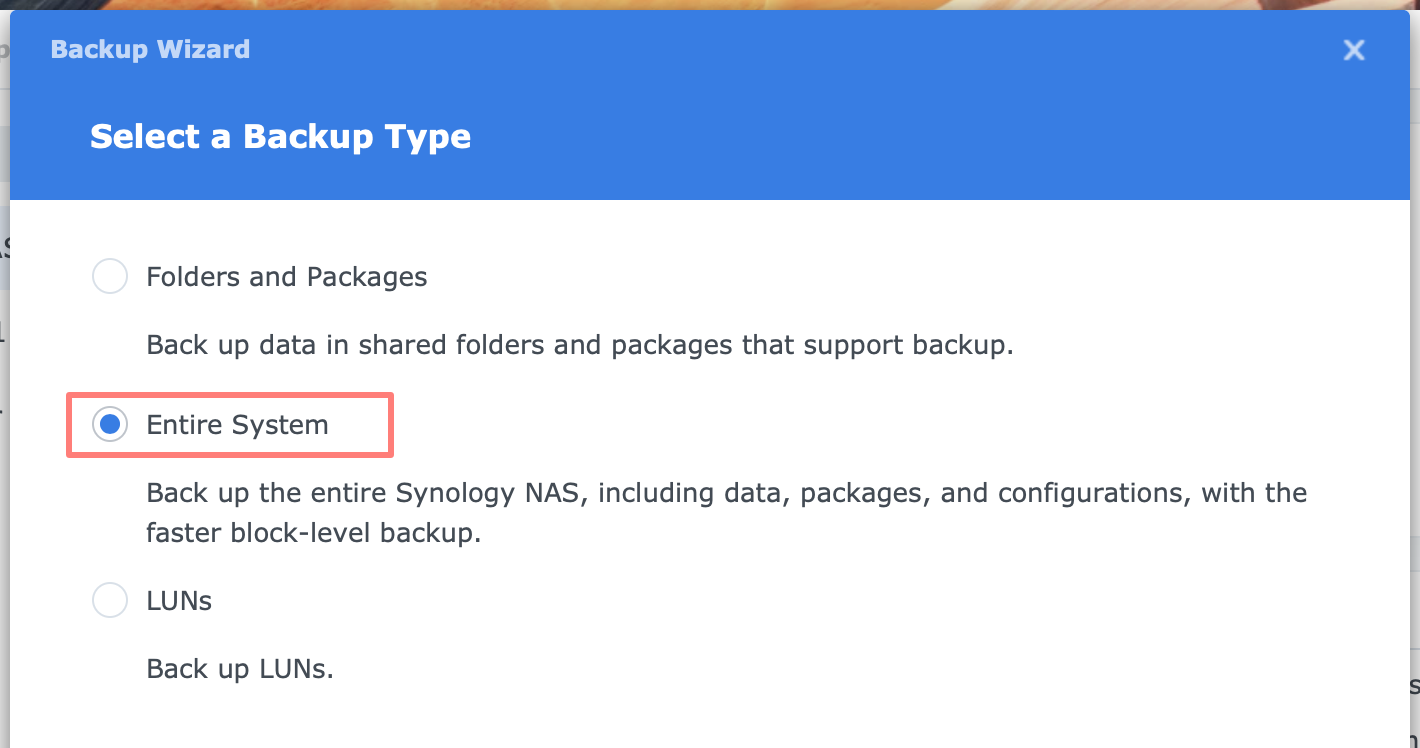
This is a multiple versions backup type, but the restore process differs from the Folders and Packages backup type.
Restore options
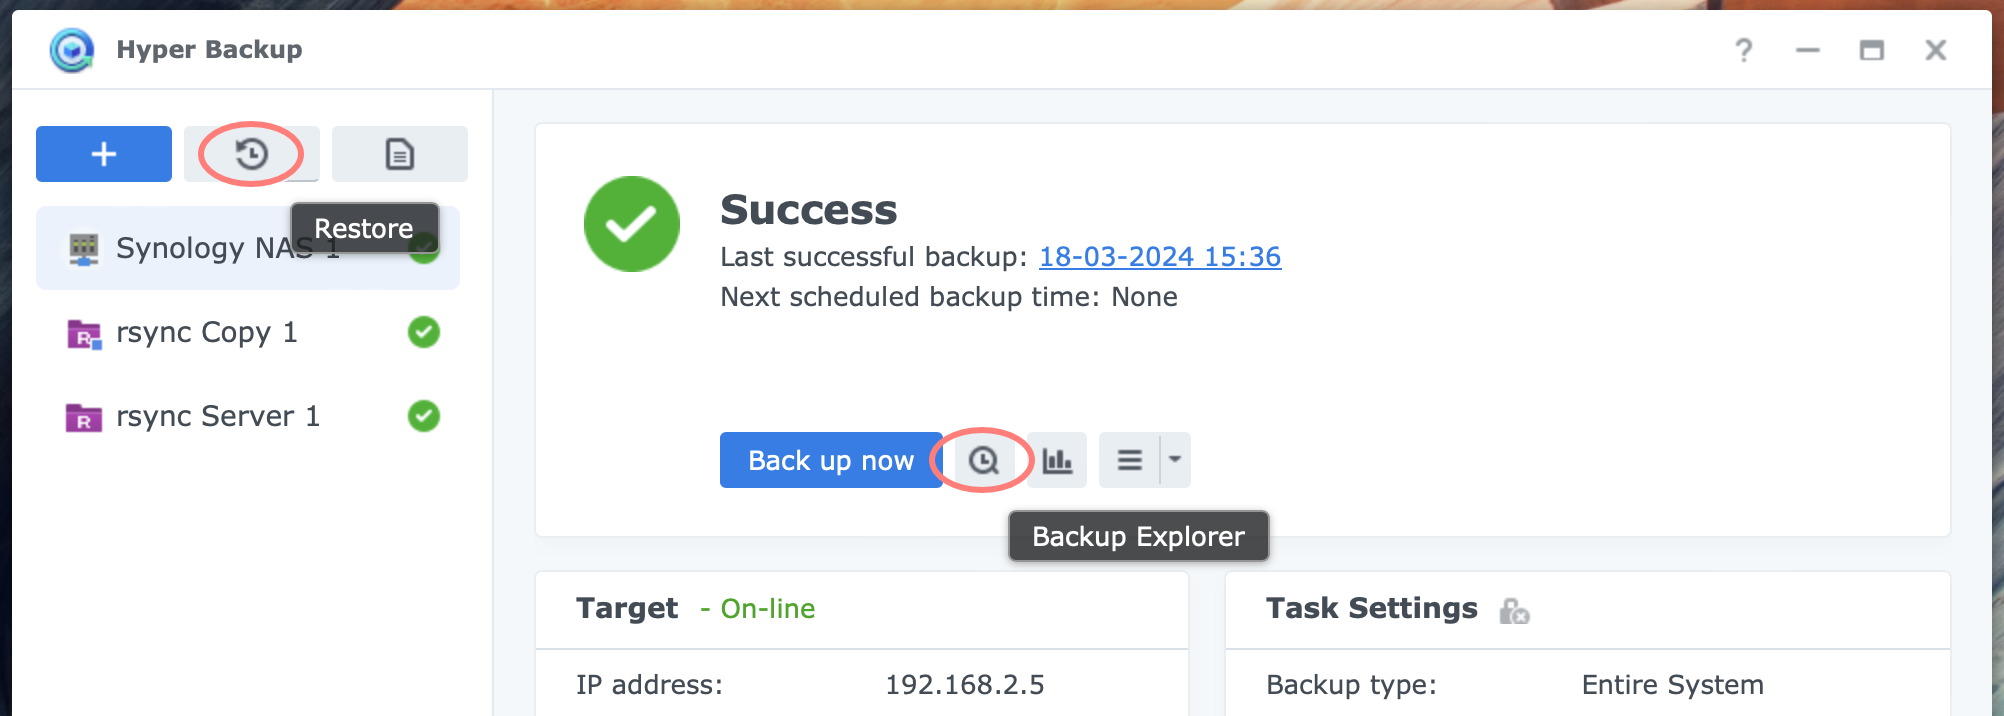
With Hyper Backup on the NAS, you have two restore options: the Restore button and the built-in Backup Explorer.
Alternatively, you can install the Hyper Backup Explorer application on your computer. Download the application from the Synology download page, fill in your product type, and go to the Desktop Utilities tab.
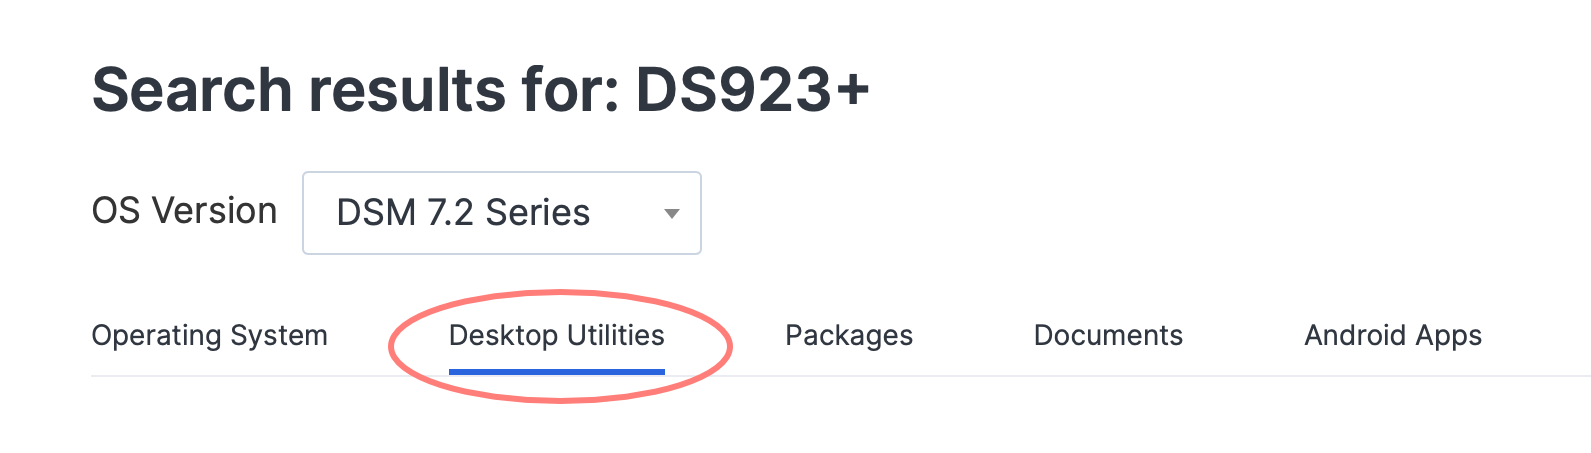
Look for the Hyper Backup Explorer application in the list and click Download. Next, select your Windows, Mac, or Ubuntu & Fedora operating system.
The restore options depend on your backup type and backup version type. See details below. Make sure to have the right options ready before you need them.
Multiple Or Single Versions Backup
There are several ways to restore files and folders from a Hyper Backup backup. The possibilities may vary depending on your backup version type: multiple versions versus single-version. For an in-depth discussion of these backup version types, please reference Understanding Hyper Backup.
Multiple versions restore
The following options are based on a backup type with multiple versions. As far as I know, almost all backup destinations allow you to create this backup version type with Hyper Backup. Some of the most used destinations are:
- Synology C2 Storage
- another Synology NAS with Hyper Backup Vault
- a local folder or USB storage device on the same NAS
- another Synology NAS or server via rsync
You can connect to this backup with applications on the NAS or a computer running Windows or macOS:
- Hyper Backup on the NAS
- Restore
- Backup Explorer
- Hyper Backup Explorer on the computer
When restoring from a multiple versions backup, you can select either the shared folder or its contents up to the folder and file level. Both options within Hyper Backup on the NAS will overwrite the existing folder or file with the one you restore from the backup.
However, the Hyper Backup Explorer application on your computer allows you to select the destination of the restored files or folders.
Single-version restore
You have different restore options with a single-version backup than with multiple versions. You create a single-version backup with Hyper Backup to the following destinations:
- a local folder or USB storage device on the same NAS
- another server or Synology NAS via rsync
You can connect to this backup:
- Hyper Backup
- Restore
- File Station or file browser of your computer
A single-version backup restores the shared folder to its original location. It is readable with any file browser, such as Windows Explorer, macOS Finder, or File Station in DSM.
I discuss the different restore options in more detail in the following sections.
Restore With Hyper Backup
As mentioned in the previous section, Hyper Backup offers two options for restoring a backup with multiple versions and one for restoring a single version backup.
Restore button
Log into DSM, open Hyper Backup, and select a backup task to restore. Click on the Restore button. This button is situated next to the Create button in the top left corner of Hyper Backup. This starts the Restore Wizard. The wizard consists of the following screens:
- select a backup type
- select a backup task
- restore system configuration
- choose data to restore to the original location
- select applications to restore
- click Done
Backup Explorer
Log into DSM, open Hyper Backup, and select a backup task to restore. Click on the Backup Explorer button. This button is next to the Backup Now button in the middle of the Hyper Backup screen. This opens Backup Explorer.
- select backup data at the scale at the bottom
- select folder or files
- copy or download the data
With Backup Explorer, you can not restore the system configuration or applications.
Restore With Hyper Backup Explorer
Install the Hyper Backup Explorer utility on your computer desktop. Start the application and select Browse Local Backup if the backup is located on a NAS, USB disk, or server. Browse to the backup location and open the backup.
If you backed up to the Synology C2 cloud, select Browse backup in Synology C2 Storage.
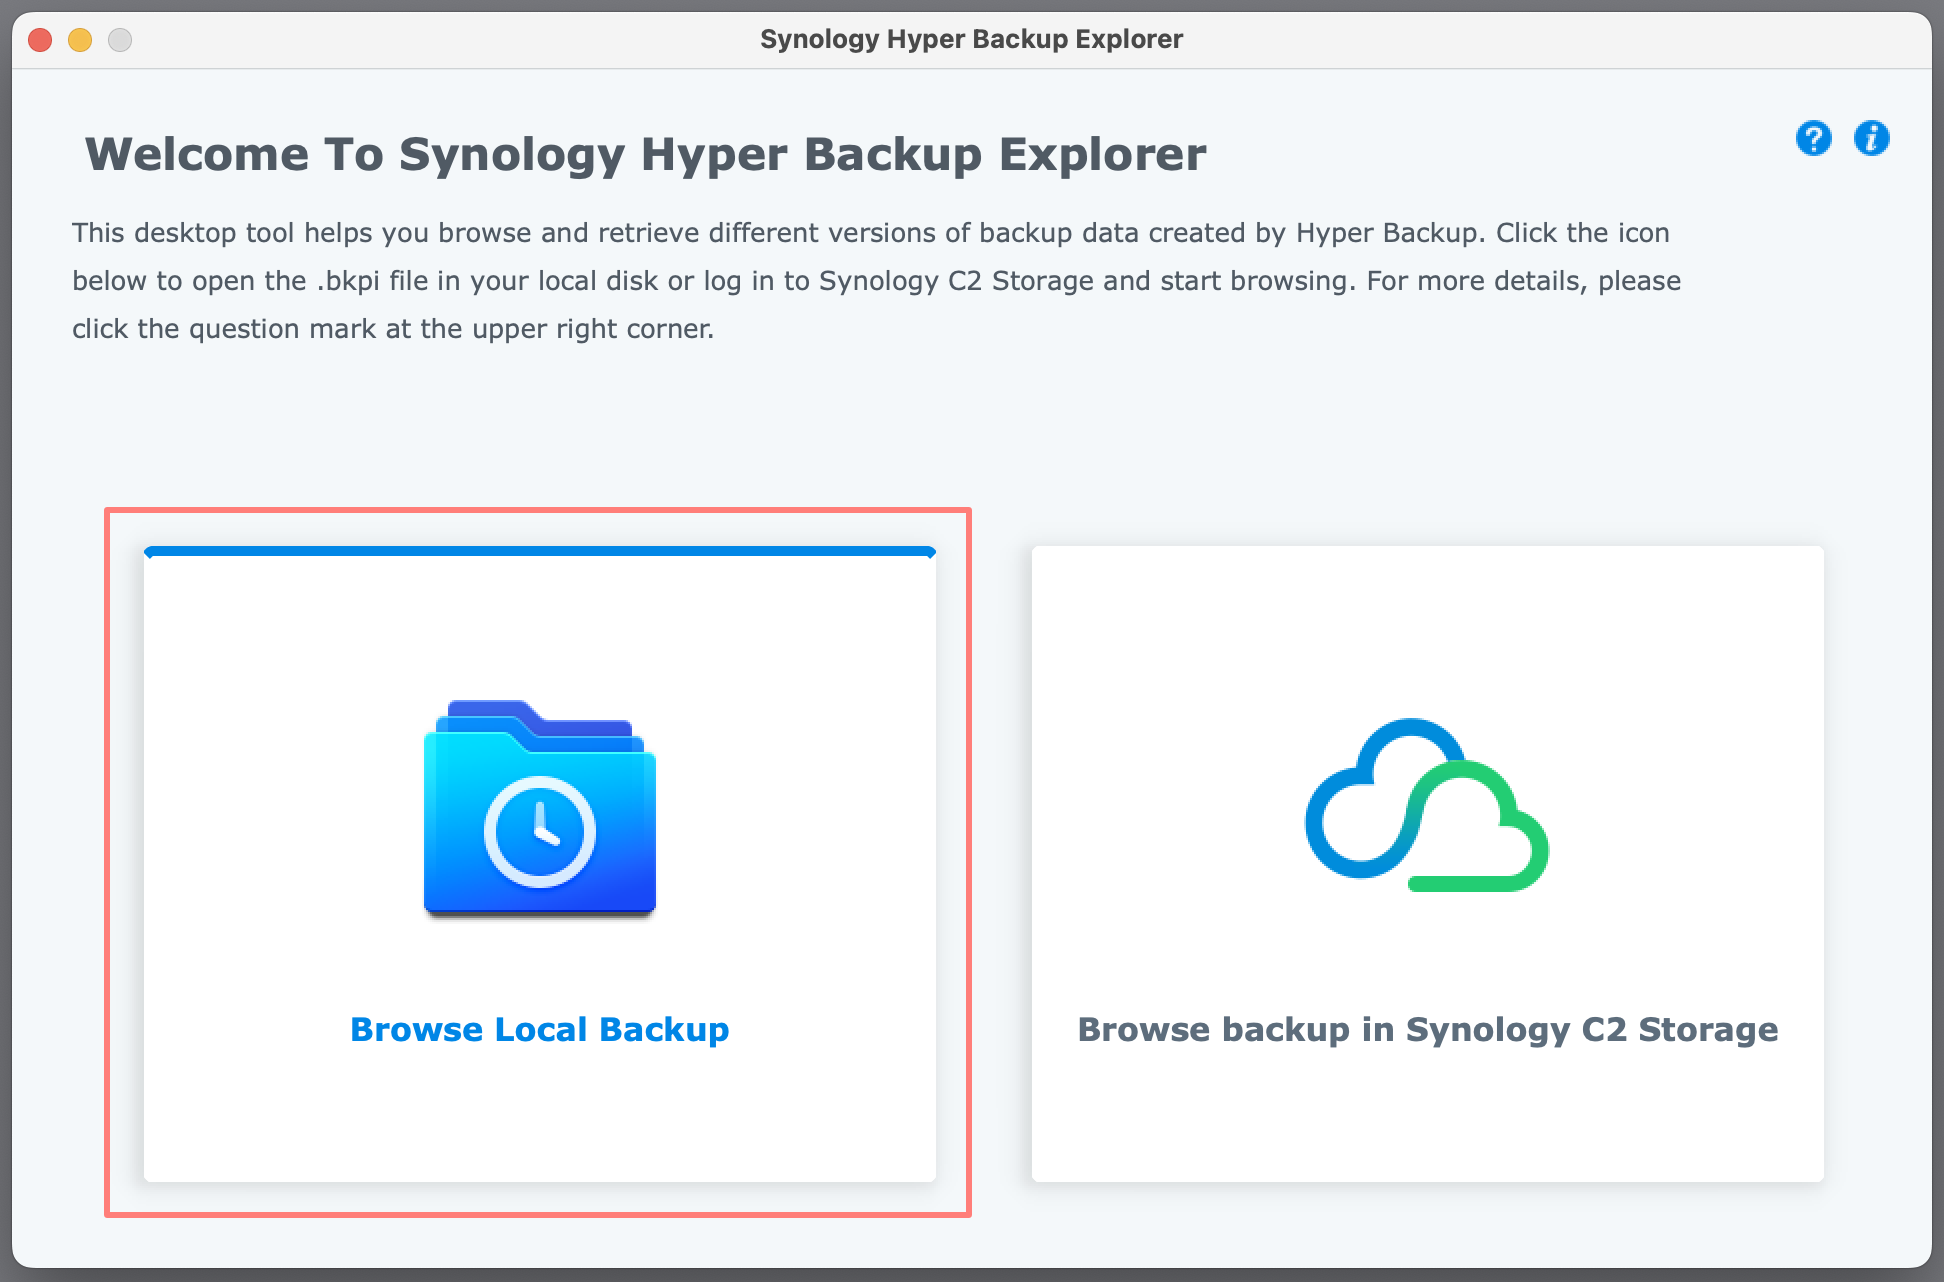
Alternatively, you can browse to the backup location, double-click on it, and then select the Hyper Backup Explorer application to open it.
Please remember to connect to the backup on the NAS with an account with sufficient privileges to open it. By default, these are administrators, but you might delegate Hyper Backup management to other non-admin users.
A file browser window opens with a column on the left and details on the right. Select the main item in the column and review the details. You can restore from the details screen. Select the items to restore, right-click, and select Copy to. This opens a file dialog where you can choose any location your computer and account can access.
Configuration Backup
The NAS configuration is invisible but contains invaluable data for system-level configurations. For the continuity of the NAS service, it is vital that you periodically create a backup after configuration changes.
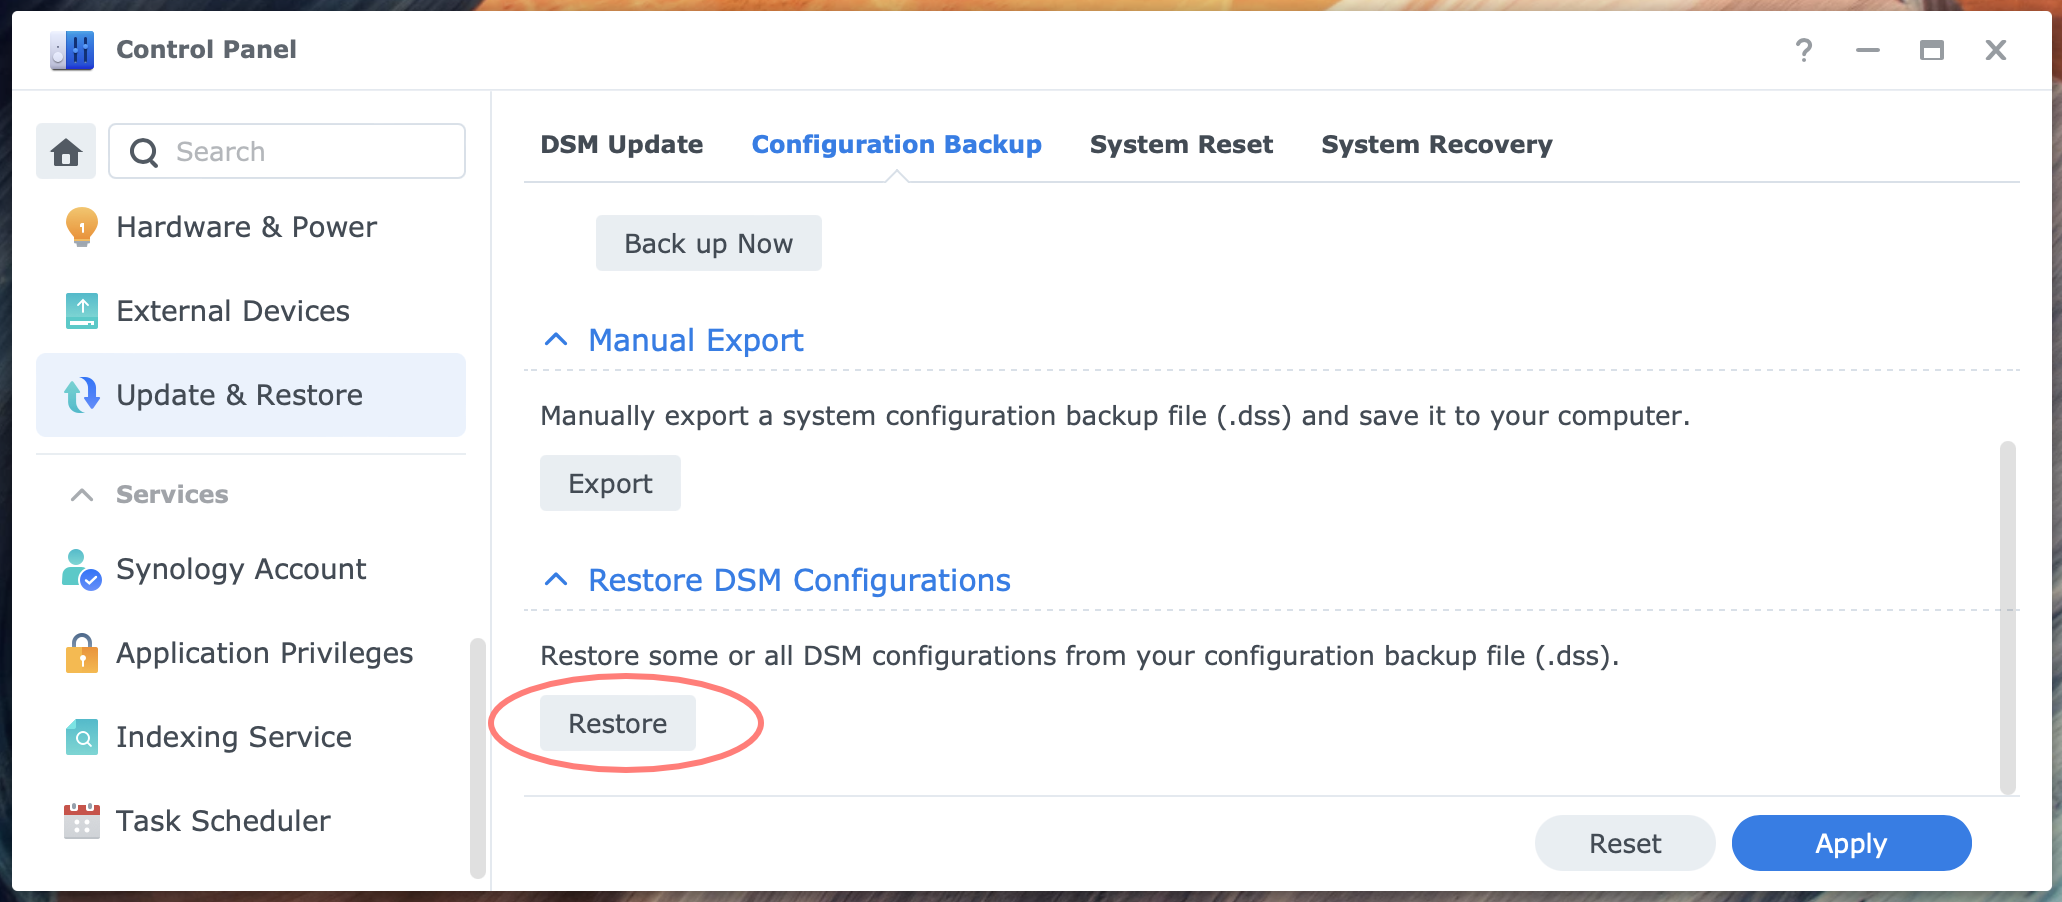
You can restore a Configuration Backup made with Control Panel with the same tool from the Update & Restore > Configuration Backup page.
You can make a configuration backup with Control Panel and Hyper Backup, but I prefer using Control Panel because of several significant differences between these configuration backups.
- via Control Panel, you have more items in the backup (Shared Folder and Hybrid Share Folder), but these items are included in the folder’s backup
- via Control Panel, you can selectively restore the backup; via Hyper Backup, all settings are restored
- via Control Panel, you optionally overwrite conflicting settings; via Hyper Backup, this option is permanent
I suggest creating your configuration backups with Control Panel rather than with or in addition to Hyper Backup.
For more details about this topic, please reference my post, Using Configuration Backup With Synology NAS.
Restore Entire Backup
An entire backup or system backup is a rather new feature of Hyper Backup. It is typically found on DSx18+ models and higher, not on the Value series models.
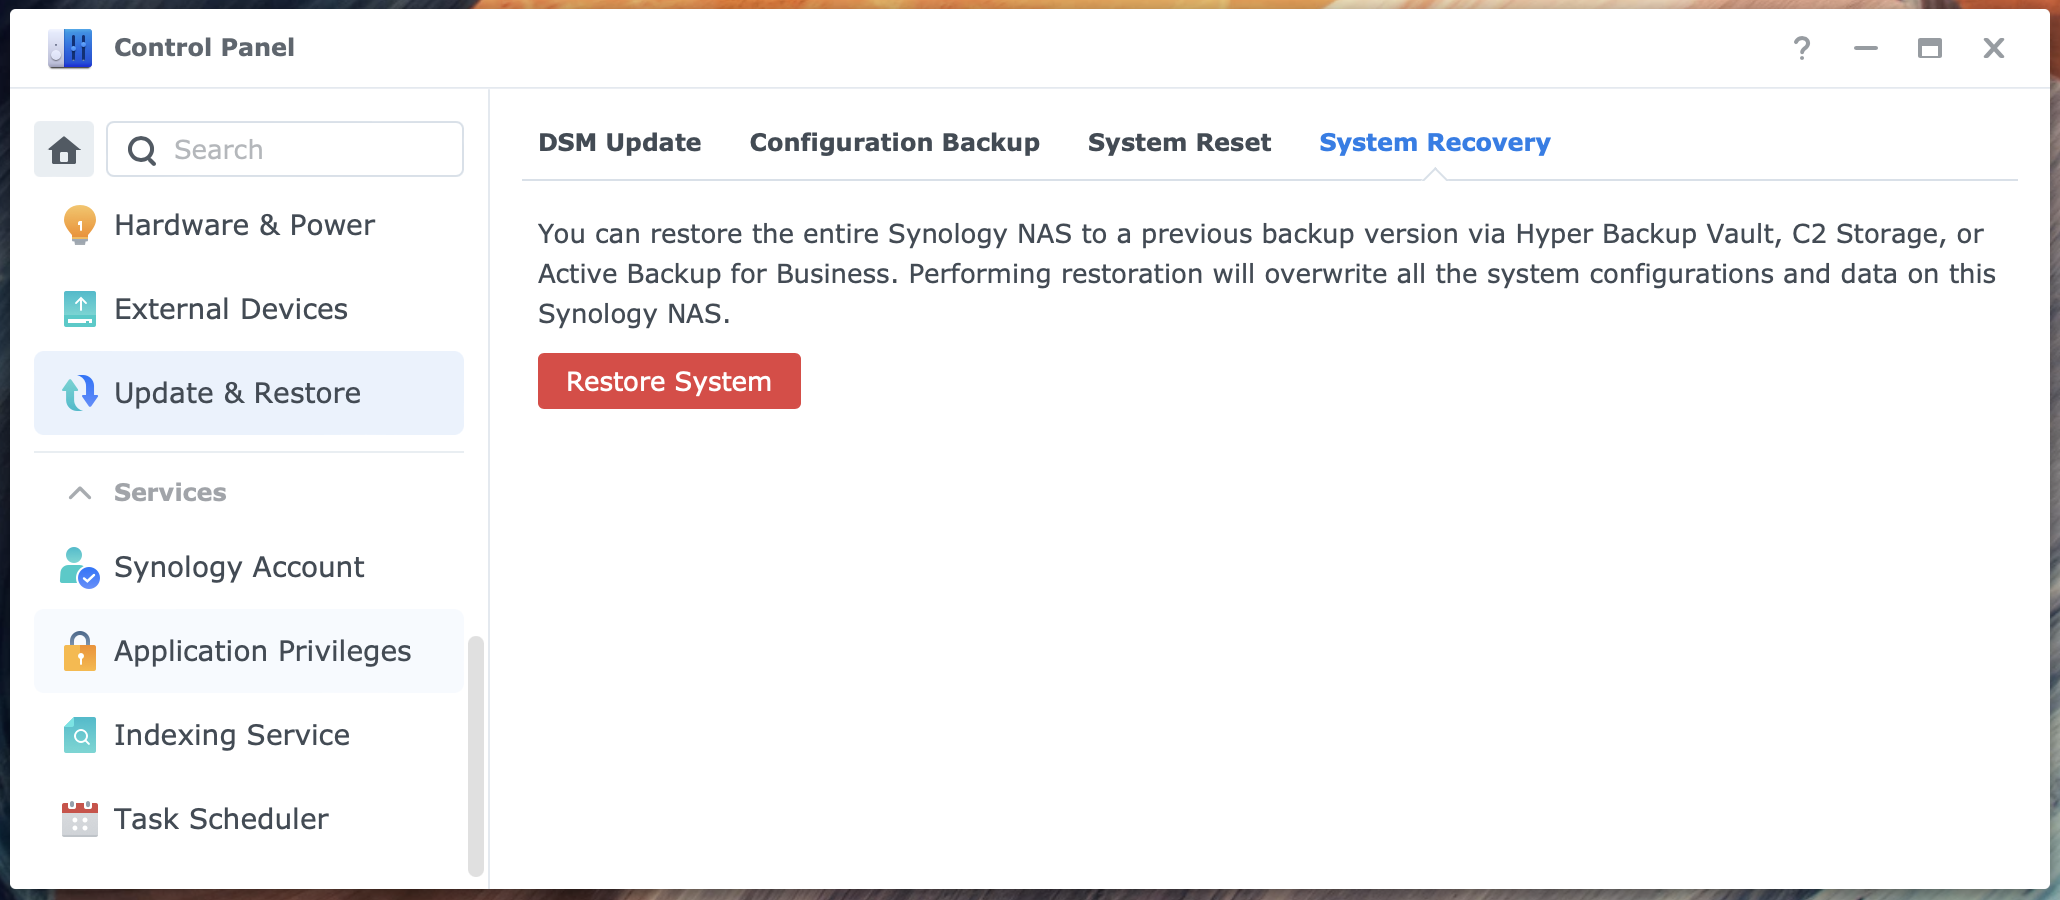
You initiate a restore via Control Panel > Update & Restore > System Recovery tab. Here, you click the Restore System button.
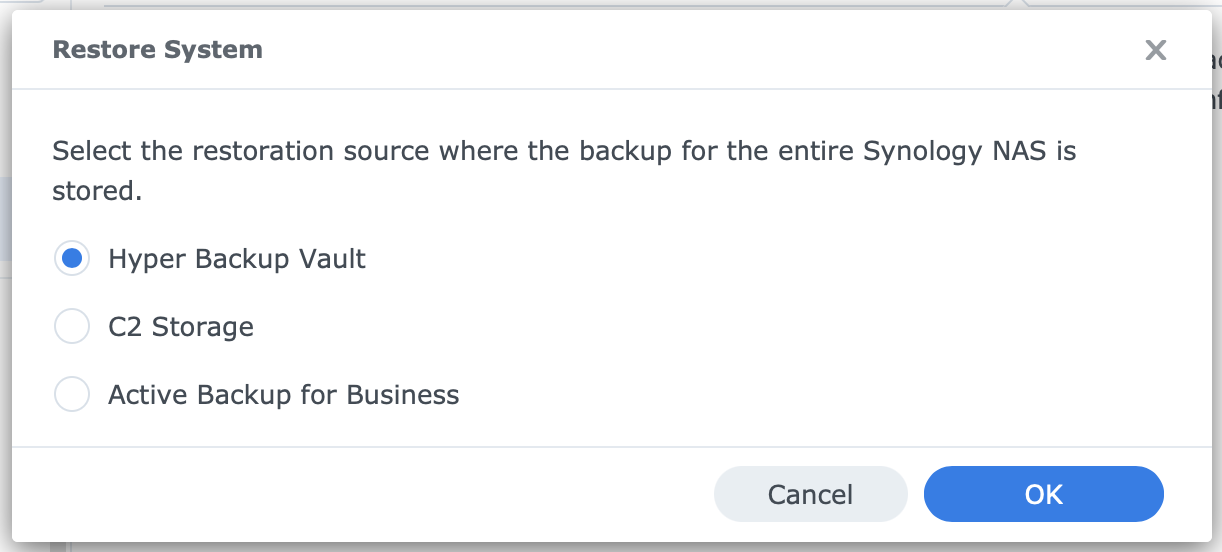
The Restore System dialog opens. Select the restoration source and follow the instructions on the screen in the System Restore wizard.
You can select the backup to restore and optionally include all network-related settings.
Thanks for reading
This post is donation-ware, and I made it to help you. Please consider leaving a comment or even buying me a coffee if it did. I will be eternally grateful.
Paul Steunebrink / Storage Alchemist