In part 2 of installing WordPress on Synology NAS, we focus on the WordPress solution provided by Synology. Its use is limited, but it is easy to install. In a step-by-step guide, I walk you through the entire process. When finished, you can continue in part 4 for tips on backup and other maintenance tasks.
Update 13 Nov 2023: this post now reflects changes made in DSM 7.2.

Install WordPress on Synology NAS (part 2)
This is part 2 of a four-part series about hosting WordPress on Synology NAS. The four parts each cover a different aspect of the topic.
- Part 1 – introduction to WordPress on your NAS
highlight the different scenarios and necessary preparations - Part 2 – install WordPress from Synology (this post)
highlights the installation steps of this setup - Part 3 – install WordPress from WordPress.org
highlights the installation steps of this setup - Part 4 – WordPress maintenance
backup, second instance, suspend, reset and uninstall, internal DNS setup
Overview
The installation and configuration include several steps that I briefly highlight below. Further on in this post, I discuss them in more detail. This post was made with a Synology NAS running DSM 7.2.1
WordPress depends on some services that you need to install first. Fortunately, Package Center installs all dependencies first and in the correct order before installing the WordPress from Synology package from Package Center.
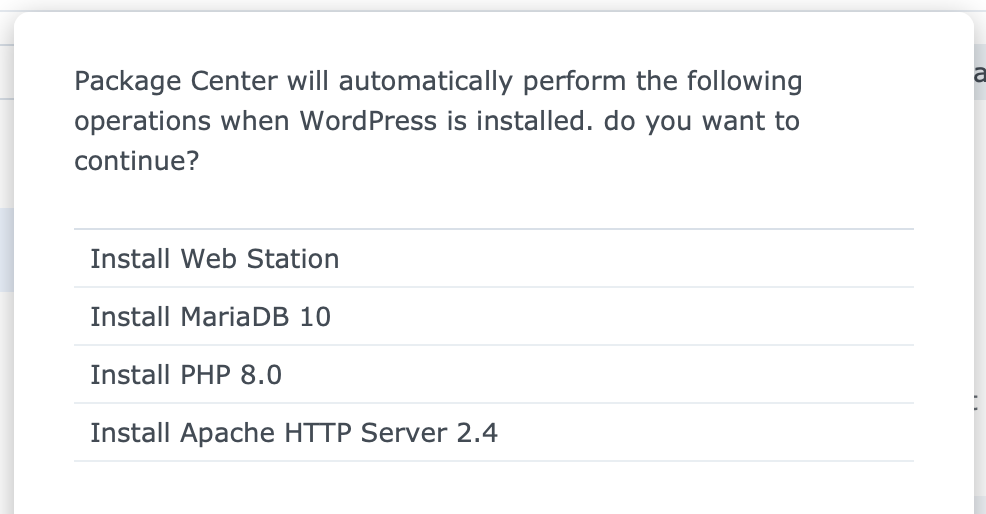
These packages are – as of DSM 7.2.1 – installed with WordPress from Synology, in the order as listed:
- Web Station
- MariaDB 10
- PHP 8.0
- Apache HTTP Server 2.4
- WordPress (from Synology) 6.1.1
Installing WordPress from Synology
In this setup, you see all the steps involved in the standard configuration, as Synology envisioned, with a few extras. The result is a WordPress website that you access locally via your NAS’s IP address or server_name.local in your browser.

Even if you plan to set up WordPress from WordPress.org in the future, it is a great experience to try the easy way first. This way, you can check how your NAS responds to the allocated resources. You also familiarize yourself with the different applications that WordPress depends on and with WordPress itself.
Migrating a WordPress website to another installation is a relatively straightforward process. Therefore, you can use this setup for building new websites that you will host later on a different server when you go live with a site on the internet.
Two ways to install
There are two ways to do WordPress from Synology’s setup. Both methods start in Package Center.
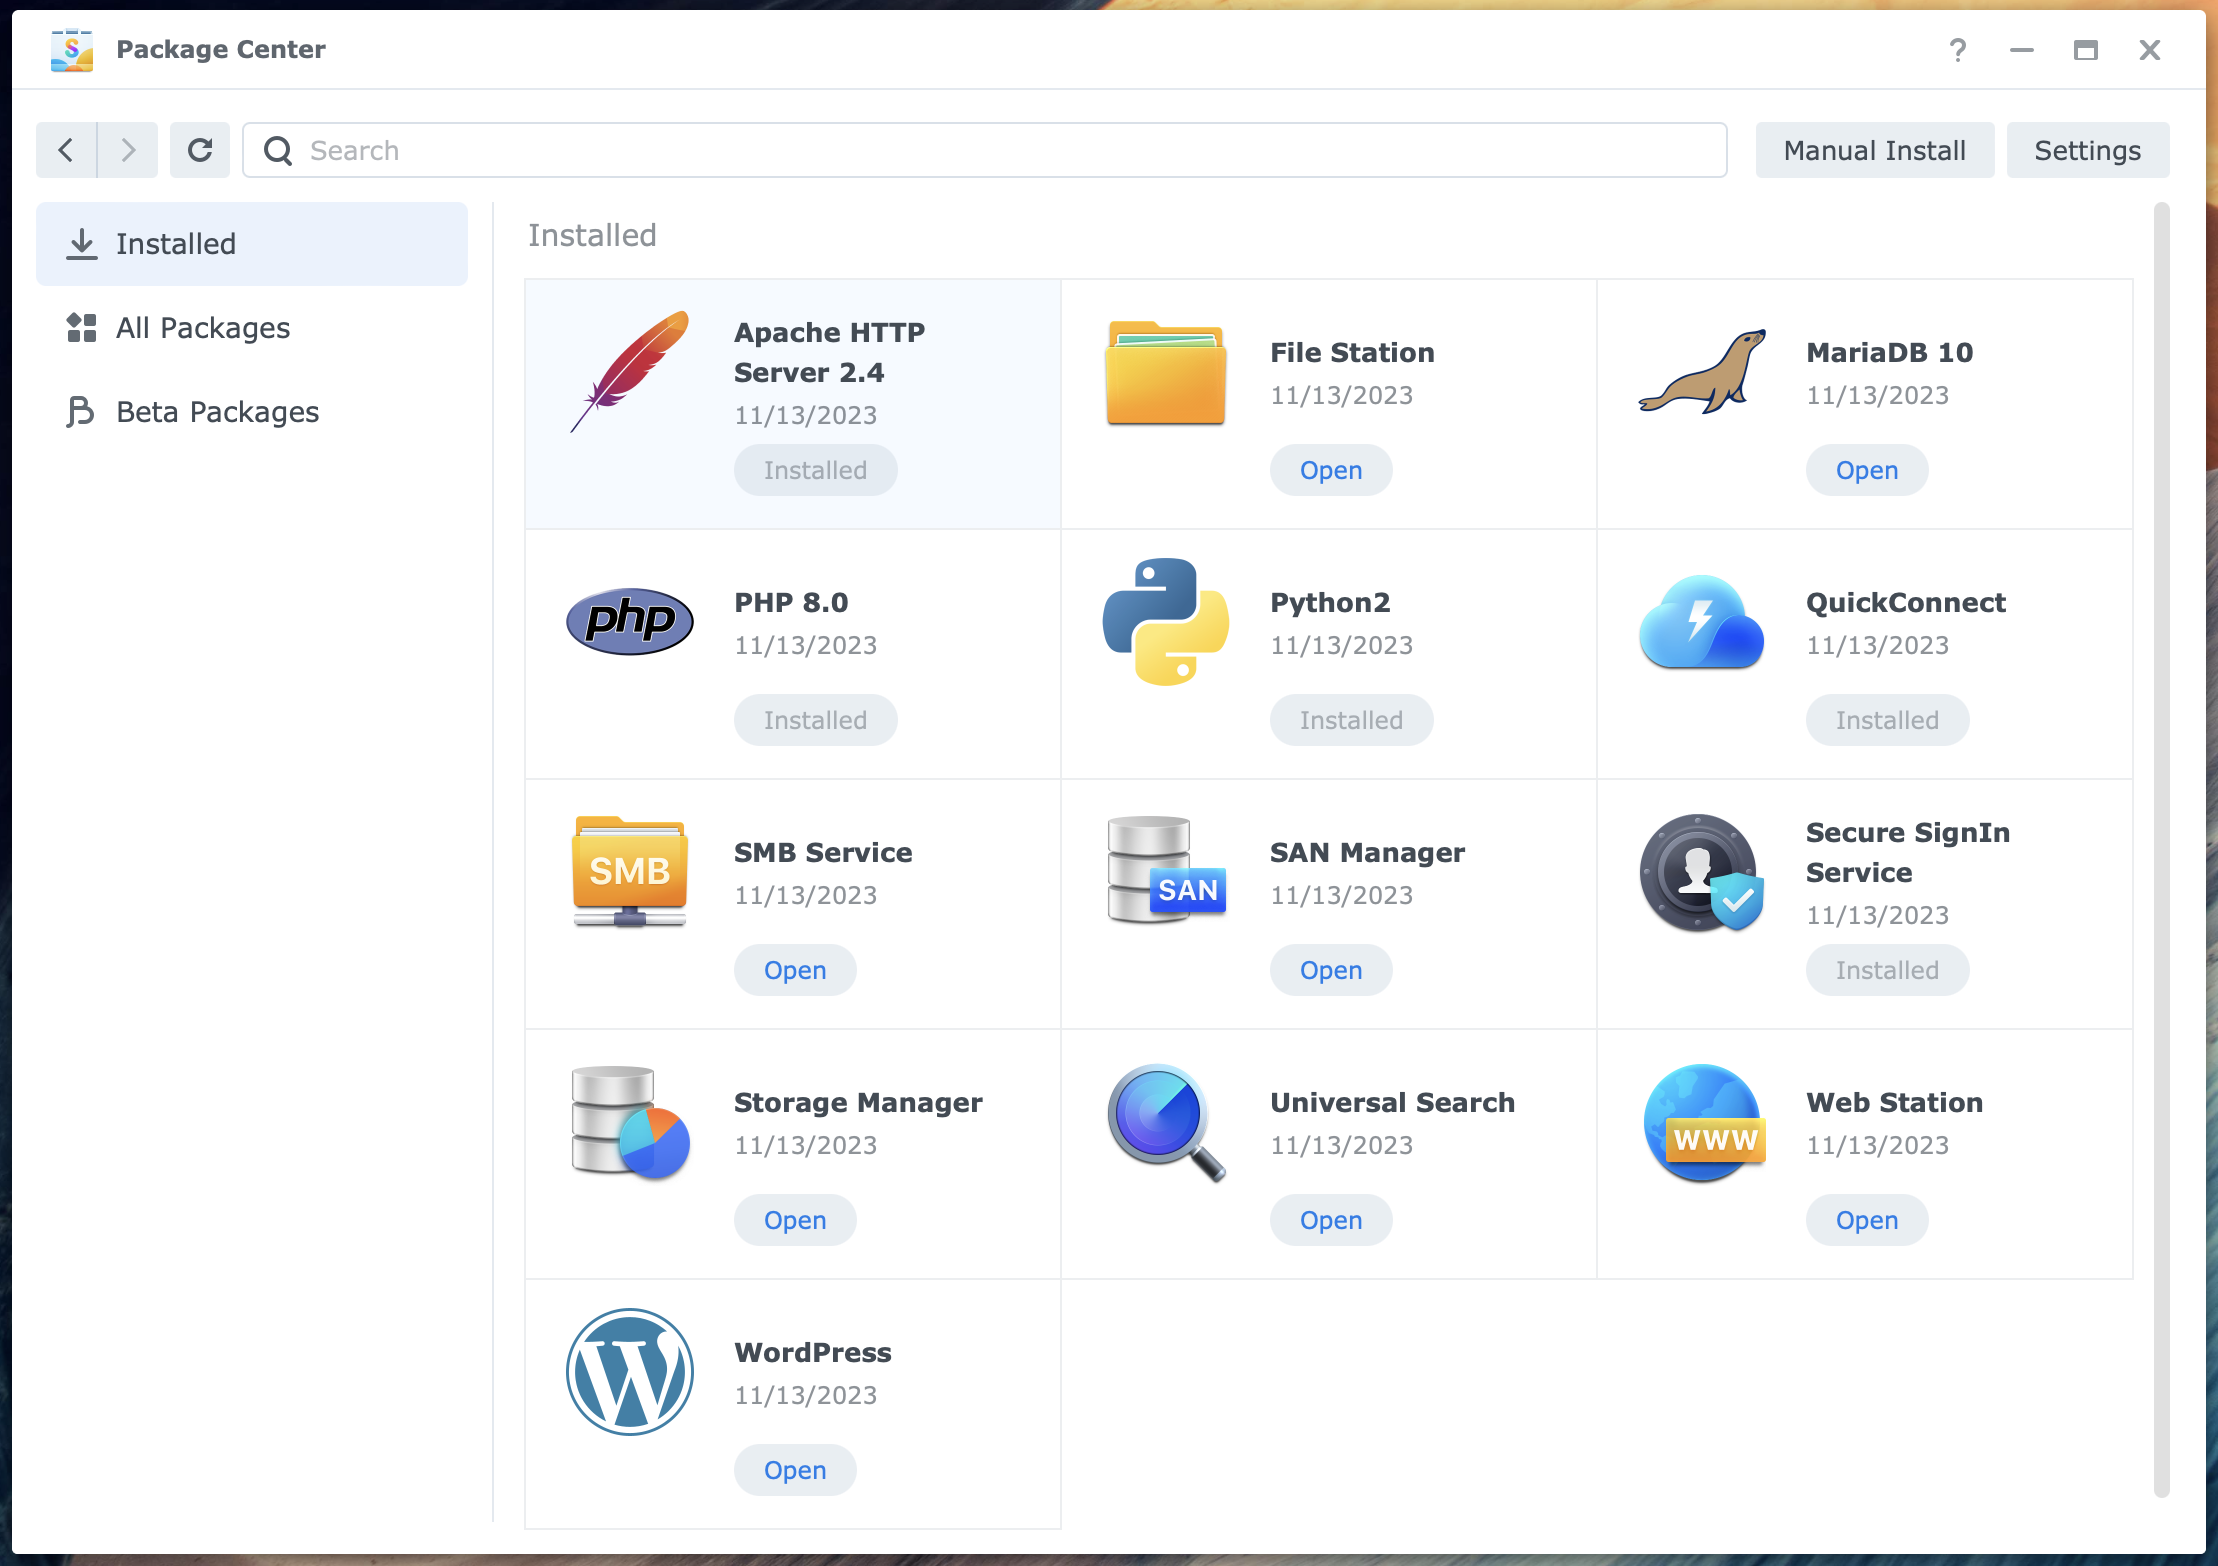
- In Package Center, list All Packages and search for the WordPress package. Click Install. Package Center will install all dependencies in the right order. This is the easiest way.
- Manually install the dependencies in the right order, as I will explain below, and evaluate each package before going to the next. This makes you more aware of the components involved and what they do.
I will discuss the second option here. You could evaluate each component even if you choose option 1.
Install Web Station
From the Package Center, install the Web Station package. This package installs the Web Station application in the main menu. It also creates the shared folders /web and /web_packages and the index.html file. You will find the WordPress files under the /web_packages shared folder at the end of the installation process.

The Web Station package turns your NAS into a web server. To check if Web Station works, open a separate window in your browser. In the address bar, type the IP address of your NAS, like 192.168.10.100, or “server_name.local,” like mynas.local.
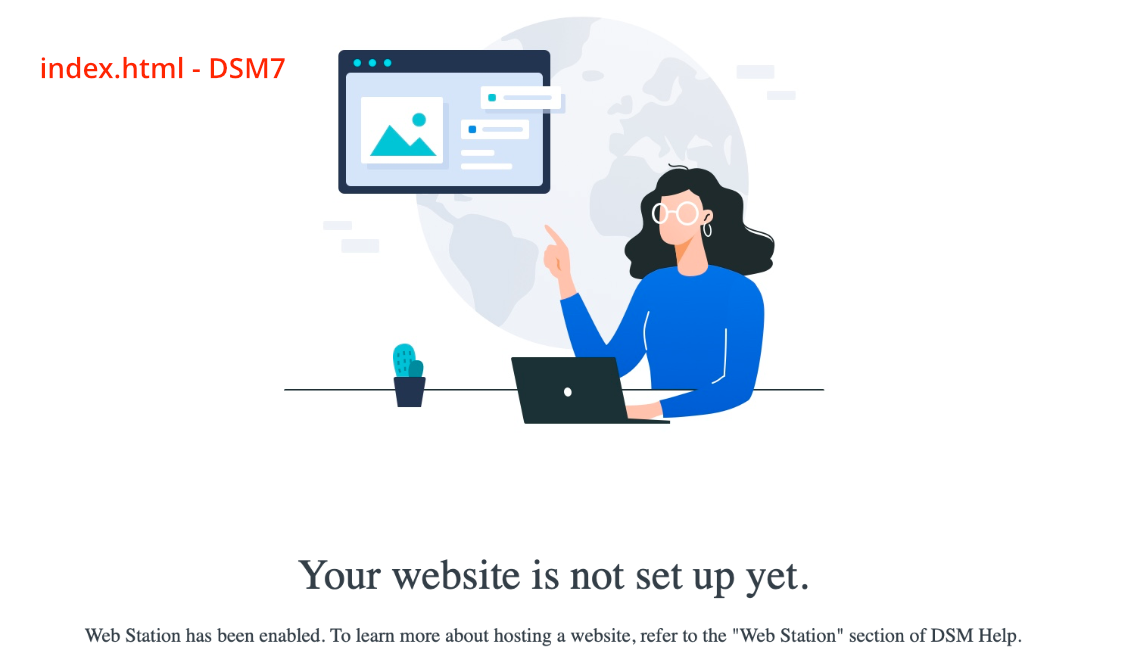
This is the index.html file. Now you know that Web Station works. For reference, please look up my Web Station datasheet.
Note
Before you installed Web Station, entering the IP address or server_name.local of your NAS in your browser gave the DSM login screen. The port number (default 5000 or 5001) was added automatically.
You must add it yourself to get the DSM login screen. If you omit the port number, you get the index.html screen from Web Station. As a result, enter IP address:5000 or server_name.local:5000 of your NAS in your browser.
Note that your port number can differ if custom port numbers are configured in Control Panel > Login Portal.
For your convenience, I suggest you update the bookmark in your browser to include the correct port number to access the DSM login screen.
If you have reserved a specific volume for WordPress on your NAS, you can install the packages on that volume.
Install MariaDB 10
WordPress needs an SQL-type database, and MariaDB is the tool for this. In Package Center, look up MariaDB 10 and install it.

During the MariaDB 10 installation, you create a password for the database root account. You will later use this password when WordPress makes a database and database user.
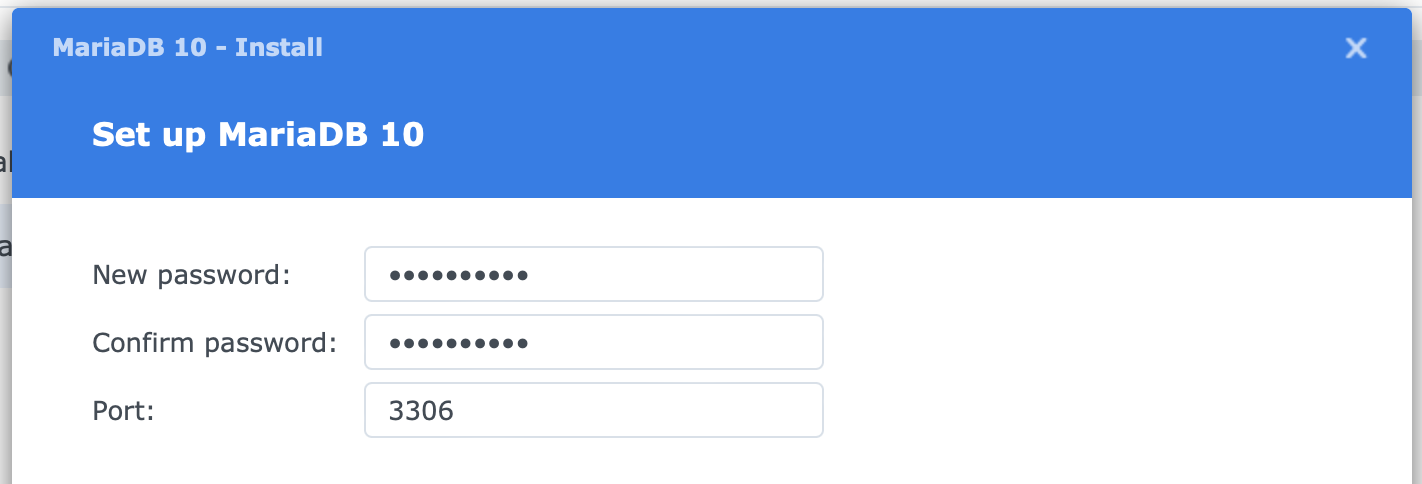
Create a strong password and unique password and store it in a safe location. Please copy and paste it into the screen twice. This avoids typos. Leave the port number at 3306.
Note that you will need the password again in a minute.
After the installation, you find the MariaDB 10 application in the main menu. The application allows you to reset the root password and the database. Usually, you do not need to use this application. For reference, please look up my MariaDB 10 datasheet.
Install PHP
WordPress is a PHP application, so you need to install a version of PHP. Install the PHP 8.0 package from Package Center.

After installation, you won’t find any traces of it in DSM, no application in the main menu, or a folder. Also, after installation, there is nothing to configure.
Summary: nothing fancy here. Check under Installed in Package Center. For reference, please look up my PHP 8 datasheet.
Install Apache HTTP Server 2.4
WordPress needs an HTTP server, and WordPress from Synology uses Apache HTTP Server 2.4.

As with the PHP package, there are no configurations to make. Again, there is nothing fancy here. Check under Installed in Package Center.
For reference, please look up my Apache HTTP Server 2 datasheet.
Install WordPress
Finally, you install the WordPress package. You get two screens to fill in information that lets WordPress connect with the database from the MariaDB 10 application.

Right after the installation, you run the famous 5-minute WordPress installer. During this process, you provide the site name and create an administrative user account for the website. I cover that in a minute.
Set up WordPress
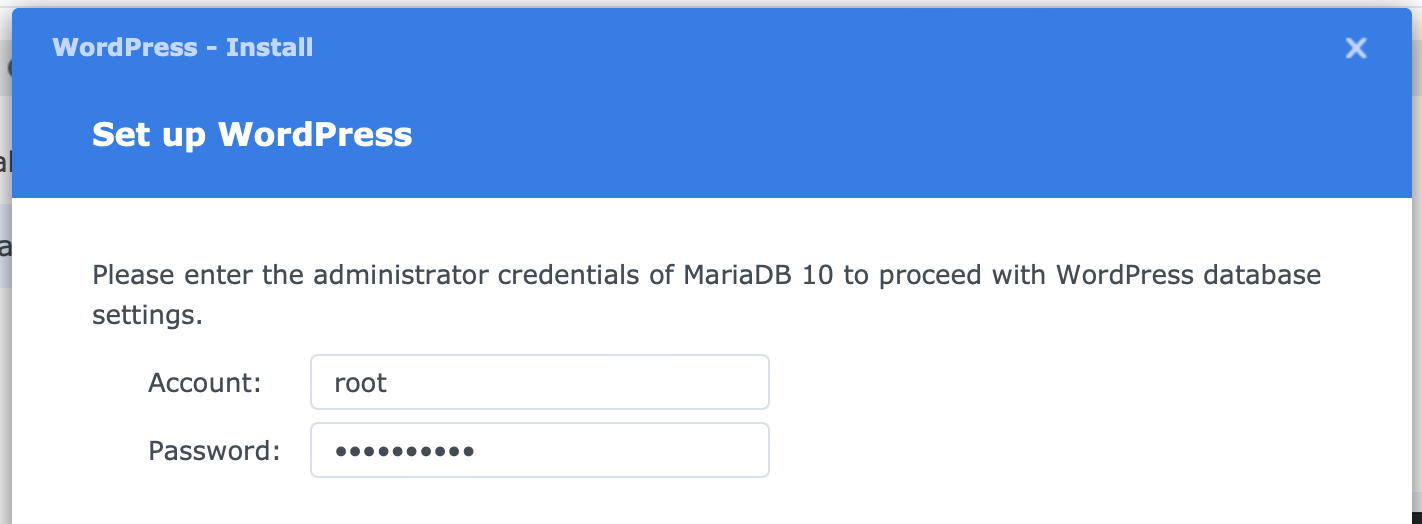
You are immediately asked for the administrator credentials of MariaDB 10. This is the account root and password you created in the previous step. This allows WordPress to set up its database and database user in the next step. Once that is done, WordPress will not use the root account anymore.
Set up the WordPress database
You enter three items on this screen. The database name and database user account are already filled in. You can change them, but I see no need to do this. Fill in a password.
Again, create a strong and unique password, store it in a safe location, and copy and paste it into the screen to avoid typos. Do not reuse the root password.
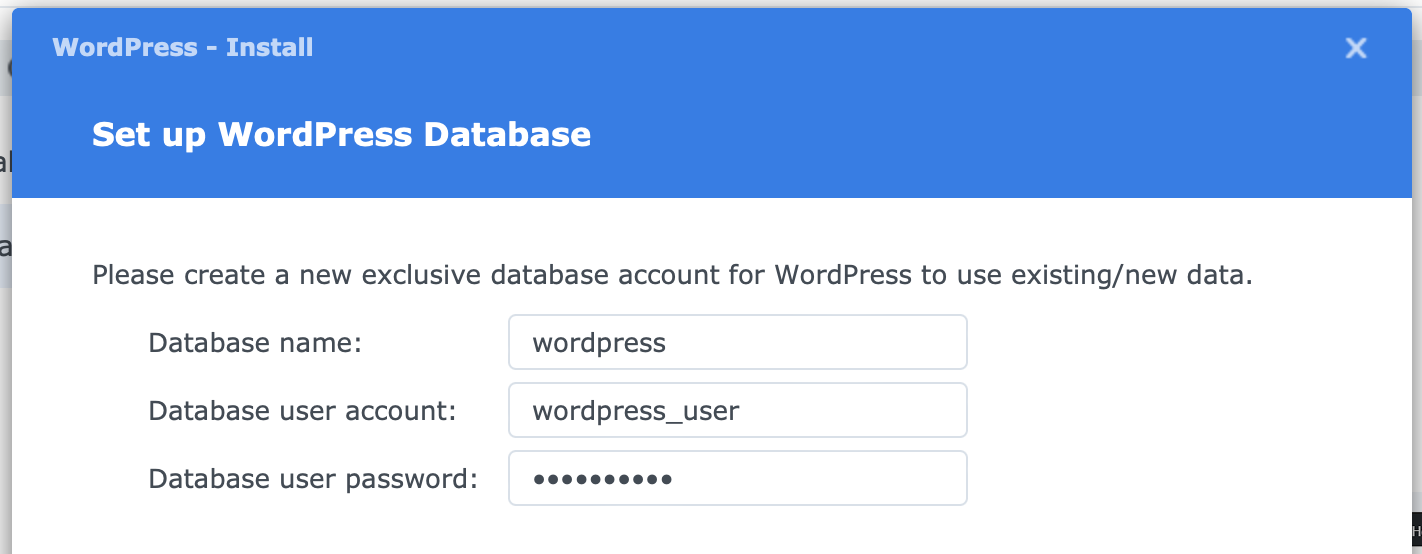
WordPress uses this account to connect to the database and read and write information. You will never use this account to log into WordPress. It is a database account.
We create your first WordPress account in a minute.
Ready but not done yet
Technically, you now installed WordPress with all dependencies and made a connection between WordPress and the database. The WordPress files are in the /web_packages/wordpress folder. However, the WordPress website does not yet exist.
You bring WordPress to life with the WordPress installer in the next step. For DSM 7 users, there is one optional step to take.
For reference, please look up my WordPress datasheet.
Configure The WordPress Alias
This is a feature that applies to Web Station in DSM 7 only. You can configure the alias. This step is optional.

In the example from the screenshot above, the address to the WordPress website is http://ip_address_nas/wordpress. The part after the IP address is the alias.
The default alias is “wordpress” without quotes. This is configured in the Web Portal page in Web Station.

You can edit the alias. Open Web Station > Web Portal and select the WordPress service in the right pane under Default Portal. Double-click on it or click the Edit button above.
In the Edit alias portal dialog, see Alias and change “wordpress” to another value like “intranet” and click Save.
Important: use lowercase characters and no spaces or special characters in the alias. Please keep it simple.
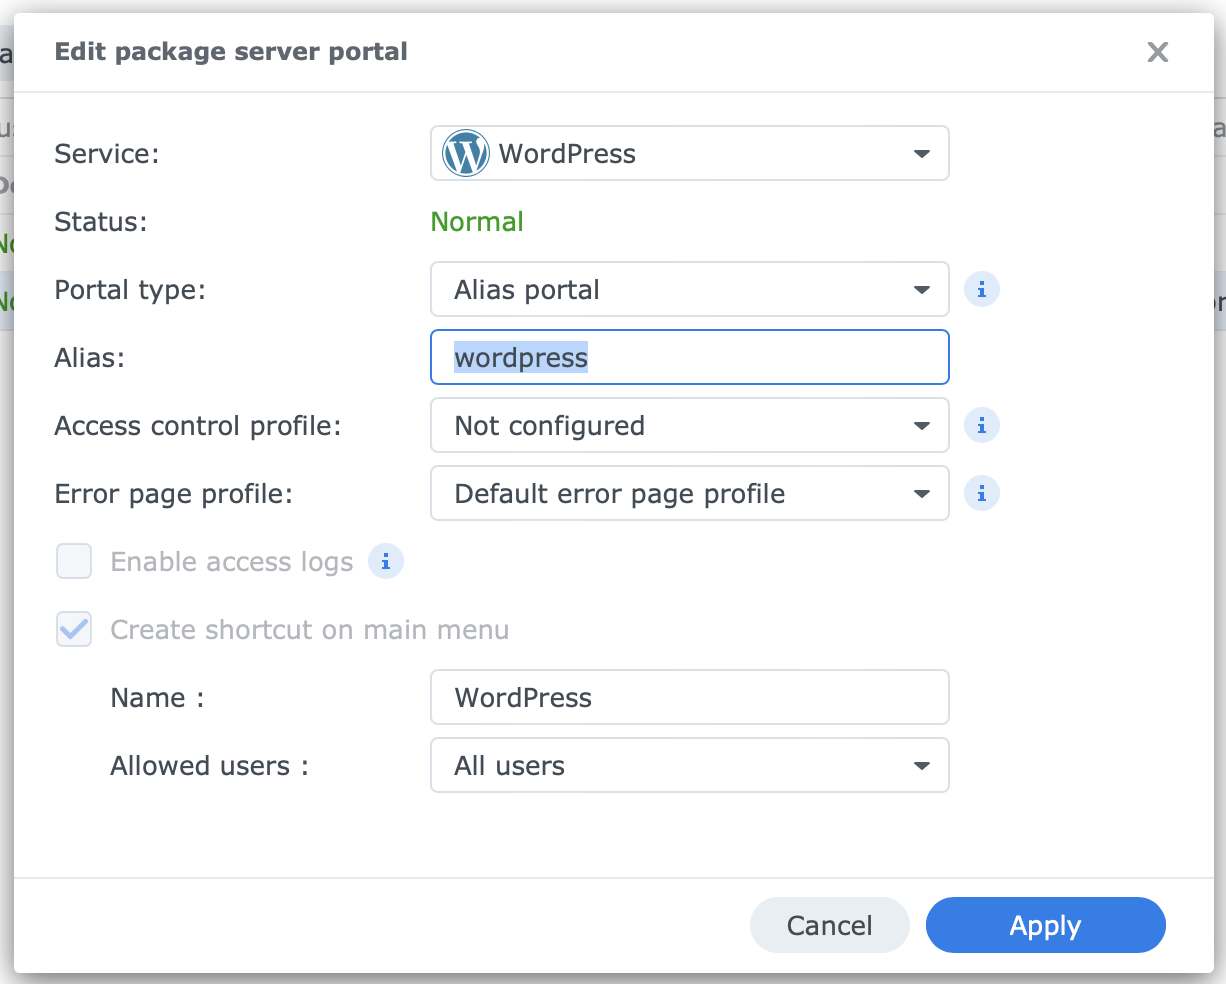
Now, your WordPress website is accessible via http://ip_address_nas/intranet or http://server_name.local/intranet.
You can also configure an Access Control Profile for your site, an Error page profile for custom error pages, and more. I do not cover these items in this post.
Note
I suggest you configure the alias before you set up WordPress. I have not tested whether or not changing the alias after the fact also works or breaks your WordPress website.
Run the WordPress Installer
After installation comes configuration: run the WordPress installer. This is also known as the 5-minutes installation. The installer is a PHP script inside WordPress. There are two ways to start the installer. The result is the same.
You can open the WordPress application in your NAS’s main menu. This will open the installer in a new browser window or tab.
The address is http://ip_address_nas/wordpress/wp-admin/install.php. Typing in that address in your browser is the other way.
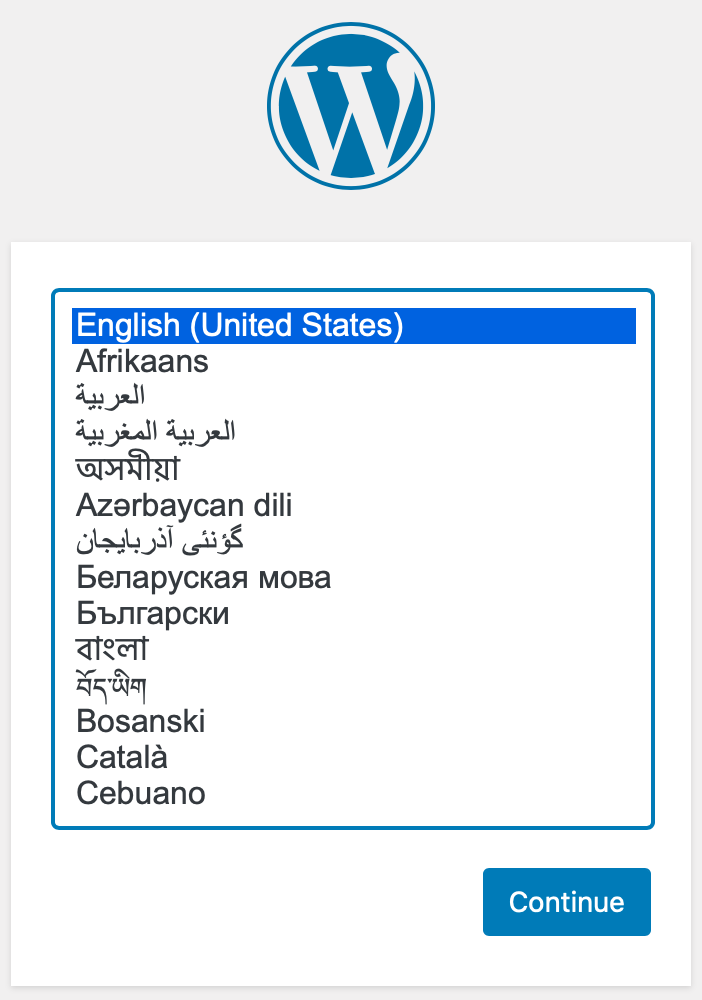
- Language
in the first screen, select the language, and click Continue
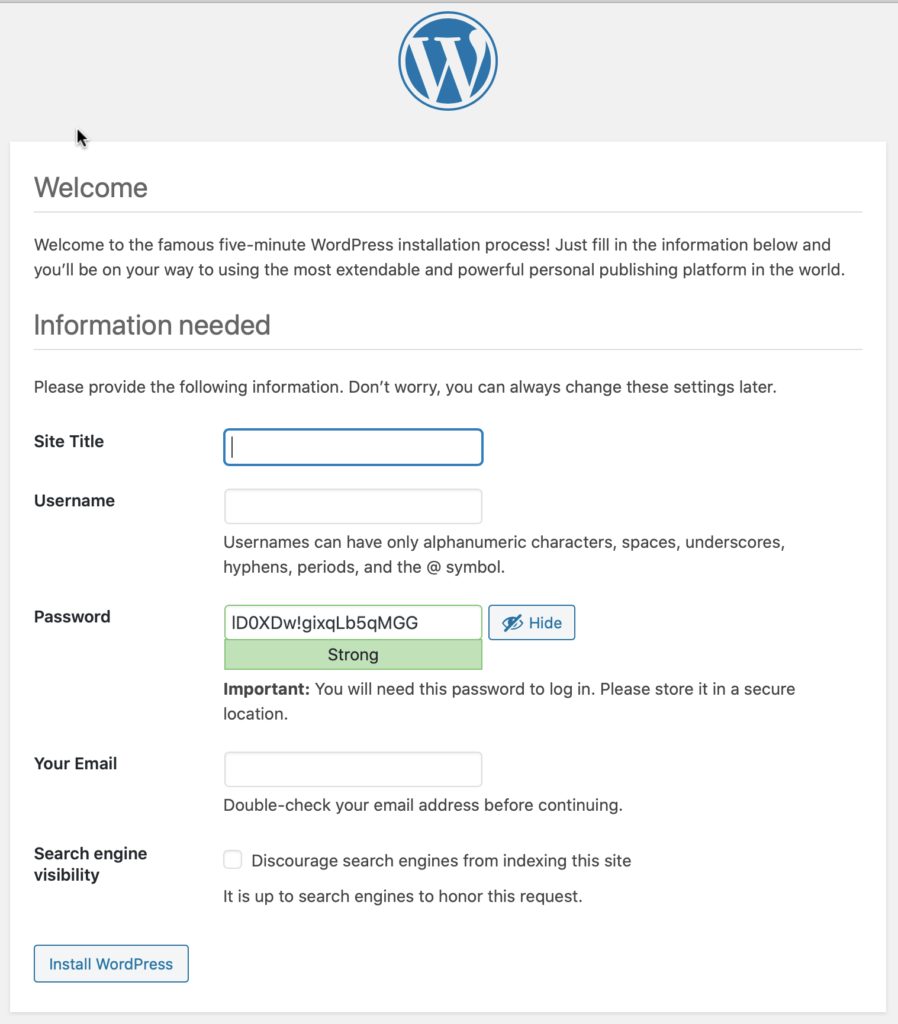
- Welcome
in the Welcome screen you are requested to fill in some information- Site Title
WordPress uses this as the title of your site. It can be the business name, or the name of your sports club or hobby.
Note that you can easily change this afterwards so no reason to sweat about it. - Username
This is the first user that you create to log in to WordPress. It will have administrator privileges and you will typically use it to set up your web site in WordPress. Note: you are advised to create at least one additional non-administrator account later for creating content.
Tip: choose a name that is not obviously recognizable as administrator. Avoid everything with ‘admin’ in it. - Password
This is the password of the administrator user mentioned above. Again, create a strong and unique password, save it and paste it into the screen to avoid typos. Do not reuse passwords. - Your Email
Enter an email address for the user. This email address is used for administrative purposes by the web site. Messages about a finished backup for example are send to this address. - Search engine visibility
If you are building your website, you may not need search engines crawling your site just yet. If you use your site internally, this setting does not affect it anyway.
- Site Title
Now, click Install WordPress to make it happen. Hopefully, you get the Success! screen. Click on the Log In button.
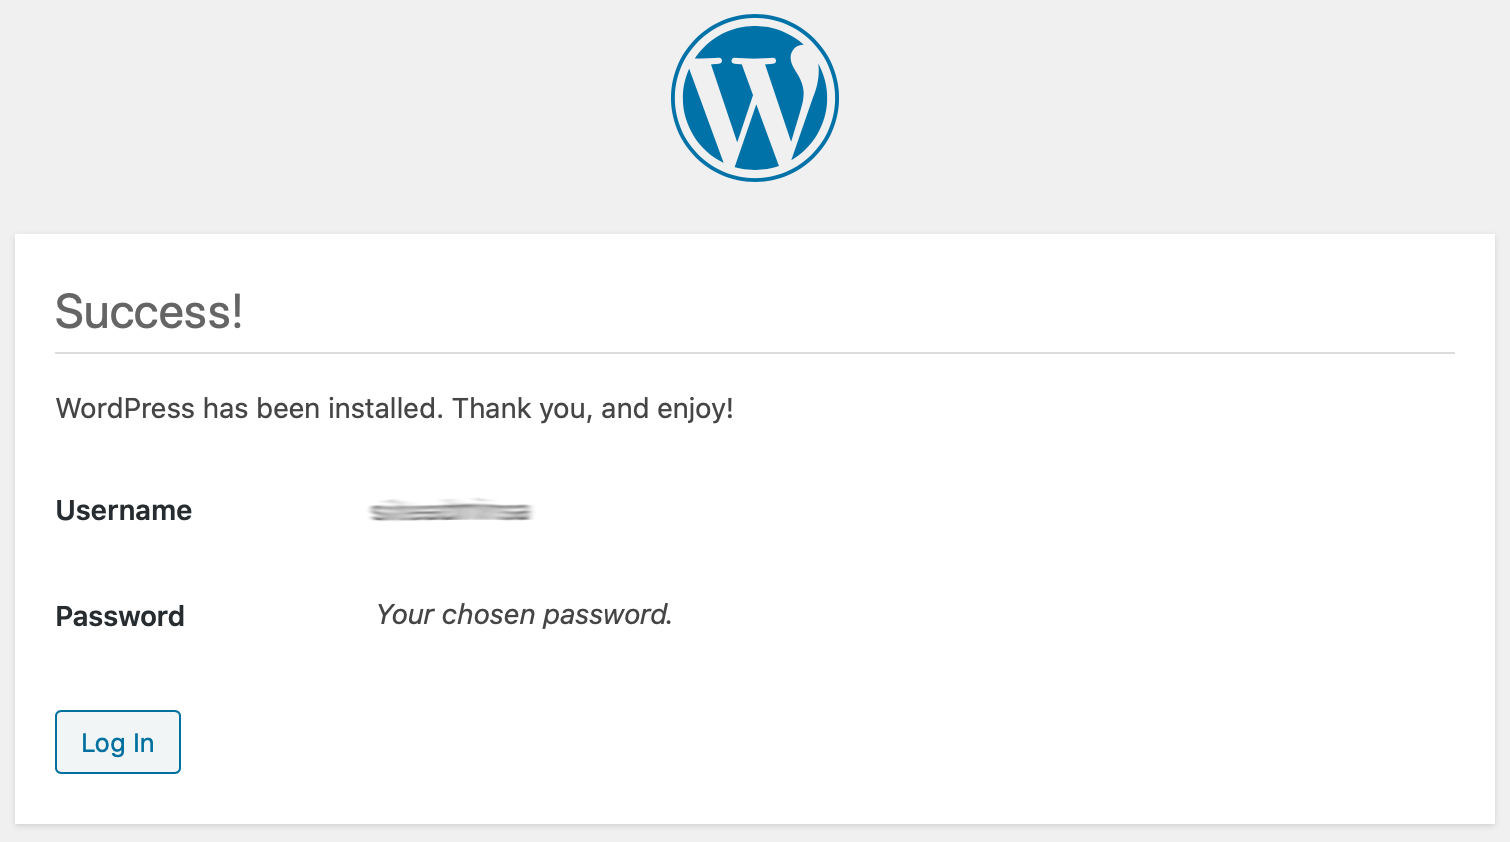
You now get the login screen that gives you access to the backend of your website.
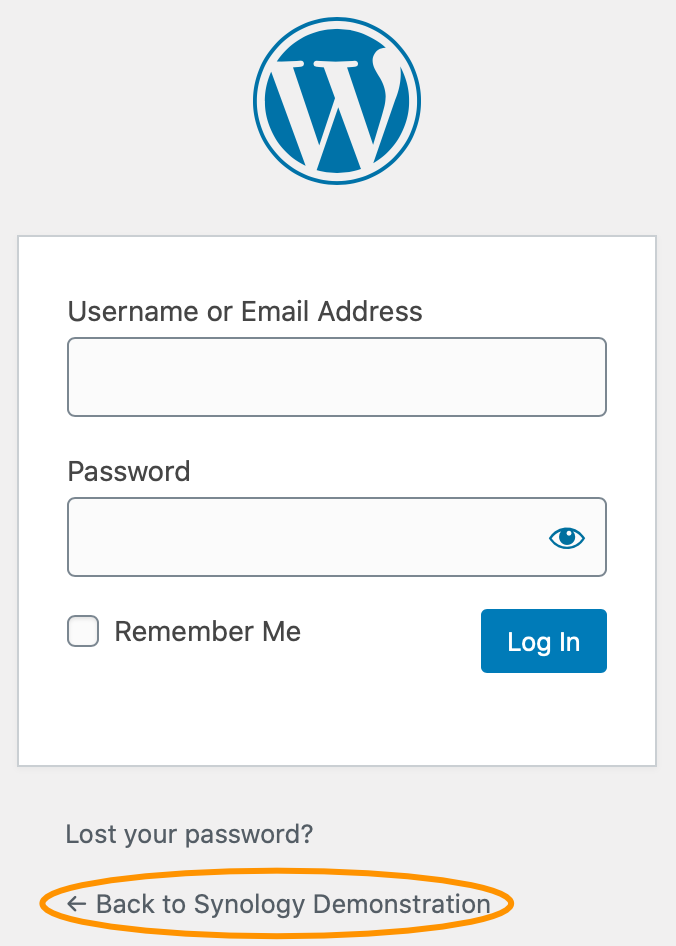
Instead of logging in, let’s have a look at the website! Click in the log-in screen on Back to <site name> or type in the browser http://ip_address_nas/wordpress/.
You should see your WordPress website with the Site Title you just filled in.
With the address http://ip_address_nas/wordpress/wp-login.php you get the login screen. Log in with the username and password you just made with the WordPress installer. You are now in the admin pages or Dashboard. Here you manage your website. You can log out from the top-right corner.
Note that you now technically have two websites—one at http://ip_address_nas/ and one at http://ip_address_nas/wordpress/. The first one is from Web Station’s index.html file, as mentioned earlier.
Remember to log in to DSM via http://ip_address_nas:port_number/. For example, http://192.168.10.100:5000 if 5000 is your DSM port number (which is the default for HTTP access).
Thanks for reading
This post is donation-ware, and I made it to help you. Please consider leaving a comment or even buying me a coffee if it did. I will be eternally grateful.
Paul Steunebrink / Storage Alchemist

Thanks for your time on this tutorial.
I have tried to follow, but every time I get the same error:
Internal Server Error
The server encountered an internal error or misconfiguration and was unable to complete your request.
Please contact the server administrator, admin and inform them of the time the error occurred, and anything you might have done that may have caused the error.
More information about this error may be available in the server error log.
Additionally, a 500 Internal Server Error error was encountered while trying to use an ErrorDocument to handle the request.
Can you help me with that?
Thanks in advance!!
Hi Miguel,
Sorry to hear that you are not successful with your setup. If you like, please send me details about your NAS, RAM in the NAS, version of DSM via email (link is on the home page, at the bottom), and a screenshot of the error(s).
Best regards, Paul Steunebrink / Storage Alchemist
Thanks for your efforts for making these tutorials. The contents are crystal clear and should be good for beginners like me.
So, I have WordPress installed on my Synology NAS using the DSM 7 package centre following Part 2 of the Tutorial. Having enabled DDNS support to allow access to the NAS through a registered hostname provided by one of those free DDNS service providers, I have verified that the port forwarding operation of my router with a simple html webpage created in a sub-folder in the “web” shared folder, “e.g., …/web/sub-folder/index.html” after setting up of a virtual host.
In an attempt to make my WordPress become extenally accessible in the same fashsion, I am eager to create a a second virtual host for it. However, unlike the personal website in “web” mentioned above, I found that the default file path of the WordPress (as a DSM 7 package), i.e., “…/web_packages/wordpress” was not available for selection as the “document root” of web service portal in Web Station (although ‘web_packages’, and any sub-folders therein, have been defined as shared folders). Could you please advise how I can complete Web Station customisation for creation of a virtual host for my WordPress website to make it publicaly accessible from URL like http://username.ddns-domain/wordpress-alias?
Million thanks!
Hi, the folder name ../wordpress is reserved for the Synology WordPress package. Please use a different name. See part 3 of this series for detailed instructions. I suggest using these instructions for both your WordPress websites, instead of the Synology package, if you like to make it externally available.
Best, Paul Steunebrink / Storage Alchemist