In setting up a Synology DNS Server, we look at how to set up a primary and secondary DNS server, configure forwarding, and create a forward zone. You also configure the DNS clients and learn how to troubleshoot DNS issues.
Setting Up DNS Server On Synology NAS
A Synology NAS is well-known as a stable and secure file server. The system software DSM offers most industry-standard protocols for a wide range of connectivity.
It provides additional productivity tools, cloud connections, and remote access features for businesses of all sizes and home users.
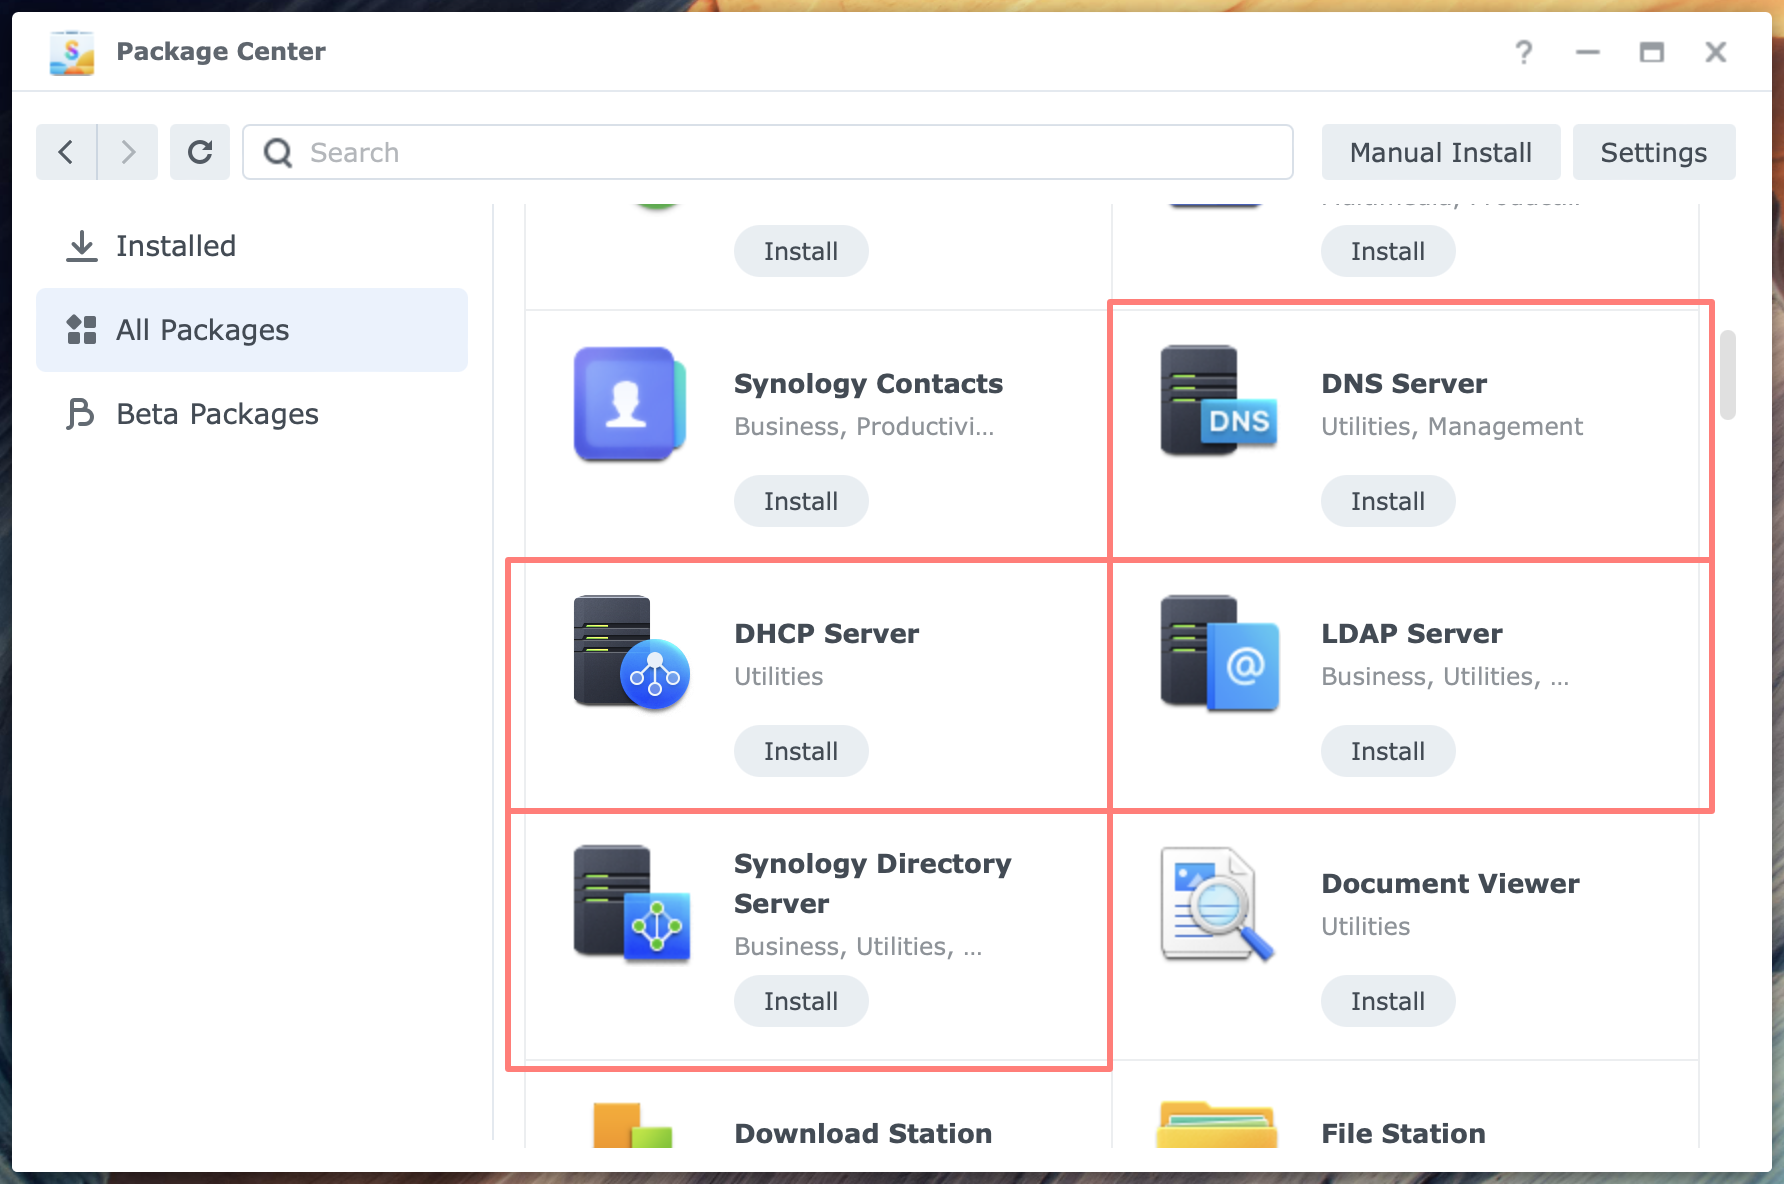
For small and medium-sized businesses, a Synology NAS offers several network services that you can host on your NAS. The DNS Server is perhaps the most important one. Other network services are the DHCP Server, LDAP Server, and Synology Directory Server.
A functioning DNS server with a zone for the domain that LDAP uses is mandatory for setting up an LDAP Server. For Synology Directory Server, however, you do not manually configure the zone for the domain. The Synology Directory Server application handles this task when setting up the directory.
I discuss each of these services in several posts as a business solution. This post was written as preparation for an LDAP Server installed on a Synology NAS in mind. If you plan to use LDAP, please refer to Setting Up LDAP Server On Synology NAS.
Overview
This post discusses setting up a primary and optional secondary DNS server. Setting up a server is one thing; ensuring that computers and other clients on the local network use it is another. Both graphical user interface (GUI) and command-line tools are helpful here.
Servers we use
We use the following servers and domains in this post. Where applicable, replace the names and IP addresses with yours.
- primary DNS server
- hostname: vdsm7-1
- IP: 192.168.2.201
- secondary DNS server
- hostname: vdsm7-2
- IP: 192.168.2.202
- domain name
- synodemo.com
- this is a registered domain name that I use for demonstration purposes only
Design Considerations
The Synology DNS Server is a fully featured service with an easy-to-use graphical interface, initially making it easy to set up. However, successfully setting up a DNS server requires some careful planning.
- domain name
- you typically buy a domain name on the Internet; next, you create and manage one or more subdomains on your local DNS server; alternatively, you can make any .local domain on your NAS for services that run locally only
- two DNS servers
- being an essential network service, losing your DNS means your are can not run any service locally or over the Internet; therefore, you set up a second DNS server for failover
- forwarders
- there are the external DNS servers you forward any DNS request to that the DNS server can not resolve; you can use the DNS server of your internet provider or any other DNS server; you can find the ISP’s DNS servers in the settings of your internet router
- zones
- a DNS zone is the namespace you manage on your DNS server; typically, it is the domain name or subdomain name
- you have a primary versus a secondary zone server; the primary DNS server contains a writeable copy of the zone information, whereas the secondary contains a read-only copy derived from the primary server
- next, a forward zone resolving names in IP addresses; you can, optionally, create reverse zones
- fixed IP address
- all devices that use the DNS server, the DNS clients, must be able to find the DNS server by its IP address; therefore, it is a mandatory step to give the NAS that hosts the DNS server a fixed or static IP address on the local network. For details, please refer to How To Configure A Fixed IP Address.
accessibility - do you use the DNS server on the NAS for internal access only, or do you want it to be accessible from the Internet?
- all devices that use the DNS server, the DNS clients, must be able to find the DNS server by its IP address; therefore, it is a mandatory step to give the NAS that hosts the DNS server a fixed or static IP address on the local network. For details, please refer to How To Configure A Fixed IP Address.
Use Cases
Perhaps you have already decided that you need a local DNS server. If so, skip this paragraph and continue with Setting Up A Primary Server.
When you run network services and applications on our local network, you might need a DNS server on your local network. Here are a few examples.
- define external DNS servers
- if your internet router defines your external DNS servers, but you like to deviate from these values but you have no access to the router
- use server names via VPN
- when connecting via an OpenVPN connection, server names are not resolved through broadcast as on the local network; you, therefore, need a name server to use server names instead of IP addresses
- finding applications or web services on local networks by their name, not IP address
- apart from resolving the name to an IP address, a name server makes it easy to centrally manage services if their IP address changes, for example, when moving a service to another server
- if you prefer to access the locally hosted services from the Internet, you need to make these services accessible through port forwarding and provide name resolution through an external DNS service
- supporting dependent services
- directory services like LDAP server or Active Directory rely on a DNS server on the local network;
- when using a reverse proxy, you might benefit from a local DNS server
There are countless other examples of using a DNS server on the local network.
Set Up A Primary Server
When you set up your first DNS server on a Synology NAS, you go through installation and configuration steps. After these steps, you have a fully functioning DNS server on your local network.
It is essential to test the DNS server by resolving both the zone you configured and the resolution of addresses on the Internet.
Install DNS Server
Assuming you gave your Synology NAS a fixed IP address on at least one LAN port, let’s start installing the DNS server on your NAS.
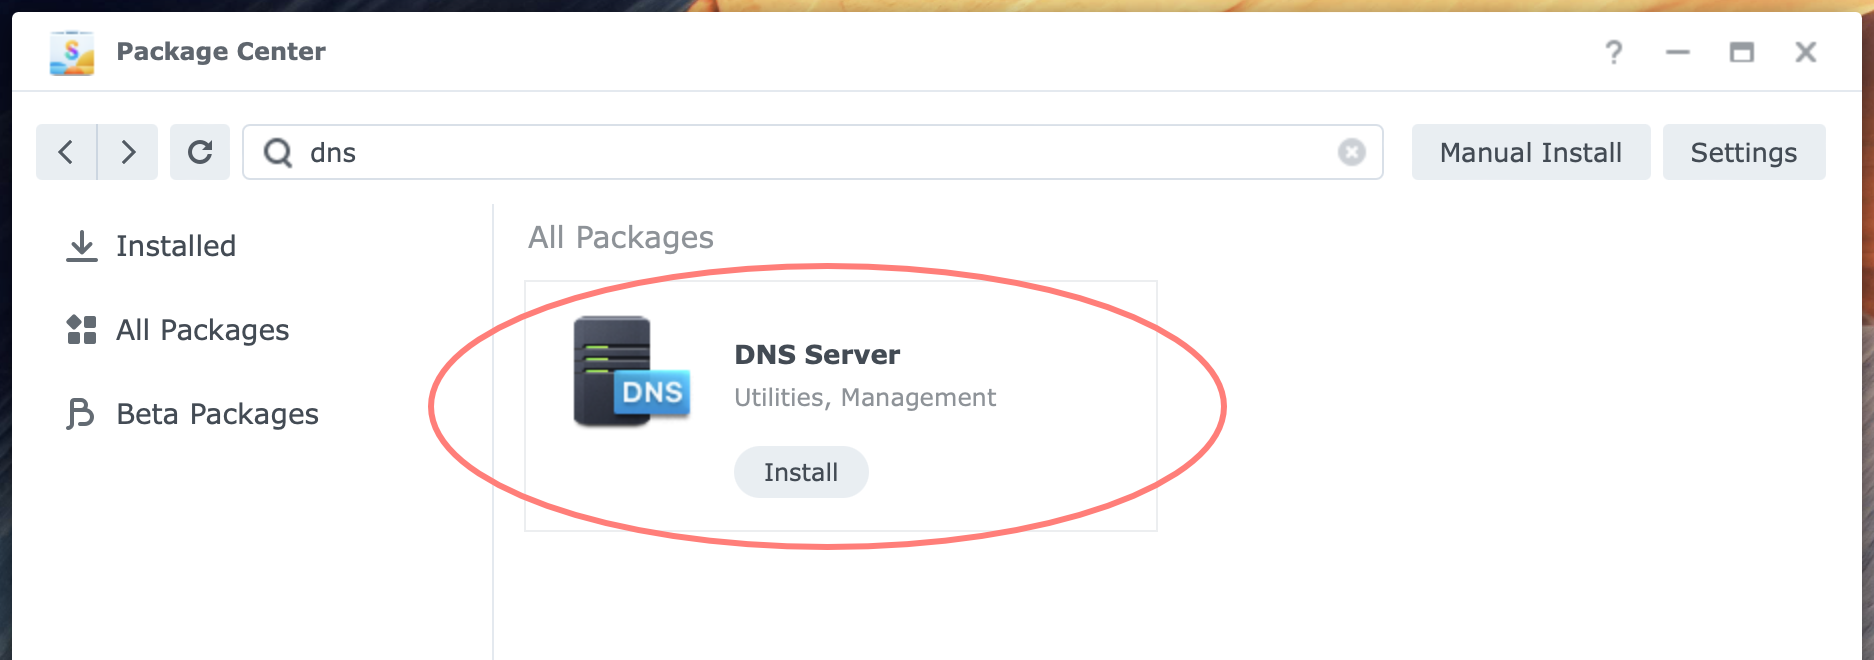
Log in to the DSM desktop with an administrator account and open Package Center. In Package Center, select All Package in the left column.
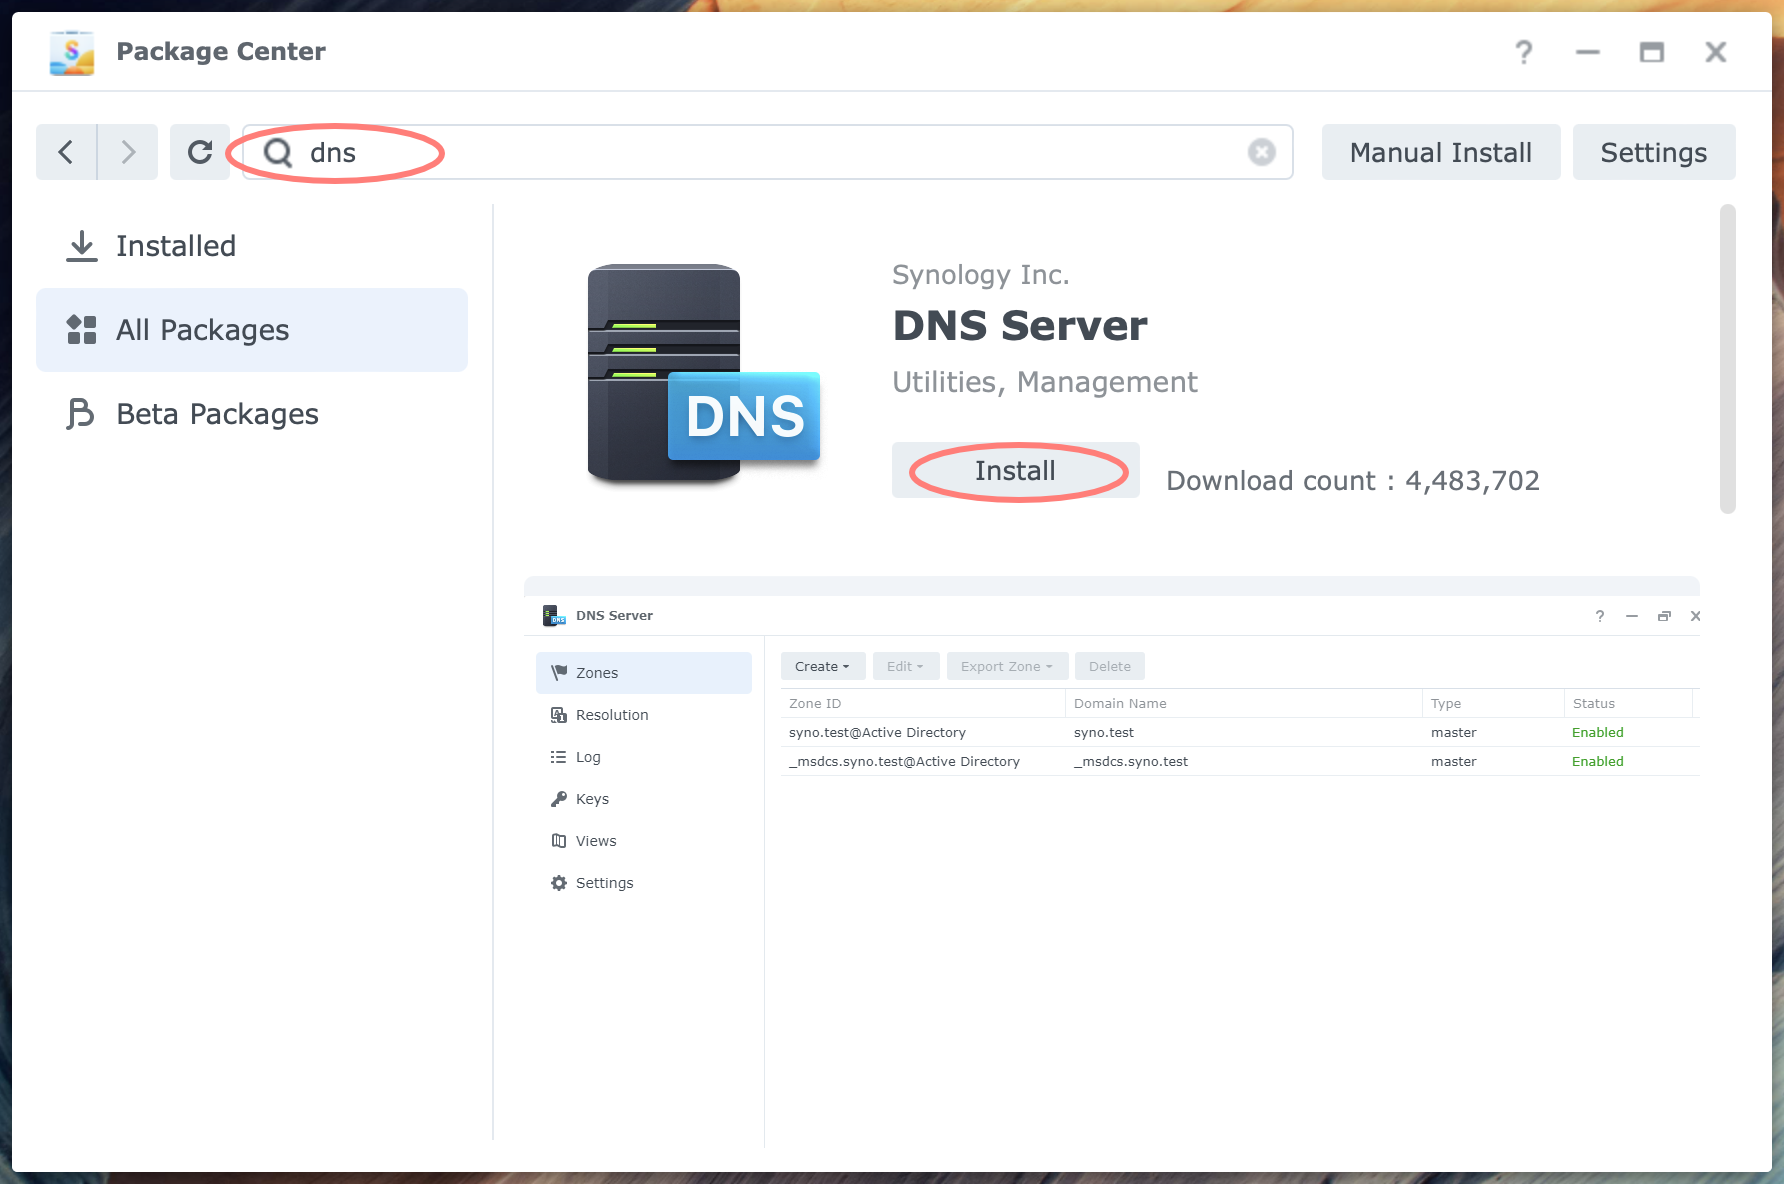
I prefer to use the search function to find the package I am after quickly. Type dns in the search bar and press Enter. The DNS Server package appears. Click on the Install button.
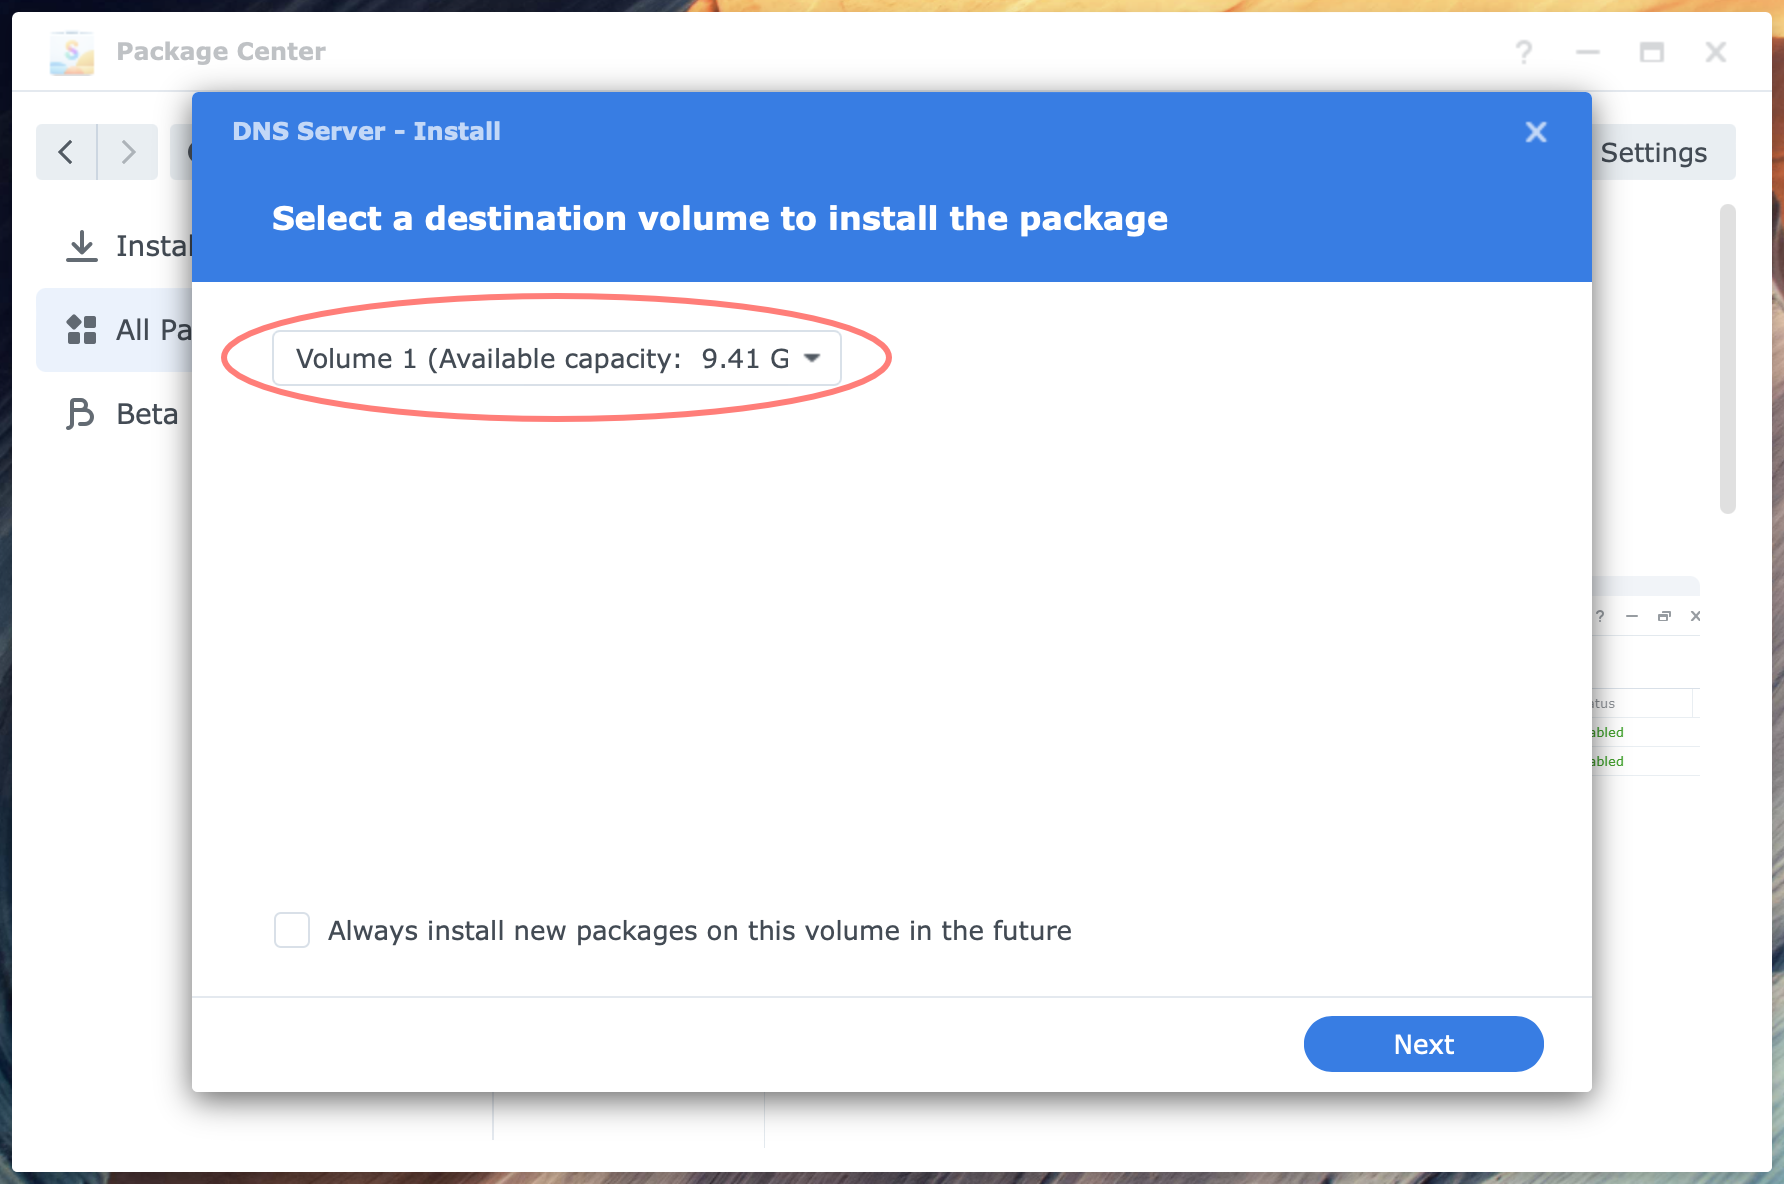
If you have multiple volumes on your NAS, the installer might ask for the volume to install the package. Click Done in the Confirm settings screen, and keep the Run after installation checkbox enabled.
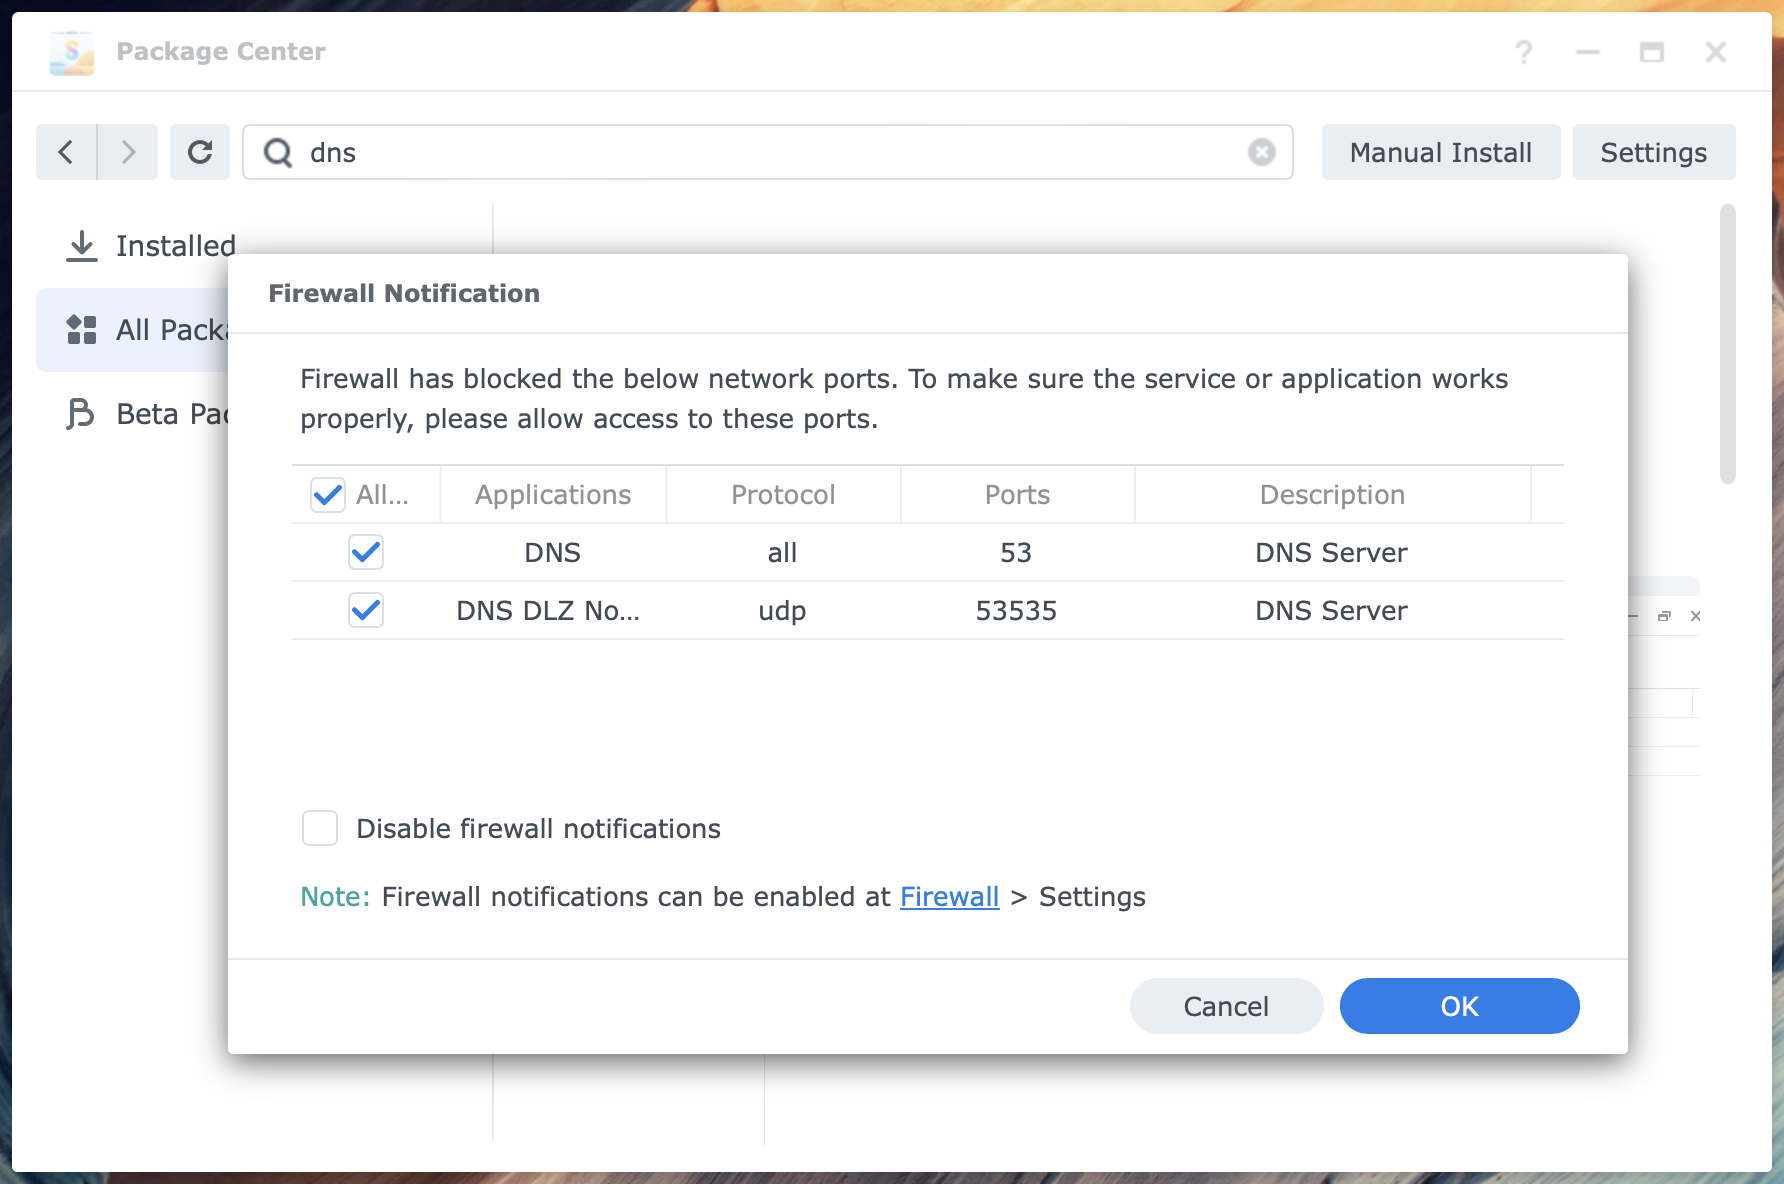
If you have a firewall configured on your NAS, you will receive a Firewall Notification unless you turn off these notifications earlier. Click OK to add two rules to your firewall.
You have now installed the DNS Server service and application. It is running and ready to be configured.
Configure application backup
Consider adding the DNS Server application to a Hyper Backup task to preserve the work you put into your DNS Server configuration.
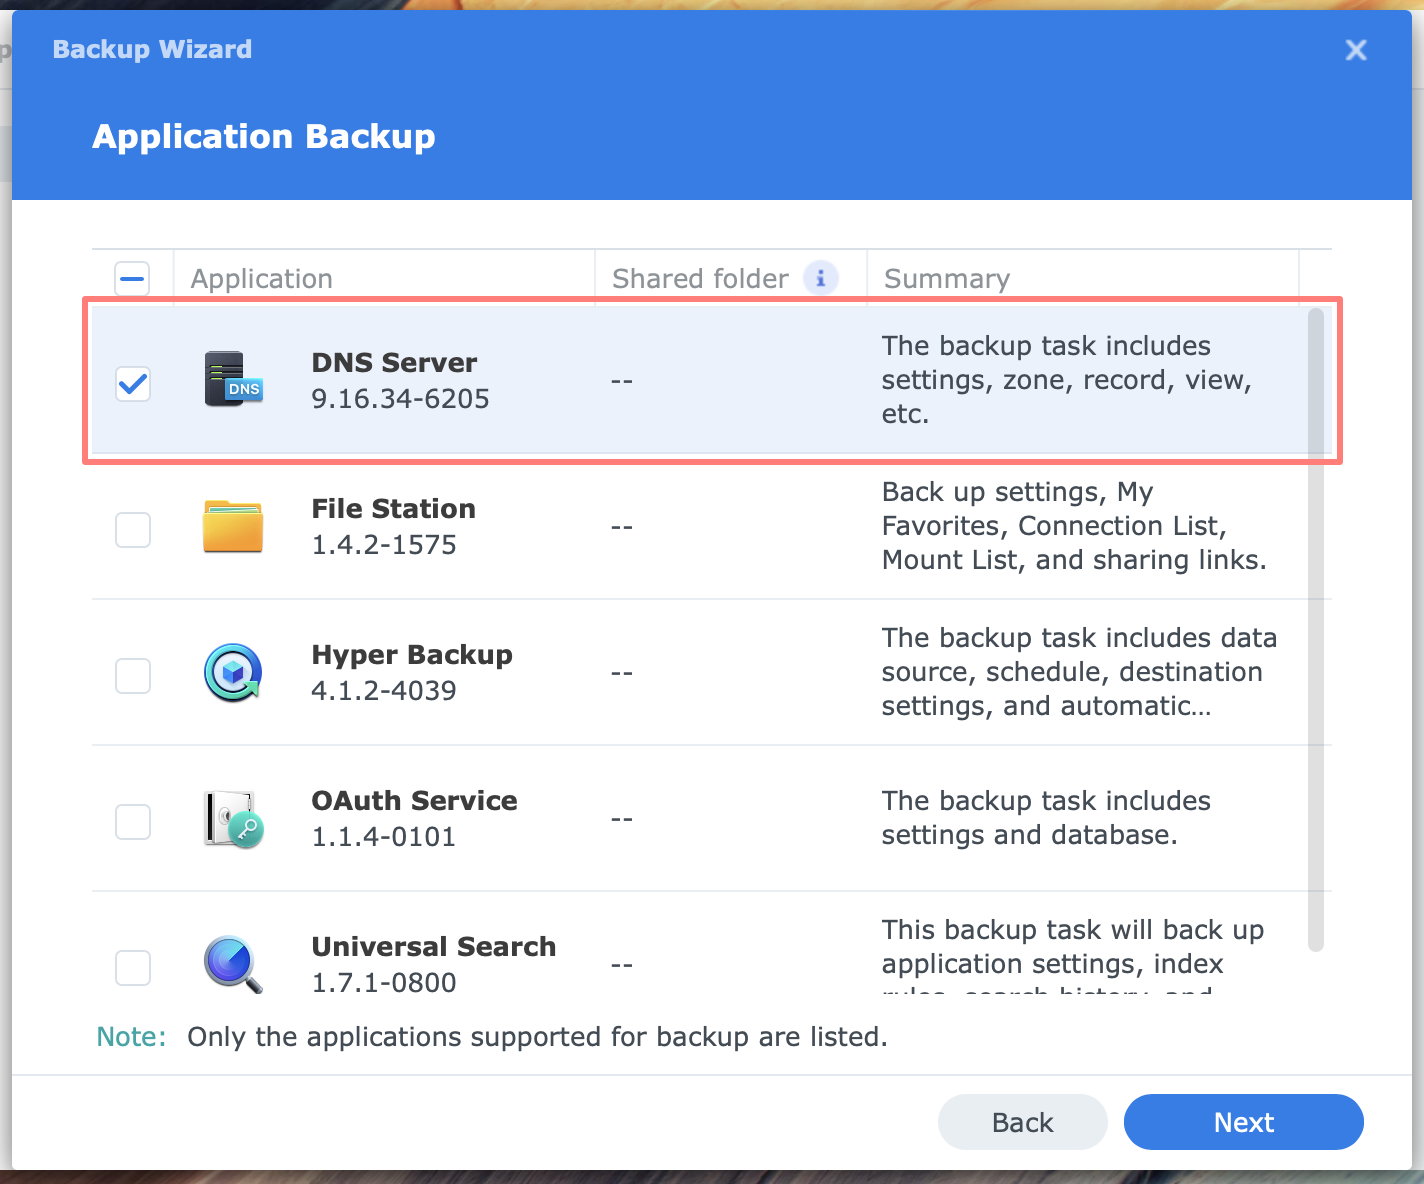
Create or edit a Folders and Packages backup task and enable DNS Server from the Application Backup page of the Backup Wizard or the Application page of an existing task.
Configure DNS Server
You must enable forwarders to integrate the DNS server in the client’s resolve chain. This process has three steps.
- Enable forwarding in your DNS server,
- change the DNS client configuration, and use the new DNS server
- to test the connection.
When the test is successful, you proceed to the next step: creating a primary zone. But first, forwarding.
Enable forwarding
Open the DNS Server > Resolution page and check Enable resolution service. By default, Enable forwarders is also checked. There is no general reason to limit the hosts allowed to send recursive queries so you can skip that option.
Forwarder 1 is the DNS server that the NAS uses. This address is typically the internet router, which often has two external DNS servers configured.
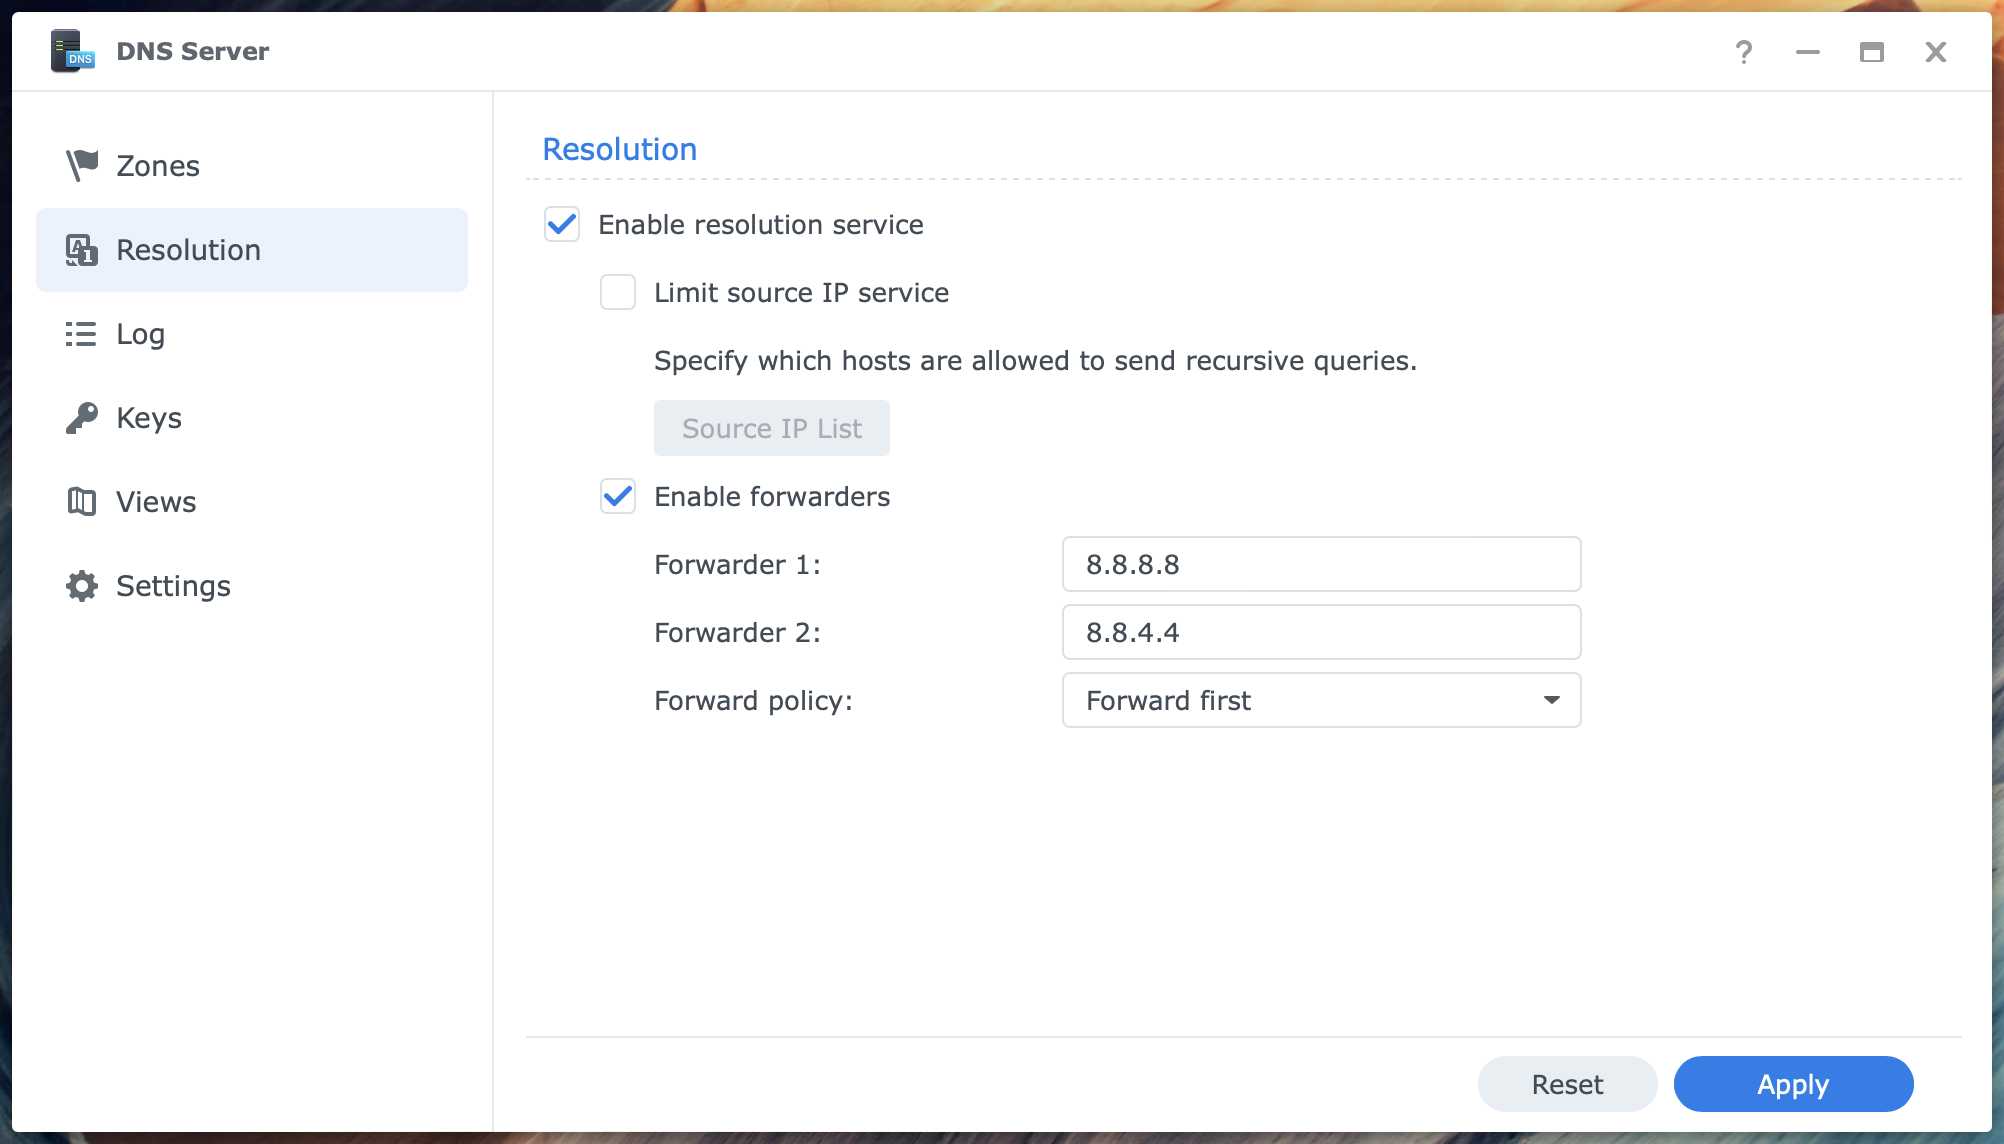
I suggest changing Forwarder 1 to the first external DNS server and Forwarder 2 to the second external DNS server for your internet connection. Of course, you can change this into another public DNS server if you like.
A popular choice is a pair of Google DNS servers with IP addresses of 8.8.8.8 and 8.8.4.4, respectively. Leave the forward policy to Forward first and click Apply to confirm the settings.
Change NAS’ DNS settings
Like any computer or mobile device, the NAS is a network DNS client. When you introduce a new DNS server on the network, like we do, you can point the NAS to this DNS server to resolve queries.
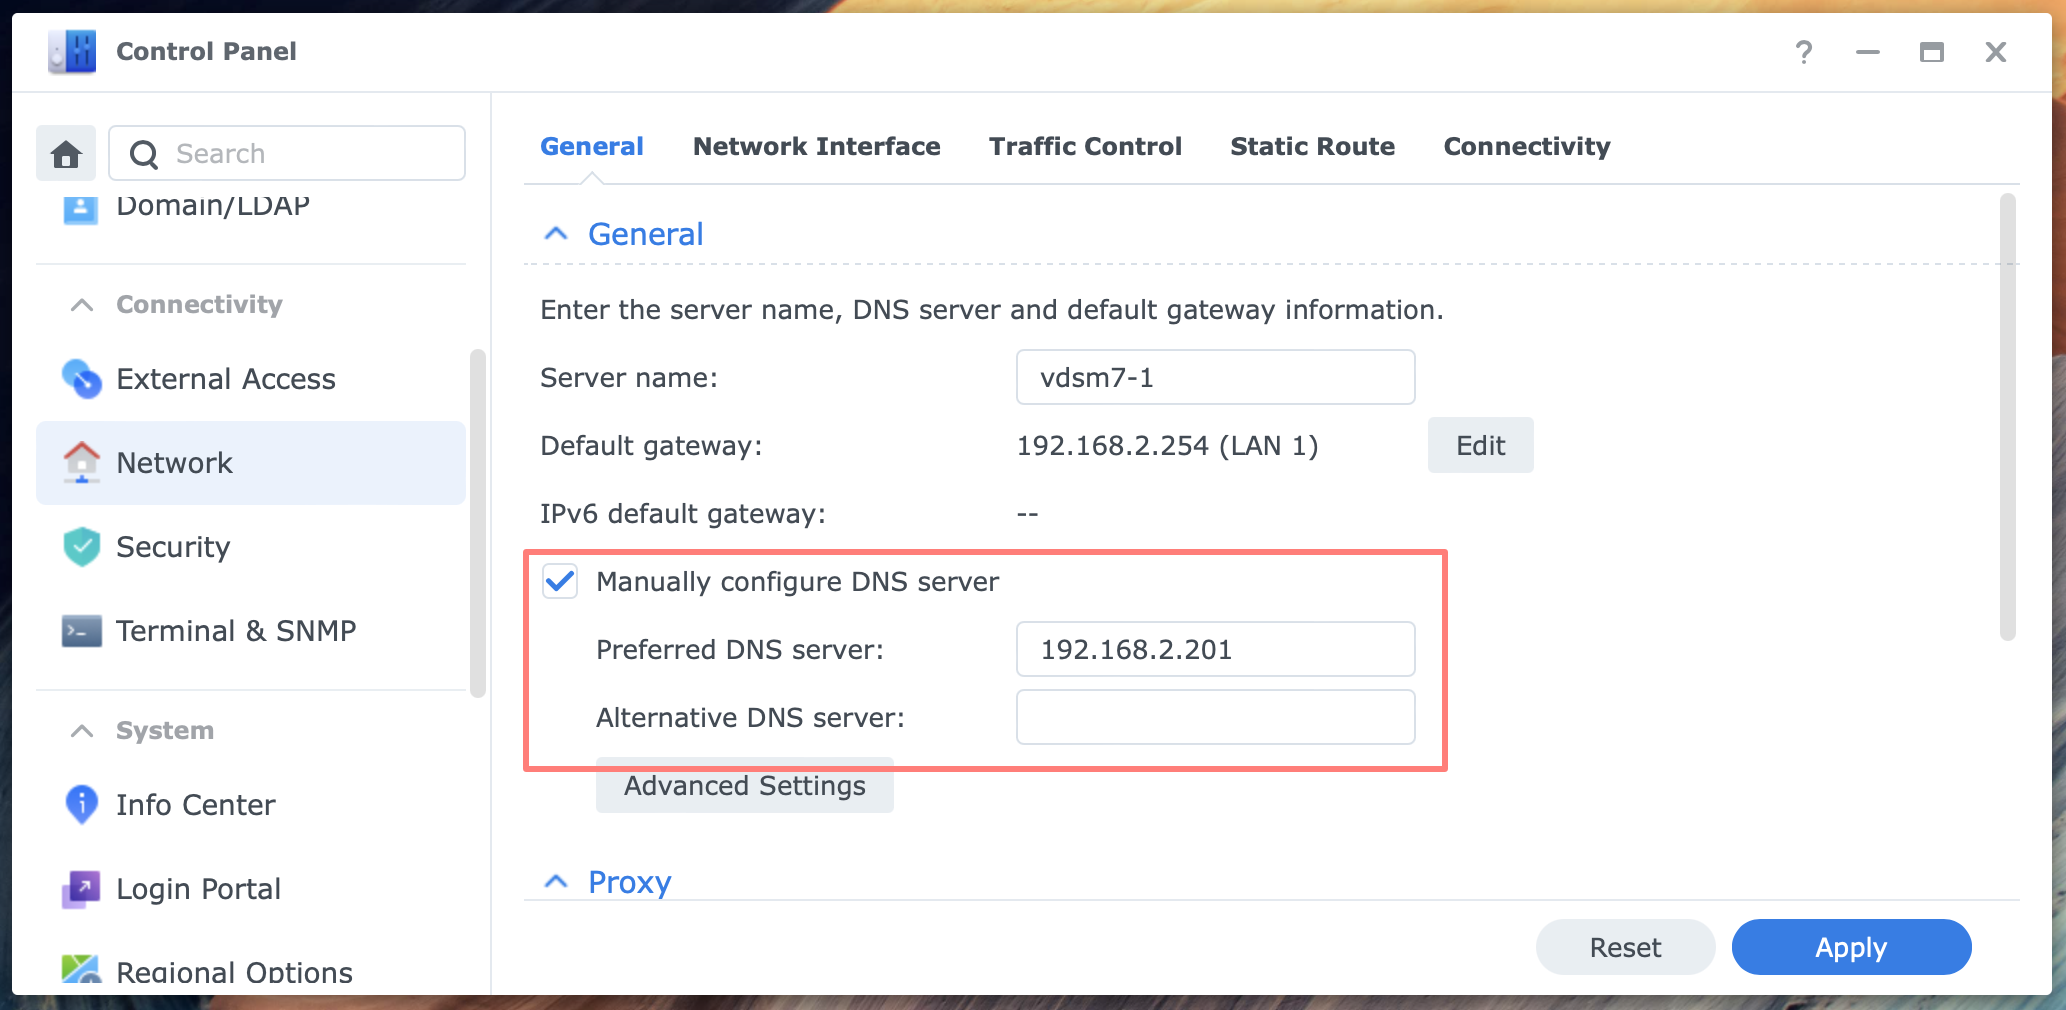
Open Control Panel > Network > General. Enable Manually configure DNS server.
- Preferred DNS server:
- enter the IP address of the NAS, in my case 192.168.2.201
- Alternative DNS server:
- leave it open for now; if you plan to configure a second DNS server, enter its IP address here
Test forwarding
At the client, change the DNS server setting to the DNS server on the NAS. I suggest changing this setting for one client individually for testing purposes. When everything works correctly, change the DNS server setting in the DHCP server of your local network. This way, all systems will get the new DNS server setting when they renew their DHCP lease.
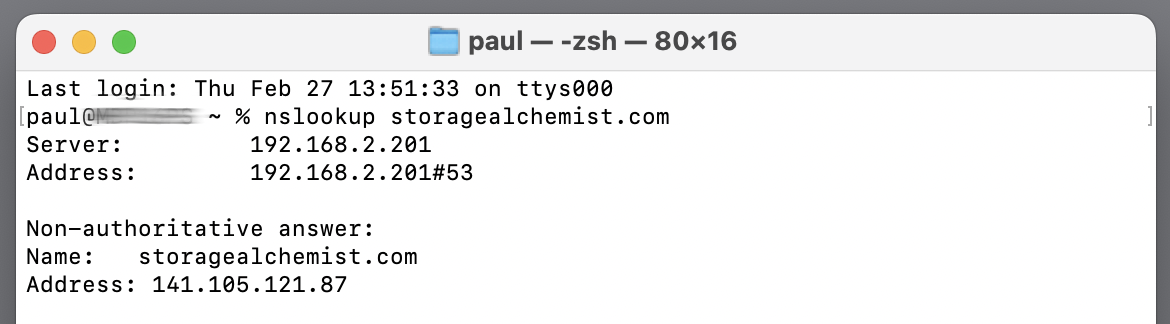
Open a terminal window or command-line box on your computer. With the nslookup-command, we ask the DNS server to resolve a name into an IP address, a forward lookup.
I use this website as an example with the command:
nslookup storagealchemist.com
In the reply, you will notice the IP address of the requested server and the IP address of the DNS server to which the request was sent. This should be the IP address of the NAS that runs the DNS server (192.168.2.201 in my example).
Create primary zone
Without zones, the DNS server only forwards requests and keeps resolved requests in its cache for the duration of the TTL or Time To Live setting. In the description below, I assume that the DNS zone is for internal use only and is not accessible from the Internet.
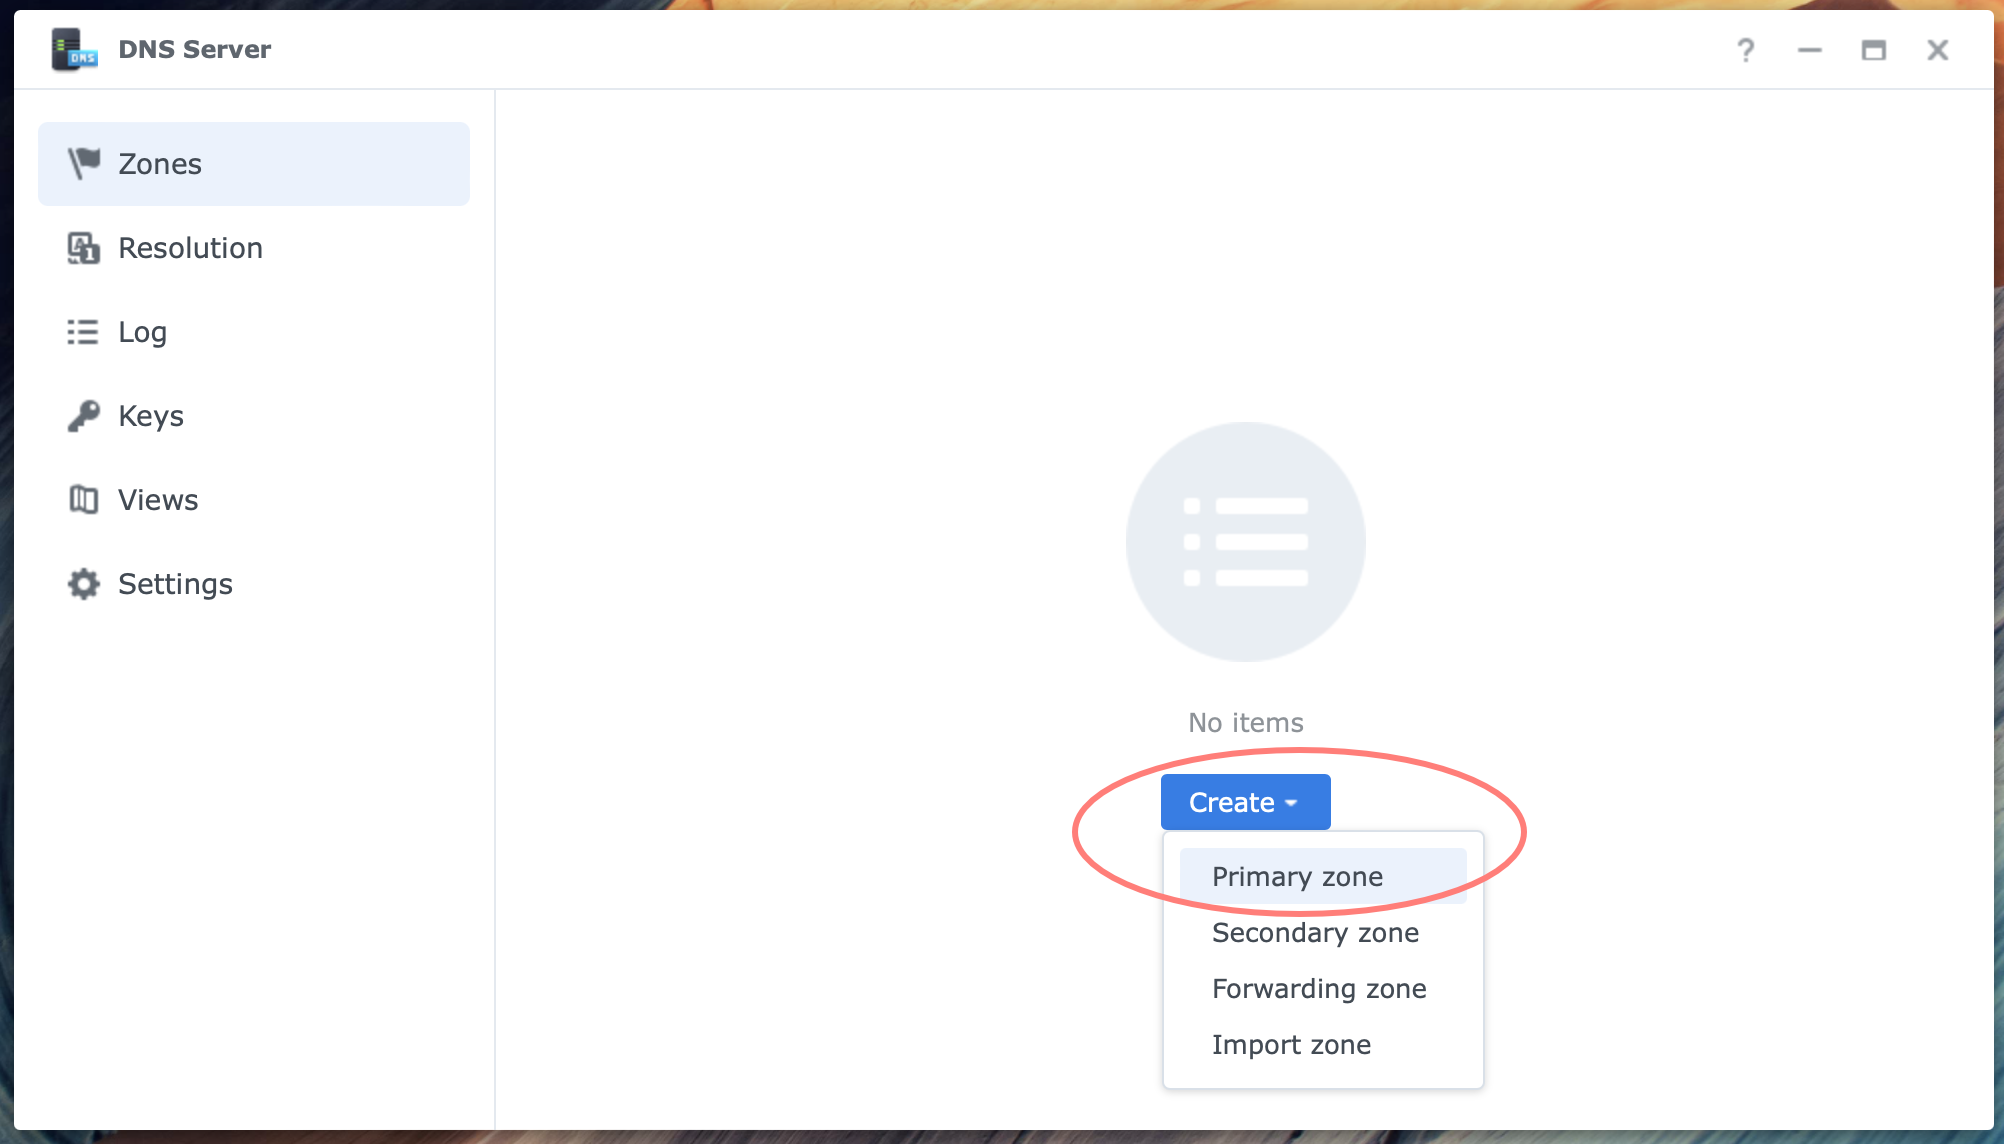
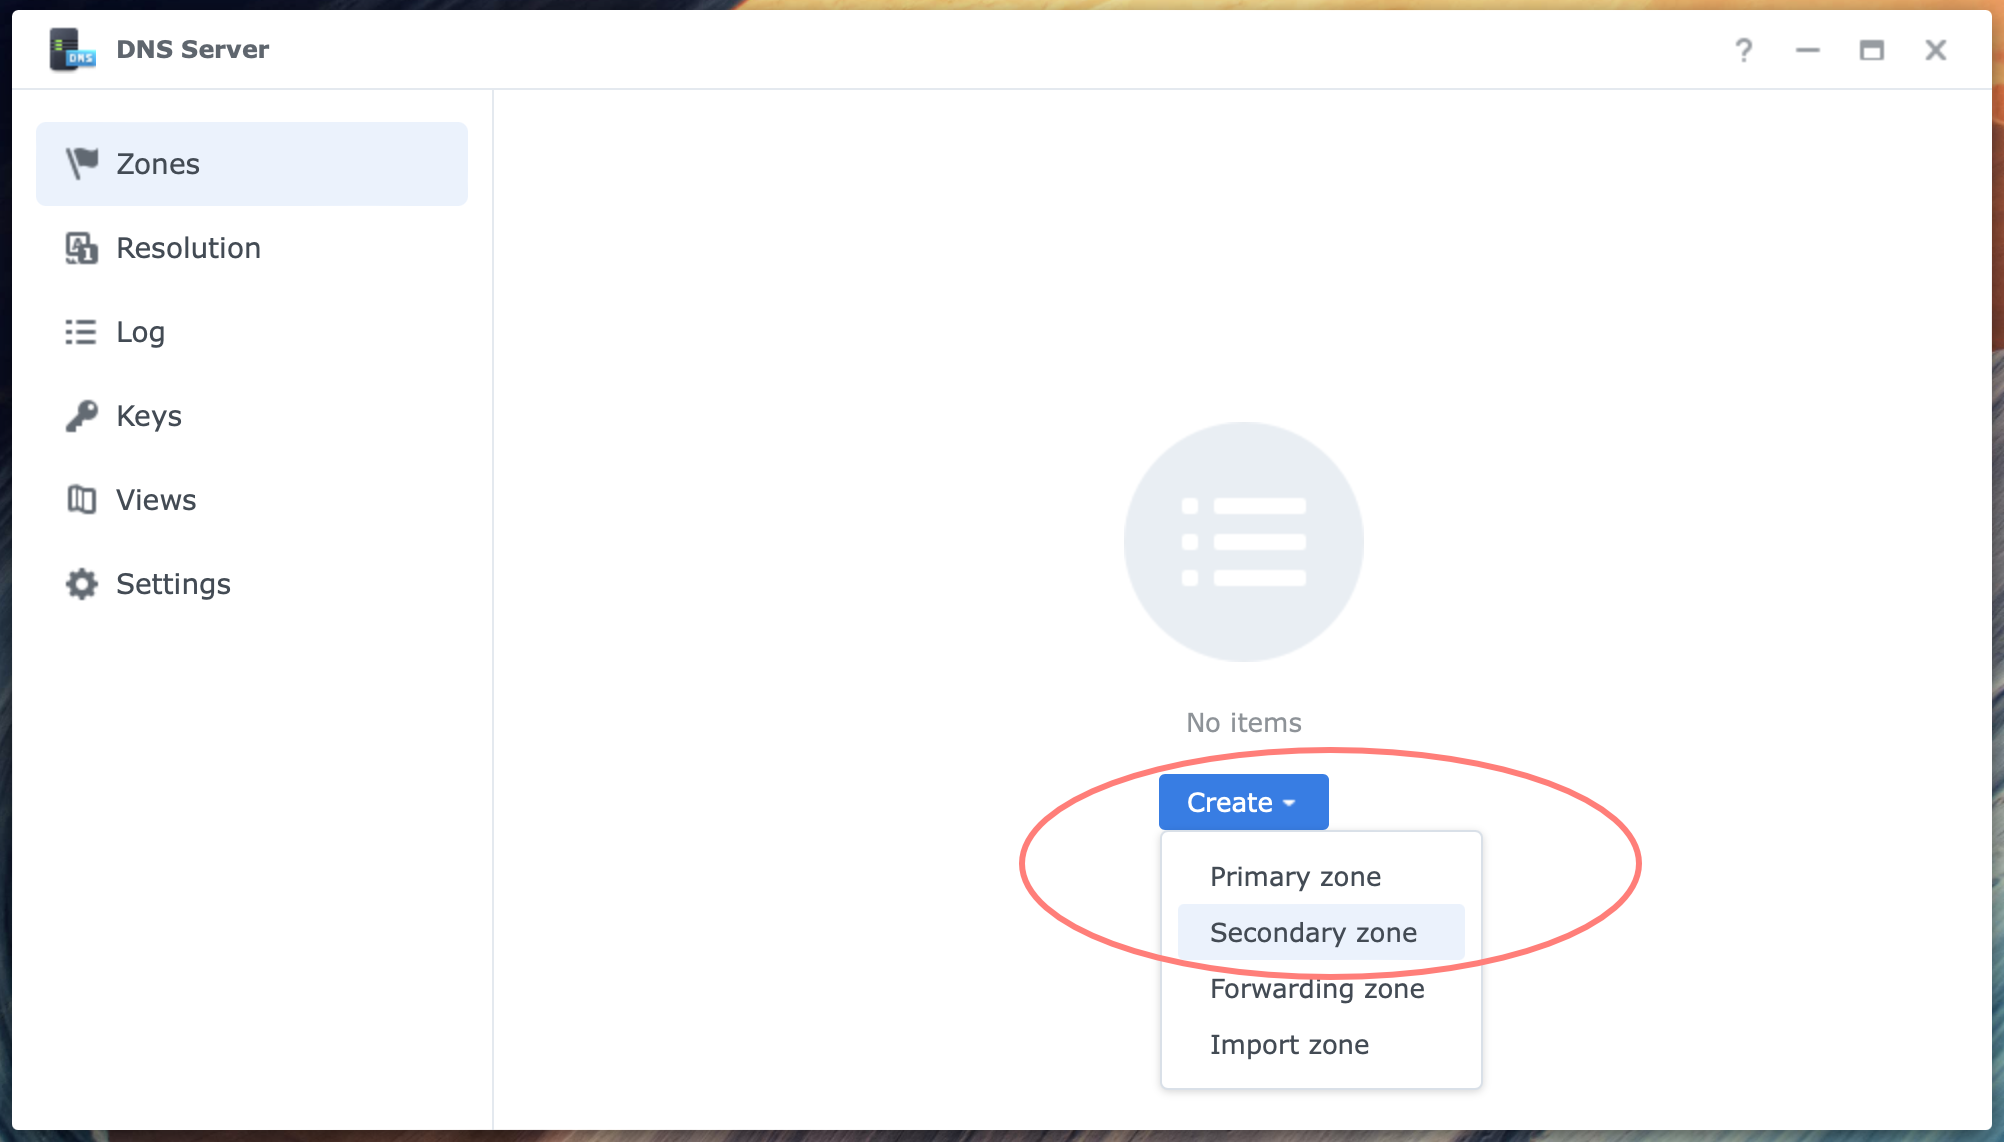
Open the DNS Server application from the DSM desktop to create a zone. On the Zones page, click Create > Primary zone. The Create a primary zone dialog opens.
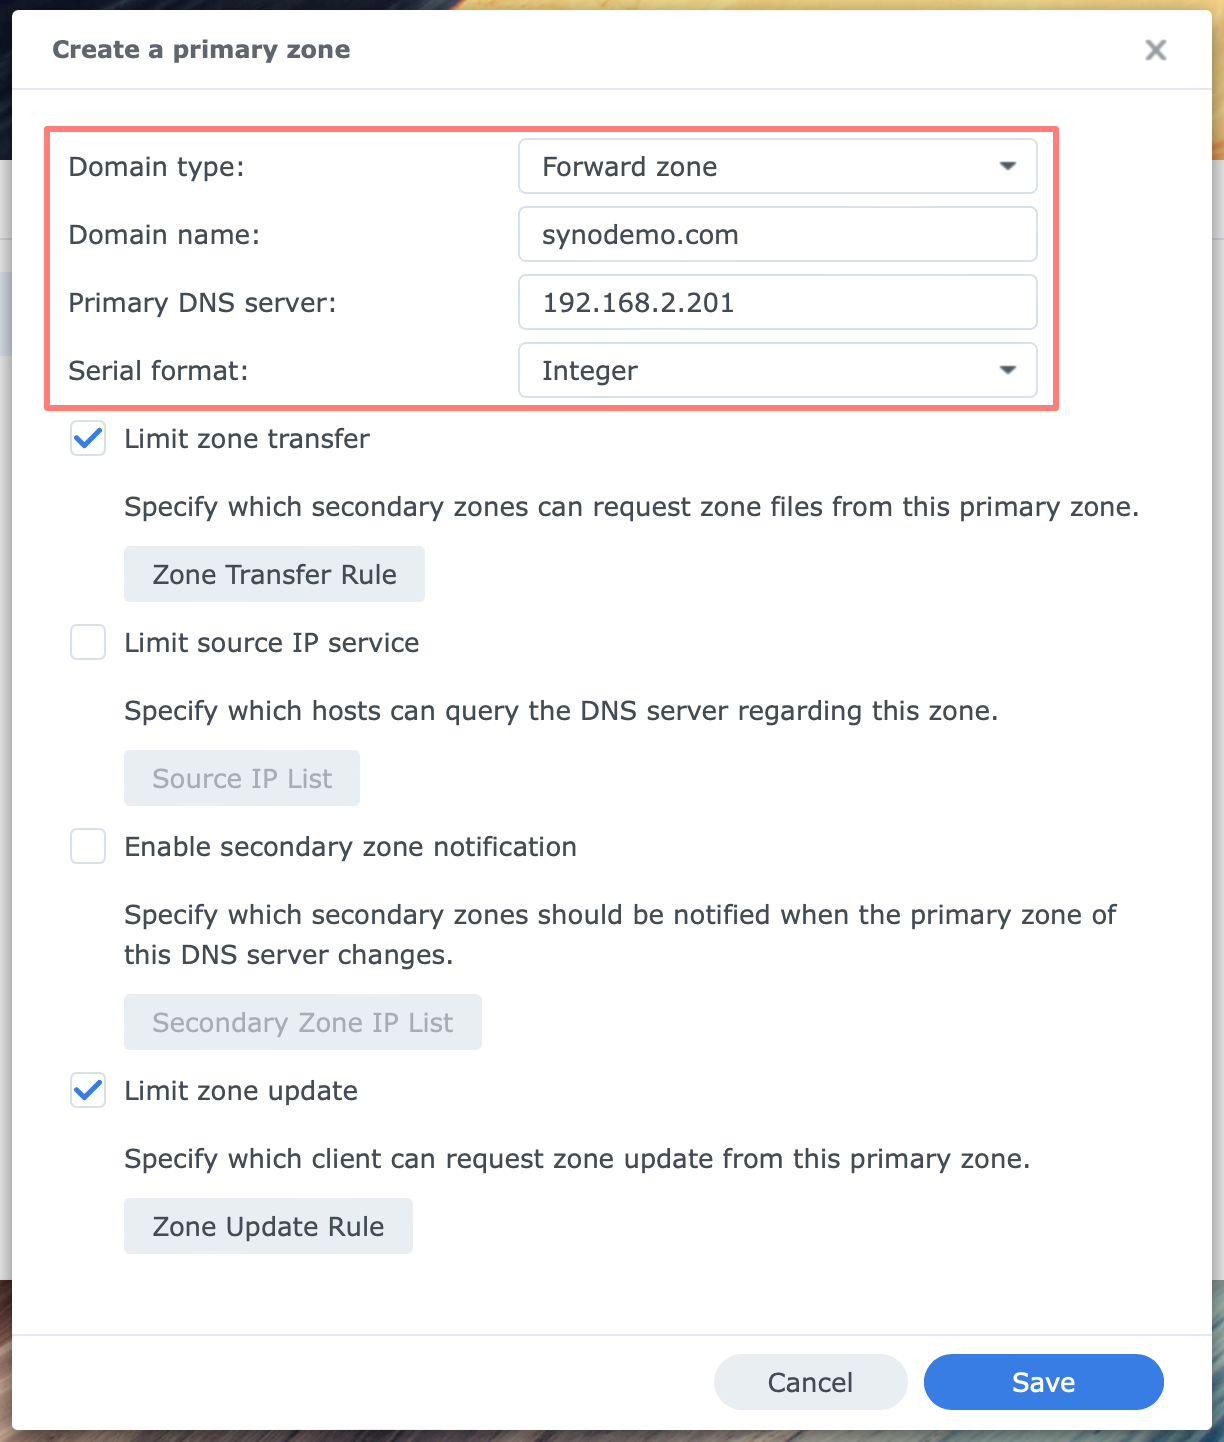
- Domain type
- Forward zone
- Domain name
- enter your domain name
- Primary DNS server
- fill in the IP address of the NAS that runs the DNS Server
- Serial format
- Integer (although Date would work equally well)
As you can see from the screenshot, I use synodemo.com for demonstration purposes. Please replace it with your domain name.
The dialog to create a zone has four checkboxes. You can skip these items if you only make a primary zone. If you plan to build a secondary zone on another DNS server, you need to configure zone transfer to the secondary zone in the primary zone.
You can configure zone transfer later. I discuss this item when setting up a secondary zone. Click Save to create the zone.
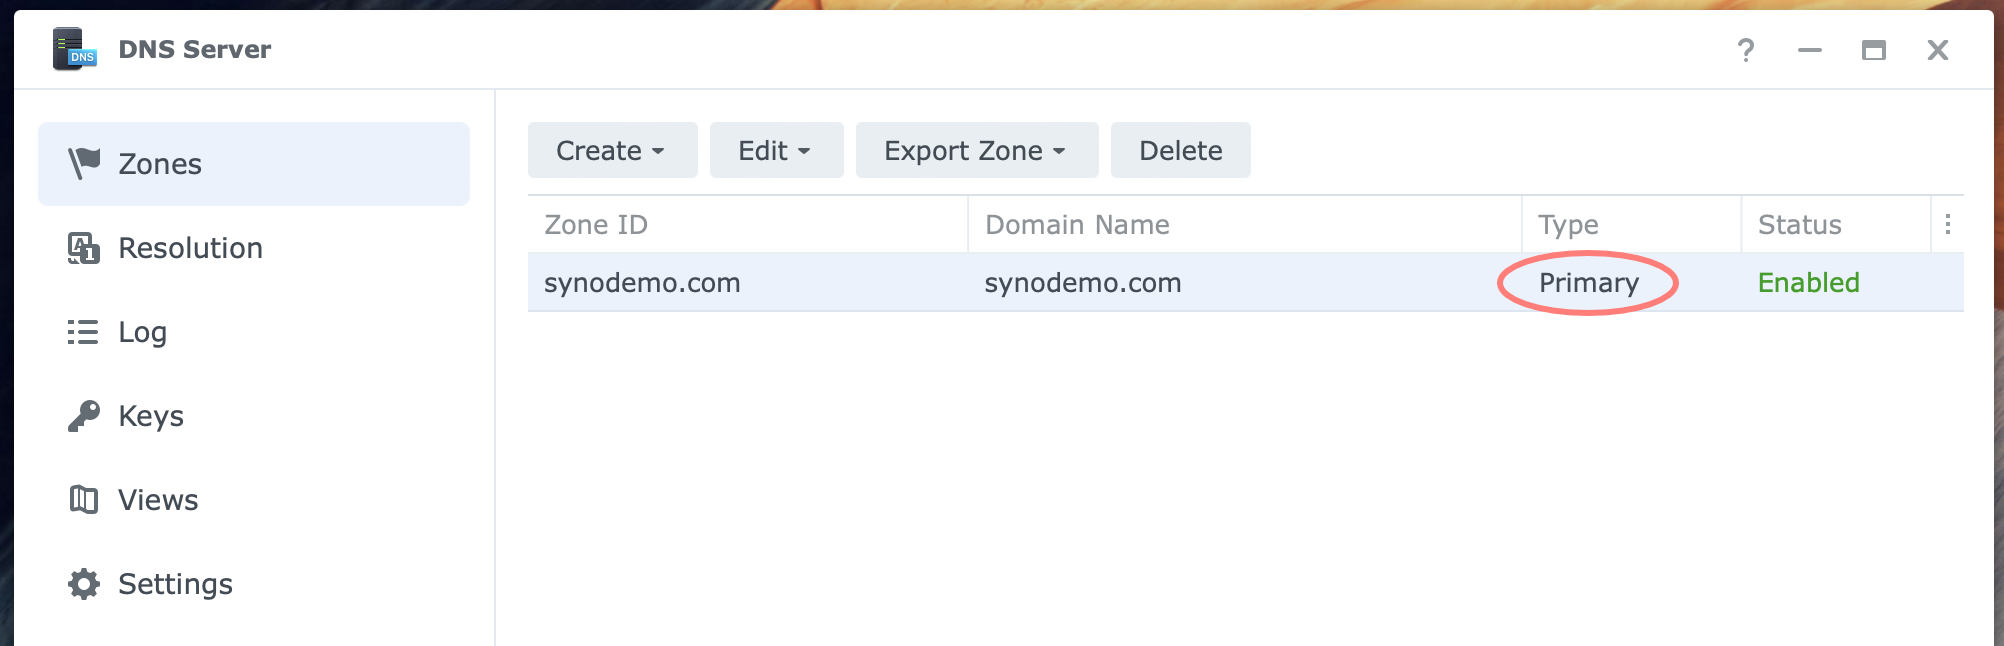
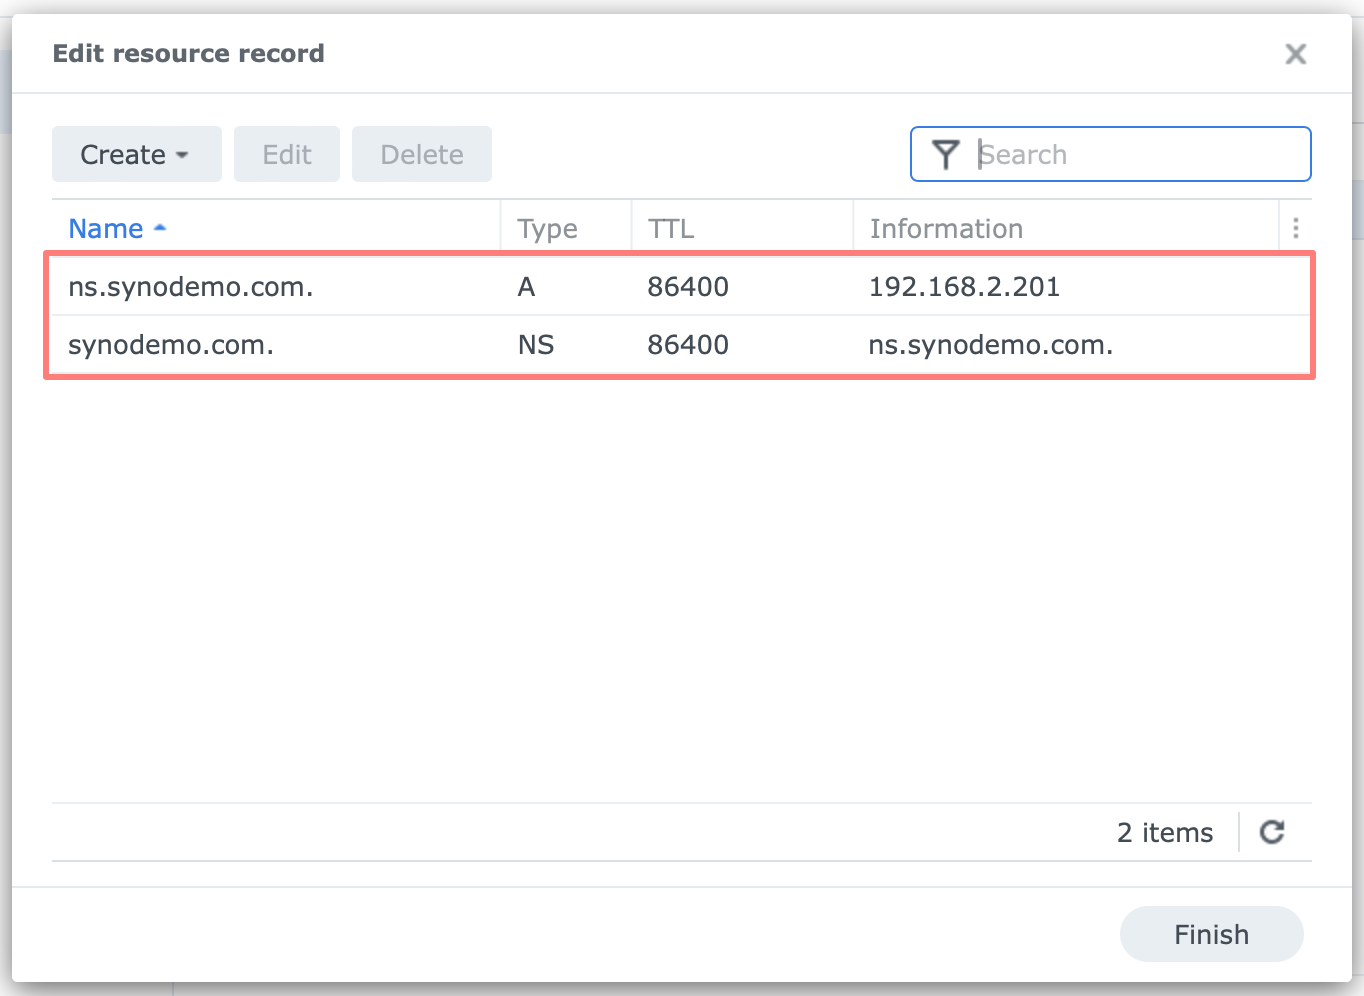
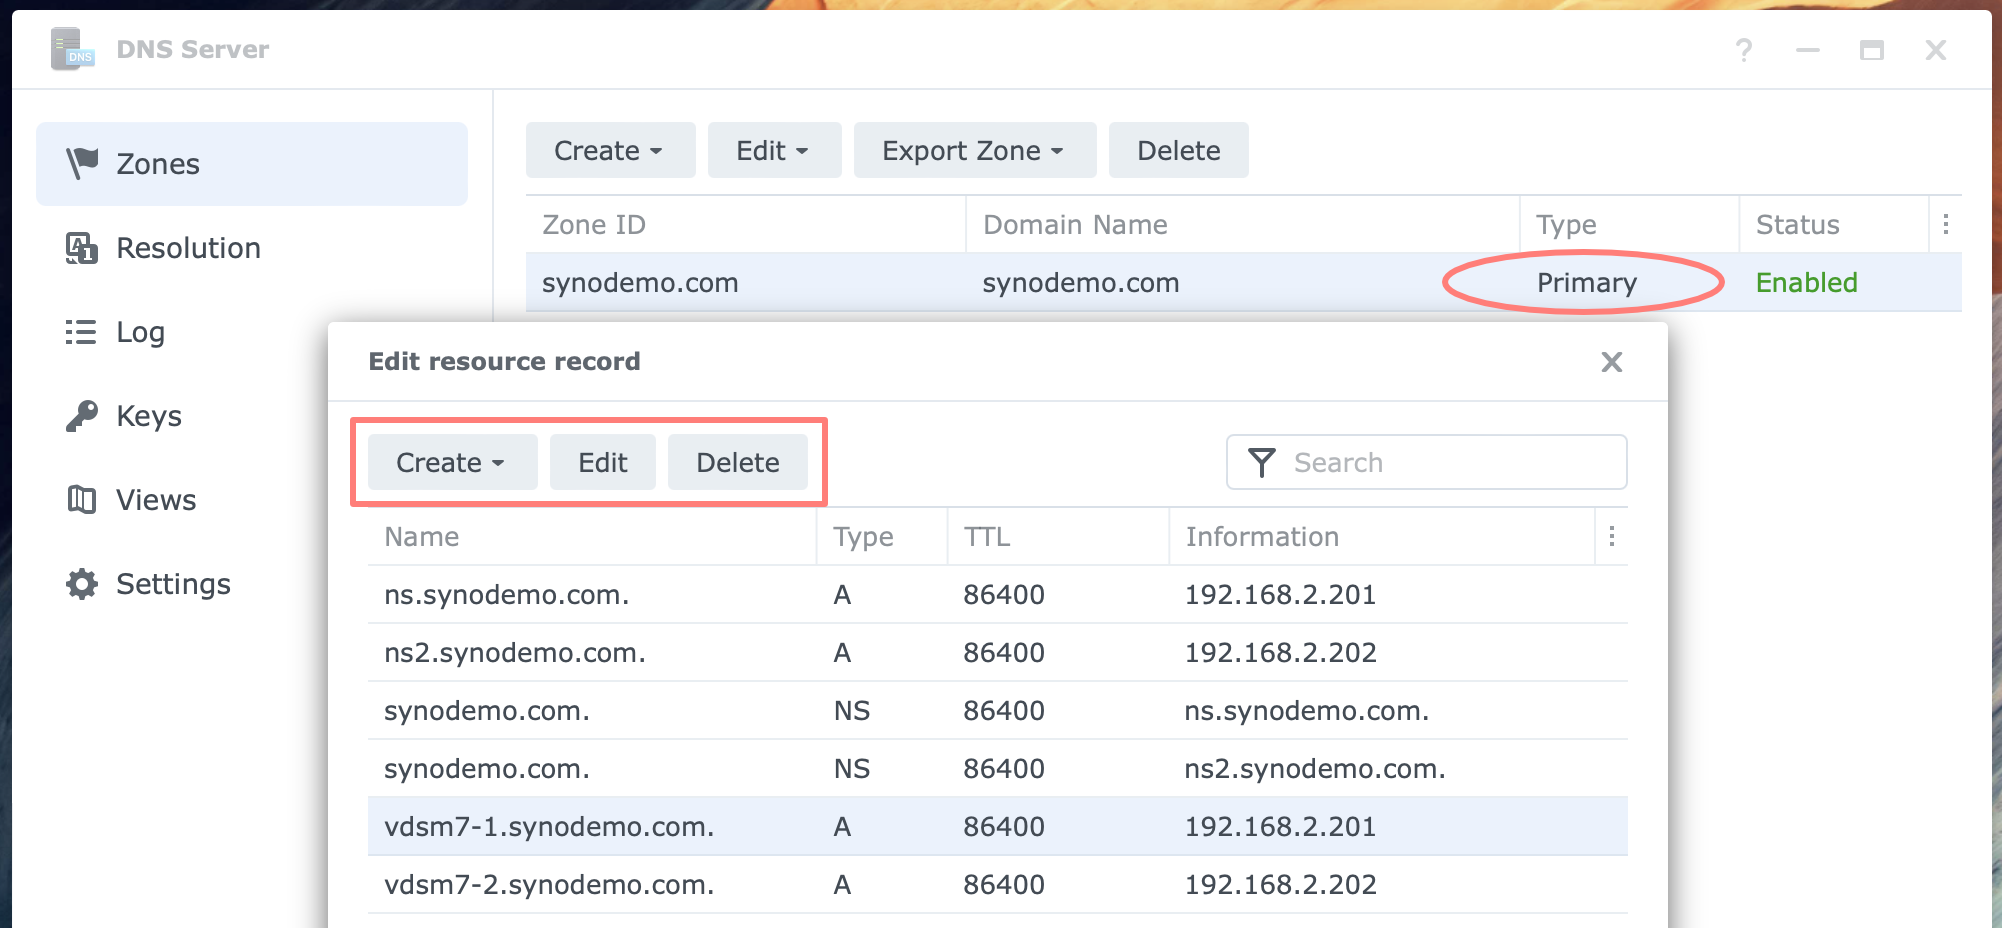
You return to the Zones screen. Notice the zone you just created and that the zone type is Primary. Double-click on the zone. The Edit resource record dialog opens. Review the two records that were created during zone creation:
- an A record for the domain’s name server (ns.synodemo.com),
- an NS record, which stands for Name Server.
Next, with the zone opened in the previous step, create an A-type resource record that points to a website or service.
Create A record
In the Edit resource record dialog, click Create > A type. The Add resource record A-dialog opens.
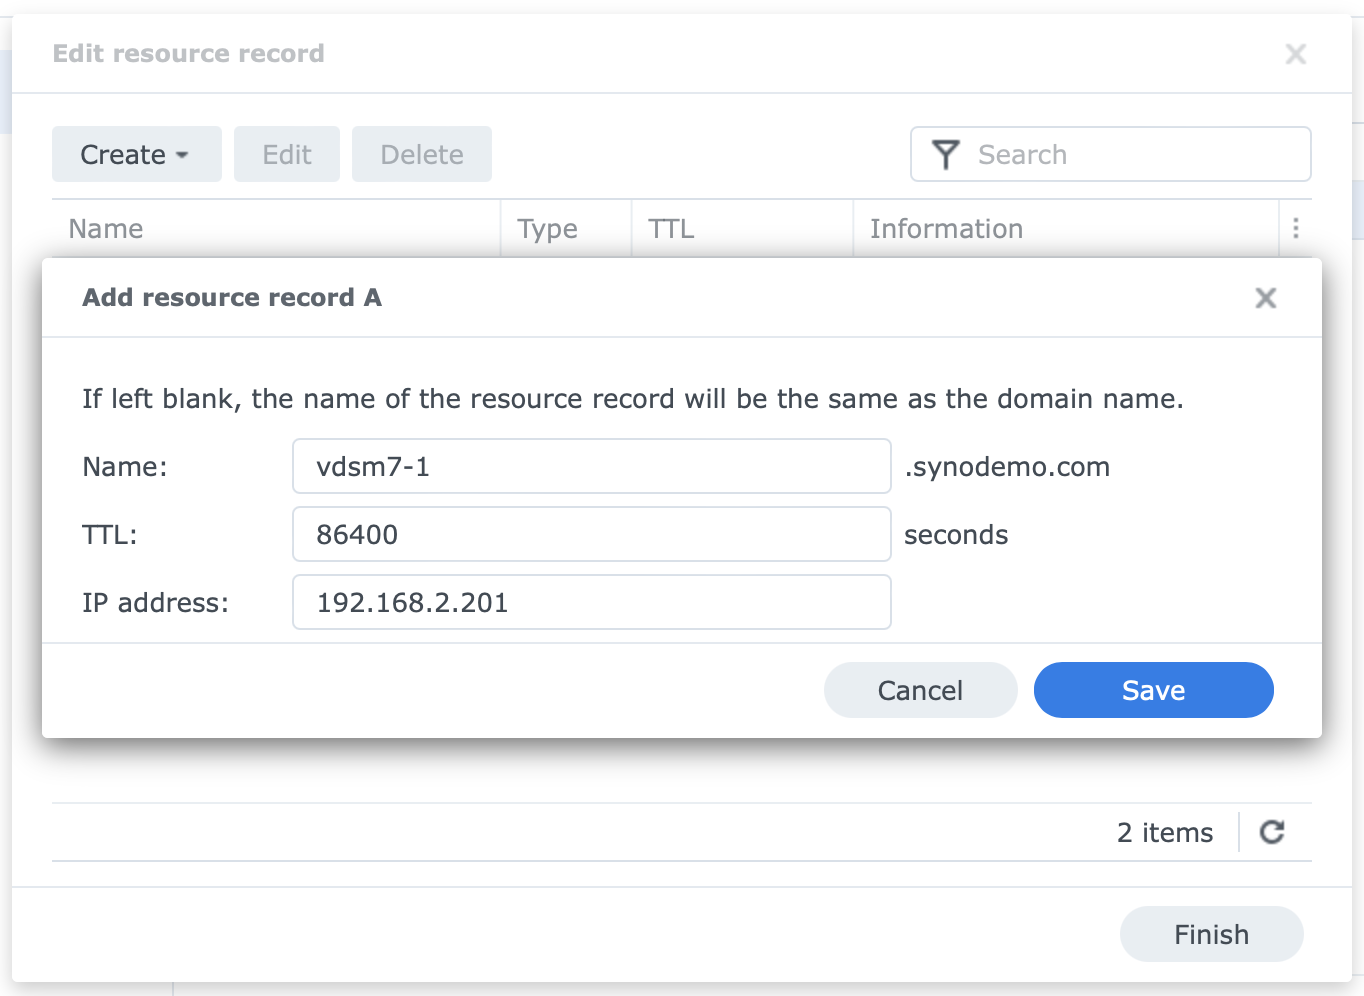
You can add any server on your local network to enable DNS to find its IP address. For example, my test server name is vdsm7-1. It is the server that runs the DNS Server. It already has a ns. record. Now, it gets a second record with a name I am familiar with.
When you enter the necessary information, click Save to review the new record and click Finish to return to the Zones page.
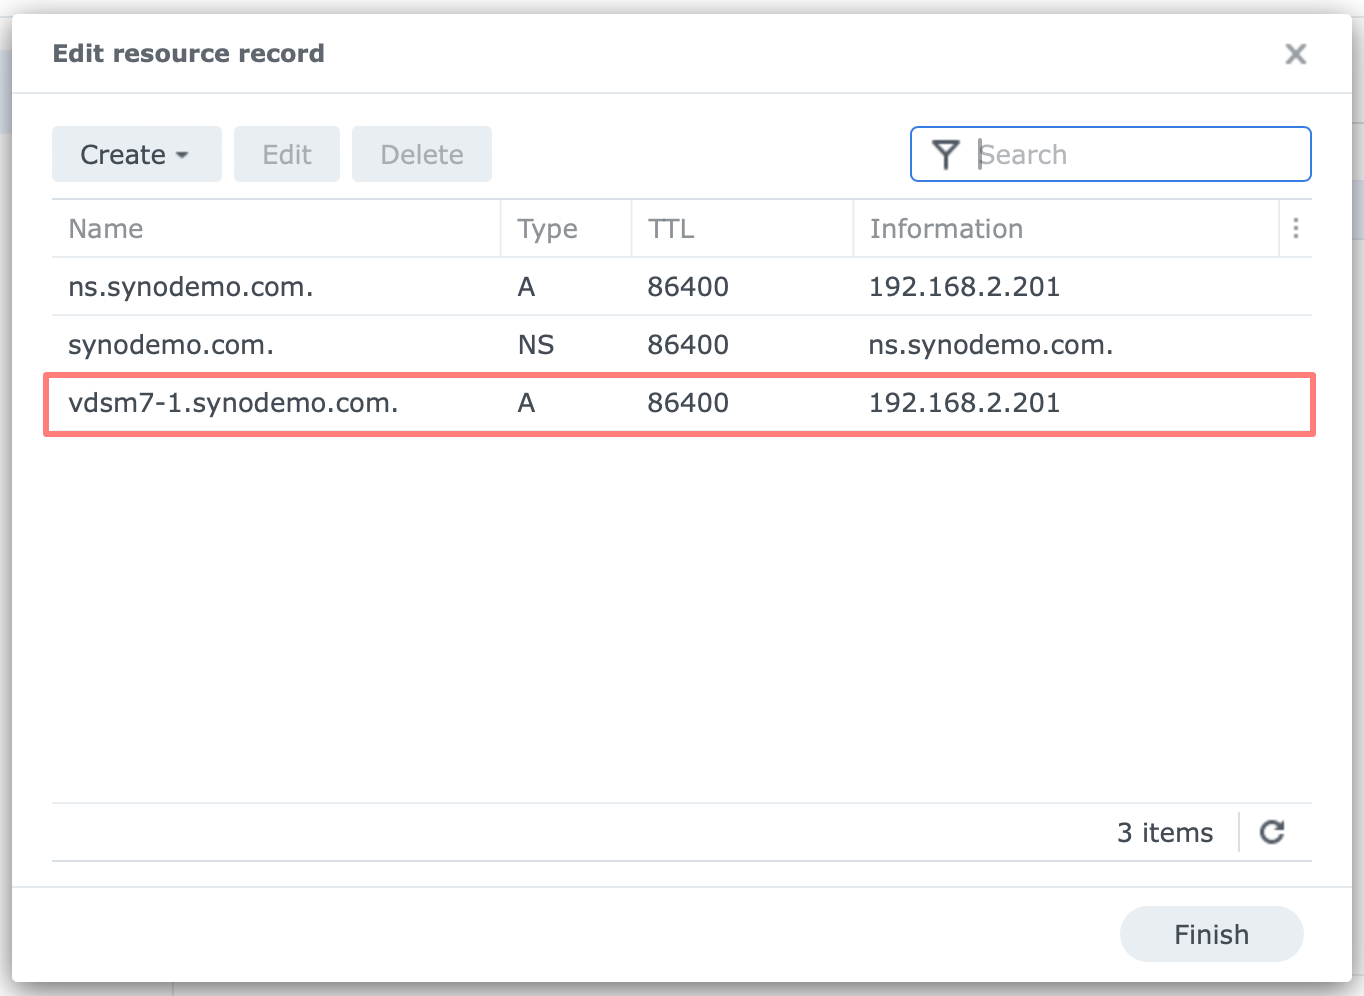
Test forward zone
To test the new zone and DNS records, use NSLookup from a client to check if it gets a proper response. If not, flush your client’s DNS cache and try again.
Open nslookup and type in a request for ns.synodemo.com en vdsm7-1.synodemo.com. Both queries should come up with the same IP address.
Set Up A Secondary Server
This step is optional. A single DNS server is sufficient for home and small business use. I recommend a second DNS server with a secondary zone for resilience for medium-sized businesses.
Installation and configuration
The DNS Server package installation is identical to the installation on the primary server. You do not need to create a backup task for the DNS Server application like you did for the primary server.
Enable forwarding
After installation, open the DNS Server application and go to the Resolution page. Enable the resolution service and configure forwarders as you did for the primary server.
Create secondary zone
This part of the process is significantly different from the primary server. A secondary forward zone is a read-only copy of the zone from the primary server.
You start by creating the secondary forward zone. Open the DNS Server > Zones page. Click on Create > Secondary zone. The Create secondary zone dialog opens.
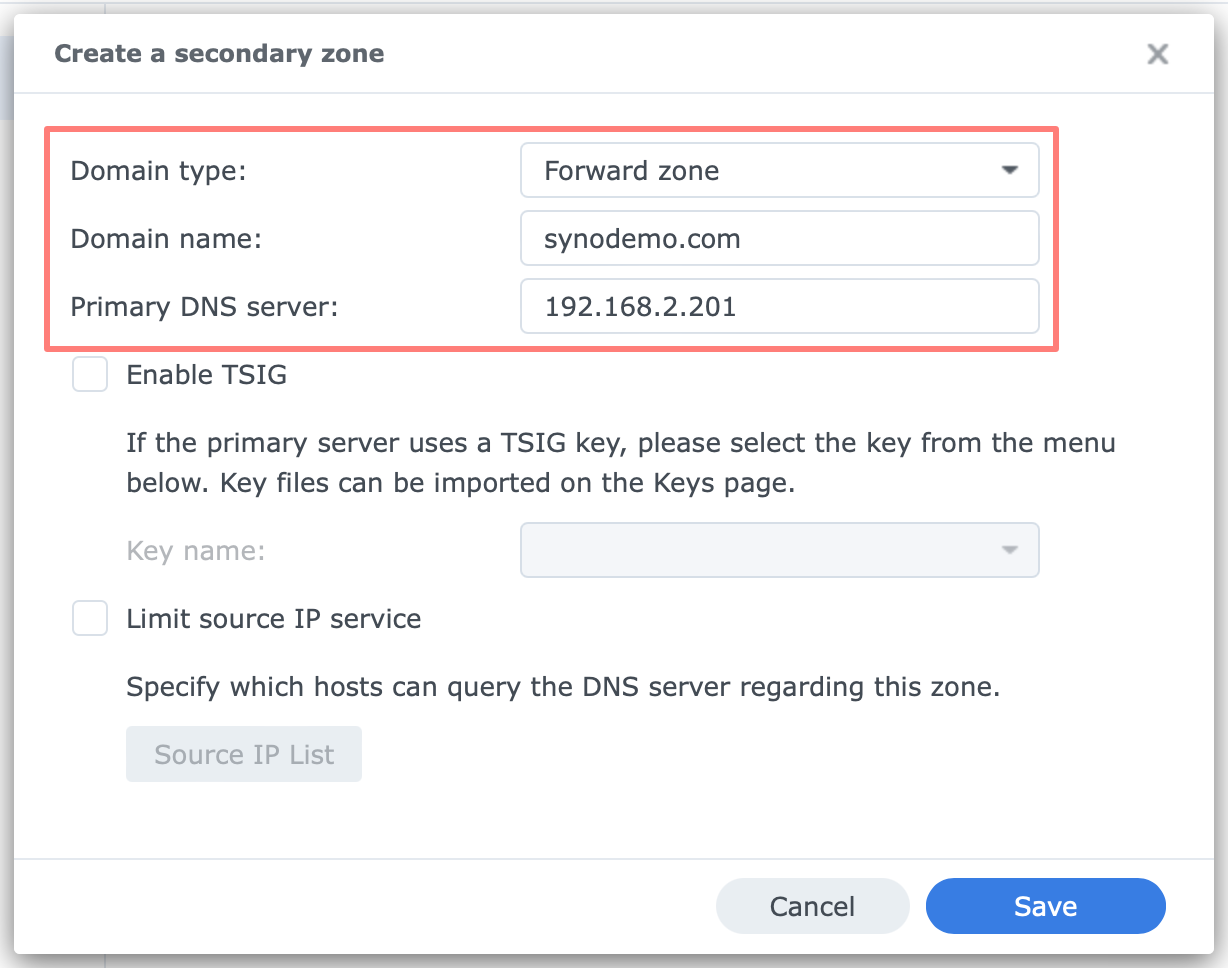
- Domain type
- Forward zone
- Domain name
- the same as for the primary zone
- Primary DNS server
- the IP address of the DNS server with the primary zone

Skip the remaining two items. After entering the information, click Save to return to the Zones page. Notice the zone type: Secondary. Now, the DNS server with the secondary forward zone is almost ready.
Double-click on the zone and notice that it is empty. The primary zone does not automatically populate it. We will rectify this in a minute when we configure zone transfer.
Configure zone transfer
Switch to the DNS server with the primary forward zone to configure the zone transfer. Open DNS Server > Zones and select the zone to configure the zone transfer.
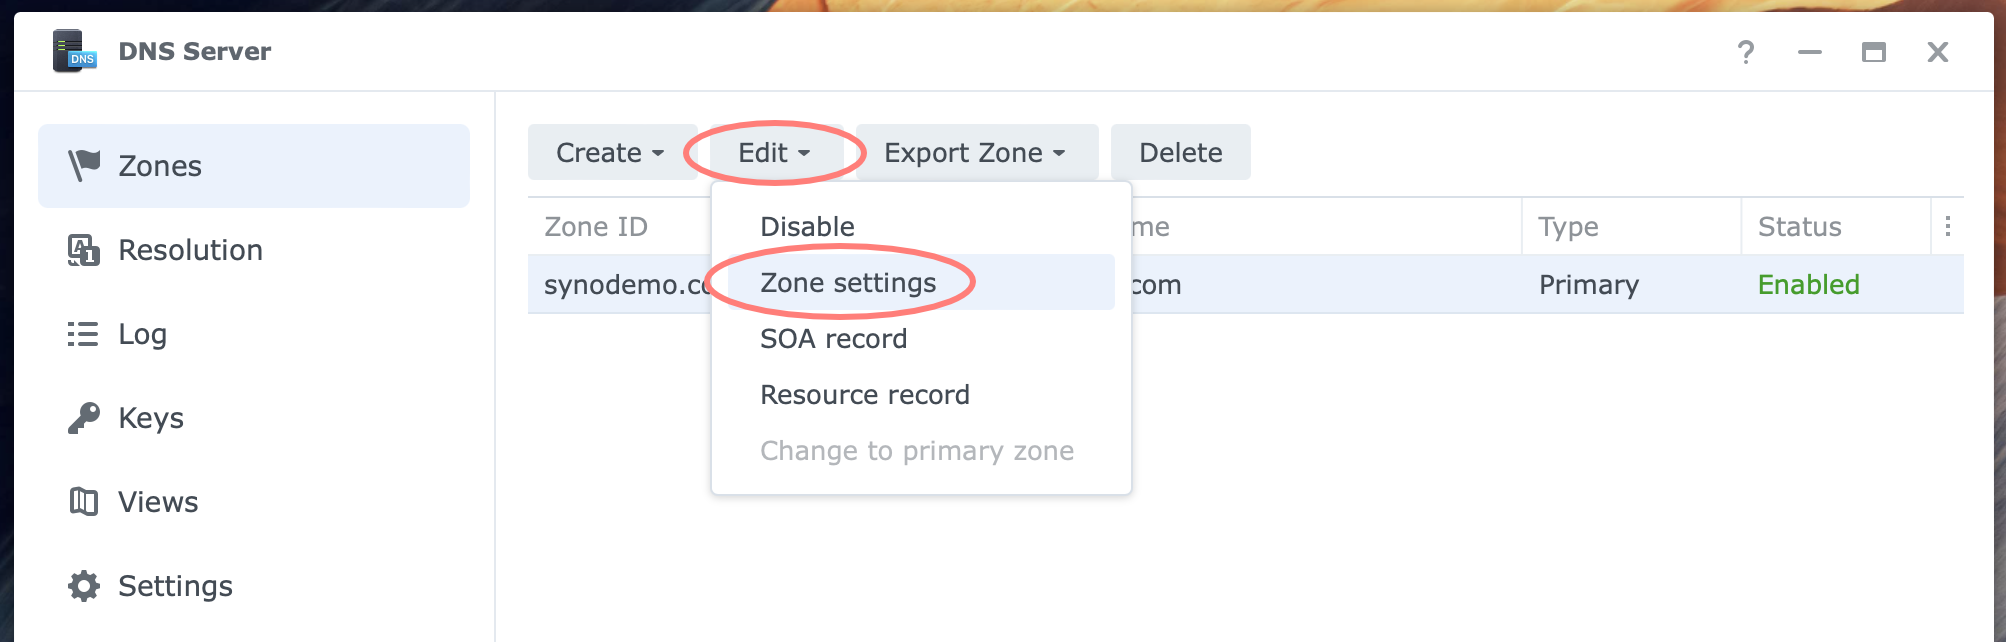
Click on Edit > Zone settings. The Edit zone settings dialog opens. Here, you need to configure two items.
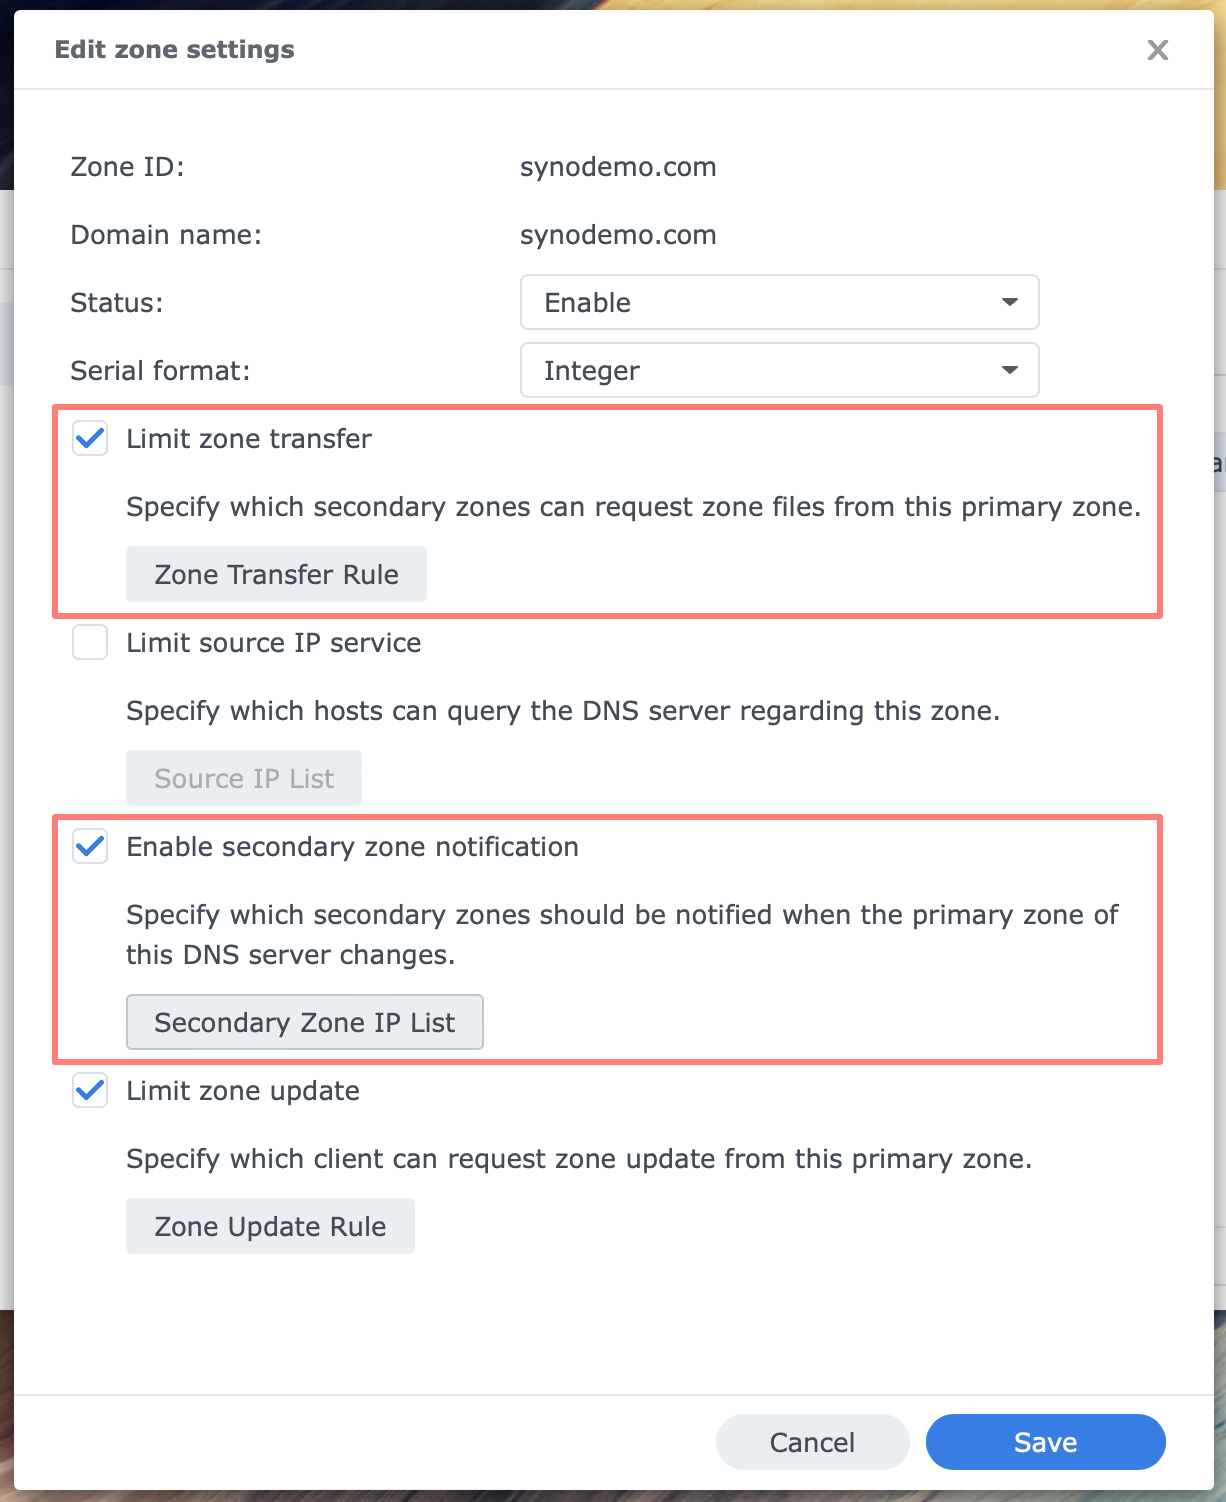
- Limit zone transfer
- this setting is enabled by default, but no hosts are defined as exceptions; as a result, zone transfer is disabled
- either turn off this option or add the IP address of the secondary DNS server under the Zone Transfer Rule button to allow zone transfer
- Enable secondary zone notification
- a notification after a change in the primary zone is the trigger to start the zone transfer
- enable this option, and under the Secondary Zone IP List button, configure the IP address of the secondary DNS server
Click Save when ready. Note that only if you change the primary zone will a notification start the zone transfer. Let’s do that.
Add NS record for second name server
We now add two (or better, three) records to the zone:
- a NS or Name Server record for the secondary server
- an A record for the second DNS server
- an A record for the NAS (optional)
Open the DNS Server application and double-click on the zone or click Edit > Resource record. The Edit resource record dialog opens.
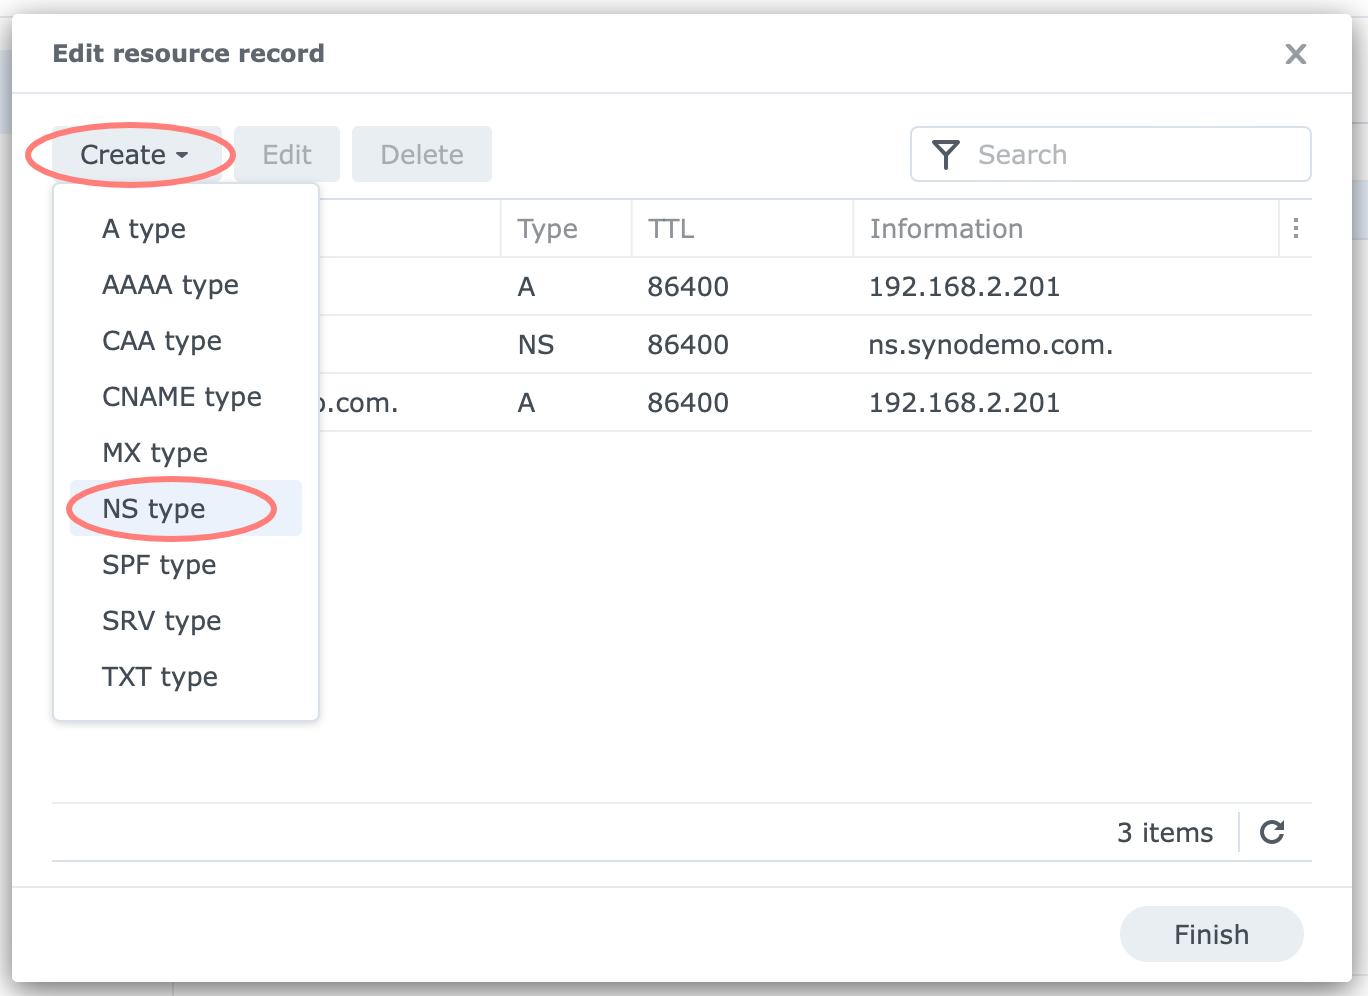
Click Create > NS type. The Add resource record NS dialog opens.
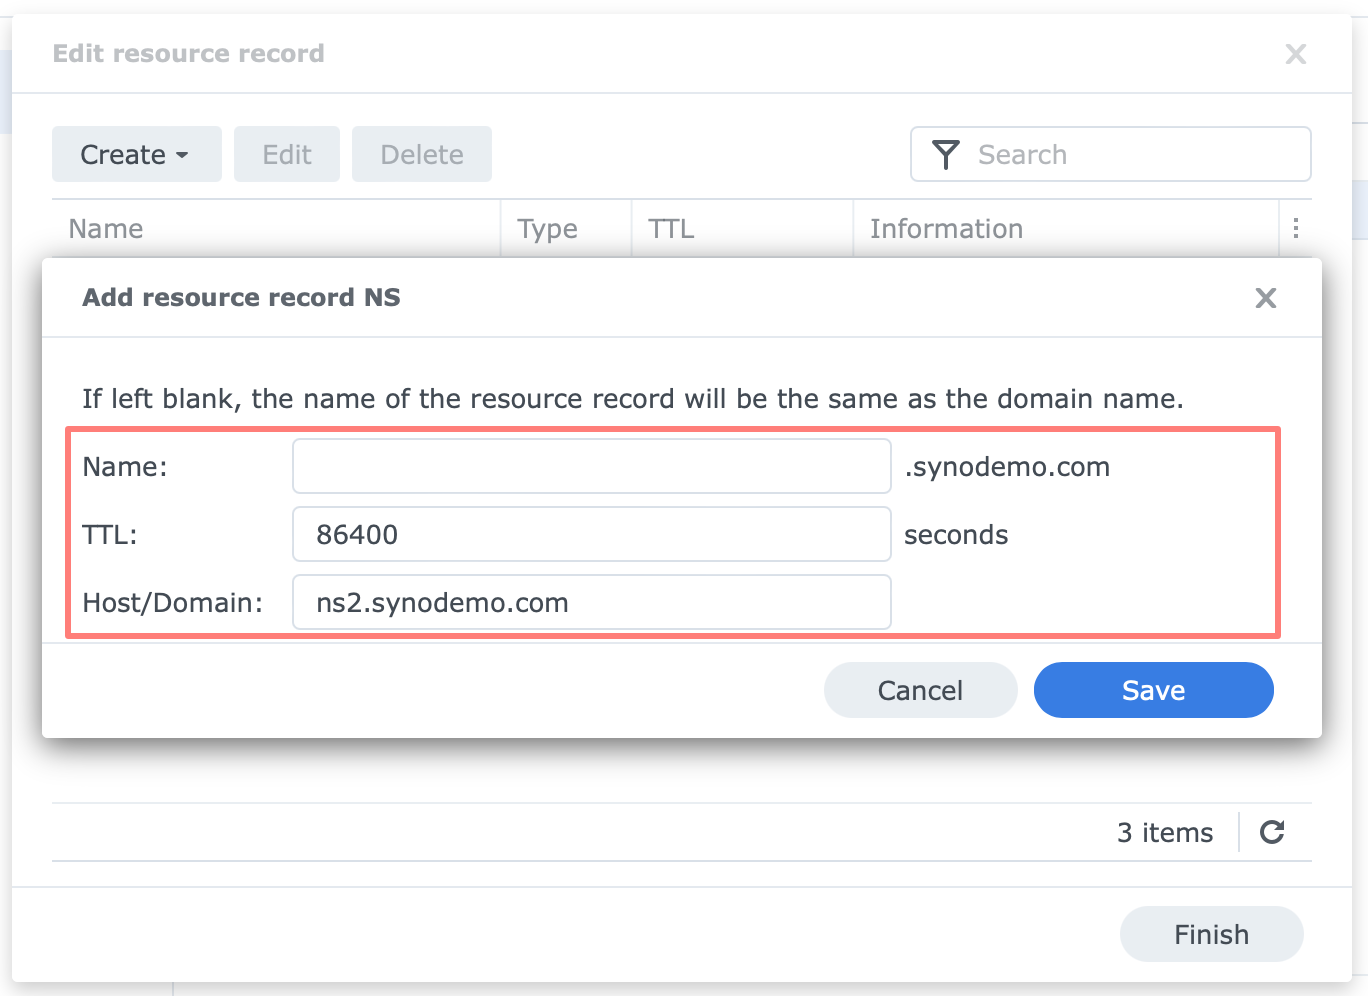
- Name
- leave this open because we create an NS record for the synodemo.com domain, not a subdomain
- TTL
- leave as is
- Host/Domain
- enter a hostname for the name server, like ns2.synodemo.com
Click Save. Continue and click Create > A type to create an A record, as I explained earlier, for the new name server ns2.synodemo.com:
- Name
- ns2
- TTL
- leave as is
- IP address
- 192.168.2.202 (fill in your server’s address)
Click Save. Optionally, create another A record for the server name, like vdsm7-2 in my case, for the same IP address. The resource records should look like in the screenshot below. Notice that all buttons are active in the primary zone when I select a resource record.
Return to the second DNS server that contains the secondary zone. Double-click the zone to check that it now contains resource records.
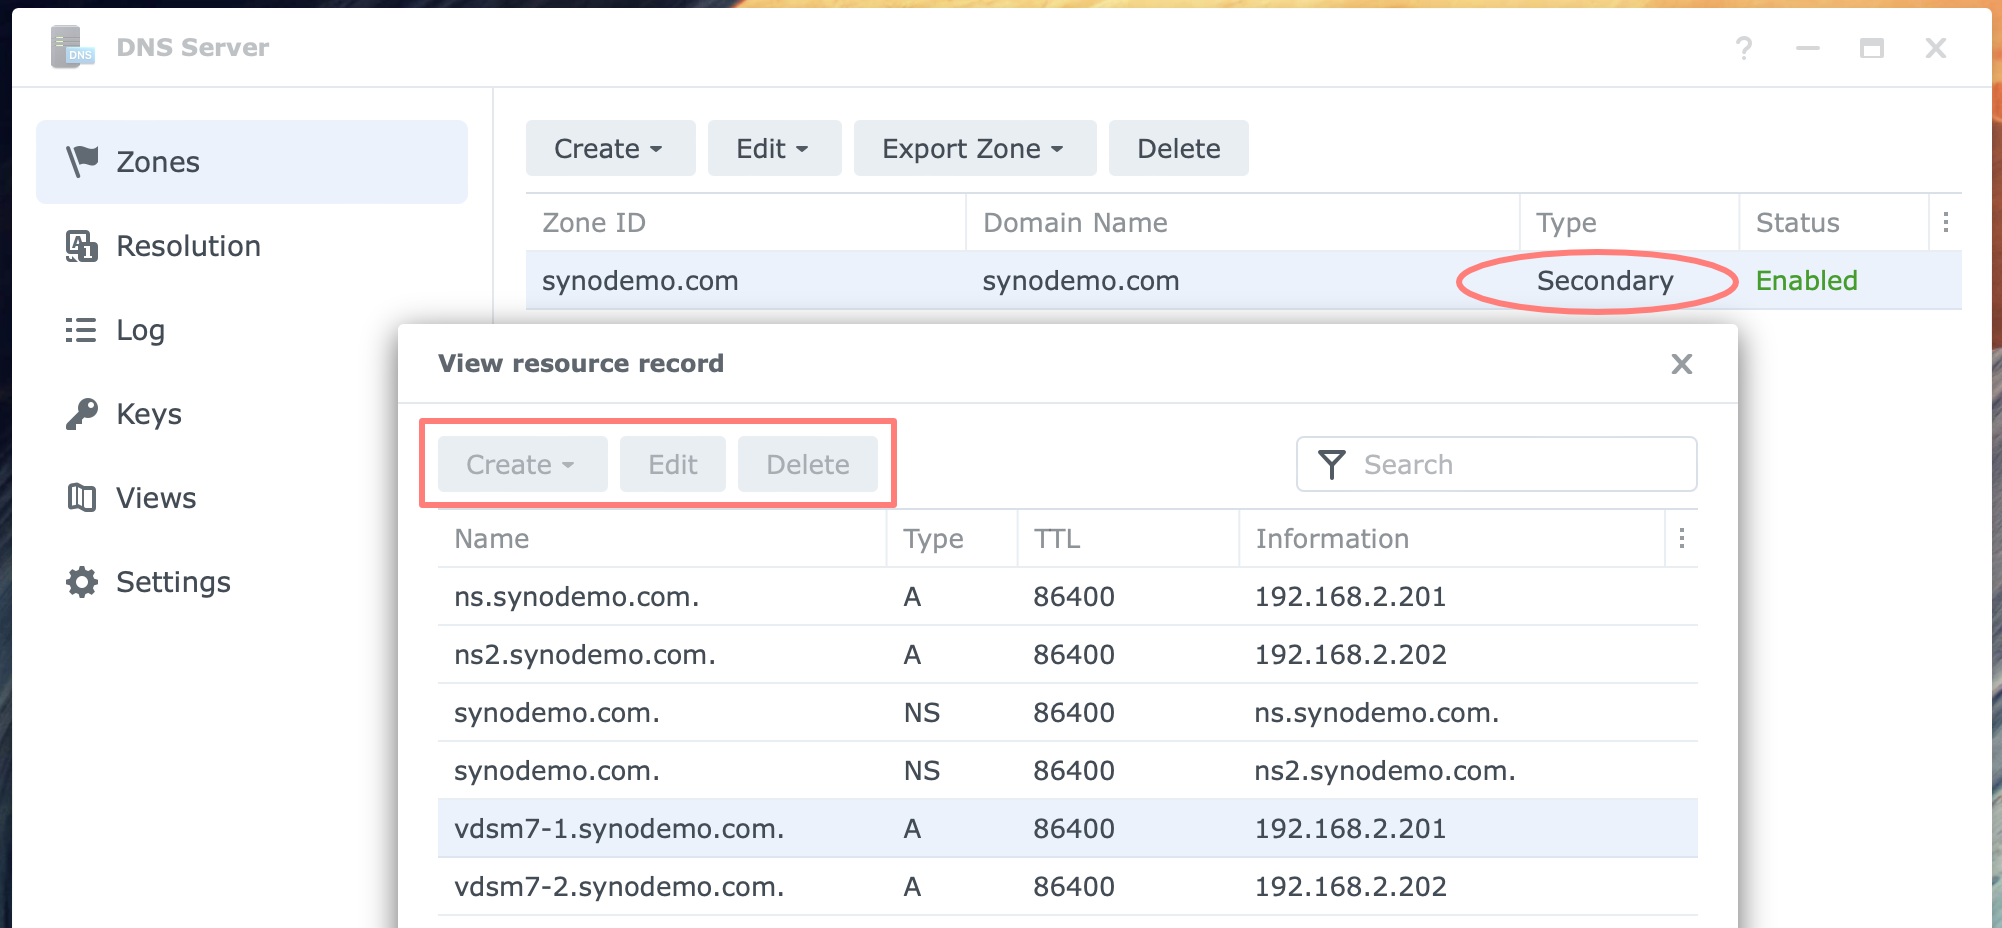
Notice that despite selecting a record, all buttons remain inactive because the secondary zone is a read-only zone.
Update DNS client settings
Like with the first DNS server, you must change the DNS settings of the clients on the network with the second or alternative DNS server. If the first server fails, the clients will look for the second.
As mentioned earlier, you can change the DNS settings on the host or via DHCP.
Thanks for reading
This post is donation-ware, and I made it to help you. Please consider leaving a comment or even buying me a coffee if it did. I will be eternally grateful.
Paul Steunebrink / Storage Alchemist