Virtualization is a technique in which you run a computer system in a virtual machine. A virtual machine is software that emulates the underlying hardware through the hypervisor. The hypervisor on Synology NAS is the Virtual Machine Manager.

Using Virtual Machine Manager On Synology
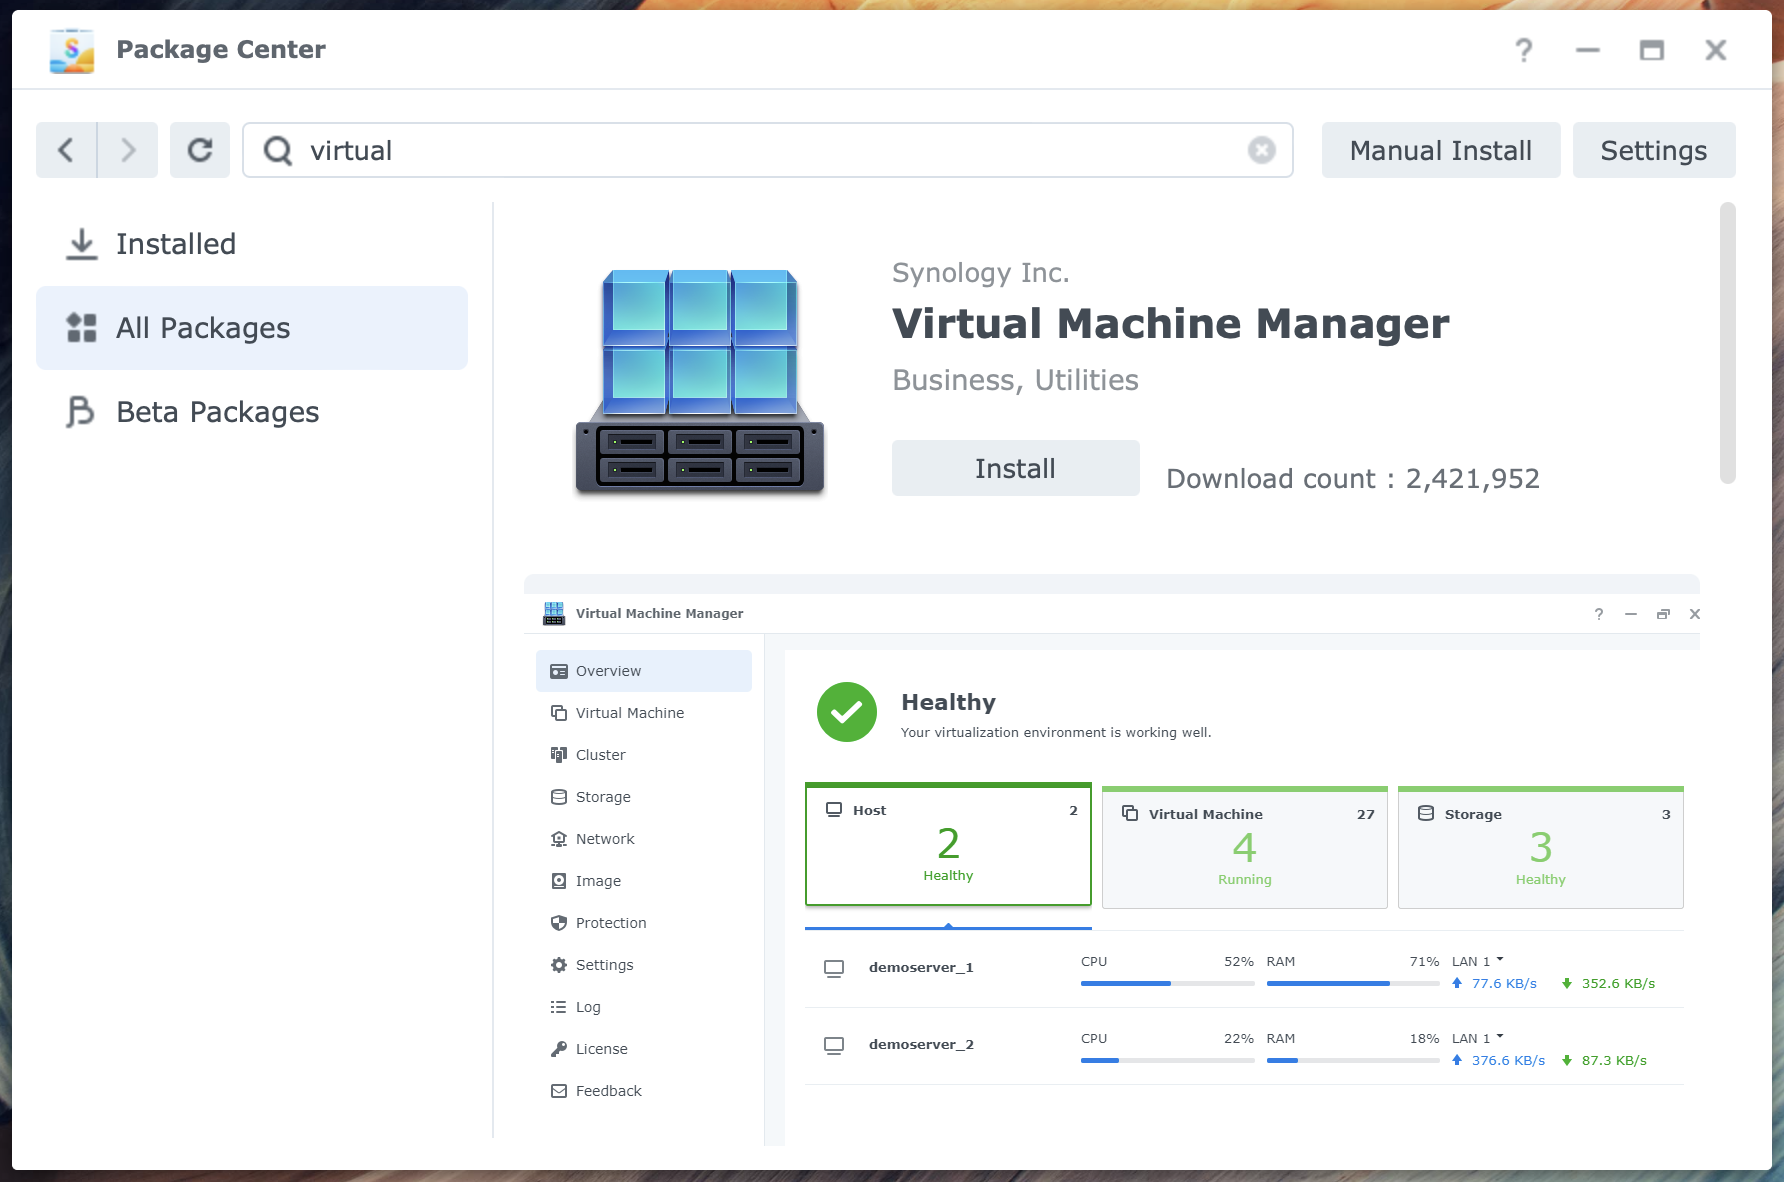
Synology DSM’s hypervisor is the Virtual Machine Manager, which you find in the Package Center.
A virtual machine has multiple benefits over a physical system.
- You do not have to buy new hardware
As long as your host is powerful enough, you can run numerous virtual machines. - Quick rollout
Creating a new virtual machine is often a matter of minutes. - Flexible assignment of resources
Processor cores, memory, storage, or network; with a virtual machine, you add or change resources with a mouse click. - Run, pause, revert
You can easily pause the system or revert to an earlier state you recorded in a snapshot.
Use cases
When do you choose a virtual machine as opposed to a physical machine?
IT guys love virtual machines for testing updates or new functionality. Does everything work well before being rolled out to production machines? The virtual machine’s capability to revert to a previous state in seconds is another great advantage. Or the ability to run an older or newer version of the software, application, or operating system. You can run DSM 6 in a virtual machine on the host with DSM 7.
Separation can be a reason. You might not want to expose your primary NAS to the Internet, but you must share files with others or run a website. A virtual machine can easily separate a specific function to improve security or separate administration from your primary system.
What is a hypervisor?
A hypervisor abstracts the physical hardware from the virtual hardware. It is the in-between. I believe it is Microsoft who came up with the term hypervisor a few decades ago. Before that, it was called virtualization software. The hypervisor virtualizes processor, memory, storage, and network. The USB ports on your NAS are not virtualized; your virtual machine has no USB port.
- processor
the processor is copied on a 1-to-1 basis, meaning that you can see in Virtual Machine Manager the exact amount of processor cores and assign a number of them to your VM; however, not all assigned cores in the VM are permanently lost for the host; it all depends on processor utilization on the VM - memory
set memory is allocated as long as the VM runs. In a host with 6 GB RAM and a running VM with 2GB RAM, you will have the remaining 4 GB RAM for the host - storage
the Virtual Machine Manager reserves an amount of storage in a storage node on the selected volume during installation; image files and VMs will use that space dynamically. You can create multiple disks for a VM; each disk will use space in the storage node. - network
the installation of Virtual Machine Manager creates a virtual network; there are different options for VMs like no network, virtual network only (communicating with other VMs), NAT, or on the local LAN via an active LAN port
Requirements Virtual Machine Manager
The minimal requirements for running a Virtual Machine Manager are:
- a NAS model that supports the Virtual Machine Manager package
- a NAS with DSM 6.1.2 or later
- a volume with the Btrfs file system
- a minimum of 2GB RAM; note that earlier, the minimum was 4GB RAM
It would be best if you typically had a NAS from the + or xs+ series. Here you find a list of supported NAS models: https://www.synology.com/en-us/dsm/packages/Virtualization
Recommendations
A powerful NAS is recommended since you will share resources between the host and one or multiple virtual machines. An SSD cache, if your NAS supports it, is recommended. Virtual machines highly benefit from an SSD cache.
From my experience, a virtual DSM machine on a DS218+ with 6GB RAM takes a few minutes to start or shut down. After upgrading to a DS923+ with an SSD cache, performance significantly improved.
Types of Virtual Machines
You can run virtual machines with Linux, Windows, and DSM on your NAS with Virtual Machine Manager.
License
Virtual Machine Manager can run in Basic or Pro mode. The Basic mode is free. The Pro mode, with additional features, requires a license. The benefits of Virtual Machine Manager Pro are the high availability of monitoring options and events to monitor, clustering, local snapshots with remote replication, and host auto selection. I discuss the Basic mode in this post.
Backup and restore
If the virtual machine’s operating system, such as Linux or Windows, supports Active Backup for Business, you can use it for backup purposes.
For a virtual DSM machine, there is no backup option. You can export the virtual machine and import it if necessary.
Note that a system backup with Hyper Backup or Active Backup for Business includes the Virtual Machine Manager installation and configuration plus virtual machines. Restore is not as straightforward as you might want, but I got it working during the test and with some help from Synology.
Scope
This post focuses on installing and configuring Virtual Machine Manager in Basic mode on your NAS. In a second post, I will discuss setting up DSM in a virtual machine or virtual DSM.
These instructions are based on Virtual Machine Manager 2.6.5 on DSM 7.2.1.
Installing Virtual Machine Manager
Install the package Virtual Machine Manager from Package Center. This adds the Virtual Machine Manager application to the main menu. This package depends on the Replication Service and SAN Manager. The SAN Manager is permanently installed, and the Replication Service is installed first if not yet installed.
The installation of each package may come with a firewall warning if you have the firewall active on your NAS. The Replication Service installs on the System Partition, while Virtual Machine Manager installs on the selected volume if your NAS has multiple volumes. Note that the volume you install Virtual Machine Manager is separate from the volume you will store your virtual machines, as you will see later.
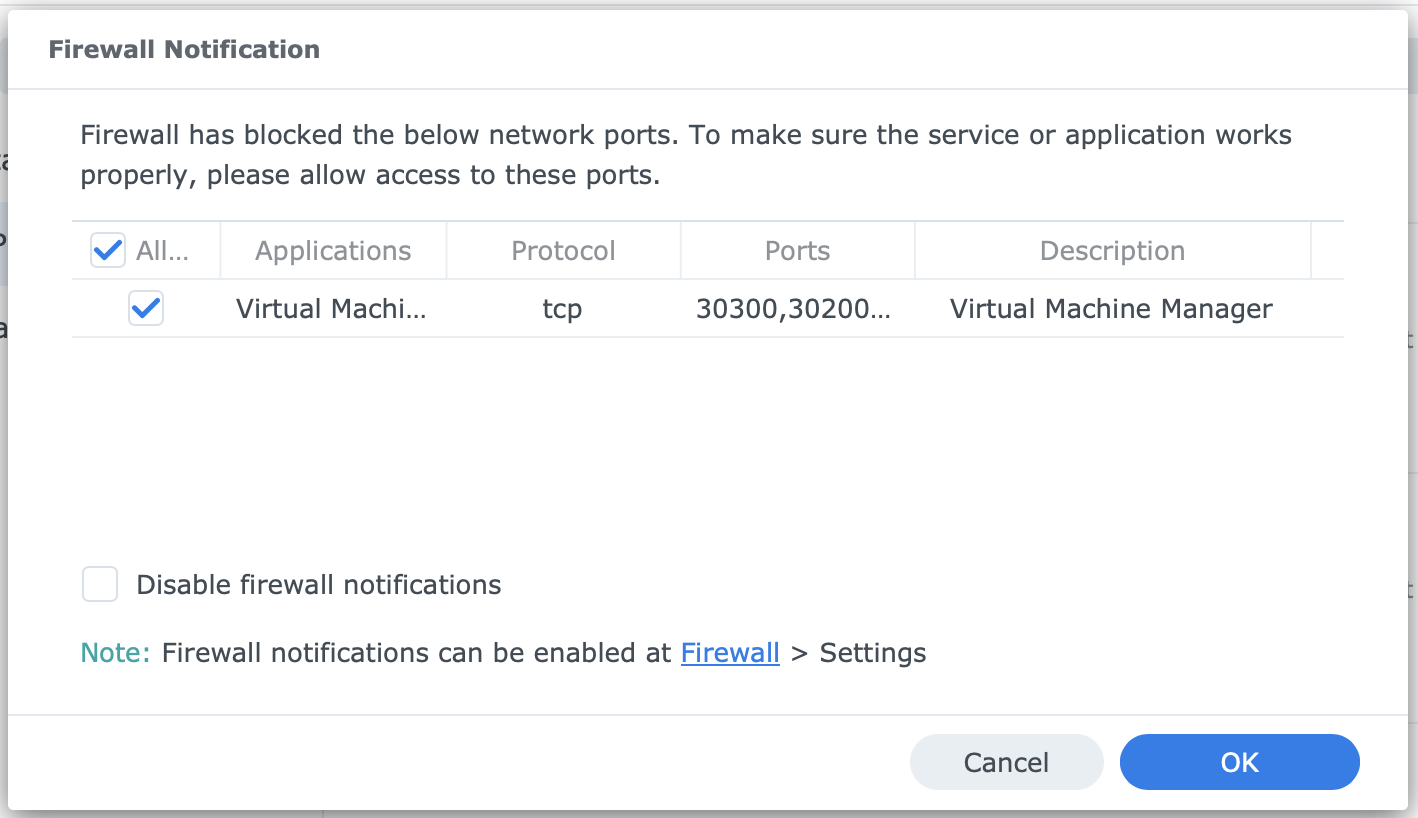
If you run Virtual Machine Manager on a single node with a free license, I assume you do not need to open ports since there is no replication. When you have multiple nodes where you installed Virtual Machine Manager on multiple NAS devices and connect them in a single cluster, please open the assigned ports.
Virtual Machine Manager Setup Wizard
After installation, start the Virtual Machine Manager application from the main menu. The Virtual Machine Manager Setup Wizard automatically starts. The wizard will assist you in setting up the virtualization cluster. It helps you select the volume for storage and check if host settings are suitable. Click Start to start the wizard.
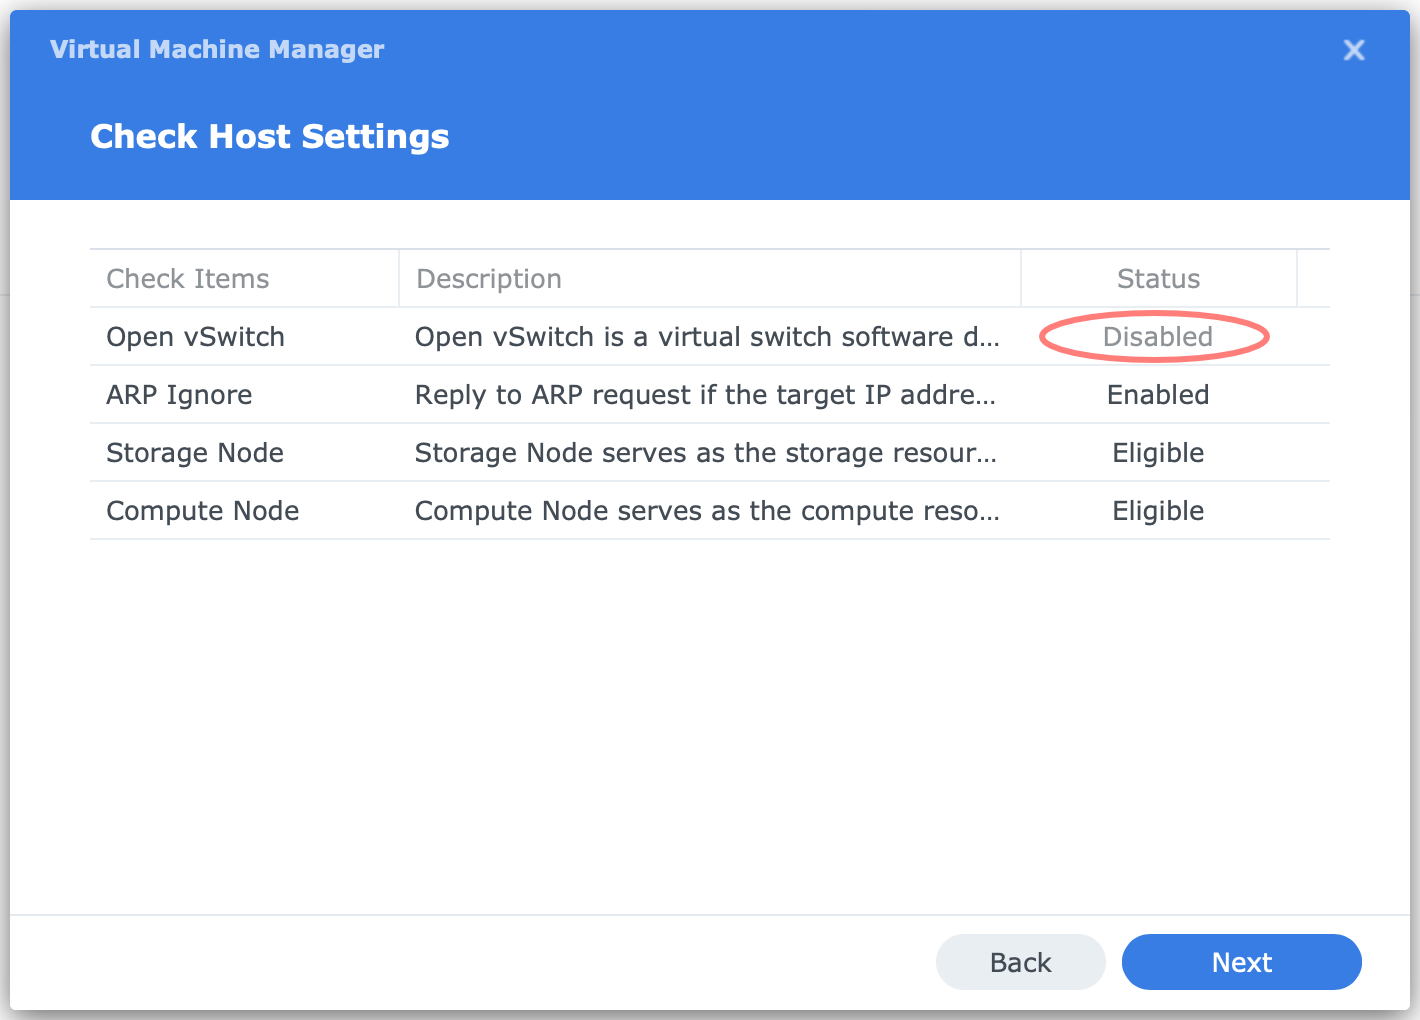
On the Check Host Settings page, you see the following four items:
- Open vSwitch
- Open vSwitch is a virtual switch software designed for virtualization environments.
- Status: Disabled
- ARP Ignore
- Reply to ARP request if the target IP address is identical to a local address configured on the incoming interface.
- Status: Enabled
- Storage Node
- Storage Node serves as the storage resource for virtual machines to store data. Only Btrfs volumes are supported.
- Status: Eligible
- Compute Node
- Compute Node serves as the compute resource for virtual machines to run on. You must have more than 2GB RAM in the host.
- Status: Eligible
Notice that the status can be Disabled, Enabled, or Eligible. Click Next.
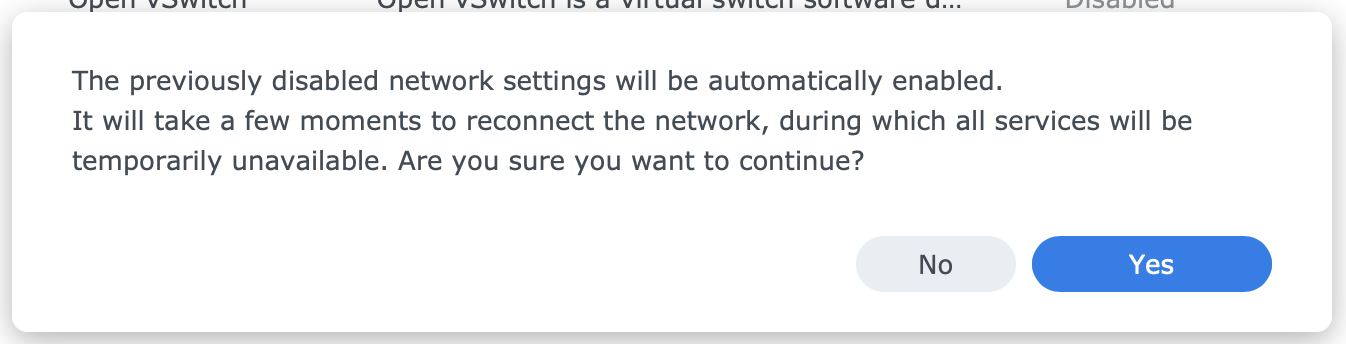
If the Open vSwitch is disabled, a message appears that the network settings will be automatically enabled. This will temporarily disconnect the NAS from the network. Click Yes to continue.
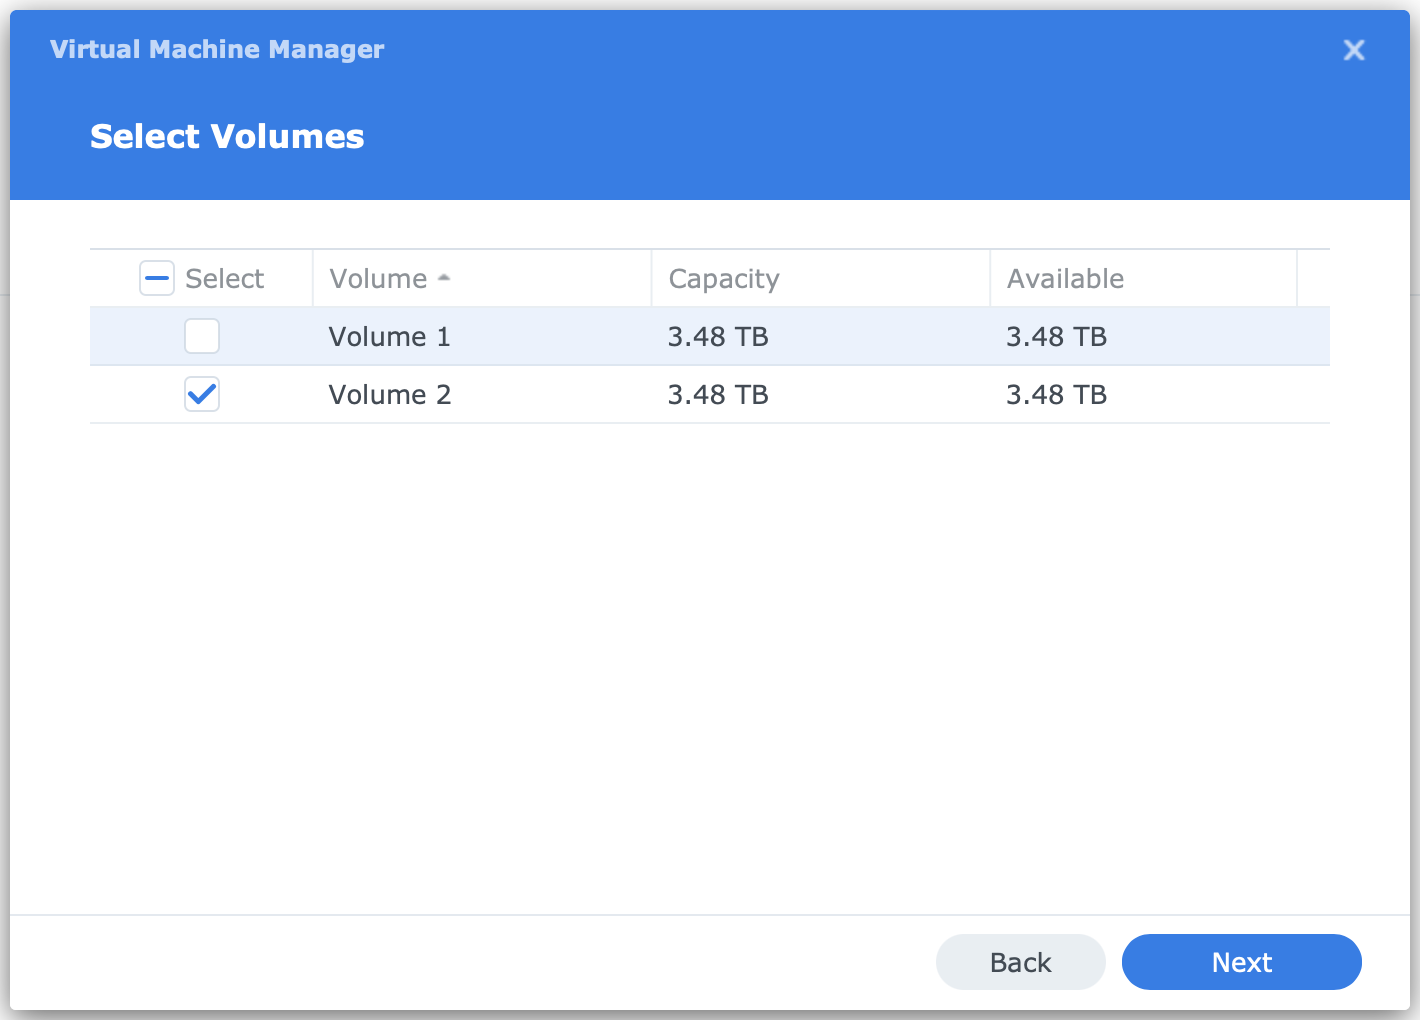
On the Select Volumes page, select the volume to store the virtual machines. Virtual Machine Manager creates a storage node on the selected volumes. If you have multiple volumes on your NAS, you can choose any volume you like to use. In Virtual Machine Manager, you can add and remove storage nodes later. Click Next.
While displaying the text Loading, the Setup Wizard applies all settings. It may take a minute before the You Are All Set screen appears to notify you that the virtualization cluster was created successfully. Click Finish to close the wizard.
Virtual Machine Manager is now ready to run with all default settings. However, before installing your first virtual machine, let’s examine some settings inside Virtual Machine Manager and the DSM level.
About Open vSwitch
Virtual Machine Manager uses and requires Open vSwitch. This component creates a virtual network for the virtual machines. As explained above, Open vSwitch is enabled as part of initialization on the first use of Virtual Machine Manager. After removing Virtual Machine Manager, Open vSwitch remains enabled.
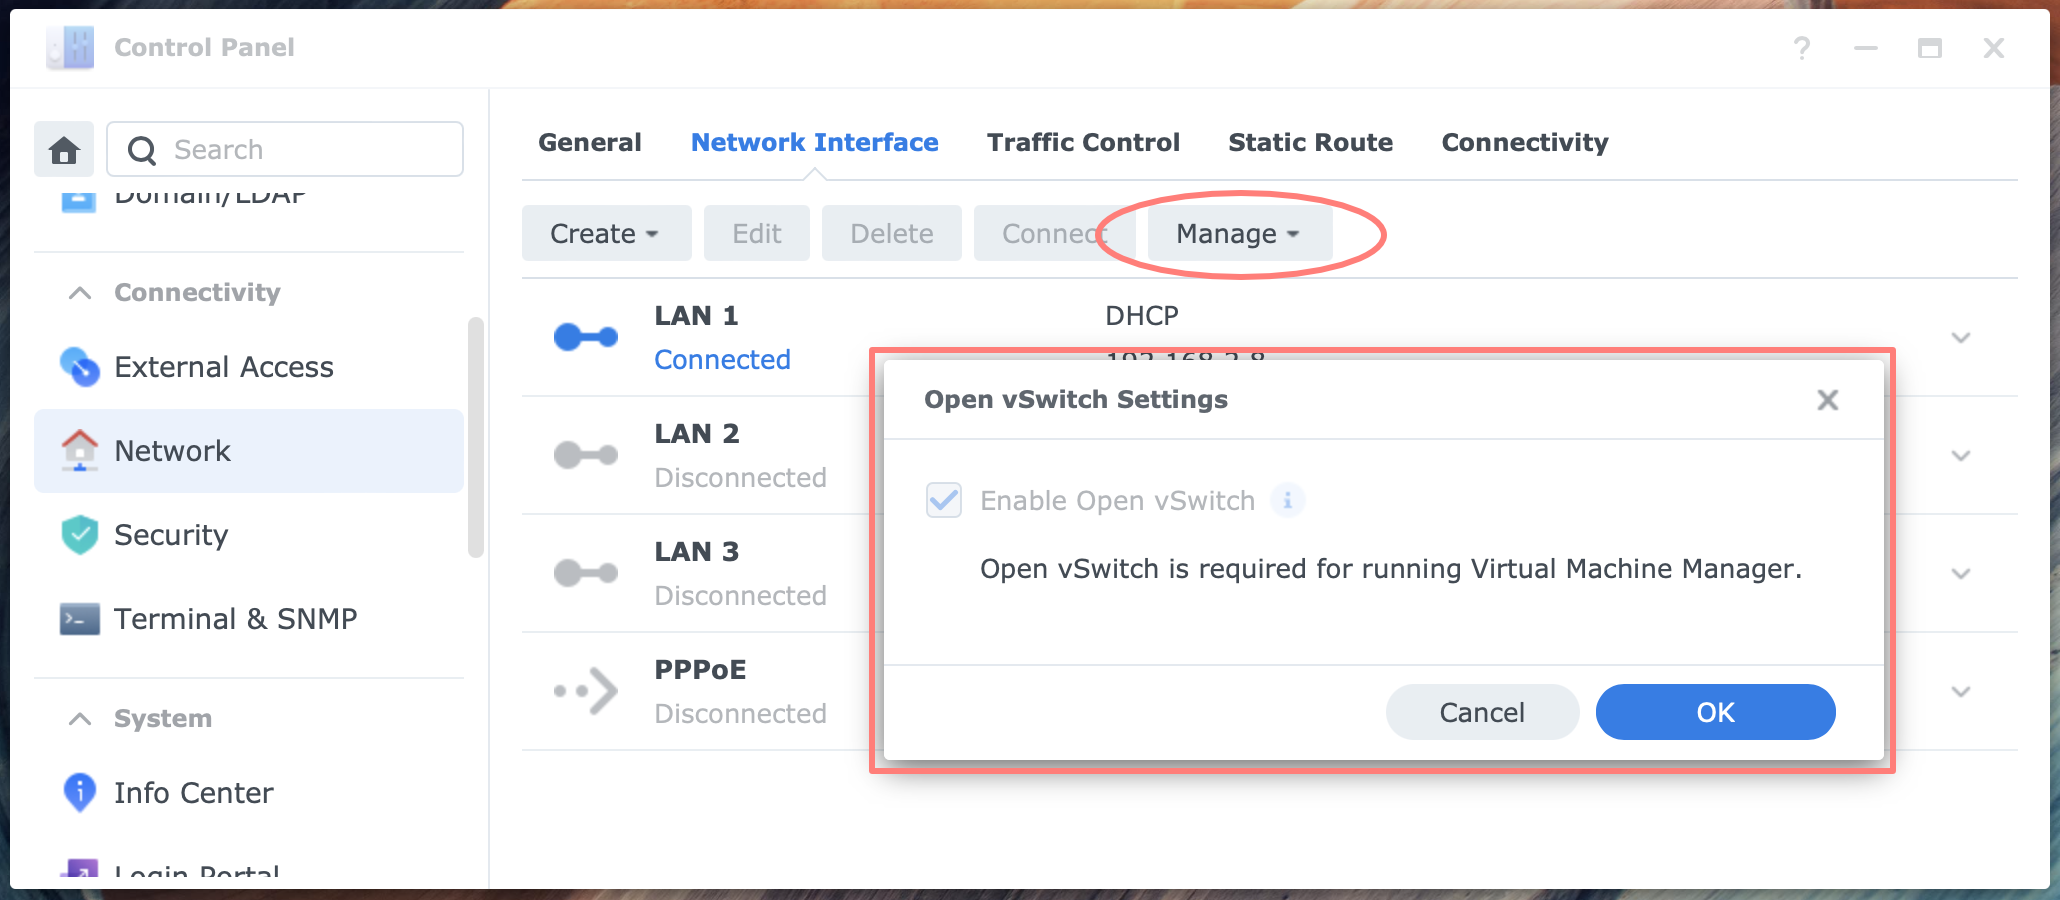
You can turn Open vSwitch on and off via Control Panel > Network Interface tab > Manage button > Open vSwitch Settings.
Configuring Virtual Machine Manager
There are a few settings to configure inside Virtual Machine Manager and some outside.
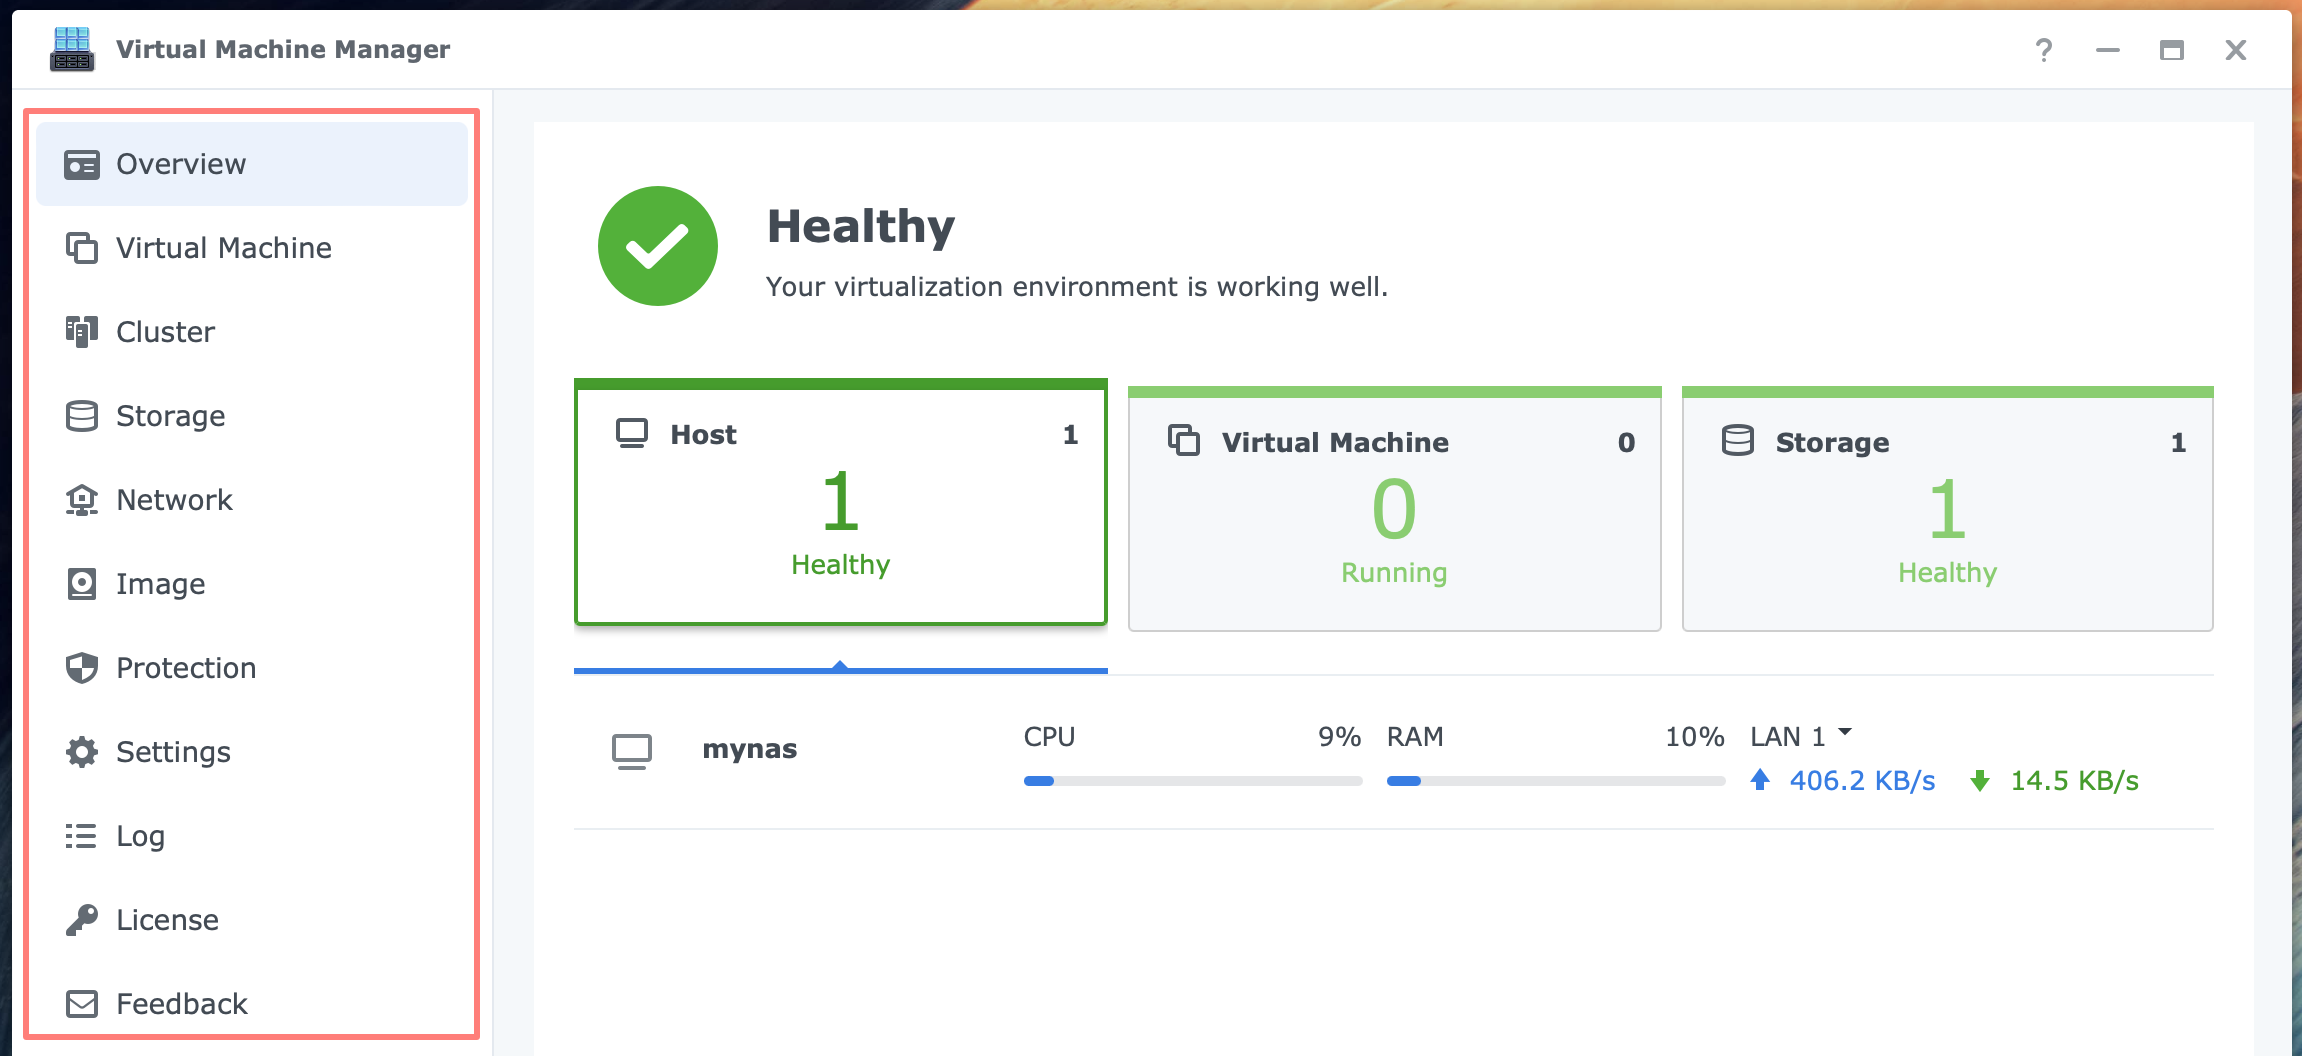
After you finish the setup wizard, Virtual Machine Manager displays the main screen with eleven items in the left column and a larger screen on the right.
You should see a Healthy status for your Host and Storage on the Overview screen. Click on each of the three buttons and review the settings below the buttons.
Settings
Move over to the Settings screen > General tab. Here are a few settings you might want to consider.
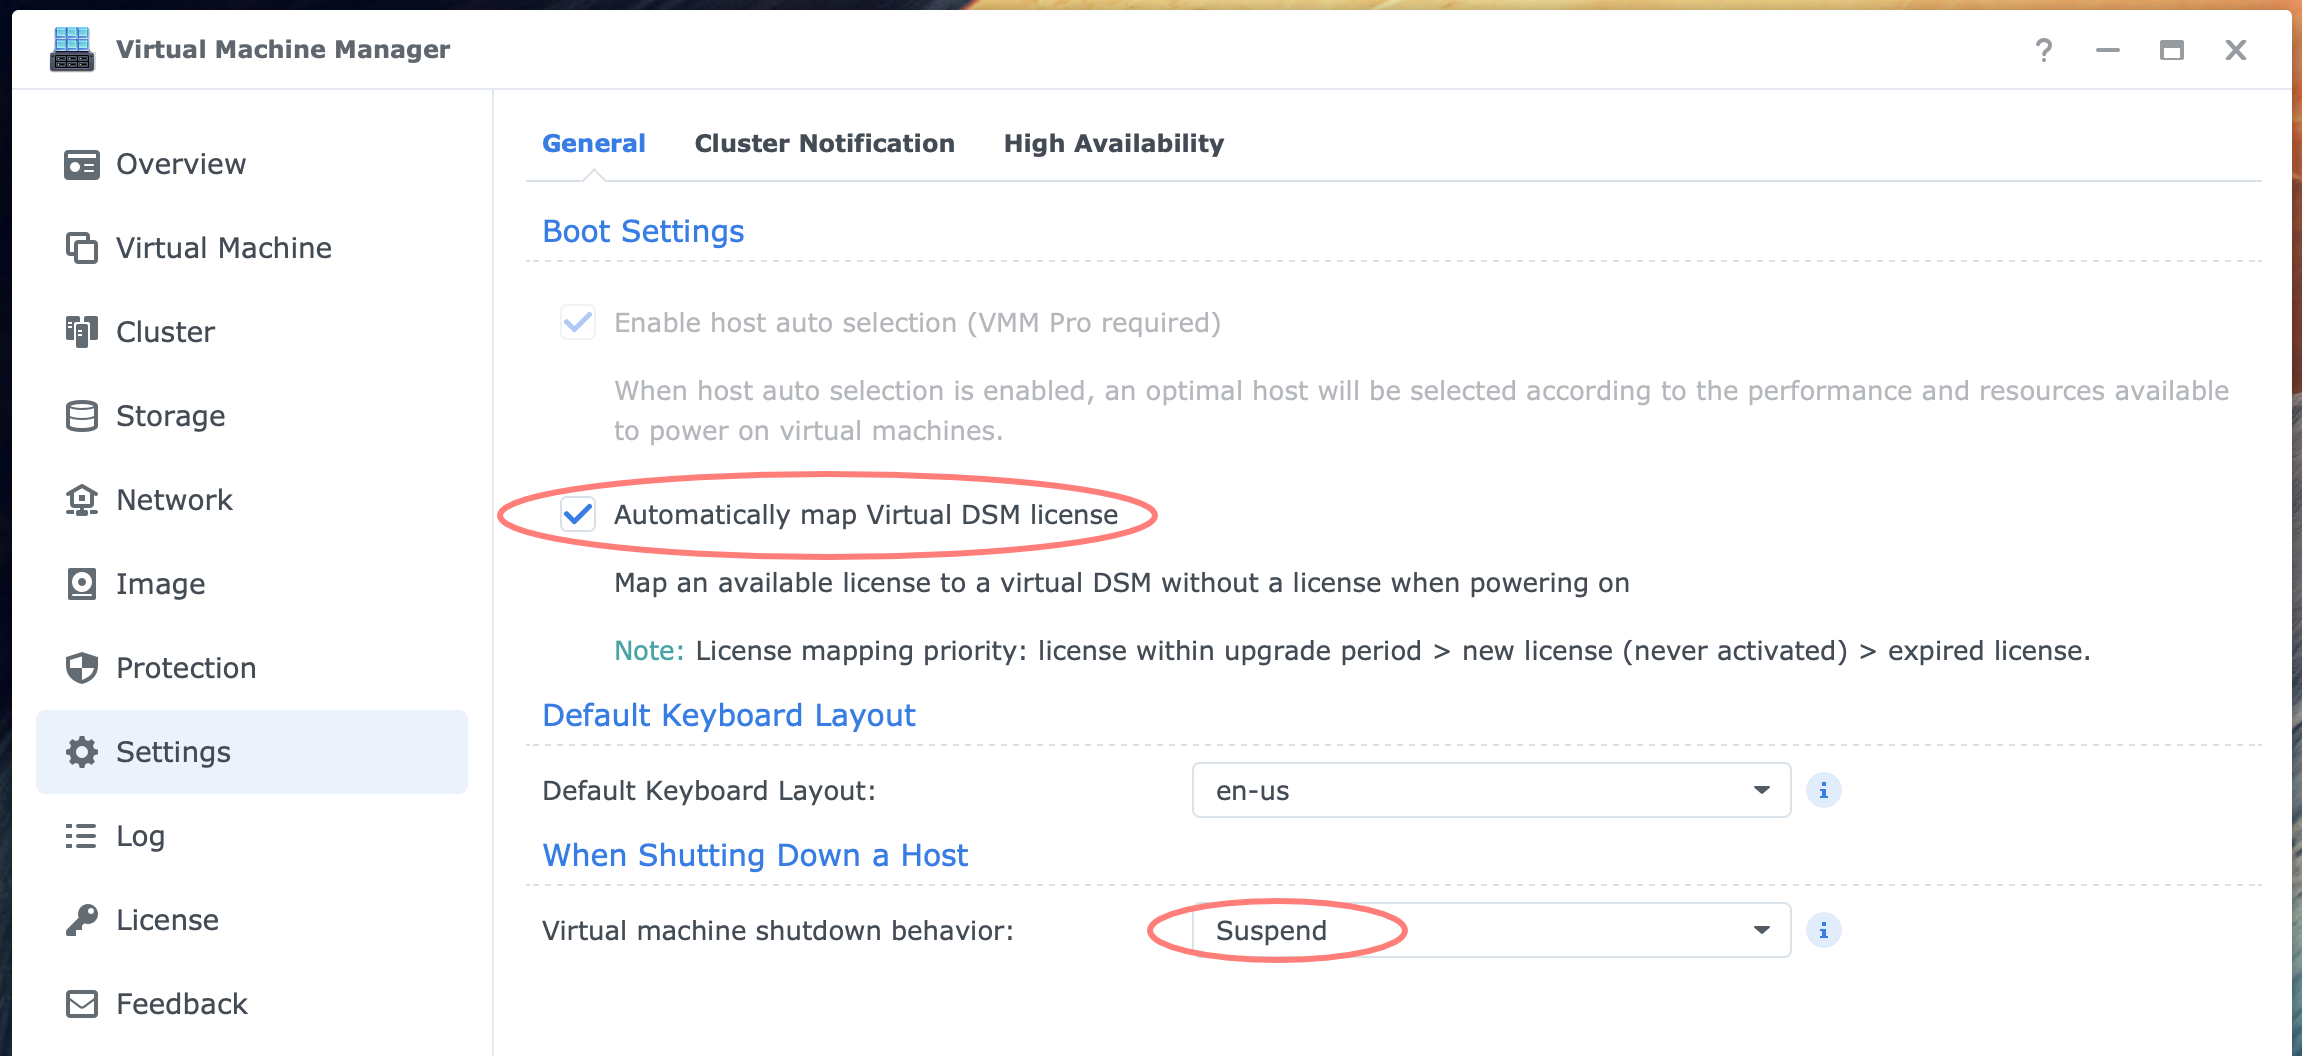
- Automatically map Virtual DSM license
You have one free license and can purchase and add more licenses. Virtual Machine Manager can automatically map a license when you power on a virtual DSM machine. - Default Keyboard Layout
This setting will only apply to new VNC connections and share links. - When Shutting Down a Host
This setting will apply to both manual and scheduled shutdowns. I find Suspend quite convenient. If you use a planned shutdown for your NAS, you must configure this setting to Suspend or Shutdown; otherwise, the shutdown of your NAS as host will fail.
Stay on the Settings screen, but move to the Cluster Notification tab. Here, you can configure up to ten recipients for email notifications. Note that Virtual Machine Manager added and enabled several notifications by default in Control Panel > Notifications > Rules during installation.
If you have not configured these notifications, I strongly encourage you to do so. If you have configured notifications in Control Panel, the SMTP server is already filled in for notifications from Virtual Machine Manager.
Licensing
Open the License screen. Notice the two tabs, Virtual Machine Manager and Virtual DSM. Review both tabs.
They refer to Virtual Machine Manager Pro licenses rather than Basic and Virtual DSM licenses. You get one free Virtual DSM license per NAS.
On the Virtual Machine Manager tab, you can upgrade to Pro by adding a license. Virtual Machine Manager Pro comes in different flavors for 3- and 7-nodes, valid for one or three years. You can start a 30-day free trial for Pro.
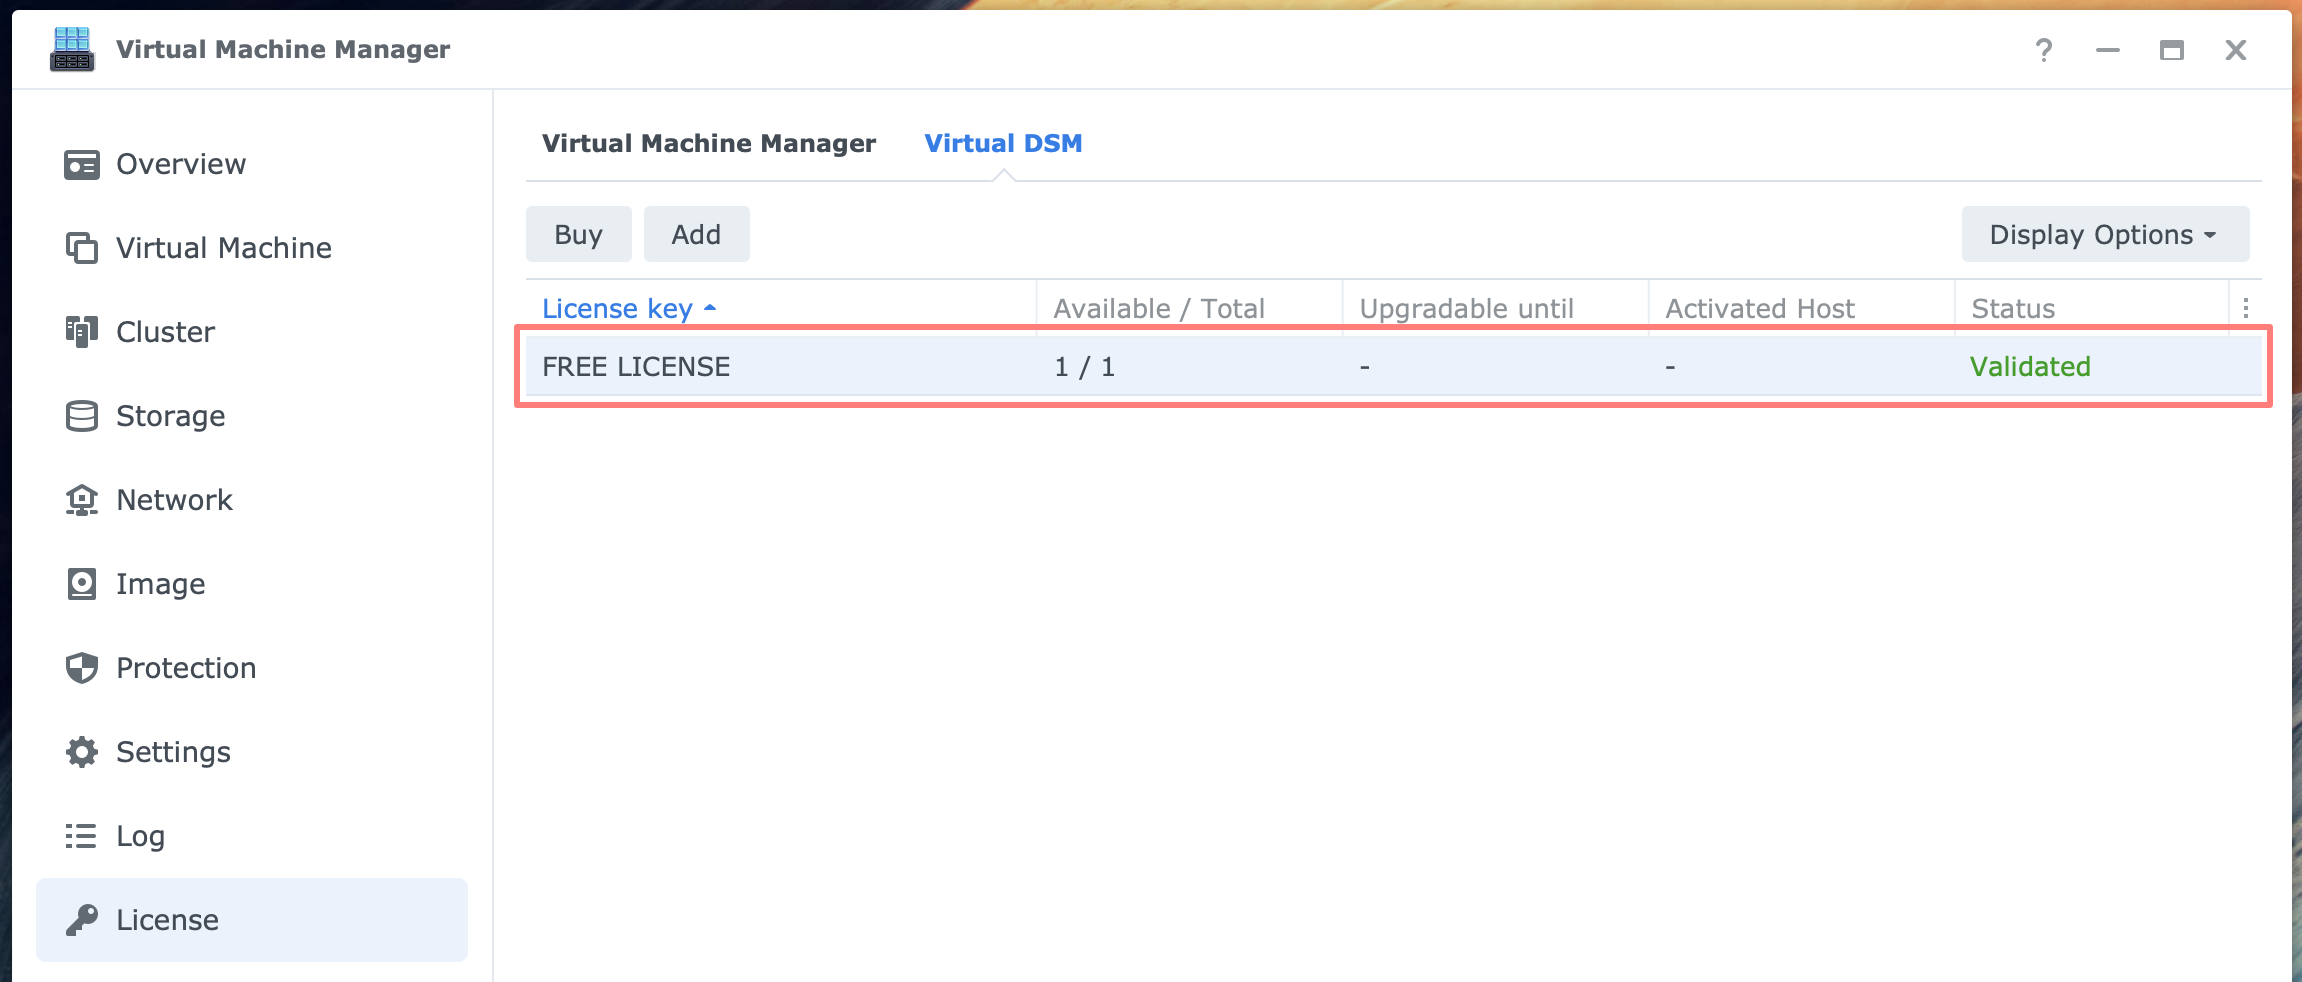
You will see a free license on the Virtual DSM page. We will use this later in the next post on installing virtual DSM.
This finishes the Virtual Machine Manager configuration. You may now close Virtual Machine Manager or leave it open if you plan to return here shortly.
Configuring DSM
You configure the several DSM settings via Control Panel.
- Login Portal
- Application Privileges
- Firewall
- Certificate
Login Portal
From the Login Portal, you configure the alias and port numbers. These configurations are optional. They allow you to open Virtual Machine Manager directly without logging into DSM first.
Go to Control Panel > Login Portal > Applications tab—Double-click on Virtual Machine Manager. The Edit screen opens. Look at the Web Services section.
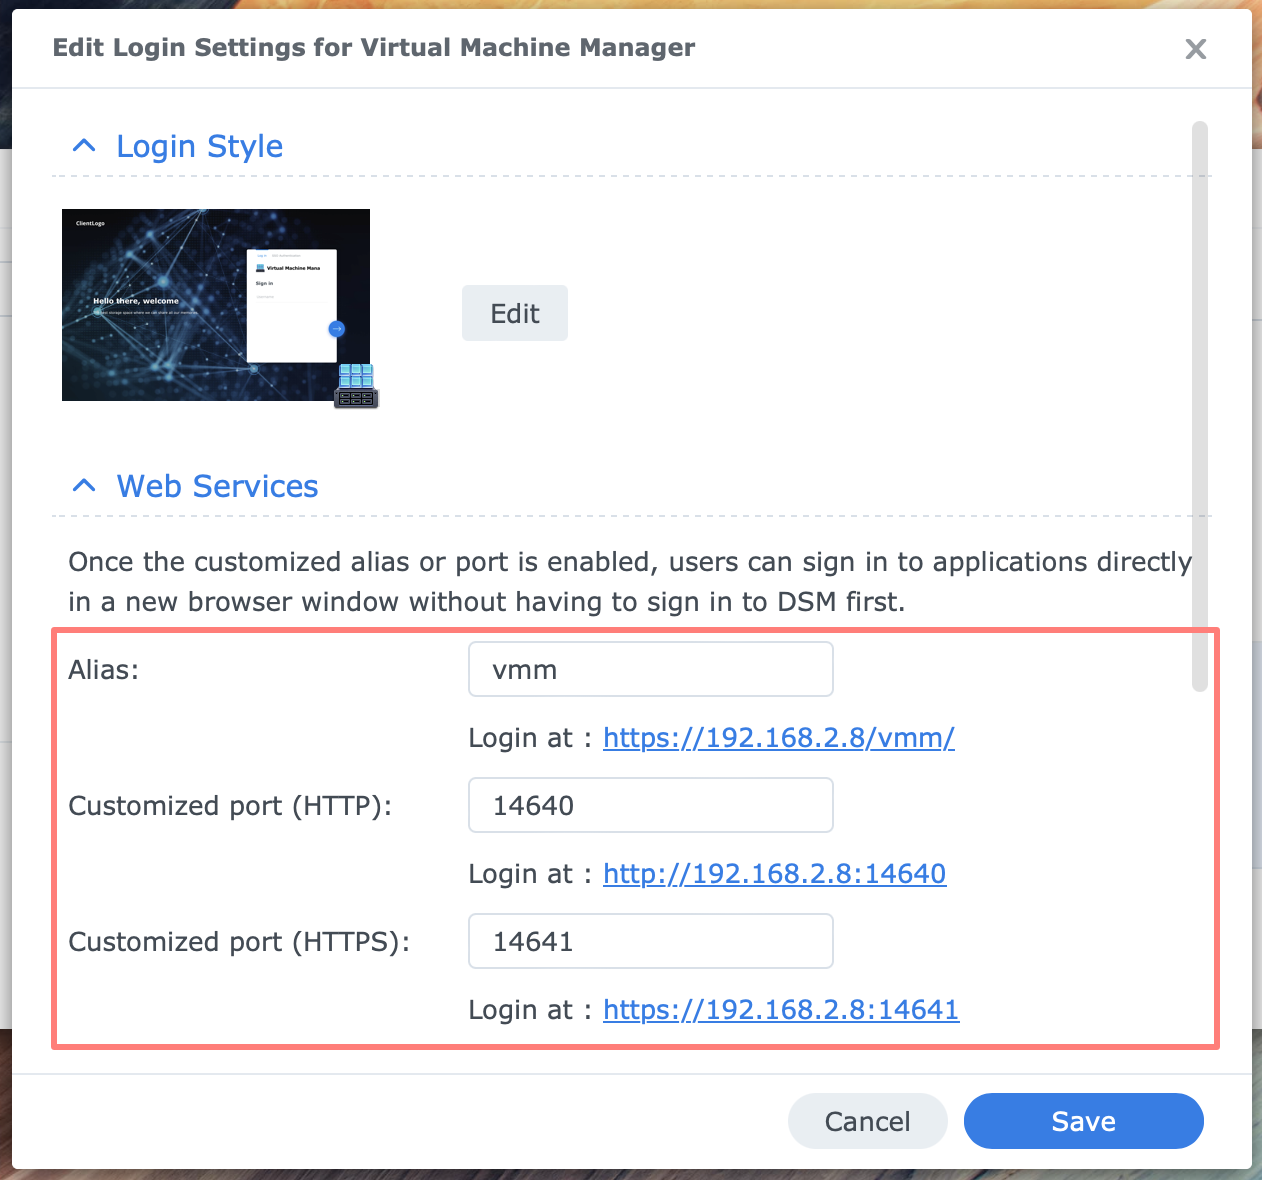
Note that you can configure the alias, the customized port numbers, or both. The screenshot above reflects the default values. When you configure port numbers, you must forward that port from the router and open the port in the firewall. The port number lets you configure a specific certificate.
Application Privileges
By default, only administrators have permission to open the Virtual Machine Manager. You can allow other (non-administrative) users to manage virtual machines. Those users can start, suspend, resume, shut down, and reset a virtual machine via a trimmed-down version of Virtual Machine Manager. They can not create a new virtual machine, delete an existing one, or use snapshots. You can extend this privilege to other users and groups by configuring Application Privileges in Control Panel.
If you have several NAS users who manage virtual machines, consider creating a group and assigning the application privilege for the Virtual Machine Manager to that group to ease administration.
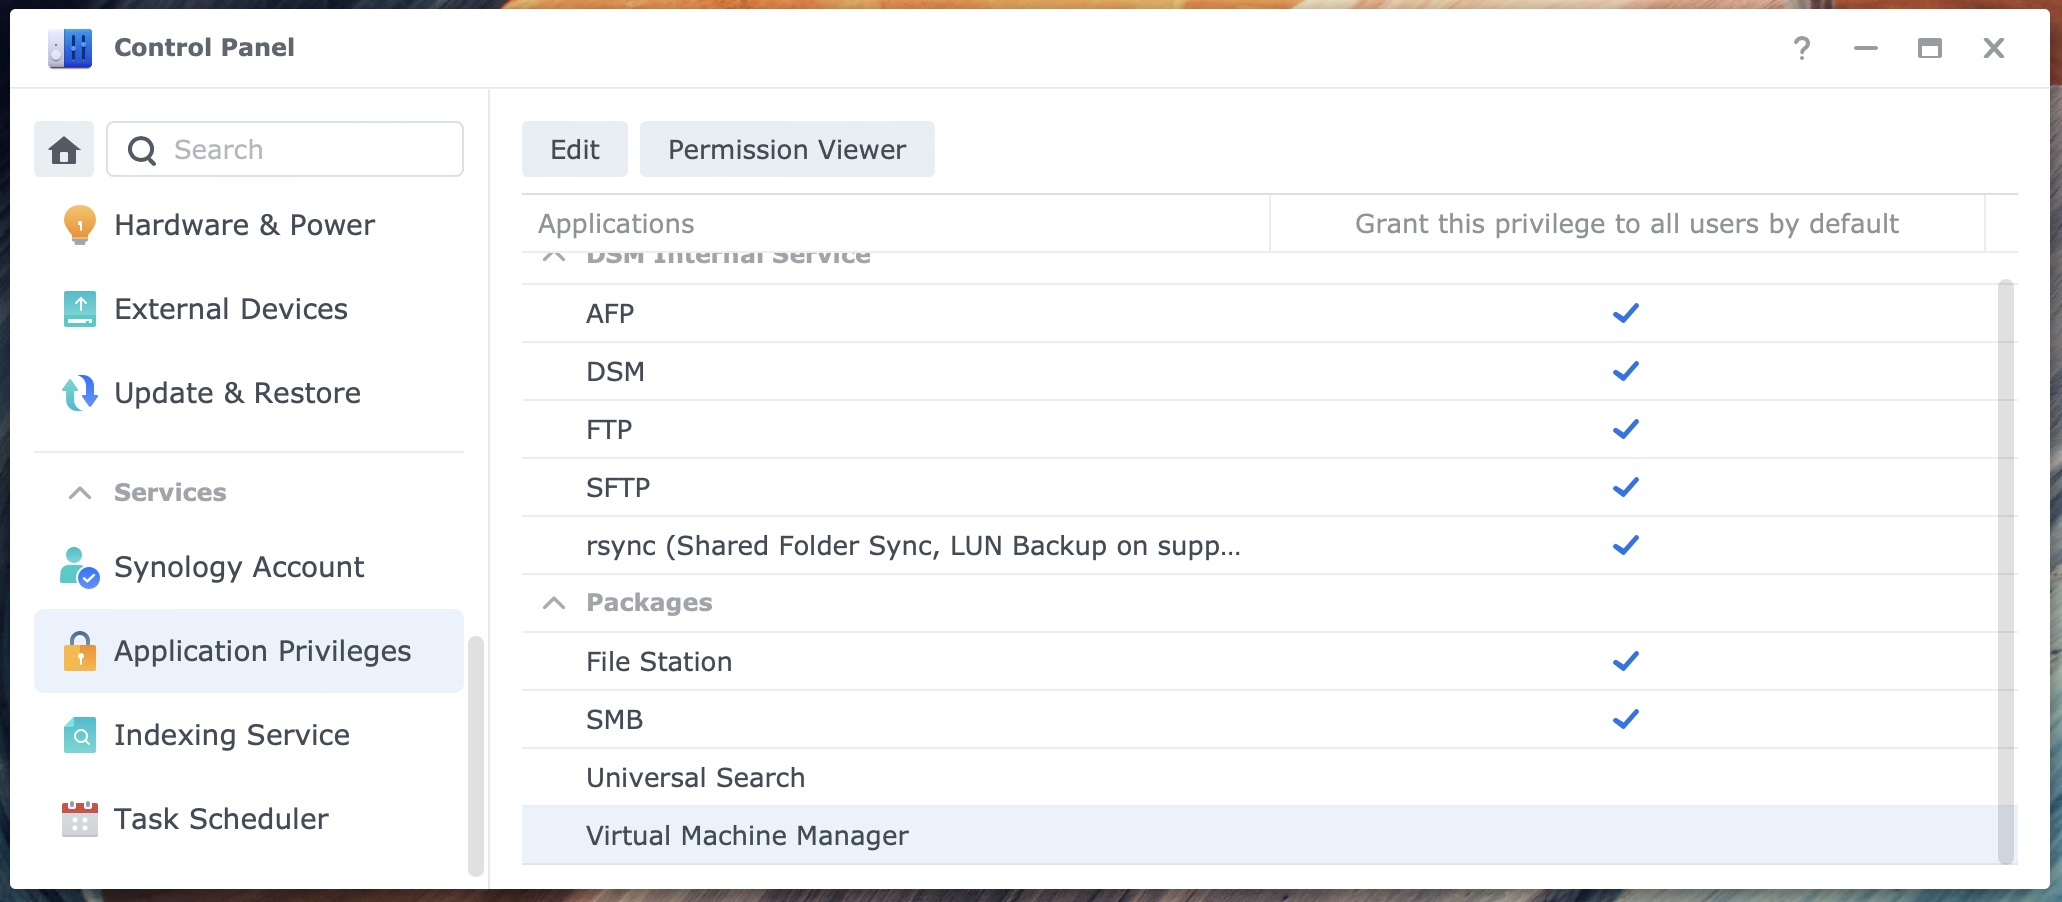
Go to Control Panel > Application Privileges, select Virtual Machine Manager from the list, and click the Edit button. You can assign permissions to users or groups or make it a default privilege for all users.
The user (non-admin) can now open Virtual Machine Manager, but he only gets an empty Virtual Machine screen. In the next step, an administrator permits the user or group in Virtual Machine Manager to access a specific virtual machine. You can give specific users permissions to each virtual machine individually. See the section below for a more elaborate explanation.
Permission to manage a virtual machine
From the DSM desktop, open Virtual Machine Manager. Select the Virtual Machine page and select the virtual machine to edit the permissions. Right-click > Edit or Action button > Edit. The Edit Virtual Machine dialog opens.
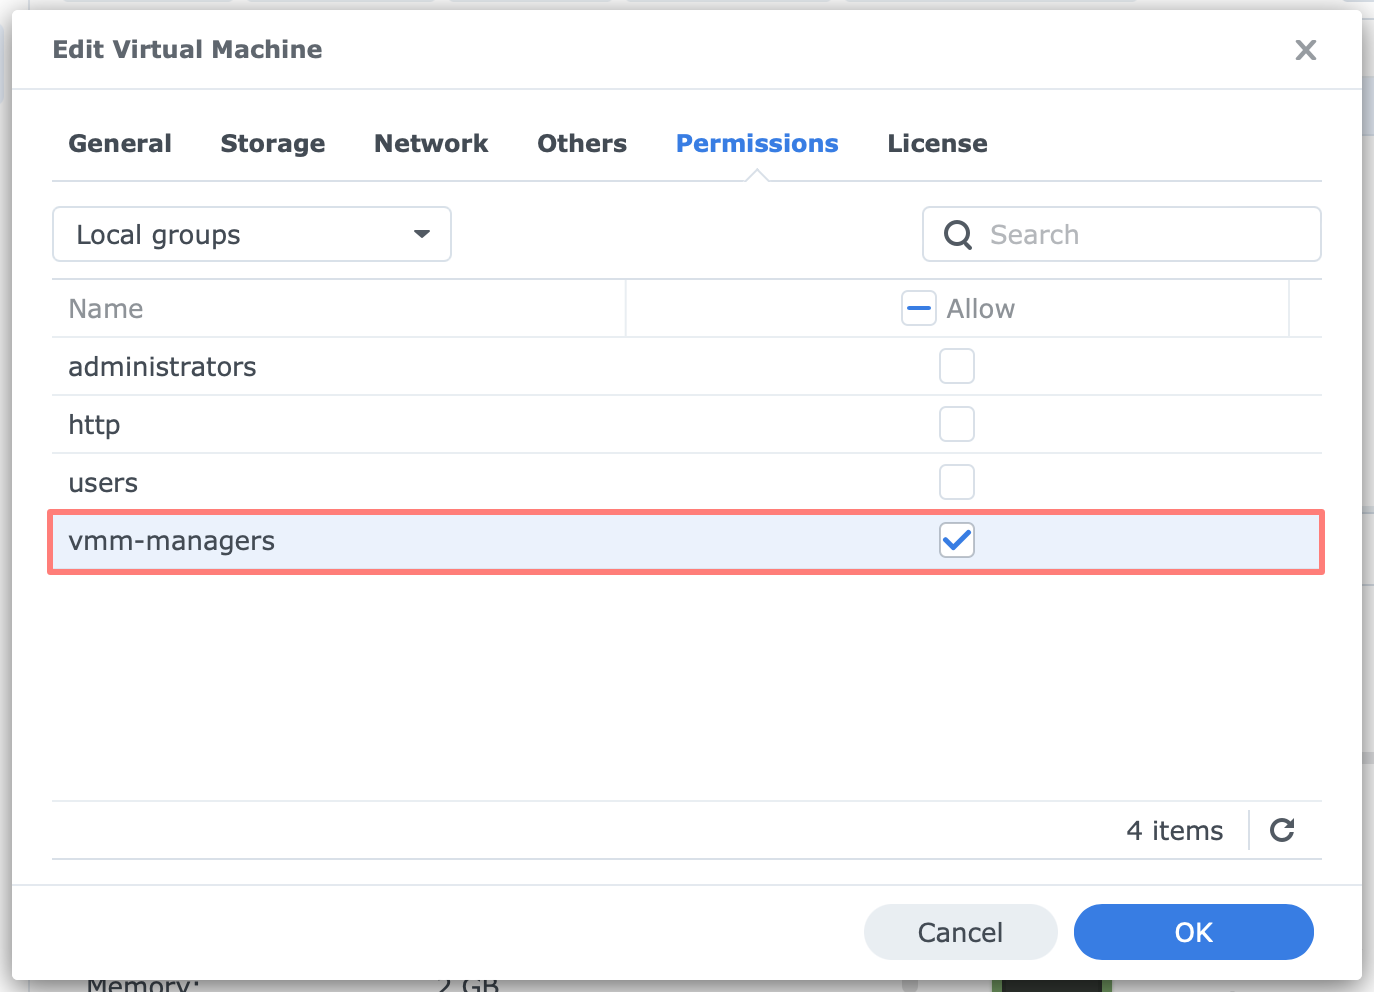
On the Permissions tab of the Edit Virtual Machine dialog, select Local Users or Local Groups from the drop-down list. Next, assign the Allow permissions to the selected users or groups. Note that any administrator group member has already been allowed permissions.
When a user has allowed permissions, he will have the Virtual Machine Manager application in the main menu of the DSM desktop. In Virtual Machine Manager, the user only has the Virtual Machine page. On this page, the user only lists the virtual machines it has allowed permissions.
As stated earlier, the user can connect to the virtual machine, power on and shut down, suspend, and resume. In addition, the user can reset the virtual machine, reset the virtual machine’s admin password, and set network settings to DHCP. This applies to virtual DSM. The user has no access to snapshots of the virtual machine.
Firewall
Looking at your firewall configuration after the Virtual Machine Manager installation, you will notice several new items related to Virtual Machine Manager and replication. It would be best if you opened these ports in a multi-node setup. As discussed in this post, there is no need to open ports in a single NAS cluster.
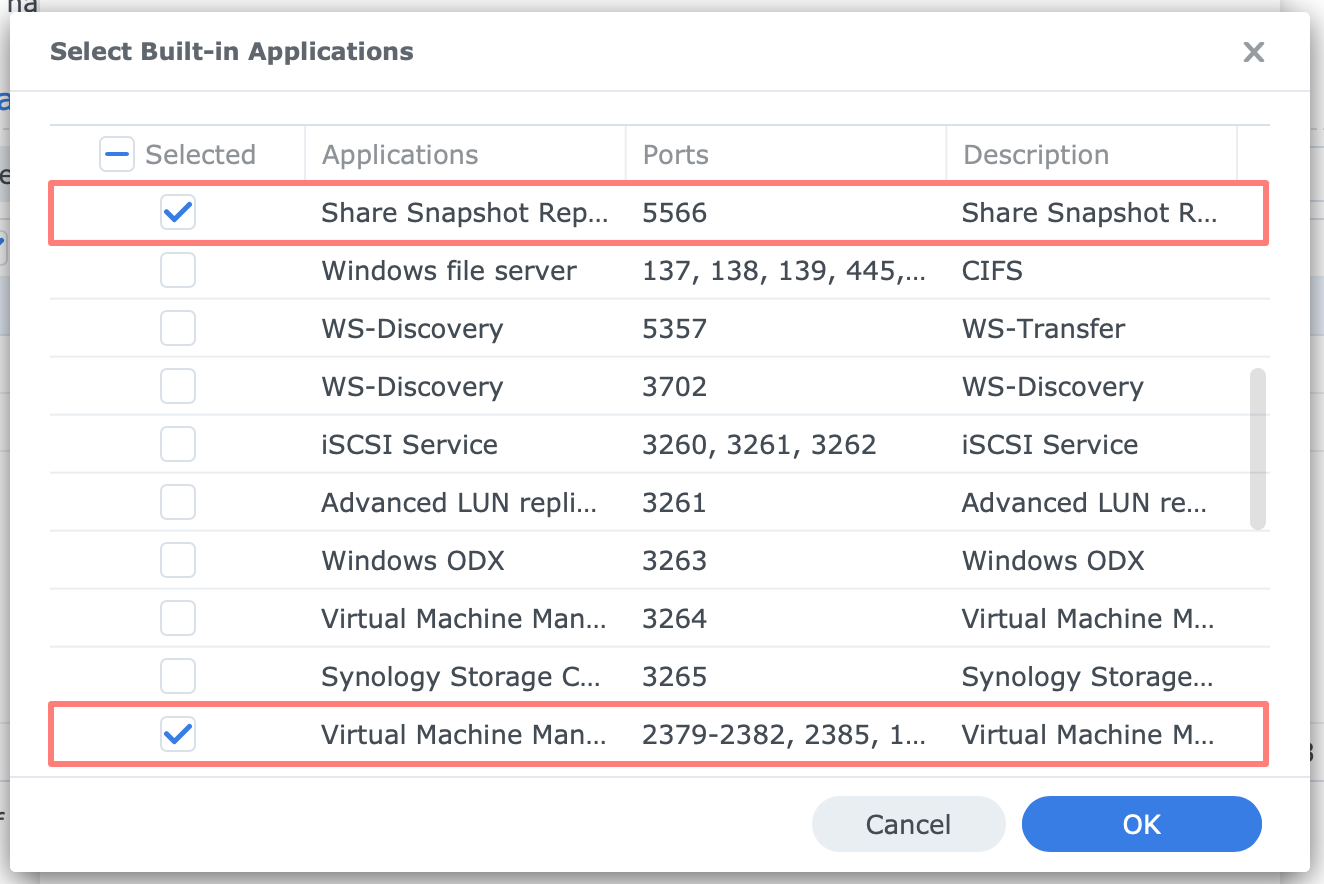
The services and ports are:
- Share Snapshot Replication – 5566
- Virtual Machine Manager Remote Storage – 3264
- Virtual Machine Manager – 2379-2382, 2385, 16509, 16514, 30200-30299, 30300
In addition to the ports mentioned above, open the necessary port in your firewall to access the Virtual Machine Manager to manage virtual machines. Which port depends on other configurations in the Login Portal (see above). The default for an HTTPS connection to Virtual Machine Manager is port TCP 14641.
Certificate
After installating Virtual Machine Manager, there is no service to configure for a specific certificate. When accessing Virtual Machine Manager over https, you will use the certificate for Standard default.
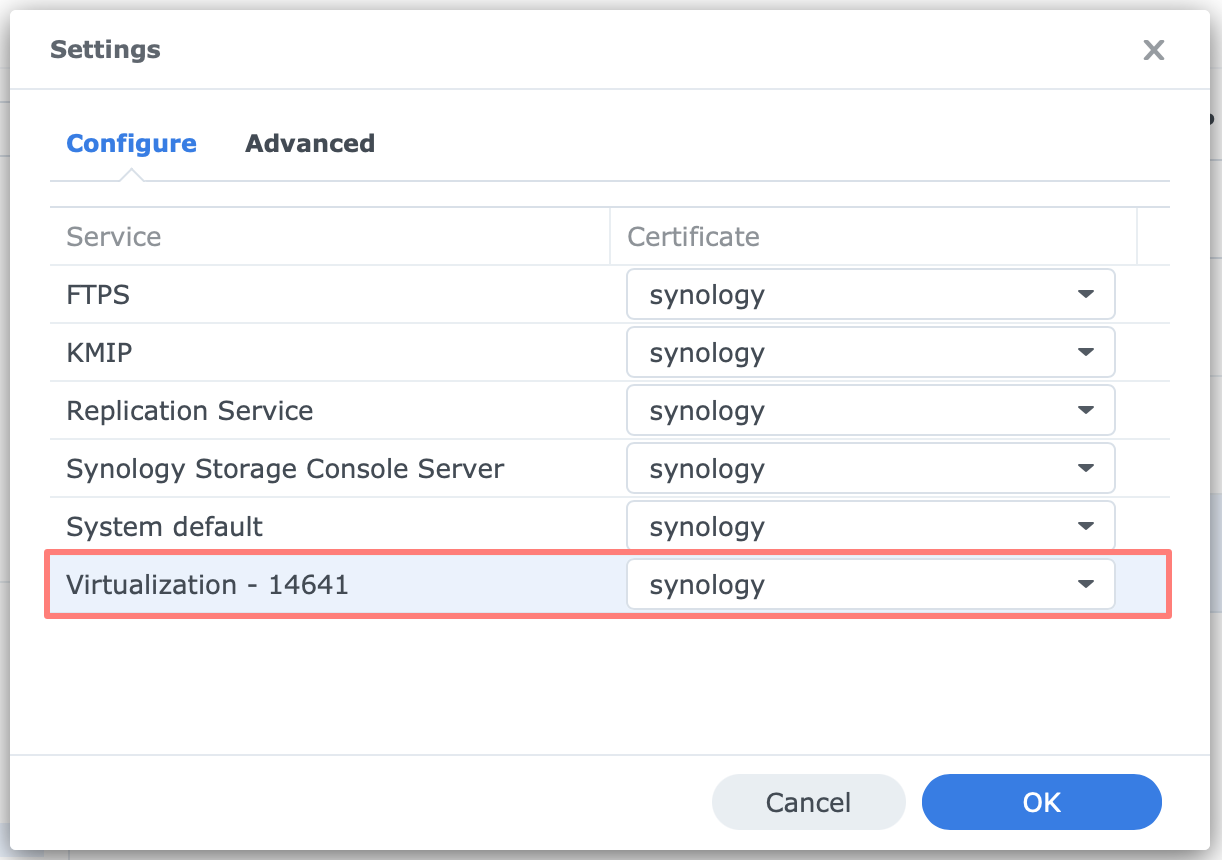
Once you configure a port number via Control Panel > Login Portal, as discussed above, you can assign a specific certificate for the service Virtualization. You use this certificate when you log in directly into Virtual Machine Manager without first logging into DSM.
Hyper Backup
I always include Hyper Backup instructions, as you can back up the configuration of many services and applications. However, in this case, it does not apply. There is no option to back up Virtual Machine Manager with Hyper Backup.
Understanding Virtual Machine Manager
Understanding the Virtual Machine Manager means understanding how virtualization on a Synology DiskStation works. The Virtual Machine Manager app has elf items in a column on the left, corresponding with elf pages on the right.
- Overview
this page displays the status (Healthy preferably) and three items as larger buttons: Host, Virtual Machine, and Storage.
A host is a physical device, your DiskStation. On the host, you run a cluster. With Virtual Machine Manager (non-Pro), you have a 1-node cluster; with Virtual Machine Manager Pro, you have a 3- or 7-node cluster, meaning 3 or 7 hosts, depending on your license. When selected, you see the host’s name and the use of resources.
The Virtual Machine button displays the total number of VMs and how many are running. When you click on it, you see the VMs listed with their status
Storage shows the number of storage locations and their status, and when you click on it, the space utilization.
You can click on each item and see its status below the three buttons. - Virtual Machine
this page lists the VMs installed and their status (running, suspended, powered off). When you select a VM, you see details below in five tabs. You can connect to a running VM, edit its properties, shut down/restart a VM, etc. Here, you also create a new VM. You need Virtual Machine Manager Pro for a high-availability cluster of VMs. - Cluster
this page gives the status and details of the host(s) that run the VMs. Note that with Virtual Machine Manager (non-Pro), you have a 1-node cluster, the actual DiskStation. When you select a host, you see several details below in four tabs, including storage and network for VMs. You can edit a host, like for Host Resource Management > Reserved CPU Threads (that a VM can not utilize): 0 or 1. - Storage
this page displays the storage resources. When you select a storage resource, typically named “server_name – VM Storage 1”, the details below display which VM uses the storage chosen; you can add, edit, and delete storage locations for VMs; storage is managed per volume; editing means that you change the name and the low on space threshold. - Network
this page displays the available virtual networks to which the LAN interface connects and which VM uses the selected network. Editing a virtual network means changing the name and adding/removing LAN interfaces like unused interfaces. You can create additional networks besides the “Default VM Network.” Each network is either External (connected to LAN interface) or Private (not connected to the outside world). The details below show the VMs, MAC addresses, and other network settings. - Image
before you can create a VM, you need an ISO file (for Windows VM?), disk image (for what?), or DSM image (for a virtual DSM). You can load and install them from this page. You load the files from your computer or your NAS or download them from the internet (depending on what you load). You can also download the Synology Guest Tool to ensure data consistency for Windows VMs. - Protection
the page lists the protected VMs (or all VMs) and their Protection Plan; this plan has a schedule policy for snapshot creation and a retention policy for snapshots. In Virtual Machine Manager (basic), you have local snapshots only; in Virtual Machine Manager Pro, you have snapshot replication; there are three schedule policies and three retention policies preconfigured; you can create custom policies. - Settings
this page has three tabs with settings that apply to all VMs. On the General tab are boot settings, default keyboard layout, and when shutting down a host. You can configure email notifications on the Cluster Notification tab. The High Availability tab is about monitoring and requires Virtual Machine Manager Pro. - Log
a separate log for Virtual Machine Manager. This log cannot be retrieved from the Log Center. - License
you can manage your Virtual Machine Manager license on this page, either Basic (free) or Pro (3- or 7-node). You can start a 30-day free trial for Pro. - Feedback
let you give feedback via technical support, product inquiries, business & partnership, and feature suggestions.
Import And Export A Virtual Machine
You can export a virtual machine into a .ova file and import it later on a different DiskStation. I use this successfully for Virtual DSM machines, but I assume this also works for Windows and Linux virtual machines. However, I have not tested that.
Import vDSM
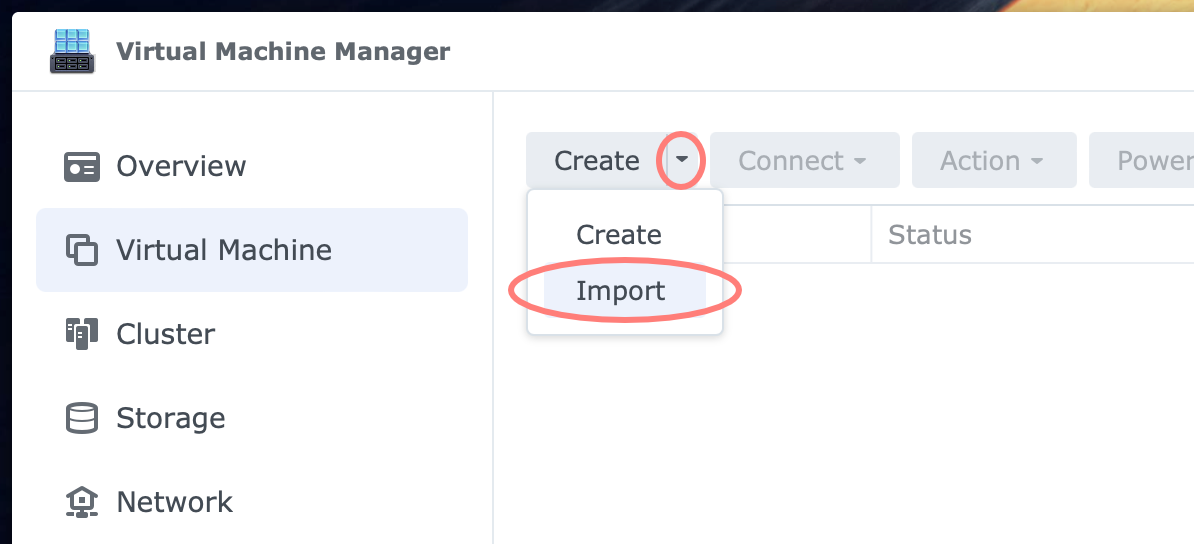
Go to Virtual Machine Manager > Virtual Machine > Create > Import to create a virtual machine via import. Click on the small triangular-shaped symbol next to the Create button.
Follow the instructions in the Import a virtual machine wizard:
- Select import method
- Import from OVA files
- Upload a file from PC / Select a file from DiskStation
- Select Storage
- select the storage on the host
- Configure General Specifications
- Name, CPU(s), Memory, Description
- note that it will not allow duplicate names
- Storage
- Virtual Disk 1: set size
assumably, the number of virtual disks is in the .ova file
- Virtual Disk 1: set size
- Configure Network
- Network: drop-down list
there are options: one to configure the virtual network, one to add or remove networks
- Network: drop-down list
- Other Settings
- Autostart: No / Yes / Last state
applies when DiskStation is powered on
- Autostart: No / Yes / Last state
- Assign Power Management Permissions
- only allow permissions to users and groups who can power on/off or restart the virtual machine (administrators always have access permissions)
- Summary
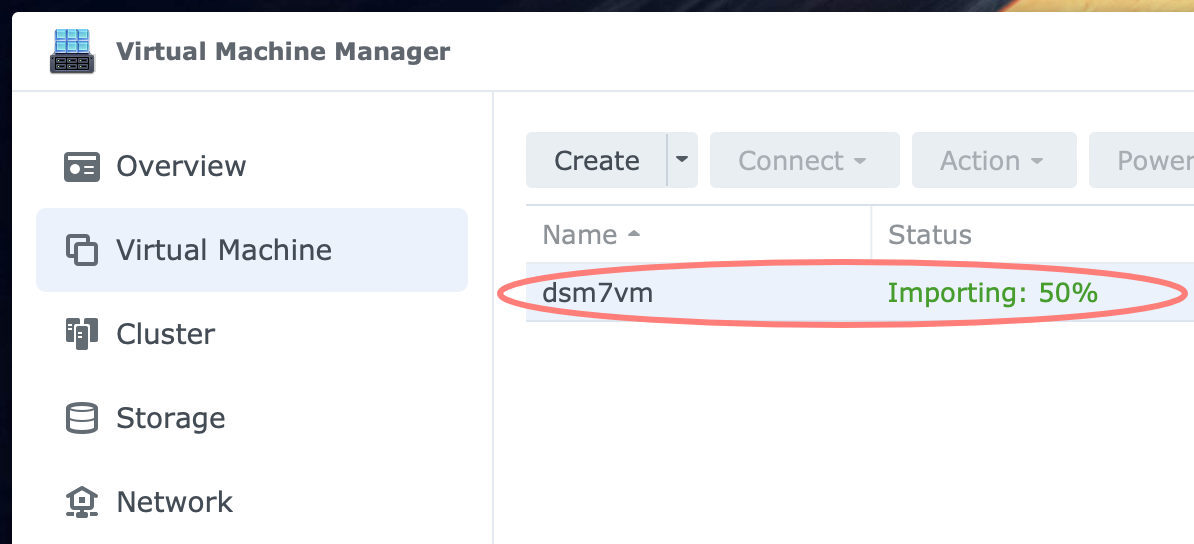
Once you click Done on the Summary screen, the import starts and can not be interrupted. In the Virtual Machine Manager log, you find an event: “The virtual machine [name] has been successfully imported.”
Export vDSM
To export a virtual machine, you have to power it down first. Next, go to Virtual Machine Manager > Virtual Machine tab and select the virtual machine to export.
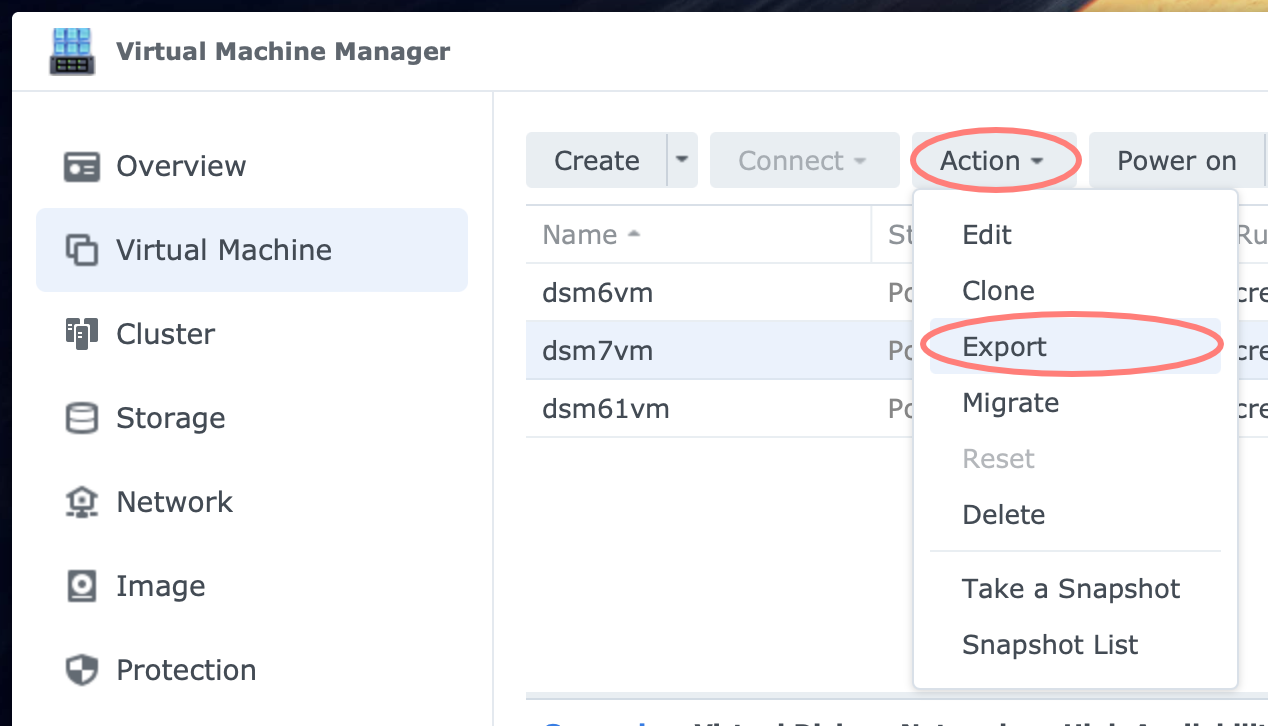
Next, right-click the virtual machine and select Export, or go to Action > Export and choose a location from your NAS to store the exported virtual machine.
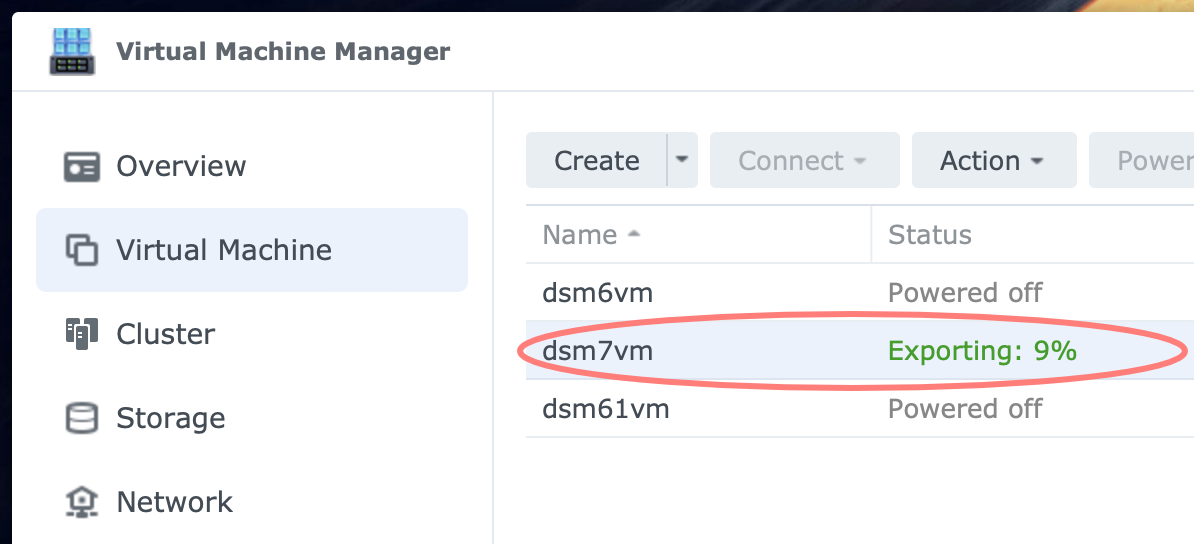
The Export to screen lets you select the export folder. Select the (shared) folder and click Select. The export starts immediately, and it will run until it is finished. You can not interrupt or pause an export. Notice the status in percentage exported on the Virtual Machine screen.
When the export is ready, a file with the virtual machine’s name and the .ova extension is saved in the chosen folder. In the Virtual Machine Manager log, you find an event: “The virtual machine [name] has been successfully exported.”
If you export the same virtual machine multiple times to the same folder, a second file with the same name plus suffix, like (1), is created. The export does not include virtual machine snapshots, and no Virtual DSM license is transferred. The network interface has a new MAC address after import.
Congrats!
Your Virtual Machine Manager is up and running on your NAS. In a second post, Installing Virtual DSM On Synology NAS, I will guide you through the virtual DSM installation and tips on using Virtual Machine Manager.
Thanks for reading
This post is donation-ware, and I made it to help you. Please consider leaving a comment or even buying me a coffee if it did. I will be eternally grateful.
Paul Steunebrink / Storage Alchemist